1
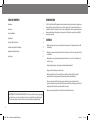
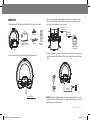
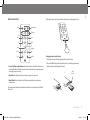
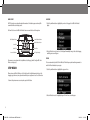
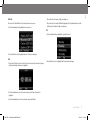
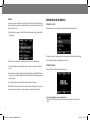
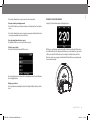
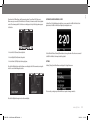
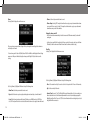
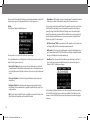
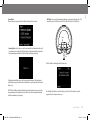
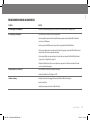
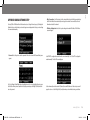
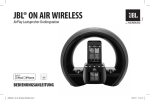
JBL®
On
Air
Wireless
AirPlay speaker dock
OWNER’S MANUAL
0269CSK - On Air Wireless OM ENv6.indd 1
06/01/11 11:51:49
Table of Contents
Introduction
Introduction
2
Connections
3
Controls and Display
4
Setup Wizard
6
Using Your JBL On Air Wireless
®
8
Troubleshooting Your JBL On Air Wireless
17
Appendix: Manual Network Setup
19
Specifications
21
The JBL® On Air Wireless AirPlay speaker dock will revolutionize the way you listen to music. Imagine being
able to play all the music files from iTunes 10 on your Mac computer or PC, or from an iPhone, iPod touch
or iPad device with iOS 4.2 software. The full-color screen displays album, artist and song information, and
album artwork from your iTunes library or streaming device. All with the clean, powerful sound that JBL
products are famous for.
features
• AirPlay technology enables you to stream all the music from your iTunes 10 library wirelessly to the JBL
On Air Wireless.
• Wirelessly stream music from your iPhone, iPad or iPod touch device (iOS 4.2 or later required) to the JBL
On Air Wireless.
• Displays album-cover art and song/artist information (from iTunes 10 or an iOS 4.2-enabled device) on
a full-color screen.
• Provides playback transport control (play/pause/skip forward/skip backward).
• Charges your iPod or iPhone device while docked.
• AirPlay works with iTunes 10.1 (Mac and PC) or later, and iPhone 4, iPhone 3GS, iPod touch (4th
generation), iPod touch (3rd generation), iPod touch (2nd generation) and iPad devices.
• Dock connector works with iPod nano 6th generation, iPod nano 5th generation, iPod nano 4th
generation, iPod nano 3rd generation, iPod touch 4th generation, iPod touch 3rd generation, iPod touch
2nd generation, iPod touch 1st generation and iPod classic devices.
• Dock connector works with iPhone 4, iPhone 3GS, iPhone 3G and iPhone devices.
Important Note for All Electronic Products: Turn off the unit before inserting or unplugging
audio cables from a source device’s headphones or line-level output jacks. Doing so will prolong the
life of your unit, help protect your device from static electricity and prevent potential damage.
2
0269CSK - On Air Wireless OM ENv6.indd 2
06/01/11 11:51:49
1. Carefully unpack your JBL On Air Wireless and confirm that all the items shown here are included:
ENGLISH
Connections
3. If you are going to use your JBL On Air Wireless with another audio source, plug one end of a 3.5mm
stereo cable (not included) into the JBL On Air Wireless’s Aux Input connector, and plug the other end
into the audio source’s headphone-out or line-out connector.
3.5mm Stereo Cable
(not included)
*
To Headphone
or Line Output
iPod Adapter
Power Supply and Outlet Adapter
(*Adapter varies by region)
FM Antenna
Remote Control
and Battery
Portable Music Player
or Other Audio Device
JBL On Air Wireless
2. Connect the included FM antenna to the JBL On Air Wireless’s FM Antenna connector.
4. Slide the supplied power-outlet adapter all the way into the JBL On Air Wireless’s power supply, plug
the power supply into the JBL On Air Wireless’s 12V connection, and plug the power supply into a wall
outlet.
1.
2.
Power Supply
(included)
FM Antenna (included)
IMPORTANT: Use the JBL On Air Wireless’s USB port only to perform system updates. Do NOT connect it to
a computer or any other type of USB host/controller. You could damage the JBL On Air Wireless or the host/
controller device. See System Update, on page 15.
www.jbl.com
0269CSK - On Air Wireless OM ENv6.indd 3
3
06/01/11 11:51:54
Controls and Display
• Volume Up/Down buttons: Press these buttons to raise or lower the volume. Press both buttons
imultaneously to mute the sound. When the sound is muted, press either the Volume Up or the Volume
Down button to restore the sound. (NOTE: On the remote control, the mute function has its own button.
See Remote Control Buttons, on page 5.)
Controls
Snooze/
Alarm Off
• Home button: Press this button to display the Home/Clock screen (see Main Display, on page 6). If you
press the button when the Home/Clock screen is displayed, the JBL On Air Wireless will display the Main
Menu screen. See Listening to a Source, on page 8.
• Left/Center/Right Soft buttons: The functions of these buttons will vary according to the screen
that is active when the buttons are pushed. See Using Your JBL On Air Wireless, on page 8, for more
information.
• Up/Down buttons: Press these buttons to scroll up or down the menu screens and to highlight items.
Volume
Up
Up
OK
Right
Power
Volume
Down
Home
Left
Soft
Button
Center
Soft
Button
Right
Soft
Button
Down
Left
• OK button: On most menu screens, press this button to select a highlighted menu item. See Using Your
JBL On Air Wireless, on page 8, for more information.
• Left and Right buttons: Press the Left button to return to the previous menu screen. The function
of the Right button depends on the screen that is active when you press the button. On many menu
screens, pressing the Right button performs the same function as pressing the OK button. See Using Your
JBL On Air Wireless, on page 8, for more information.
• Snooze/Alarm Off button: Press this button momentarily to shut the alarm sound off for nine
minutes. The alarm will then sound again. Press and hold this button for three seconds to shut off the
alarm sound until the next time the alarm is scheduled to ring.
• Power button: Press this button to turn the JBL On Air Wireless on or to put it into the Standby mode.
While in the Standby mode, the unit will shut down power to the speakers, FM radio and aux input
functions. The display screen will dim and will display the clock function. The alarms will still function
when the unit is in the Standby mode. See Listening to Streaming Audio from Your Computer, on page
10, for information about AirPlay operation while the JBL On Air Wireless is in the Standby mode.
4
0269CSK - On Air Wireless OM ENv6.indd 4
06/01/11 11:51:58
Power
ENGLISH
Remote Control Buttons
Before using the remote control, remove the battery contact-protection strip by pulling on the tab.
Volume Up/Down
Soft Buttons
Up
Home
Mute
Left
Right
Down
Previous
Snooze
OK
Play/Pause
Next
Alarm Off
• Previous, Play/Pause and Next buttons: When listening to iTunes, a docked iPod or iPhone device or
a streaming iPod, iPhone or iPad device, press these buttons to skip to the previous song, play/pause the
current song or skip to the next song.
Changing the remote control’s battery:
1. Press the tab on the side of the battery tray and pull the tray out of the remote.
2. Place a model CR2025 battery into the tray with the positive (+) terminal facing as shown in the
illustration, and replace the battery tray in the remote.
1.
2.
CR2025
Battery
• Mute button: Press this button to mute the sound; press it again to restore the sound.
• Alarm Off button: Press this button to shut off the alarm sound until the next time the alarm is
scheduled to ring.
The remaining remote control buttons perform the same functions as their counterparts on the JBL On Air
Wireless unit.
www.jbl.com
0269CSK - On Air Wireless OM ENv6.indd 5
5
06/01/11 11:51:59
Main Display
Language
NOTE: The display screens shown throughout this manual are for illustrative purposes and may differ
somewhat from the actual display screens.
1. Use the Up and Down buttons to highlight the your choice of language for the JBL On Air Wireless’s
display.
The Home/Clock screen is the JBL On Air Wireless’s main screen and is the base for all navigation.
Left Soft-Button Function
Center Soft-Button Function
Right Soft-Button Function
Current Time
Alarm 1 Time
Snooze On/Off Indicator
Alarm 2 Time
Wi-Fi® Signal Strength
Other menu screens are shown in the Setup Wizard section (this page), and the Using Your JBL On Air
Wireless section (page 8).
SETUP WIZARD
2. Press the OK button to select your choice. The display will immediately change to the selected language,
and the Region screen will appear.
Region
This screen automatically sets the JBL On Air Wireless’s FM-radio frequency band and tuning increments to
match the FM-radio broadcasts in your region.
1. Use the Up and Down buttons to highlight the region you live in.
When you turn your JBL On Air Wireless on for the first time, the Setup Wizard requires that you set the
language, region, time zone, time, day and network before you can play music or use the clock functions.
To return to the previous menu screen at any time, press the Left button.
2. Press the OK button to select the highlighted region. The Time Zone screen will appear.
6
0269CSK - On Air Wireless OM ENv6.indd 6
06/01/11 11:52:00
ENGLISH
Time Zone
• If the clock is in the 24-hour mode, the Day screen will appear.
This screen sets the JBL On Air Wireless’s clock to match the time zone in your area.
• If the clock is in the 12-hour mode, AM/PM will be highlighted. Use the Up and Down buttons to set AM
or PM, and press the OK button. The Day screen will appear.
1. Use the Up and Down buttons to highlight the time zone you live in.
Day
1. Use the Up and Down buttons to highlight the current day of the week.
2. Press the OK button to select the highlighted time zone. The Time screen will appear.
Time
1. Use the Center Soft button to set the clock to the 12-hour or 24-hour mode. The active mode is displayed
directly below the button, and the hours are highlighted.
2. Press the OK button to select the highlighted day. The Network screen will appear.
2. Use the Up and Down buttons to set the current hour, and press the OK button. The minutes are
highlighted.
3. Use the Up and Down buttons to set the current minute, and press the OK button.
www.jbl.com
0269CSK - On Air Wireless OM ENv6.indd 7
7
06/01/11 11:52:00
Network
You can connect your JBL On Air Wireless to your Wi-Fi® network, which lets your JBL On Air Wireless play
music files and Internet radio broadcasts streamed from iTunes 10 or from your iPhone, iPod touch or iPad
device (with iOS 4.2 or later).
Using Your JBL On Air Wireless
Listening to a Source
When the Home/Clock screen is displayed, press the Home button to display the Main Menu.
1. When the Network screen appears, the JBL On Air Wireless will automatically search for any available
Wi-Fi networks.
The Main Menu lets you scroll through and select the following items: FM, iPod, AirPlay, Aux and Settings.
2. When the search is completed, the screen will display a list of up to four available networks.
3. Use the Up and Down buttons to highlight the network you want to use, and press the OK button to
select it.
Use the Up, Down and OK buttons to highlight and select an item.
Listening to FM Radio
Selecting “FM” on the Main Menu displays the FM-radio screen.
4. If your network router is WPS-compatible, use the Up and Down buttons to highlight “WiFi Protected
Setup,” and press the OK button. The JBL On Air Wireless will automatically set up and configure to work
with your network.
5. Press the Home button to exit the Setup Wizard. The Home/Clock screen will appear.
NOTE: If the JBL On Air Wireless cannot connect to your Wi-Fi network, it will display a “Wi-Fi connection
not functioning” message. To connect to a network manually, see Settings: Network, on page 14.
To tune to the next higher or lower receivable station:
1.Press the Left Soft button to put the radio in the scan mode. The display will show “Scan” under the
button.
8
0269CSK - On Air Wireless OM ENv6.indd 8
06/01/11 11:52:00
Listening to Your iPod/iPhone Device
To tune up or down by one tuning increment:
1. Press the Left Soft button to put the radio in the tune mode. The display will show “Tune” under the
button.
Selecting “iPod” on the Main Menu displays the iPod playback screen.
ENGLISH
2. Press the Up or Down buttons to scan up or down to the next receivable station.
2. Press the Up or Down button to tune up or down by one tuning increment. Hold down the button to
tune up or down continually until you release the button.
To save the currently tuned station as a preset:
Press the Right Soft button. You can store up to 10 stations as presets.
To listen to a preset station:
Press the Center Soft button to display the FM Presets screen.
NOTE: Be sure to install the adapter supplied with the JBL On Air Wireless or with your iPod/iPhone device
into the JBL On Air Wireless before docking your iPod/iPhone device (see illustration). Do not place an iPod
or iPhone device in the JBL On Air Wireless unless the dock adapter is installed. Otherwise, the iPod or
iPhone device will not connect properly, and both it and the JBL On Air Wireless may sustain damage that
is not covered by the warranty.
Use the Up or Down button to scroll through the list and highlight each station. Press the OK button to
listen to a highlighted station.
Deleting a preset station:
Use the Up or Down button to highlight the station. Press the Right Soft (Delete) button to delete the
station.
www.jbl.com
0269CSK - On Air Wireless OM ENv6.indd 9
9
06/01/11 11:52:02
Use the JBL On Air Wireless’s Soft buttons (or the remote control) to control playback of your iPod/iPhone
device:
• Press the Left Soft (Previous) button to skip back.
If the JBL On Air Wireless is in the Standby mode when you press Play in iTunes 10 or on the iPod, iPhone
or iPad device, the JBL On Air Wireless will automatically switch to the AirPlay input and begin playing the
streaming audio.
• Press the Right Soft (Next) button to skip ahead.
IMPORTANT: JBL On Air Wireless units sold in the EU will not automatically switch from the Standby mode
to AirPlay streaming. To play streaming audio:
• Press the Center Soft (Play/Pause) button to play/pause.
1. Press the Power button to bring the JBL On Air Wireless out of Standby.
The JBL On Air Wireless will charge your iPod/iPhone device while it is docked.
2. Start the AirPlay stream from iTunes 10 or the iPod, iPhone or iPad device.
NOTE: We recommend that you pause playback before undocking your iPod or iPhone device from the JBL
On Air Wireless.
3. Select the JBL On Air Wireless from the pop-up list as described above.
Listening to Streaming Audio from Your Computer
If the JBL On Air Wireless is on and is set to the iPod, FM or Aux input, you must select “AirPlay” in the Main
Menu before the JBL On Air Wireless will begin playing the streaming audio.
Your JBL On Air Wireless can play audio files or an Internet radio station that is streaming from iTunes 10
on a networked computer or from an iPod, iPhone or iPad device with iOS 4.2 or later. (iTunes 10 is a free
download for Mac computers and PCs, available at www.apple.com/iTunes.)
NOTE: When you begin AirPlay streaming, the JBL On Air Wireless will default to the volume level that is set
in the iTunes application. Use the JBL On Air Wireless’s Volume Up/Down buttons to adjust the volume.
To initiate streaming from the computer, launch iTunes 10, click on the AirPlay button that appears at the
bottom of the iTunes window and select “JBL On Air Wireless” in the pop-up list that appears.
While the JBL On Air Wireless is playing streaming audio, the display will show any embedded art (if
available) and will scroll song-title, artist-name and album-title ID3 data, or will scroll data embedded
by the Internet radio station. If the data is unavailable, the display will show the song’s file name or the
Internet radio station’s name.
AirPlay
button
Select
“JBL On Air Wireless”
from pop-up list
To initiate streaming from an iPod, iPhone or iPad device, tap the AirPlay button on the screen and select
“JBL On Air Wireless” in the speaker-selection list that appears.
10
0269CSK - On Air Wireless OM ENv6.indd 10
06/01/11 11:52:02
• Press the Left Soft (Previous) button to skip back.
ENGLISH
If you have selected “Allow iTunes control from remote speakers” in your iTunes Edit > Preferences >
Devices menu, you can use the JBL On Air Wireless’s Soft buttons (or the remote control) for basic playback
control of the streaming audio file. The function icons will appear at the top of the display when you press
a Soft button:
Listening to an Auxiliary Audio Source
Selecting “Aux” on the Main Menu plays audio from a source connected to the JBL On Air Wireless’s Aux
Input connector. The JBL On Air Wireless will display the Aux playback screen.
• Press the Right Soft (Next) button to skip ahead.
Use the JBL On Air Wireless’s Volume Up/Down buttons to change the volume. The audio source connected
to the JBL On Air Wireless’s Aux input controls the playback.
• Press the Center Soft (Play/Pause) button to play/pause.
Settings
Press the OK or Right button to switch the album cover-art display to the Full Screen mode, increasing the
size of the cover art while hiding the text data:
Selecting “Settings” on the Main Menu screen displays the Settings Menu screen:
This screen lets you configure your JBL On Air Wireless to operate the way you want it to.
Press the OK or Right button again to restore the normal display.
www.jbl.com
0269CSK - On Air Wireless OM ENv6.indd 11
11
06/01/11 11:52:03
Alarms
Selecting “Alarms” displays the main Alarms screen:
• Volume: Set how loud you want the alarm to sound.
• Volume Ramp: Selecting “Off” ramps the alarm from silence up to your pre-determined alarm volume
over a period of three seconds. Selecting “On” ramps the alarm from silence up to your pre-determined
alarm volume over a period of three minutes.
Turning the alarm sound off:
• Press the Snooze button momentarily to shut the alarm sound off. After nine minutes, the alarm will
sound again.
This screen shows your current alarm settings and lets you change the alarm settings. Active alarms are
indicated by a check mark.
To set an alarm, press the Center Soft (Edit) button. The JBL On Air Wireless will display the Alarm Settings
menu screen. When you’re finished setting the alarms, press the Right Soft (Save) button to save the
settings.
• On the unit, press and hold the Snooze button for three seconds (on the remote control, press the Alarm
Off button) to shut the alarm sound off until the next time the alarm is scheduled to ring.
Time/Day
Selecting “Time” displays the Main Time menu screen:
Use the Up, Down, Left, Right and OK buttons to adjust the following items:
Use the Up, Down, Left, Right and OK buttons to adjust the following items:
• Alarm Time: Set the time you want the alarm to sound.
• Repeat: Set the alarm to repeat every day, weekdays only or weekends only, or turn the alarm off.
• Sound: Set the alarm to wake you with a buzzer, FM radio or your iPod/iPhone device. NOTE: If you
select “iPod” and your iPod device is not docked at the time the alarm is set to ring, the buzzer will sound.
• Time: Set the current time of day. You can also set the clock to operate in the 12-hour or 24-hour mode.
• Day: Set the current day of the week.
• Internet Time: If you select “On,” the JBL On Air Wireless will automatically set its clock according to an
Internet-based time service. It will automatically maintain the correct time, including an appropriate
Daylight Saving Time offset. If you select “Off,” the clock will maintain the time settings that you selected
using the Main Time menu screen.
12
0269CSK - On Air Wireless OM ENv6.indd 12
06/01/11 11:52:03
• Time Zone: Select your time zone.
ENGLISH
• Daylight Savings Time: Select “On” if Daylight Saving Time is observed where you live.
Language
Selecting “Language” displays the Language Setting screen:
When you’re finished making your settings, press the Right Soft (Save) button to save your settings.
Brightness
Selecting “Brightness” displays the Brightness Setting screen:
Use the Up, Down and OK buttons to select a language for the JBL On Air Wireless’s display. The JBL On Air
Wireless’s interface will immediately change to the selected language.
Regional Settings
Selecting “Regional Settings” displays the Region screen:
Use the Up, Down and OK buttons to highlight and select a display and button brightness level.
Auto: The JBL On Air Wireless will automatically adjust its display and button brightness according to the
room’s ambient light conditions.
1 – 6: Selecting one of these options manually sets the display and button brightness to the selected level.
The brightness will not vary according to ambient light conditions.
www.jbl.com
0269CSK - On Air Wireless OM ENv6.indd 13
13
06/01/11 11:52:03
This menu sets the JBL On Air Wireless’s FM radio-frequency band and tuning increments to match the FM
broadcasts in your region. Use the Up, Down and OK buttons to select the region you live in.
• [Network Name 1 – 4]: The display screen lists each available network. The currently selected network
is indicated by a check mark. The bars indicate the strength of the Wi-Fi network connection.
Network
Selecting “Network” displays the Network Setup screen:
To select a network, use the Up, Down and OK buttons. If the network that you select has no security, then
the JBL On Air Wireless will attempt to connect to the network. If the network has saved settings (e.g.,
password, IP settings), then the JBL On Air Wireless will attempt to connect to the network using these
settings. If the network requires a password and the JBL On Air Wireless has not saved a password, it will
display the Settings – Network Password screen so you can enter the password. See Appendix: Manual
Network Setup, on page 19, for more information.
• Wi-Fi Protected Setup™ (WPS): If your network router is WPS-compatible, select this option to set up
and configure the JBL On Air Wireless to work with your network automatically.
This menu provides access to all of the JBL On Air Wireless’s network settings.
Use the Up and Down buttons to scroll through the list. Use the OK button to select items, and use the Left
button to return to the previous menu screen.
• Refresh (Left Soft) button: Press this button to search for all available networks or refresh the list
of available networks. The JBL On Air Wireless will automatically connect to the network that was used
most recently. If that network is unavailable, it will connect to the next most recently used network and
so forth.
• Add Network: Select this option to add a network manually. See Appendix: Manual Network Setup, on
page 19, for more information. NOTE: If the JBL On Air Wireless is searching for available Wi-Fi networks
when you select Add Network, the search will immediately stop.
• Name [Device]: This is the name of the JBL On Air Wireless speaker that will appear in the iTunes 10
screen. Select this option to change the default-device name to one of your own choosing (such as
“Bedroom” or “Office”). The Name screen will appear.
• Info (Center Soft) button: Press this button to display the IP information for the system’s current
network settings.
• Edit (Right Soft) button: Press this button to make changes in an existing network’s setup or to
enter information for a new network manually. See Appendix: Manual Network Setup, on page 19, for
complete instructions.
• WiFi: Select this option to turn the Wi-Fi function on and off. When you turn the Wi-Fi function on, the
JBL On Air Wireless will automatically search for available Wi-Fi networks.
Use the Up, Down, Left, Right and OK buttons to select letters on the keypad to enter the new name. Press
the Center Soft (Delete) button to backspace a character, press the Right Soft (Save) button to save the
new name or use the Left Soft (Back) button to return to the previous menu screen without changing the
device name.
14
0269CSK - On Air Wireless OM ENv6.indd 14
06/01/11 11:52:03
ENGLISH
System Update
This menu allows you to update your JBL On Air Wireless’s firmware to the latest version.
• USB Update: You can search for and download new firmware on your computer and transfer it to a USB
memory device. Insert the USB device into the JBL On Air Wireless’s USB port. Select USB Update.
USB Port
• Internet Update: Select this option to search for and download the latest firmware from the server. If
a new firmware version is available, the JBL On Air Wireless will automatically download and install it.
During downloading and installation, the JBL On Air Wireless will display a progress bar.
USB Memory
Device
The JBL On Air Wireless will display the Install Software screen.
If the download and installation are successful, the progress bar will turn green. If the download and
installation fail, the progress bar will turn red, and you will have to repeat the procedure from the System
Update screen.
NOTE: The JBL On Air Wireless will automatically attempt to contact the Internet server once a day in the
evening and determine if a new firmware version is available. If so, it will automatically download and
install the new firmware as described above.
Press the Right Soft (OK) button to install the software; press the Left Soft (Cancel) button to cancel the
upgrade and return to the previous menu screen.
www.jbl.com
0269CSK - On Air Wireless OM ENv6.indd 15
15
06/01/11 11:52:03
IMPORTANT: Use the JBL On Air Wireless’s USB port only to perform system updates. Do NOT connect it to
a computer or any other type of USB host/controller. You could damage the JBL On Air Wireless or the host/
controller device.
• Current Version: Select this option to display the version number of the currently installed firmware.
Press the Left Soft (Back) button to return to the System Update screen.
System Reset
This menu lets you return your JBL On Air Wireless to its out-of-the-box factory-default condition and erase
all of your clock and alarm settings, network settings, menu settings and FM radio preset stations. When
the JBL On Air Wireless completes the System Reset, it will return to the Setup Wizard screen (see page 6).
Select Reset or the Right Soft (OK) button to reset the system; select Cancel or the Left Soft (Back) button to
cancel the system reset and return to the previous menu screen.
16
0269CSK - On Air Wireless OM ENv6.indd 16
06/01/11 11:52:03
ENGLISH
Troubleshooting Your JBL On Air Wireless
Problem
Solution
No sound (display is not illuminated):
• Make sure that the power supply is properly connected to the JBL On Air Wireless and to a working AC outlet.
No sound (display is illuminated):
• Touch the Volume Up (+) button to increase the system volume.
• If you’re using FM radio, make sure that the included FM antenna is properly connected and that the JBL On Air Wireless is
tuned to an active FM frequency.
• If you’re using a docked iPod/iPhone device, make sure that it is properly docked in the JBL On Air Wireless.
• If you’re using an auxiliary audio source, make sure that the audio cable is properly connected to the JBL On Air Wireless’s Aux
Input connector and to the source component’s audio output.
• If you’re using an AirPlay source, make sure that you have selected the correct network in the JBL On Air Wireless’s Network
Setup screen. (See Settings: Network, on page 14.)
• Make sure that the iPod device, AirPlay source or auxiliary source component is not in the Pause mode and that its volume
control is not turned all the way down.
Sound crackles, hisses or is distorted:
• Turn the iPod device or other source component’s volume down.
• Make sure that the iPod device’s EQ setting is set to “Off.”
Loud hum or buzzing:
• Make sure that the audio cable is plugged all the way into the JBL On Air Wireless’s Aux Input jack.
• Replace the audio cable.
• Unplug the power supply and connect it to a different AC outlet.
www.jbl.com
0269CSK - On Air Wireless OM ENv6.indd 17
17
06/01/11 11:52:03
Problem
Solution
Sound comes from only one speaker:
• Make sure that the iPod/iPhone device is properly seated all the way into the docking connector.
• Make sure that the audio cable is plugged all the way into the Aux Input jack.
• Make sure that the audio cable is a stereo cable.
The JBL On Air Wireless does not respond to any button presses:
• Press and hold the Snooze and Power buttons on the unit together for seven seconds to reset the unit’s microprocessor. NOTE:
Resetting the microprocessor will erase all of your clock and alarm settings, network settings, menu settings and FM-radio
preset stations. When the microprocessor reset is completed, the JBL On Air Wireless will return to the Setup Wizard screen (see
on page 6).
18
0269CSK - On Air Wireless OM ENv6.indd 18
06/01/11 11:52:03
Selecting “Edit” or “Add Network” on the Network screen (see Settings: Network, on page 14) displays the
Network edit screen, which allows you to make changes in an existing network’s settings or enter settings
for a new network manually.
• Delete Connection: Select this option to delete a network from the system. Deleting a network stops
the JBL On Air Wireless from automatically connecting to the network’s server and deletes all saved
information related to the network.
• IP Address Configuration: Select this to option configure the network’s IP address. The IP Address
screen will appear:
• Password: Select this option to enter the password for the active network. The Password Entry screen
appears:
Select “DHCP” to configure the network from the server automatically. Select “Static IP” to configure the
network manually. The Static IP screen will appear:
Use the Up, Down, Left and Right buttons to highlight characters. To select a highlighted character, press
the OK button. When you have completed selecting the password, press the Right Soft (Next) button to
enter the password.
Select and manually enter the network’s IP, Subnet, Router and DNS addresses. A data-entry screen will
appear for each one. Select the Right Soft (Save) button when you have finished entering each address.
www.jbl.com
0269CSK - On Air Wireless OM ENv6.indd 19
ENGLISH
Appendix: Manual Network Setup
19
06/01/11 11:52:03
• Proxy: Select this option to configure the network for a proxy server. The Proxy screen will appear:
Select “Off” if the network does not have a proxy server. Select “On” if the network does have a proxy server.
Select the Center Soft (Edit) button to enter the proxy server settings manually. The Proxy Settings screen
will appear:
Select and manually enter the proxy server’s server address and port address, the proxy user name and the
proxy password. A data-entry screen will appear for each one. Select the Right Soft (Save) button when
you have finished entering each item.
When you have finished entering all the information, select the Center Soft (Test) button to test the proxy
settings. The JBL On Air Wireless will attempt to connect to the proxy server using the settings you entered.
If it is successful, it will save the settings and display the previous menu screen. If it is unsuccessful, it will
display the error message returned by the proxy server and you will need to correct the information you
entered.
20
0269CSK - On Air Wireless OM ENv6.indd 20
06/01/11 11:52:03
ENGLISH
Specifications
Compatibility* (AirPlay):
iTunes 10.1 (Mac and PC), iPhone 4, iPhone 3GS, iPod touch (4th generation), iPod touch (3rd generation), iPod touch (2nd generation), iPad
Compatibility* (docking):
iPod nano 6th generation, iPod nano 5th generation, iPod nano 4th generation, iPod nano 3rd generation, iPod touch 4th generation,
iPod touch 3rd generation, iPod touch 2nd generation, iPod touch 1st generation, iPod classic iPhone 4, iPhone 3GS, iPhone 3G, iPhone
Wi-Fi network compatibility:
802.11b/g
Transducers:
2 x JBL Phoenix full-range transducers; 1 x JBL Ridge tweeter
Amplifier power:
6,5 watts x 2
Frequency response:
20Hz – 20kHz
Signal-to-noise ratio:
>90dB
Aux Input sensitivity/impedance:
250mV/10k ohms
Power requirement:
12V DC
Power consumption:
<2W (standby); 22W (maximum)
Dimensions (H x W x D):
9-3/8" x 11" x 7-13/16" (238mm x 280mm x 198mm)
Weight:
3.7 lb (1.69kg)
Available finishes:
White; black
*Compatibility information is correct as of the printing of this manual. Please check www.jbl.com for the latest compatibility information.
www.jbl.com
0269CSK - On Air Wireless OM ENv6.indd 21
21
06/01/11 11:52:04
HARMAN Consumer, Inc.
8500 Balboa Boulevard, Northridge, CA 91329 USA
www.jbl.com
© 2010 HARMAN International Industries, Incorporated. All rights reserved.
Features, specifications and appearance are subject to change without notice.
JBL is a trademark of HARMAN International Industries, Incorporated, registered in the United States and/
or other countries.
AirPlay, Apple, Mac, iPhone, iPod, iPod nano, iPod classic, iTunes and iPod touch are trademarks of Apple
Inc., registered in the U.S. and other countries. iPad is a trademark of Apple Inc. iPod/iPhone/iPad not
included. “Made for iPod” and “Made for iPhone” mean that an electronic accessory has been designed
to connect specifically to iPod and iPhone, respectively, and has been certified by the developer to meet
Apple performance standards. Apple is not responsible for the operation of this device or its compliance
with safety and regulatory standards.
Wi-Fi is a registered trademark of the Wi-Fi Alliance. Wi-Fi Protected Setup is a trademark of the Wi-Fi
Alliance.
Part No.: 950-0309-001 Rev.: A
22
0269CSK - On Air Wireless OM ENv6.indd 22
06/01/11 11:52:04