1
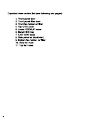
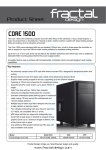
fractal
DEFINE R3 COMPUTER CASE
bb
USER'S MANUAL
A
Thank you and congratulations on your purchase of your new
Fractal Design Define R3 ATX Computer Case!
Before using the case, please take the time to read these instructions carefully.
Limited Warranty and Limitation of Liability
This product is guaranteed for twelve (12) months from the date of delivery to end-user
against defects in materials or workmanship. During this period, the product will either
be repaired or replaced, upon our discretion. The product must be returned to the
agent from whom it was purchased with shipping prepaid. The warranty does not cover
a product which has been used for hire purposes, misused, handled carelessly or other
than in accordance with any instructions provided with respects to it use.
a product with damages from acts of nature such as lightning, fire, flood or earthquake
are not covered by the warranty.
a product where the serial number have been removed or tampered with
About Fractal Design — our concept
The concept of Fractal Design is to provide products with an extraordinary design level,
without compromising the important factors of quality, functionality and pricing. The
computer of today has come to play a central role in most people’s home, creating a
demand for appealing design of the computer itself and its accessories. Our main prod-
uct areas are computer enclosures, power supplies and related accessories
Designed and engineered in Sweden
All Fractal Design products have been thoroughly designed, tested and specified in
our Swedish head quarter. The well known ideas of scandinavian design can be found
through all of our products; a minimalistic but yet striking design - less is more.
Introduction
Fractal Design’s Define R3 case series offers stylish cases packed with features, all to an
affordable price tag.
Features
Stylish front panel with noise insulated door
Unique ModuVent feature which allows you to either have fan holes in side and
top panels closed for optimal silence or open for optimal ventilation
Effective noise absorbing material mounted on side and top panels
10 drive bays
- 8x internal 3,5” HDD-bays with trays equipped with anti vibration silicone pads
- 2x external 5,25” bays.
5,25">3,5” converter is included to use with for example card reader.
Black painted interior with white painted HDD-bays and PClI-slots for a stylish look
Optimal air flow cooling system
2 front 120mm intake fans with removable, washable filter (1 included)
2 top 120/140mm exhaust fan (optional)
1 rear 120mm exhaust fan (included)
1 side 120/140mm exhaust fan (optional)
1 bottom 120/140mm intake fan with removable, washable filter (optional)
1 bottom intake hole for PSU with removable, washable filter
(The top and side fan holes are pre-fitted with ModuVent and effective noise absorbing
material. The ModuVent's can be removed when more air flow is needed.)
Fan controller included A fan controller for controlling up to three (3) fans is included.
Easy cable organisation through the rubber-covered holes in the motherboard plate.
Hole in motherboard tray for easy mounting of CPU coolers that needs a back plate.
The hole is big enough to also accommodate Core i7 back plates.
Top, front mounted ports provides convenient connections:
2x USB 2.0
1x USB 3.0
Audio In and Out (HDA and AC’97 compatible)
Water cooling holes. Four W/C holes
Quality feets with anti-vibration material
Compatibility
Mini-ITX, Micro ATX and Standard ATX
7 expansion slots
ATX PSU (not included). Anti-vibration pads to avoid vibrations from PSU.
Net weight 12.50 kg / 27.60 Ibs
Case dimensions
17.33” (H) x 8.16” (W) x 20.52” (D)
440 mm (H) x 207.4 mm (W) x 521.2 mm (D)
Installation guide
Please read through this entire manual before proceeding with the installation.
Install the motherboard using the supplied M/B stands (11pcs) and the M/B screws (11pcs).
The appearance of the supplied stands and screws is printed on the Accessory Box.
Please consult the manual of the motherboard.
Install the PSU using the supplied PSU screws (4pcs).
The appearance of the supplied stands and screws is printed on the Accessory Box.
Please consult the manual of the PSU.
Install the 3,5-inch hard drive(s) in the metal HDD-trays using the supplied HDD screws
(32pcs in total, 4pcs per HDD). The silicone grommets mounted on the HDD-tray will ab-
sorb most of the vibrations from the HDD.
You can also install 2,5-inch SSD drives using the attached FDD-screws (4pcs). T
he appearance of the supplied stands and screws is printed on the Accessory Box.
Please consult the manual of the hard drive(s).
Connect the peripheral cables to IDE-connected drives if you have such (older HDD and
optical drives). Connect the SATA power connectors to SATA-connected drives (newer
HDD and optical drives)
Connect the floppy connector if you have a floppy drive
Install and secure CPU, RAM, Heatsink, necessary cooling products and any optional input
cards. Consult the motherboard’s manual to attach all the cables from the front panel to the
right inputs in the motherboard. These cables include power switch, reset button, audio МО,
USB inputs.
Install optional cooling fans in the front, side or top of the case. First, you need to remove
the ModuVent lids covering the side and top panel holes.
Connect all cooling fans to either the motherboard or the PSU.
Connect the AC power cord to the Fractal PSU and turn on the on/off switch.
Exploded view content list (see following two pages)
. Front panel door
. Front panel filter door
. Front fan holder w/ filter
. Top ODD cover
. Lower ODD/3,5” cover
. Metal HDD tray
. 5,25” ODD bays
. Side panel w/ ModuVent
. Bottom fan holder w/ filter
10. Rear fan hole
11. Top fan holes
OONDO SONS
www.fractal-design.com