1
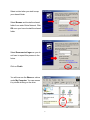
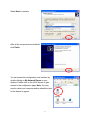
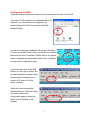
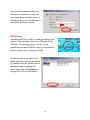
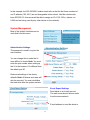
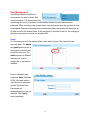
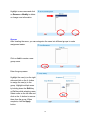
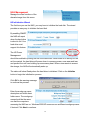
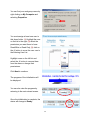
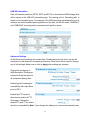
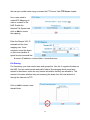
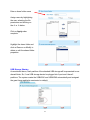
Introduction
Network Attached Storage (NAS) addresses the growing need for shared network
storage in the home and small/medium sized business environments. NAS has the
advantage of being easy to use, manage and simple in design. Files can be shared
between computers regardless of the operating system they are using or the network
server they are attached to. This solution provides a convenient common storage
resource. Networked storage can be used in the following ways:
At the home:
Store media files for networked MP3/Media players and computers
-
Backup your home computers
Share files, media, pictures with all of your networked computers
Make files available when you are away from home
Run an FTP server without leaving your computer on
Have personal/private storage for each family member
In the office:
Provide personal/private storage for employees
Run an FTP server for file upload and download
Share files between different operating systems
Backup data from networked PCs and Macs
Backup data from other servers
Product Features
-
Windows, Mac, and Linux NFSv2 file systems supported
Create and assign users with passwords for security
Assign users and groups to shared folders
No maintenance required
Built in FTP server for file upload and downloading via the internet
No user licenses to purchase
Firmware updates via user interface
Share your USB storage on the network
System Requirements
For Accessing Files:
Network adapter installed and functioning properly
For configuration:
For PC Users:
Internet Explorer 5.5 and newer or latest Opera browser with Java support
For Mac Users:
Internet Explorer 5.2 or latest Opera browser with Java support
For Linux Users:
Latest Opera browser with Java support
Package Contents
z
z
z
z
z
Network Attached Storage Device
Power Adapter and power Cord
Ethernet cable
User Manual CD
Quick Start Installation Guide
Physical Parts/Connectors/LEDs
Ethernet port : 10/100 Mbps
Ethernet port MDI/MDIX switch
Reset Button
Power Button
Power Jack – DC 12V
LEDs : Link/Activity LED, Ethernet 10/100Mbps LED, HB (Heart-Beat) LED,
HD (Hard Disk) LED, Power LED
Ethernet Port MDI/MDIX Switch (Crossover selector)
The Ethernet port MDI/MDIX switch is used to adjust the
cable connection of the Ethernet port. If the port is connected
to hub, you should move the switch to the “hub” side; if the
port is connected directly to a PC, you should move the
2
switch to the “PC” side. If after connecting the Ethernet cable from the unit to your
network/system and the LAN link light does not turn on, move the switch to the alternate
position.
Note: Turn the NAS off then turn it back on to get an IP address from the network.
Ethernet Port
The Ethernet port is used to connect to a PC, server, hub,
switch or other network device on the LAN.
Reset Button
If you forget your password and/or unit IP address, you will not
be able to access the NAS. You can use the Reset Button to
restore the factory settings. To initiate a reset, you must hold the
button for at least 5 seconds or until the unit stop beeping.
The primary default settings are listed in the following table.
Configuration Item
Default Settings
Administrator Username
<empty>
Administrator Password
admin
Internal IP address
Dynamically Assigned (DHCP Client)
Power Button
Turns the unit on/off. Press lightly once. The unit will write
all data into the drive and safely power down. To force the
unit to power down immediately, press and hold the
button until the power is off.
3
Description of LEDs
LED
Power
Heart-Beat
Link/Activity
Ethernet port
10/100 Mbps
Status
Meaning
On
Power On
Off
Power Off
Solid/Off
System is not ready
Flashing
System is ready
On
Link is up
Off
Link down
Flashing
Transmitting/receiving packets
On
The network link is 100 Mbps
Off
The network link is 10 Mbps
NAS Quick Start Installation
In order to facilitate the use of the NAS, the product comes with default settings that most
users can install without any modification. If the network manager needs to modify any of
the settings, the NAS provides an intuitive Web-based user interface.
NOTE: Make sure that the TCP/IP protocol is installed on the networked computers that
wish to access the NAS.
Hardware Installation
Connect the included Ethernet cable and power
adapter to the back of the NAS.
Connect the other end of the Ethernet cable to an available
port on a network switch, router or computer’s LAN port.
4
Plug the AC adapter into a surge
protector.
Turn on the power on the NAS.
If the LAN link LED in the front of the NAS is not ON,
please change the switch next to the LAN port of the
NAS unit to the alternate position. Power off the NAS
and turn it back on to get an IP address from the
network.
Accessing the NAS
If your unit shipped with a preformatted hard
drive, you can find the new share folder by
double clicking My Network Places and the
Nas device name.
Mapping A Share Folder
Mapping your shared folder(s) to your computer makes accessing them easier. When a
shared folder is mapped, it will appear as a drive letter like D: or E: on your computer.
When you want to access that shared folder, you can simply go to My Computer and
double click on the drive letter. You can also have the computer log into the shared folder
at startup so you do not have to manually do it each time.
You can map the NAS’s share folder to
a drive letter under My Computer.
Select Map Network Drive from the
Tools menu.
5
Select a drive letter you wish to map
your shared folder.
Select Browse and locate the shared
folder from under Entire Network. Click
OK once your have located the shared
folder.
Select Reconnect at logon so you do
not have to repeat this process in the
future.
Click on Finish.
You will now see the Share as a drive
under My Computer. You can access
it by double clicking on the drive.
6
Enabling UPnP™
Note: UPnP™ is only available in Windows XP and Me. We recommend that this is
enabled for ease of configuration, but it is not required.
To enable UPnP™, go to the
Start menu and select the
Control Panel. Select
Add/Remove Programs.
Click Add/Remove Windows
Components on the left hand
side.
The Windows Components Wizard
screen will appear. Highlight Network
Services and click Details.
Select Universal Plug and Play and
click OK.
7
Select Next to continue.
After all the components are installed,
click Finish.
You can access the configuration user interface by
double clicking on My Network Places on your
desktop. Double click on the UPnP device to gain
access to the configuration page. Note: You may
need to restart your computer and/or refresh the view
for the device to appear.
8
Configuring the NAS
There are several methods for accessing the configuration interface for the NAS.
If you have UPnP enabled in your Windows Me or XP
computer, you can access the configuration by
double clicking the UPnP device name under My
Network Places.
You can also insert the installation CD into your Windows
PC and run the NAS Finder utility. Your NAS unit should be
listed with the unit’s IP address. Double click on the device
name or highlight the device name and click on ‘Configure’
to bring up the configuration page.
If you know the name of the NAS
device, you can type it directly into
an Internet Explorer browser. Note:
Some network configurations or
version of IE may not find the
device correctly.
Users who have changed the
default settings to a fixed IP setting
can directly access the
configuration page by typing the
NAS’s fixed IP address in the
browser.
9
A window should appear asking for a
username and password. Leave the
User Name blank and enter ‘admin’ in
the password field. You will be taken to
the system information screen.
NAS Finder
Included in the CD is a utility for locating the NAS on the
network. This application runs on any Windows 98 SE,
2000, Me, XP operating system. You can run the
application from the CD-ROM or copy it to the computer
that you want to use to configure the NAS.
All NAS devices will be listed in the
NAS Finder along with the associated
IP address of the unit. Double click on
the device name or highlight the
device name and click Configure to
bring up the UI for the NAS device.
10
NAS Management User Interface
User Interface Structure
From the user interface (UI), you can maintain and monitor all the functions of the NAS.
This interface is accessible from any computer on the network with the appropriate
browser. Only one user
can log into the UI at a
time. The password for
the UI can be set under
the administrative
menu. This is a
different password than
any user passwords on
the NAS. To get to the
lower menus, simply
move your cursor over
the main menu items.
Basic Settings
The Basic Settings page allows you to name your NAS and configure it as a DHCP client
or a Fixed IP device on the network. Note: You must click on Apply for the changes to
take affect. The NAS
may reboot to finalize
the changes.
NAS Name
Network devices have
an IP address and a
name. These two are
usually related and
allow the network to identify the device. This name must be unique or there may be
difficulties in configuring and using the NAS. Please make sure that no other computer or
device in the network use the same name that you assign to this NAS.
11
DHCP Client
The default factory setting is DHCP client. There should be a DHCP server on the
network. In most cases, this is the router or network switch. The DHCP server will assign
the NAS an IP address when it is turned on. This setting allows the NAS to be easily
installed into any network environment.
Fixed IP Address
In some situations it may
be best to assign the NAS
a Fixed IP Address. This is
most useful when you wish
to access the NAS from a
remote location. Most
routers can only forward
traffic to a specific IP
address. If you have the NAS configured as a DHCP client, your IP address could
change periodically. Having the NAS configured with a Fixed IP address means that the
IP address will not change unless you reassign it. The IP address that you assign must
follow two basic rules. First, it must be within the same subnet of your current network.
For example, if your router’s IP address is 192.168.1.1, your subnet is more than likely
192.168.1.x (where x is a number from 2 to 254). Secondly, it cannot already be in use
by another computer or network device on the network. Generally, NAS will only be
accessible to computers on the same subnet.
You can find your gateway’s IP address and your
netmask by going to the command prompt and
running ipconfig.
Your PC’s IP address
Your netmask
Your gateway IP address
12
In this example, the 255.255.255.0 subnet mask tells us that the first three numbers of
our IP address (192.168.1) are not changeable in this subnet. Had the subnet mask
been 255.255.0.0, then we would be able to assign an IP of 192.168.x.x (where x is
0-254 and not being used by any other device on the network).
System Management
Most of the system functions can be
controlled from this menu.
Administrative Settings
This password is used to log into the
user interface.
You can change this to make the UI
more difficult to locate. Note: You must
enter the port number when calling up
the UI in the browser if it’s different than
the default port 80.
Restores all settings to the factory
defaults. Note: All shares and users will
also be removed. You must reinitialize
the hard drive after the system restarts.
Event Report Settings
Send alerts to an e-mail account.
The mail server should allow e-mails
from the same network.
E-mail address to send the alerts to.
13
Firmware Update
Updates and functionality can be added via this function. Please check the web for the
latest firmware if you are having any issues. In general, no update should be needed
unless it is recommended by technical support. Note: Do not do a firmware update over
a wireless connection or power the unit down during a firmware update. Any interruption
during an update will damage your unit and require you to send it in for service.
Current firmware version
Select Browse and locate
the updated firmware. If the
firmware file is not correct, it will not update the firmware in the unit. The version number
will remain the same after the firmware update procedure.
The update percentage will
update the status.
Click Restart when the upload is
complete.
Though it is not generally necessary,
you should Restore factory default to
make sure that new features and
settings are implemented. Note: You
must re-initialize the hard drive if you
do this. All data will be lost.
14
Time Settings
The NAS’s built-in clock should be adjusted to the current local time. This will insure
accurate time reporting in the logs and file records.
Select your GMT time zone and then enter
the date and time. Click on Apply to make
the changes.
You can find your GMT time zone by double
clicking on the clock located on the bottom
right corner of your desktop.
System Reports
Administrators can view the system
information and log files.
15
System Information
Current firmware
Time since last restart
Hard Drive information
Current IP address
Network link is up or
down
System Log
Use the information
provided here to
help diagnose any
network related
issues.
Navigate through
the history with
these buttons.
You can clear the event logs under the Administrator settings page.
16
User Management
The NAS provides a client/server
environment for users to share files
over the network. File sharing works by
authorizing the users or groups to access shared folders by their username and
password. When creating a new shared folder, user and groups from the current list must
be assigned. When a user/group tries to access the folder, the system will check the list
of valid users for the shared folder. If the user/group is included in the list, the user/group
then has permission to access the shared folder.
Users
For file sharing to work, we have to allow users and/or groups. We create the user
accounts here. The admin
and guest accounts are in
the system by default and
cannot be removed. The
admin account is different
than the one used to
access the UI and can be
modified.
Enter a username and
password. Note: Windows
98 SE, Me users should
user the same username
as their Windows login.
Passwords are
recommended, but are not
required. Click Apply
when completed.
17
Highlight a user name and click
on Remove or Modify to delete
or change user information.
Groups
After creating the users, you can categorize the users into different groups to make
assignment easier.
Click on Add to create a new
group name.
Enter the group name
Highlight the user(s) on the right
side and click on the Å button
to assign the user(s) to the
group. Highlight multiple users
by holding down the Shift key
or Ctrl key while selecting users.
Select users on the left side and
click on the Æ button to remove
them from the group. When
complete, click the Apply
button.
18
NAS Management
Manage the main functions of the
shared storage from this menu.
HD Initialization Wizard
The first time you use the NAS, you may have to initialize the hard disk. The wizard
provides an easy way to initialize the hard disk.
By enabling SMART,
the NAS will report
when the hard drive
is about to fail. Your
hard drive must
support this feature.
The HD Power
Management
should be enabled to prolong the life of the hard drive. When there is no activity for the
set time period, the hard drive will power down to conserve power, save wear and tear,
and prevent the unit from building up unnecessary heat. When a user wants to access
the storage, the NAS will automatically wake up.
The status will show Ready when the hard drive is initialized. Click on the Initialize
button to begin the initialization process.
Click OK to the warning message
to continue the process.
Enter the workgroup name,
description and initial share
folder name. The workgroup
name should be the same
one that the computers
accessing the NAS are on. Windows 2000/XP users can use a different workgroup name
if desired. Click Next to continue.
19
You can find your workgroup name by
right clicking on My Computer and
selecting Properties.
You must assign at least one user to
this share folder. (1) Highlight the user
on the list to the right, (2) select the
permission you want them to have:
Read/Write or Read Only, (3) click on
the Å button to move the user over to
the Allowing User List.
1
3
Highlight users on the left list and
select the Æ button to remove them
from the share or change their
permissions.
2
Click Next to continue.
The progress of the initialization will
be displayed.
You can also view the progress by
returning to the main wizard screen.
Once the initialization is complete, the
status will change to Ready.
20
USB HD Information
Each of formatted partitions (FAT32, EXT2 and EXT3) on the attached USB storage drive
will be shown in the USB HD information page. The naming rule for “Mounting path” is
based on the connecting port. For example, if the USB hard drive was attached on port A
and here are three formatted primary partitions on the disk, the SA will create "USBHDA1"
and "USBHDA2" mounting path to represent each partition space.
Advanced Settings
All the file protocols settings are located here. Disable any protocols not in use by the
computers on the network to increase performance. Most users will not need to change
any of the settings. Make sure to click on Apply after making any changes.
Change the workgroup or
NAS description. Workgroup
name should be the same for
all computers sharing files.
Enable Apple file sharing for
compatibility with older Macs
prior to OS X.
Enable the FTP server to
allow remote and local FTP
file access. Change the
default FTP port 21 for added
security or compatibility. Note: If you change the default port, users must manually enter
21
the new port number when trying to access the FTP server. See FTP Server chapter.
Linux users need to
create NFS Mappings in
order to connect to the
NAS. Enable the
Network File System and
click on Add to create
the mapping.
Enter the Remote UID, IP,
netmask and the local
mapping user. Once
complete, mount the share
on the Linux machine. A
typical mount command line:
# mount <IP address>:/<share folder> /<local directory>
File Sharing
For file sharing, you must create users and groups first. Use this to organize the data on
the NAS. You can create private and public folders. By managing which users have
access to the shares, users can only access information that they are allowed to. This
access is the same whether they are accessing the share from the local network or
through the Internet via FTP.
Click on Add to create a new
shared folder.
22
Enter a share folder name
Assign users by highlighting
the user, selecting the file
permission and clicking on
the Å or Æ button.
Click on Apply when
complete.
Highlight the share folder and
click on Remove or Modify to
delete or edit the shared folder
properties.
USB Storage Sharing
As mentioned above, each partition of the attached USB storage will be presented to one
shared folder. So, if one USB storage device be plugged into A port and it have 2
partitions. The system create the USBHDA1 and USBHDA2 automatically and assigned
the guest have read/write permission by default.
23
FTP Server
If you want to access files stored on your NAS from a remote location, the included FTP
server is the easiest way. Here is a typical setup:
Connection Diagram:
Work PC<-->Internet<-->DSL/Modem<-->Router<-->NAS
To access files from the NAS from a remote location, a static IP and/or a DNS name is
required. You can also setup a DDNS account if you are using a dynamic IP (your DSL IP
changes all the time). See Dynamic Domain Name Server for additional information
and help in setting up this service. Your router must have this feature or you may have to
run a client software on a PC that is running on the network. You must set your router to
forward port 21 to your NAS’s fixed IP address. Refer to the DDNS and port
forwarding/virtual server chapter of your router manual for details.
Enable the FTP server on the NAS.
You can change the default FTP port in the same configuration screen. This is useful for
making you FTP server less visible to users whom you do not want to grant access.
Some networks also block the standard port 21 and may require you to change to a
different port. Note: If you change the default port 21, you will need to enter the port
number every time you access the FTP server.
Make sure to have users and passwords assigned to all your shared folders. If you want
to allow anyone access, just assign the 'guest' account to that folder. FTP users can then
log on with and anonymous account to that folder. Note: Users will be able see the
names of all the other shared folders, but will not be able to access them without a
username and password. To completely disable anonymous access (must have user
account on NAS to see folders), make sure you do not have the ‘guest’ account assigned
to any shared folder.
Now from the remote location, type into a browser (or FTP application) ftp://<DDNS
Name> and it will take you to your NAS unit. If you cannot see anything on your browser,
make sure you have the 'View FTP Folders' option turned on in your browser settings.
You may also have to go into 'File->Login As'. Use a valid user name and password for
the NAS.
24
Windows USB Printer Server
Standard USB 1.1 and 2.0 printers can easily be shared between Windows users on the
network with the built-in USB printer server. Note: Some or all functions of multi-function
printers may not work depending on the driver support by the respective printer
manufacturers.
Please make sure the hard
disk has been initialized. (the
status is READY)
Connect a USB Printer to
the USB port on the back of
the NAS and turn it on.
Locate the NAS device in My Network
Places and select it by double clicking on the
icon.
Enter a valid user name and password when
prompted.
You will now see the printer port next to the
shares for the device.
Double click on the PortA printer icon and
follow the instructions to install the printer
driver at the local station. You may need to
select ‘Have Disk’ and insert your printer’s driver CD during the installation process.
Once the driver installation is completed, you should be able to select the printer from the
printer list in any Windows application. You can manage the printer the same way as any
other networked printer under Windows.
25
UPnP™ Media Server
Note: Your networked media receiver must be using the UPnP media receiver standard.
Please check with the manufacturer of your networked media player.
UPnP media receivers using the
UPnP media receiver standard will
be able to view and play media files
located in the UpnPMedia shared
folder when this feature is enabled.
You can enable the media server
function under Basic Settings.
UPnP NAS Device must also be
enabled for the server to function properly.
A new share folder called UPnPMedia will be created with the guest
user assigned to it. You should change the user access and security
(located in File Sharing) to your current network setup.
Copy the media files that you want the media receivers to see into this
share. You can create folders within the share to organize the media files.
Pinging
You can test your network connection in various situations with this very simple method.
From a command prompt,
type in: ping <IP address> or
ping <network name>
If there are replies, then there
is a connection running
between the two machines.
By pinging the device name,
we also get the IP address of
that device also.
26
Searching the Network for the NAS
If you are not able to locate the NAS in the Network Neighborhood or My Network
Places, you can try to search for it.
Click Search under My Network
Places.
Enter the name of the NAS or the
Fixed IP address if configured that
way and click Search Now.
All other company and/or products names are trademarks and/or registered trademarks of their respective owners.
27