1
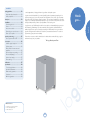
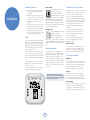
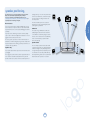
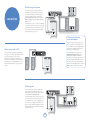
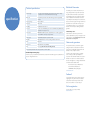
log
o
Handbook
Manuel
Handbuch
Handleiding
CAUTION: To reduce the risk of electric shock, do not remove cover (or back). No user serviceable parts inside. Refer servicing to qualified service
personnel.
safety
guidelines
WARNING: To reduce the risk of fire or electric shock, do not expose this apparatus to rain or moisture.
The lightning flash with an arrowhead symbol within an equilateral triangle, is intended to alert the user to the presence of uninsulated ‘dangerous voltage’
within the product’s enclosure that may be of sufficient magnitude to constitute a risk of electric shock to persons.
The exclamation point within an equilateral triangle is intended to alert the user to the presence of important operating and maintenance (servicing)
instructions in the literature accompanying the product.
CAUTION: In Canada and the USA, to prevent electric shock, match the wide blade of the plug to the wide slot in the socket and insert the plug fully
into the socket.
Important safety instructions
6. Climate
12. Cleaning
This product is designed and manufactured to meet
strict quality and safety standards. However, you
should be aware of the following installation and
operation precautions.
The appliance has been designed for use in moderate
climates.
Unplug the unit from the mains supply before cleaning.
7. Siting the unit
1. Take heed of warnings and instructions
It is important that you:
A. read all the safety and operating instructions
before operating this speaker.
B. keep this handbook for future reference.
C. follow all instructions and adhere to all warnings
in the handbook or on the speaker.
2. Water and moisture
The presence of electricity near water can be
dangerous – for example next to a bathtub,
washbowl, kitchen sink, in a wet basement or near a
swimming pool, etc.
Take care that objects do not fall and liquids are
not spilled, dripped or splashed into the enclosure
through any openings. Liquid-filled objects such as
vases should not be placed on the equipment.
Refer all servicing to qualified servicing personnel.
9. Power-cord protection
4.Ventilation
Do not block any of the ventilation openings.
Do not place the equipment on a bed, sofa, rug or similar
soft surface, or in an enclosed bookcase or cabinet, since
ventilation may be impeded. We recommend a minimum
distance of 50mm around the sides and top of the
appliance to provide adequate ventilation.
Do not install the speaker near any heat producing
equipment such as radiators, stoves or other
appliances (including other amplifiers) that produce
heat.
13. Servicing and repair
The speaker is supplied with a market-suitable
electrical plug. Do not substitute or modify the
supplied plug – see your dealer if a replacement is
required.
The primary method of isolating the Logo speaker
unit from the mains supply is to use the switch on
the rear of the unit. The Logo speaker unit must be
installed in a manner that makes plug disconnection
possible.
3. Object or liquid entry
We do not advise the use of furniture cleaning sprays
or polishes as they can cause indelible white marks if
the unit is subsequently wiped with a damp cloth.
8. Power sources
This product is a Class II or double insulated electrical
appliance. It has been designed in such a way that
it does not require a safety connection to electrical
earth (U.S. = ground).
Do not use this speaker near water.
5. Heat
The unit is not designed for placing in a rack or stand.
It should be placed directly on the floor and sited
where electrical and other leads do not cause a trip
hazard.
The case should normally only require a wipe with a
soft, dry, lint-free cloth. Do not use paint thinners or
other chemical solvents for cleaning.
Servicing is required when: the speaker has been
damaged in any way, such as:
A. the power-supply cord or the plug has been
damaged, or
B. liquid has been spilled, or objects have fallen
into the enclosure, or
C. the appliance has been exposed to rain or
moisture, or
D. the appliance does not appear to operate
normally or exhibits a marked change in
performance, or
E. the appliance has been dropped or the
enclosure damaged.
Power supply cords should be routed so that they
are protected against being walked on or pinched,
particularly at plugs and the point where they exit
from the speaker.
Safety compliance
10. Protection from electrical storms
This device complies with Part 15 of the FCC Rules.
Operation is subject to the following two conditions:
(1) This device may not cause harmful interference,
and (2) this device must accept any interference
received, including interference that may cause
undesired operation.
Unplug the speaker during lightning storms or when
unused for long periods of time.
11. Abnormal smell
If an abnormal smell or smoke is detected from the
appliance, turn the power off immediately and unplug
the unit from the wall outlet. Contact your dealer
immediately.
E-2
This product has been designed to meet the IEC
60065 international electrical safety standard.
contents
thank you….............................................. E-3
installation................................................. E-4
Positioning the unit........................................E-4
Power.....................................................................E-4
Interconnect cables........................................E-4
Connecting to a sound source..............E-4
Care of your speaker...................................E-4
speaker positioning................................. E-5
Stereo system with no LFE......................E-6
connection................................................ E-6
Sub/full range+sat system.........................E-6
Sub/sat system..................................................E-6
Direct mode in Arcam surround
amplifiers..............................................................E-6
Crossover frequency setting....................E-7
Crossover Q setting.....................................E-7
Volume level setting......................................E-7
Phase setting......................................................E-7
... and congratulations for buying the Arcam Logo sub-bass loudspeaker system.
Logo can extend the bandwidth of your main (satellite) speakers by accurately revealing the low
frequency components of stereo and surround-sound programme sources. It also offers a separate
but concurrent LFE (low frequency effects) connection – this is a channeI intended by the recording
engineer to be exclusively reproduced by a subwoofer. Logo’s own volume control permits the level to
be adjusted independently to achieve a perfect balance in the listening room.
thank
you…
Logo features its own 200W amplifier which is close-coupled to a downward-facing long-excursion
driver that takes full advantage of the latest materials technology and a sophisticated braced
cabinet design. The bass response is actively corrected by a Linkwitz transform crossover circuit to
give a Bessel alignment: this minimizes time distortion for accurate bass transients. The result is a
performance of great power and musicality.
English
safety guidelines....................................... E-2
Important safety instructions..................E-2
Safety compliance...........................................E-2
Please take a moment to read this handbook, as the advice that it contains will help you get the
maximum benefit from your purchase.
The Logo Development Team
calibration.................................................. E-7
log
o
specification.............................................. E-8
Technical specifications................................E-8
Worldwide Guarantee................................E-8
Claims under guarantee.............................E-8
Problems?.............................................................E-8
On-line registration.......................................E-8
What’s in the box?
< Arcam Logo sub-bass system
< IEC mains power lead
< this Handbook!
E-3
Positioning the unit
Indicator LED
An indicator LED is positioned across
the top edge of Logo’s cabinet.
< Place the Logo speaker unit on a level, firm
installation
surface, avoiding direct sunlight and sources of
heat or damp.
< Do not place Logo in an enclosed space such
as a bookcase or closed cabinet unless there is
good provision for ventilation. The Logo speaker
unit is designed to run warm during normal
operation.
< Do not place your record deck on top of Logo.
Record decks are very sensitive to the noise
generated by mains power supplies which will
be heard as a background ‘hum’ if the record
deck is too close. Vibrations from Logo may also
cause the pickup stylus to jump tracks.
When the indicator LED is off, it
indicates that the speaker is completely
disconnected from the mains. A blue
light from the indicator shows that the speaker is
powered up and ready for immediate use. A red
light from the indicator shows that the speaker is in
standby (power-saving) mode and will power up as
soon as an audio signal is received.
Standby switch
AUTO MANUAL
The push-in Standby switch provides two
settings: Auto and Manual.
‘Auto’ (button out) switches Logo’s
amplifier to standby after a period of
idleness (about 15 minutes) when no audio signal has
been received. ‘Manual’ (button in) means that Logo’s
amplifier is on whenever the unit is receiving mains
power.
STANDBY
Power
Logo is supplied with a moulded mains plug already
fitted to the lead. Check that the plug supplied fits
your supply – should you require a new mains lead,
please contact your Arcam dealer. Logo is fitted with
a transformer designed to accept nominal mains
voltages from 100V to 240V.
Interconnect cables
We recommend the use of high-quality screened
audio interconnect cables. Poor quality cables will
degrade the performance of your system. All cables
should be kept as short as is practically possible.
Push the IEC plug end of the power cable into the
socket on the back of Logo, making sure that it is
pushed in firmly. Plug the other end of the cable into
your mains socket and, if necessary, switch the socket
on.
Logo is fitted with a main power switch on the rear
panel, above the power inlet: make sure that this is
switched on to use Logo.
If your Logo is not to be used for a prolonged period,
switch the unit off at the main power switch.
It is good practice when connecting your equipment
to make sure that the mains power-supply cabling is
kept as far away as possible from your audio cables.
Failure to do so may result in unwanted noise in the
audio signals.
Connecting to a sound source
Check that your sound processor/receiver is switched
off before connecting Logo. Failure to do this may
result in both speaker and amplifier damage.
If your sound source has a Pre-out sub or LFE Out
output, connect this to IN LFE on the back panel using
RCA (phono) connectors at each end. If your sound
source does not have a SUB or LFE output, connect
the left and right channels of the stereo pre-amp
output (Pre out L and Pre out R) to IN L and IN R,
respectively.
You may connect both the LFE and the L and R
outputs to Logo if you wish to use both the LFE
channel and to supplement the bass response of
‘Large’ Left and Right speakers.
Out L, Out R and OUT LFE provide line-level outputs
for ‘daisy-chaining’ further units, in a multi-room
installation, for example.
After connecting
Turn the sound source amplifier volume down to
minimum before switching on. Switch the source
amplifier on, select a source signal, then gradually
increase the volume to the required listening level.
Care of your speaker
Running-in
In the same way as a new car requires a ‘running-in’
period, so do all loudspeakers. Your Logo may sound
good when you first connect it, but with time it will
improve dramatically. Expect about 50 hours use
before the full potential of your Logo is realised.
Cleaning
100
0.9
4
6
1.1
0.7
3
7
125
2
8
0.5
1.3
9
1
140
1.5
0.3
10
0
35
160
X-OVER Q
VOLUME
X-OVER FREQ
85
115
Note: When connecting Logo to signal leads,
or when moving Logo to a new position, make sure
that the unit is not receiving power by switching off
and disconnecting the power lead.
AUTO MANUAL
5
70
50
PHASE
STANDBY
To clean your speaker simply use a soft, slightly
dampened cloth to wipe off any dust or dirt. Do not
use solvent-based or chemical cleaning products as
these may damage the finish of the speaker cabinet.
Power handling
IN
Arcam speakers are designed to reproduce recorded
music under normal domestic conditions. We do
not recommend nor warrant them for commercial
applications, such as discothèques, public address, etc.
OUT
L
ON
OFF
R
L
R
LFE
LFE
USE ONLY WITH A 250V FUSE
100-240V~50/60HZ 275W MAX
FUSE: T2.5AL 250V
E-4
speaker positioning
standing speakers), or in corners. The speaker drivers
should be at, or a little above, ear level when seated.
If possible, centre your seating area between the
surround speakers.
Room acoustics
The final sound will depend on the acoustics of
the listening room and experimenting with speaker
positioning is very worthwhile.
The closer you place a speaker to corners and the intersection of
wall and floor or wall and ceiling, the stronger the bass output, which
may over-emphasise the bass. Moving a speaker just a few inches can
sometimes make a big difference.
Speaker setup
Proper speaker placement is the key to the best home theatre sound
(see diagram).
As a rough guide, speakers should be placed on rigid stands at about
15cms from the rear wall and at least 60cms from any side wall.
Speakers should never be placed on the floor (unless they are floor-
�
�
Subwoofer
The location of Logo will affect the overall sound
quality. Placing the subwoofer next to a wall or in a
corner will often boost efficiency and give a cleaner
low bass sound. However, all rooms react differently
and we recommend that you experiment with
subwoofer positioning.
Speaker stands
The more firmly a speaker is held, the better it will
sound. We recommend the use of rigid metal stands
of 40–60cms height. Properly damped types that do
not ‘ring’ when tapped with a pencil (either by virtue
of construction, or because they are filled with dry
silver sand) will bring out the best in a speaker. Ensure
that the stands and/or speakers do not wobble.
��
��
o
If you have a choice of listening rooms, avoid one that is perfectly
square or has one dimension exactly twice another. Such a room can
aggravate resonances that colour the sound.
�
log
Your room’s shape and how it is furnished will affect the sound you
hear. For instance, too many bare surfaces can cause reflections that
may add harshness to the sound. Carpets, wall-hangings and curtains
can all help.
���
English
The advice given here is a general guideline for setting up speakers.
Refer to the documentation supplied with your speakers for
more precise positioning and installation information, and see
www.dolby.com/consumer/home_entertainment/roomlayout.html for
usefuI information on listening-room layouts.
E-5
Sub/full range+sat system
connection
This is a surround-sound system (such as Arcam’s
Solo Movie 5.1) where full range L and R speakers
are combined with satellite (or with full range) rear
speakers. The system should be connected with
both the Sub, Subwoofer or LFE output connected to
IN LFE and Left/Right preamplifier outputs attached to
IN L/IN R on Logo.
LS
RS
PRE OUT SUB
PRE OUT RIGHT
PRE OUT LEFT
In such systems, Logo can be set up to work with two
crossover frequencies. One frequency is set up for the
rear speakers using the surround amplifier crossover,
and one frequency for the full range Left and Right
speakers, using the Logo crossover.
L
C
IN L
IN R
R
IN LFE
Direct mode in Arcam
surround amplifiers
Stereo system with no LFE
This is a typical two-channel system (such as Arcam’s
Solo). Logo is connected to L/R preamplifier outputs.
The crossover frequency on Logo should be
adjusted to the low frequency roll off of the main
speakers (see the manual for your speakers for this
information). The Q-control (X-OVER Q) can be used
to fine-tune the integration of Logo and your main
speakers.
L+
L-
R+
R-
L-
R-
L+
R+
If you wish to have your system set up to use
the crossover in the surround amplifier for 5.1
or 7.1 material, but use Left and Right full range
speakers with Logo filling in for two-channel
material, you can use Direct mode.
PRE OUT
RIGHT
Connect the amplifier and Logo as in the
Sub/full range+sat system diagram. In the
amplifier, set up all speakers to ‘Small’; this
redirects bass to Logo via the LFE channel. To use
the system’s full range, activate ‘Direct mode’ for
two-channel sources. This sends the full range
signals to the Left and Right speakers and use the
IN L/IN R inputs to Logo via its own crossover.
PRE OUT
LEFT
IN L
IN R
Sub/sat system
This is a surround-sound system (such as Arcam’s
Solo Movie 5.1) where all the main speakers are
satellite speakers, defined as ‘Small’. Logo is connected
to output marked Sub, Subwoofer or LFE.
The LFE input bypasses the crossover in Logo, so the
crossover frequency should be set by the surround
sound amplifier. For the crossover setting, please see
the response of your satellite speakers which may
vary from around 70Hz for large satellites, to 150Hz
for small satellites. We recommend 80Hz as a starting
point if you are unsure.
LS
RS
PRE OUT SUB
L
C
IN LFE
E-6
R
The subwoofer’s has two jobs: firstly to reproduce accurately and with sufficient power the sub-bass that other
‘smaller’ speakers cannot (the centre speaker is almost always a ‘small’ speaker); and secondly to reproduce the
‘.1’ or low frequency effects (LFE) track of 5.1 or 7.1 material.
Recommended settings for use
with Muso speakers
Arcam’s Muso satellite speakers ideally
complement the sound quality and design values
of Logo. The recommended settings of Logo for
use with Muso speakers are:
In most surround-sound systems, two crossovers are available: one in the surround-sound decoder and one in
the Logo unit.
In order to get the optimum sound in a variety of systems, Logo allows these controls to be used independently
for systems with ‘Large’ front speakers and an LFE output from the surround-sound decoder.
115
125
50
140
35
160
X-OVER FREQ
0.9
0.7
Crossover frequency
setting
0.5
1.1
1.5
0.3
X-OVER Q
In most systems, a crossover point for Logo of 90Hz
is recommended.
If your satellite speakers are very ‘Small’ (and thus
cannot reproduce much bass) you might like to
set the crossover point higher than this figure to
allow Logo to do more of the work. However, be
aware that the higher the crossover point, the more
directional the low frequency sounds, thus the more
easily identifiable is the subwoofer’s physical position.
3
1.3
Crossover Q setting
The X-Over Q setting controls the slope of the trace
beyond the cutoff frequency, in dB/octave. The aim
is to make a ‘mirror image’ match with the slope of
the high-pass filter – a steep cut-off of the high-pass
filter from the sound processor/receiver should be
matched by a steep cut-off of the low-pass filter
from Logo. Similarly, if the sound processor/receiver
provides a more gradual cut-off, the X-Over Q setting
should have a lower value.
If your satellite speakers can reproduce reasonable
bass, you can try a lower crossover point.
Experimentation and listening will guide you to the
right spot.
0
0
Gain,
dB
Gain,
dB
-12
-12
20
40
60
80
100
120
Crossover frequency, Hz
140
160
X-OVER Q
0.5
Volume
8
Phase
0°
4
5
calibration
6
7
2
8
1
9
10
0
VOLUME
Volume level setting
Accurate volume level setting for a subwoofer ideally
requires specialist measuring equipment such as a
Real Time Spectrum Analyser or RTA. A regular SPL
(Sound Pressure Level) meter will not work for this!
For most systems though simple experimentation
by ear will suffice. Start with a medium setting (5)
and experiment with Volume until low frequency
sounds can be heard as part of the main sound
and not traceable to the subwoofer directly. Most
sound processors or receivers allow Sub levels to be
trimmed ‘on the fly’ to counter excessively high or low
levels from particular source material.
PHASE
Phase setting
This has two settings: with the Phase button out (0°)
and with the button in (180°).
A phase delay may be used to counteract the effect
of sound waves from Logo interacting with and
partially cancelling out or unduly emphasising sound
from the satellite speakers. This effect depends
critically on the relative positioning of subwoofer
and satellite speakers and can also be remedied by
relocating the subwoofer a short distance. The phase
setting is available if relocation is not possible or
impractical.
o
100
90Hz
Q=1.5
Q=1.0
Q=0.71
Q=0.58
Q=0.49
Q=0.3
log
85
70
X-OVER FREQ
English
For optimum results, the subwoofer must be set up in the correct relation to the other speakers in the system.
The two relevant controls are the crossover point and the subwoofer level. The crossover point establishes
the frequency below which signals are redirected away from ‘small’ speakers toward the subwoofer. Setting the
subwoofer level ensures signals that are of equal volume achieve the same sound pressure level no matter what
frequency they are or which speaker they come from (i.e. subwoofer or satellite speaker).
Crossover frequency
E-7
Technical specifications
specification
System design
One-way speaker, with 10 litres internal volume. The cabinet is solidly
constructed from machined MDF with internal bracing.
Drive unit
10” (254mm) subwoofer drive unit with long excursion, magnetically
shielded.
Frequency range
20Hz to 250Hz
Impedance
4Ω nominal
Sensitivity
85dB/watt, measured at 1m
Crossover
Fourth order Linkwitz-Riley crossover circuit, 24dB/octave (80dB/decade),
adjustable for frequency and Q.
Connections
Left, Right
and Sub inputs and outputs: RCA phono sockets (gold), max
2.5V, >22kΩ. The unit may be ‘daisy-chained’.
Mains supply
100V–240V at 50/60Hz. Fuse T2.5AL 250V
Amplifier
200 watts/4Ω, under normal operating conditions, 275W max.
Finish
Black paint
Dimensions
280 x 280 x 416mm (WxDxH)
Mass
Net 15kg (Note: Take care when lifting the unit)
Note that all specification values are typical, unless otherwise stated.
Continual improvement policy
Arcam has a policy of continual improvement for its products. This means that designs and specifications are
subject to change without notice.
Worldwide Guarantee
This entitles you to have the unit repaired free of
charge, during the first two years after purchase, at
any authorised Arcam distributor provided that it
was originally purchased from an authorised Arcam
dealer or distributor. The manufacturer can take no
responsibility for defects arising from accident, misuse,
abuse, wear and tear, neglect or through unauthorised
adjustment and/or repair, neither can they accept
responsibility for damage or loss occurring during
transit to or from the person claiming under the
guarantee.
The warranty covers:
Parts and labour costs for two years from the
purchase date. After two years you must pay for both
parts and labour costs. The warranty does not cover
transportation costs at any time.
Claims under guarantee
This equipment should be packed in the original
packing and returned to the dealer from whom it
was purchased, or failing this, directly to the Arcam
distributor in the country of residence.
It should be sent carriage prepaid by a reputable
carrier – not by post. No responsibility can be
accepted for the unit whilst in transit to the dealer or
distributor and customers are therefore advised to
insure the unit against loss or damage whilst in transit.
For further details contact Arcam at:
Arcam Customer Support Department,
Pembroke Avenue, Waterbeach,
CAMBRIDGE, CB25 9QR, England
or www.arcam.co.uk.
Problems?
If your Arcam dealer is unable to answer any query
regarding this or any other Arcam product please
contact Arcam Customer Support at the above
address and we will do our best to help you.
On-line registration
You can register you product on-line at
www.arcam.co.uk.