1
TGA939(e).fm Page 1 Friday, June 27, 2008 5:40 PM
Installation Manual
Additional Digital Cordless Handset
Model No. KX-TGA939
Thank you for purchasing a Panasonic digital cordless phone.
This unit is an additional handset compatible with the following
Panasonic Digital Cordless Phones:
KX-TG9391/KX-TG9392
You must register this handset with your base unit before it can
be used. This installation manual describes only the steps
needed to register and begin using the handset. Please read
the base unit’s operating instructions for further details.
Charge the batteries for about 7 hours before initial use.
Please read this installation manual before using the unit and
save it for future reference.
For assistance, visit our website:
http://www.panasonic.com/help
for customers in the U.S.A. or
Puerto Rico.
PNQX1455ZA DM0708SY0
TGA939(e).fm Page 2 Friday, June 27, 2008 5:40 PM
Supplied accessories
Accessory item/Order number
Quantity
Charger/PNLC1001YT
1
AC adaptor for charger*1/PQLV209T or PQLV219Z
1
Rechargeable batteries*2
2
Handset cover*3/PNYNTGA430BR
1
Belt clip/PNKE1004Z1
1
*1 Both of the AC adaptors function well with the charger.
*2 Please read the base unit’s operating instructions for replacement
battery information.
*3 The handset cover comes attached to the handset.
Note:
L Please read the base unit’s operating instructions for additional/
replacement accessories.
Sales and support information
L To order additional/replacement accessories, call 1-800-332-5368.
L TTY users (hearing or speech impaired users) can call 1-866-6051277.
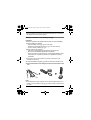
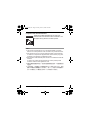
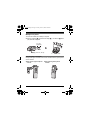
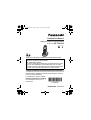
Connection
(120 V AC,
60 Hz)
Hooks
Note:
L Use only the supplied Panasonic AC adaptor PQLV209 or PQLV219.
2
For assistance, please visit http://www.panasonic.com/help
TGA939(e).fm Page 3 Friday, June 27, 2008 5:40 PM
L The AC adaptor must remain connected at all times. (It is normal for
the adaptor to feel warm during use.)
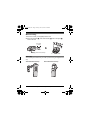
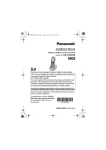
Battery installation and battery charge
Important:
L Use the supplied rechargeable batteries (Part No. HHR-55AAABU).
L When installing the batteries:
– Wipe the battery ends (S, T) with a dry cloth.
– Avoid touching the battery ends (S, T) or the unit contacts.
– Confirm correct polarities (S, T).
L When replacing the batteries:
– USE ONLY rechargeable Ni-MH batteries AAA (R03) size.
– Do NOT use Alkaline/Manganese/Ni-Cd batteries.
– We recommend using the Panasonic rechargeable batteries noted
in the base unit’s operating instructions for replacement battery
information.
1 Press the notch on the handset cover firmly, and slide it in the
direction of the arrow.
2 Insert the batteries negative (T) end first. Close the handset cover.
3 Place the handset on the charger for about 7 hours before initial
use.
Note:
L If the batteries are fully charged, but the operating time seems to be
shorter, clean the battery ends (S, T) and the charge contacts with a
dry cloth.
For assistance, please visit http://www.panasonic.com/help
3
TGA939(e).fm Page 4 Friday, June 27, 2008 5:40 PM
Attention:
A nickel metal hydride battery that is
recyclable powers the product you
have purchased.
Please call 1-800-8-BATTERY (1800-822-8837) for information on how
to recycle this battery.
Registering a handset to the base unit
1 Handset:
Lift the handset and press {OFF}.
2 Base unit:
Press and hold {LOCATOR} for about 5 seconds until the registration
tone sounds.
L If all registered handsets start ringing, press the same button to
stop. Then repeat this step.
3 Handset:
Place the handset on the charger.
L Continue the operation even when the handset display shows
“Registering”.
4 With the handset still on the charger, wait until a long beep sounds
and w stops flashing.
Note:
L If an error tone sounds, or if w is still flashing, register the handset
according to the base unit’s operating instructions.
Display language
1 {MENU} i {#}{1}{1}{0}
2 {V}/{^}: Select the desired setting.
3 Press the middle soft key to save. i {OFF}
4
For assistance, please visit http://www.panasonic.com/help
TGA939(e).fm Page 5 Friday, June 27, 2008 5:40 PM
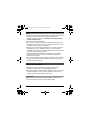
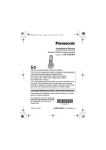
Wall mounting
1 Drive the screws (not supplied) into the wall.
2 Mount the charger (A), then slide it down (B) and to the right (C)
until it is secure.
25.4 mm
(1 inch)
A
B
C
Screws
(120 V AC, 60 Hz)
Belt clip
You can hang the handset on your belt or pocket using the supplied belt
clip.
N To attach the belt clip
N To remove the belt clip
For assistance, please visit http://www.panasonic.com/help
5
TGA939(e).fm Page 6 Friday, June 27, 2008 5:40 PM
For your safety
To prevent severe injury and loss of life/property, read this section
carefully before using the product to ensure proper and safe operation of
your product.
WARNING
Power connection
L Completely insert the AC adaptor/power plug into the power outlet.
Failure to do so may cause electric shock and/or excessive heat
resulting in a fire.
L Regularly remove any dust, etc. from the AC adaptor/power plug by
pulling it from the power outlet, then wiping with a dry cloth.
Accumulated dust may cause an insulation defect from moisture, etc.
resulting in a fire.
L Unplug the product from power outlets if it emits smoke, an abnormal
smell, or makes an unusual noise. These conditions can cause fire or
electric shock. Confirm that smoke has stopped emitting and contact
the Panasonic Call Center at 1-800-211- PANA (1-800-211-7262).
Installation
L To prevent the risk of fire or electrical shock, do not expose the product
to rain or any type of moisture.
L Do not place or use this product near automatically controlled devices
such as automatic doors and fire alarms. Radio waves emitted from
this product may cause such devices to malfunction resulting in an
accident.
CAUTION
Installation and relocation
L The AC adaptor is used as the main disconnect device. Ensure that
the AC outlet is installed near the product and is easily accessible.
6
For assistance, please visit http://www.panasonic.com/help
TGA939(e).fm Page 7 Friday, June 27, 2008 5:40 PM
Battery
L We recommend using the supplied batteries or additional/replacement
batteries noted in the base unit’s operating instructions for
replacement battery information. USE ONLY rechargeable Ni-MH
batteries AAA (R03) size.
L Do not mix old and new batteries.
L Do not open or mutilate the batteries. Released electrolyte from the
batteries is corrosive and may cause burns or injury to the eyes or skin.
The electrolyte may be toxic if swallowed.
L Exercise care when handling the batteries. Do not allow conductive
materials such as rings, bracelets or keys to touch the batteries,
otherwise a short circuit may cause the batteries and/or the conductive
material to overheat and cause burns.
L Charge the batteries provided with or identified for use with this
product only, in accordance with the instructions and limitations
specified in this manual.
L Only use a compatible charger to charge the batteries. Do not tamper
with the charger. Failure to follow these instructions may cause the
batteries to swell or explode.
Other information
L Operating the product near electrical appliances may cause
interference. Move away from the electrical appliances.
L Use only the power cord and batteries indicated in this manual. Do not
dispose of batteries in a fire. They may explode. Check with local
codes for possible special disposal instructions.
Routine care
L Wipe the outer surface of the product with a soft moist cloth.
L Do not use benzine, thinner, or any abrasive powder.
For assistance, please visit http://www.panasonic.com/help
7
TGA939(e).fm Page 8 Friday, June 27, 2008 5:40 PM
Notice for product disposal, transfer, or return
L This product can store your private/confidential information. To protect
your privacy/confidentiality, we recommend that you erase the
information such as phonebook or caller list entries from the memory
before you dispose of, transfer, or return the product.
FCC and other information
This equipment is hearing aid compatible as defined by the FCC in 47
CFR Section 68.316.
When you hold the phone to your ear, noise might be heard in your
Hearing Aid. Some Hearing Aids are not adequately shielded from
external RF (radio frequency) energy. If noise occurs, use an optional
headset accessory or the speakerphone option (if applicable) when
using this phone. Consult with your audiologist or Hearing Aid
manufacturer about the availability of Hearing Aids which provide
adequate shielding to RF energy commonly emitted by digital devices.
WHEN PROGRAMMING EMERGENCY NUMBERS AND(OR) MAKING
TEST CALLS TO EMERGENCY NUMBERS:
1) Remain on the line and briefly explain to the dispatcher the reason for
the call.
2) Perform such activities in the off-peak hours, such as early morning or
late evenings.
This device complies with Part 15 of the FCC Rules. Operation is subject
to the following two conditions:
(1) This device may not cause harmful interference, and (2) this device
must accept any interference received, including interference that may
cause undesired operation.
Privacy of communications may not be ensured when using this phone.
8
For assistance, please visit http://www.panasonic.com/help
TGA939(e).fm Page 9 Friday, June 27, 2008 5:40 PM
CAUTION:
Any changes or modifications not expressly approved by the party
responsible for compliance could void the user’s authority to operate this
device.
NOTE:
This equipment has been tested and found to comply with the limits for
a Class B digital device, pursuant to Part 15 of the FCC Rules. These
limits are designed to provide reasonable protection against harmful
interference in a residential installation. This equipment generates, uses,
and can radiate radio frequency energy and, if not installed and used in
accordance with the instructions, may cause harmful interference to
radio communications. However, there is no guarantee that interference
will not occur in a particular installation. If this equipment does cause
harmful interference to radio or television reception, which can be
determined by turning the equipment off and on, the user is encouraged
to try to correct the interference by one or more of the following
measures:
– Reorient or relocate the receiving antenna.
– Increase the separation between the equipment and receiver.
– Connect the equipment into an outlet on a circuit different from that to
which the receiver is connected.
– Consult the dealer or an experienced radio/TV technician for help.
FCC RF Exposure Warning:
L This product complies with FCC radiation exposure limits set forth for
an uncontrolled environment.
L This handset may not be collocated or operated in conjunction with
any other antenna or transmitter.
L The handset may be carried and operated with only the specific
provided belt-clip. Other non-tested belt-clips or similar body-worn
accessories may not comply and must be avoided.
Notice:
L FCC ID can be found inside the battery compartment or on the bottom
of the unit.
For assistance, please visit http://www.panasonic.com/help
9
TGA939(e).fm Page 10 Friday, June 27, 2008 5:40 PM
Compliance with TIA-1083 standard:
Compatible with
Hearing Aid T-Coil
Telephone handsets identified with this logo have
reduced noise and interference when used with T-Coil
equipped hearing aids and cochlear implants.
T
TIA-1083
Notice
LThis product is designed for use in the United States of America.
Sale or use of this product in other countries may violate local laws.
LCet appareil est conçu pour être utilisé aux États-Unis d’Amérique.
La vente ou l’emploi de cet appareil dans certains autres pays peut
constituer une infraction à la législation locale.
LEste producto está diseñado para usarse en los Estados Unidos de
América.
La venta o el empleo de este producto en ciertos países puede
constituir violación de la legislación local.
Lҏࠢட࣏छٺҢՄ೩Ȅषӵڏтড়୵ٺܖҢȂџོႂІ࿋
ӴٽݲȄ
Lߎߩຠߪޔᣣᧄ࿖ᄖߢߩ↪ࠍ⋡⊛ߣߒߡ⸳⸘ߐࠇߡ߅ࠅޔᣣᧄ
࿖ౝߢߩ↪ߪᴺᓞ㆑ߣߥࠅ߹ߔޕᓥߞߡޔᒰ␠ߢߪᣣᧄ࿖ౝߦ
߅ߡߪේೣߣߒߡୃℂߥߤߩࠨࡆࠬߪ⥌ߒ߆ߨ߹ߔޕ
10
For assistance, please visit http://www.panasonic.com/help
TGA939(e).fm Page 11 Friday, June 27, 2008 5:40 PM
If you need assistance with setup or
operation
1 Visit our website: http://www.panasonic.com/help
2 Contact us via the web at: http://www.panasonic.com/contactinfo
3 Call us at: 1-800-211-PANA (1-800-211-7262)
TTY users (hearing or speech impaired users) can call 1-877-8338855.
When you ship the product
L Carefully pack your unit, preferably in the original carton.
L Attach a letter, detailing the symptom.
L Send the unit to PSTC (Panasonic) Exchange Center, prepaid and
adequately insured.
L Do not send your unit to Panasonic Consumer Electronics Company
listed below or to executive or regional sales offices. These locations
do not repair consumer products.
Panasonic Consumer Electronics Company,
Division of Panasonic Corporation of North America
One Panasonic Way, Secaucus, New Jersey 07094
Panasonic Puerto Rico, Inc.
San Gabriel Industrial Park, Ave. 65 de Infantería, Km. 9.5, Carolina,
Puerto Rico 00985
Copyright:
This material is copyrighted by Panasonic Communications Co., Ltd.,
and may be reproduced for internal use only. All other reproduction, in
whole or in part, is prohibited without the written consent of Panasonic
Communications Co., Ltd.
© 2008 Panasonic Communications Co., Ltd. All Rights Reserved.
For assistance, please visit http://www.panasonic.com/help
11
TGA939(sp).fm Page 1 Friday, June 27, 2008 4:06 PM
Manual de instalación
Auricular Inalámbrico Digital Adicional
Modelo N° KX-TGA939
Gracias por adquirir un teléfono inalámbrico digital Panasonic.
Esta unidad es un auricular adicional compatible con los siguientes
teléfonos inalámbricos digitales Panasonic:
KX-TG9391/KX-TG9392
Debe registrar este auricular con su unidad base antes de poder
usarlo. Este manual de instalación sólo describe los pasos
necesarios para registrar y comenzar a usar el auricular. Lea las
instrucciones de operación de la unidad base para obtener mayores
detalles.
Cargue las baterías aproximadamente durante 7 horas antes de
utilizarlas por primera vez.
Lea este manual de instalación antes de usar la unidad y guárdelo para
consultarlo en el futuro.
Para obtener ayuda, visite nuestro sitio web:
http://www.panasonic.com/help para clientes de Estados Unidos o
Puerto Rico (Sólo en inglés).
TGA939(sp).fm Page 2 Friday, June 27, 2008 4:06 PM
Accesorios incluidos
Accesorio/Número de pedido
Cantidad
Cargador/PNLC1001YT
1
Adaptador de corriente para el cargador*1/PQLV209T o PQLV219Z
1
*2
Baterías recargables
2
Tapa del auricular*3/PNYNTGA430BR
1
Gancho para el cinturón/PNKE1004Z1
1
*1 Los dos adaptadores para corriente funcionan bien con el cargador.
*2 Lea las instrucciones de operación de la unidad base para obtener
información acerca de las baterías de reemplazo.
*3 La cubierta del auricular viene unida a él.
Nota:
L Lea las instrucciones de operación de la unidad base para obtener
información acerca de los accesorios adicionales o de reemplazo.
Información de ventas y respaldo
L Para pedir accesorios adicionales o de repuesto, llame al 1-800-332-5368.
L Los usuarios TTY (usuarios con impedimentos auditivos o del habla) pueden
llamar al 1-866-605-1277.
Conexión
(120 V CA,
60 Hz)
(2)
Ganchos
TGA939(sp).fm Page 3 Friday, June 27, 2008 4:06 PM
Nota:
L Use sólo el adaptador de corriente Panasonic PQLV209 o PQLV219 incluido.
L El adaptador de corriente debe permanecer conectado todo el tiempo. (Es
normal que el adaptador se caliente durante su uso.)
Instalación y carga de la batería
Importante:
L Utilice las baterías recargables que se suministran (N° de serie
HHR-55AAABU).
L Al instalar las baterías:
– Limpie los extremos de las baterías (S, T) con un paño seco.
– Evite tocar los extremos de las baterías (S, T) o los contactos de la unidad.
– Asegúrese de que las polaridades estén correctas (S, T).
L Al reemplazar las baterías:
– Utilice SÓLO baterías recargables de Ni-MH tamaño AAA (R03).
– NO utilice baterías alcalinas, de manganeso o de Ni-Cd.
– Le recomendamos que use las baterías recargables Panasonic que se
especifican en la información de las baterías de reemplazo de las
instrucciones de operación de la unidad base.
1 Oprima firmemente el seguro de la cubierta del auricular y deslícelo en
dirección de la flecha.
2 Inserte primero el extremo negativo (T) de las baterías. Cierre la tapa del
auricular.
3 Coloque el auricular en el cargador durante aproximadamente 7 horas
antes de usarlo por primera vez.
(3)
TGA939(sp).fm Page 4 Friday, June 27, 2008 4:06 PM
Nota:
L Si las baterías se cargaron por completo pero su tiempo de funcionamiento
parece ser más corto, limpie los extremos de las mismas (S, T) y los
contactos de carga con un paño seco.
Cómo registrar un auricular a la unidad base
1 Auricular:
Levante el auricular y oprima {OFF}.
2 Unidad base:
Oprima y mantenga oprimido {LOCATOR} durante aproximadamente
5 segundos hasta que suene el tono de registro.
L Si todos los auriculares registrados comienzan a timbrar, oprima el mismo
botón para detenerlos. Después repita este paso.
3 Auricular:
Coloque el auricular en el cargador.
L Continúe la operación aunque la pantalla del auricular muestre
“Registrando”.
4 Con el auricular aún en el cargador, espere a que se emita un pitido largo y
w deje de parpadear.
Nota:
L Si suena un tono de error, o si w continúa parpadeando, registre el auricular
de acuerdo con las instrucciones de operación de la unidad base.
Idioma de la pantalla
1 {MENU} i {#}{1}{1}{0}
2 {V}/{^}: Seleccione la configuración deseada.
3 Oprima la tecla de función del medio para guardar. i {OFF}
(4)
TGA939(sp).fm Page 5 Friday, June 27, 2008 4:06 PM
Montaje en la pared
1 Inserte los tornillos (no incluidos) en la pared.
2 Monte el cargador (A) y deslícelo hacia abajo (B) y a la derecha (C) hasta
que quede bien asegurado.
25.4 mm
(1 pulgada)
A
B
C
Tornillos
(120 V CA, 60 Hz)
Gancho para el cinturón
Usted puede colgar el auricular en el cinturón o bolsillo usando el gancho para el
cinturón incluido.
N Para colocar el gancho para el
cinturón
N Para quitar el gancho para el
cinturón
(5)