1
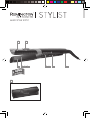
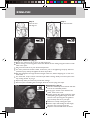
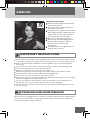
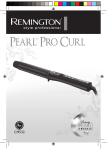
MULTI STYLE 210ºC
3
S6600
MULTI STYLE 210ºC
B
A
K
F
C D E
G H
I
J
ENGLISH
Thank you for buying your new Remington® product. Before use, please read the
instructions for use carefully and keep them in a safe place for future reference.
PRODUCT FEATURES
A Advanced Ceramic Coating for extra smooth glide and longer lasting plates
B Designed with curl bars to create endless styles effortlessly
C High heat 150 – 210°C
D Fast heat up and ready for use in 15 seconds
E Longer length slim 100mm plates
F Curl bar switch
G Variable heat wheel – 30 settings
H Recommended temperatures to suit hair types…
150°C - 180°C – Fine Hair
180°C - 200°C – Medium Hair
200°C - 210°C – Thick Hair
I
Automatic safety shut off – if no buttons have been pressed after 60 minutes the straightener
will automatically turn off
J Hinge lock for storage :- Plates can be shut together for easy storage
Locked- Push the hinge lock up to the locked position
Unlocked- Pull the hinge lock down to the unlocked position
NOTE: Do not heat the unit in the locked position
K Heat proof pouch
L Multi-voltage: For use at home or abroad.
When used at 120V the heat up times and temperatures may vary.
3 year guarantee
INSTRUCTIONS FOR USE
1
Step 1
Push the button down,
then move forward and
to the left to select
desired curl setting.
2
Step 2
Place curl bars facing
the root.
1
ENGLISH
3
Step 3
4
Turn the iron
180 degrees.
Fig 1
Step 4
Slide down the hair.
Fig 1
SETTING
SETTING
Straight & Small curl (Fig 1)
Before use, make sure hair is clean, dry and tangle-free.
Before turning on and using please select the desired curl bar setting using the switch on both
sides of the styler.
Plug in the unit and set to your desired temperature.
For extra protection and best results, section hair prior to straightening and spray with heat
protection spray. Always straighten the lower layers first.
Run the straightener through the entire length of the hair, without stopping for an even and
sleek finish.
For small curls, wrap a section round the styler whilst rotating. Gently move the styler to the
tips, curling the hair as you go.
Repeat only twice per section to prevent hair damage.
Remove styler and holding the hair length, allow the curl to spring into shape.
Fig 2
SETTING
2
Medium curl (Fig 2)
Push the switches up and outwards and click
into the 1st extended position.
Firmly grip a section of hair between the
plates, close to the roots.
Keeping tension firm gently rotate the styler
whilst pulling through the length of the hair
section to the tips using the curl guides to
grip and shape the curl as you style.
Make sure to keep rotating the styler.
Remove styler and holding the hair length,
allow the curl to spring into shape.
Repeat in sections until all hair is curled.
ENGLISH
Fig 3
SETTING
Large loose curl (Fig 3)
Push the switches up and out towards the
2nd extension position.
Firmly grip a section of hair between the
plates, close to the roots.
Keeping tension firm gently rotate the styler
whilst pulling through the length of the hair
section to the tips using the curl guides to
grip and shape the curl as you style.
Make sure to keep rotating the styler.
Remove styler and whilst holding the hair
allow the curl to spring into shape, to
maximise volume spray hair with
finishing spray.
To create luscious waves gently tease out
the curls with a tail comb.
IMPORTANT INSTRUCTIONS
Due to high heat capabilities of the straightener do not try to extend the curl bars while
in use.This is a high performance product; avoid frequent use to prevent damage to hair.
Due to the extreme heat capabilities of this straightener, extra care should be taken
when using.
For shorter hair, place a plastic comb between scalp and iron to avoid touching scalp.
Do not leave switched on for more than 30 minutes.
Before use, make sure hair is clean, dry and tangle-free.
While heating, during use and cooling, place on flat, smooth, heat-resistant surface.
Only hold unit at the end of the handle. Avoid touching the tips.
Do not style too close to scalp, face, ears, neck and skin.
Please note regular use of styling products may deteriorate the advanced ceramic coating.
Wipe clean regularly to maintain performance.
Do not use an abrasive cleaning fluid to clean the advanced ceramic coated plates, as
damage will occur. Use a soft damp cloth on the unit while unplugged.
Do not scratch the surface of the plates as this will deteriorate the effectiveness of the
ceramic coating.
CLEANING AND MAINTENANCE
Ensure the unit is unplugged and cool. Clean the outside of the handle with a slightly damp
cloth. Wipe the plates clean of styling products with damp cloth. No other maintenance
of advanced ceramic coating is required.
3
ENGLISH
SAFETY CAUTIONS
WARNING – FOR ADDITIONAL PROTECTION THE INSTALLATION
OF A RESIDUAL CURRENT DEVICE (RCD) WITH A RATED RESIDUAL
OPERATING CURRENT NOT EXCEEDING 30mA IS ADVISABLE. ASK AN
ELECTRICIAN FOR ADVICE.
WARNING – THIS APPLIANCE MUST NOT BE TAKEN INTO A BATHROOM.
IT SHOULD NOT BE USED NEAR BATHTUBS, SHOWERS, BASINS OR
OTHER VESSELS CONTAINING WATER OR OTHER LIQUIDS.
This product is not suitable for use in bath or shower.
THE STYLER SHOULD BE UNPLUGGED FROM MAINS SUPPLY WHEN NOT
IN USE.
Do not leave the styler unattended when switched on.
A l l ow t h e s t y l e r t o c o o l d ow n b e f o r e s t o r a g e .
D o n o t i m m e r se in w at e r or o t he r liq u id s .
D o n o t p l a c e s t y l e r o n s o f t m a t e r i a l e . g . c a r p e t , b e d d i n g , t owe l s , r u g s e t c .
A l w ay s e n s u r e t h e v o l t a g e t o b e u s e d c o r r e s p o n d s t o t h e v o l t a g e s t a t e d o n t h e u n i t .
Keep this product out of reach of children. The use of this appliance by persons with
reduced physical, sensory or mental capabilities or lack of experience and knowledge
can give cause to hazards. Persons responsible for their safety should give explicit
instructions or supervise the use of the appliance.
Do not use any at t achme nt s wit h t his st yler, ot her t h an t hose supplied by Re ming ton®.
Avoid allowing any part of the hot plates to contact the face, neck or scalp.
D o n o t w r a p t h e c o r d a r o u n d t h e u n i t . C h e c k c o r d r e g u l a r l y f o r a ny s i g n o f d a m a g e .
T h i s p ro d u c t i s n o t i n t e n d e d fo r c o m m e rc i a l o r s a l o n u se .
D a m a ge d c o rd s c a n b e d a n ge ro u s . I f t h e s u p p l y c o rd o f t h i s u n i t b e c o m e s d a m a ge d ,
discontinue use immediately and return the appliance to your nearest authorised
Remington® service dealer for repair or replacement in order to avoid a hazard.
S peci al tools are re quired for any ex amin ation , adjust me nt or re p air. U nqu alified re p air
work could lead to hazardous conditions for the user.
We do not accept responsibility for damage to the product, persons or other items(s),
caused by misuse, abuse or non-compliance with these instructions.
PROTECT THE ENVIRONMENT
Do not dispose of the product in household waste at the end of its life. Disposal can take place at
the Remington® Service Centre or appropriate collection sites.
For further information on recycling see www.remington-europe.com
4
ENGLISH
Fig 3
WIRING INSTRUCTIONS UK Plugs Only
This product is fitted with a BS1363 plug fused at 13A. If the plug is unsuitable, it should be
disconnected and an appropriate plug fitted as detailed below. If it is necessary to replace
the plug fuse, use only fuses that are approved to BS1362, rated at 13A. If in doubt consult
a qualified electrician.
The wires in the mains lead are coloured in accordance with following code:
BLUE - NEUTRAL
BROWN - LIVE
As the colours of the wires in the mains lead of this appliance may not correspond with the
coloured markings identifying the terminals in your plug, proceed as follows:
The wire which is coloured BLUE must be connected to the terminal which is marked
‘N’ or coloured BLACK. The wire which is coloured BROWN must be connected to the
terminal which is marked ‘L’ or coloured RED. Never connect either of the wires to the big
EARTH terminal marked ‘E’ or coloured GREEN or GREEN AND YELLOW.
SERVICE AND WARRANTY
This product has been checked and is free of defects. We warrant this product against any
defects that are due to faulty material or workmanship for the warranty period from the
original date of consumer purchase. If the product should become defective within the
warranty period, we will repair any such defect or elect to replace the product or any part
of it without charge provided there is proof of purchase.
This does not mean an extension of the warranty period.
In the case of a warranty simply call the Remington® Service Center in your region.
This warranty is offered over and above your normal statutory rights.
The warranty shall apply in all countries in which our product was sold via an authorised dealer.
This warranty does not include damage to the product by accident or misuse, abuse,
alteration to the product or use inconsistent with the technical and/or safety instructions
required. This warranty shall not apply if the product has been dismantled or repaired by a
person not authorised by us.
REMINGTON® SERVICE HOTLINE
United Kingdom
+44 0800 212 438 (free call)
5
Spectrum Brands (UK) Limited
Fir Street, Failsworth, Manchester, M35 0HS, UK.
Email: [email protected]
www.remington.co.uk
All technical modifications reserved. 02/11. TSC 09.0164
Model No. S6600
11 / UK / S6600
Version 01/11 Par t No. T22-31628
REMINGTON ® Registered Trade Mark of Spectrum Brands, Inc.,
or one of its subsidiaries
VARTA Consumer Batteries GmbH & Co. KGaA
Alfred-Krupp-Str.9
73479 Ellwangen
Germany
UK & Ireland:
Spectrum Brands (UK) Ltd.
Fir Street
Failsworth
Manchester
M35 0HS
England
www.remington-europe.com
© 2011 SBI
This product is not suitable for use in bath and shower