1
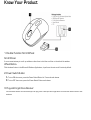
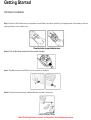
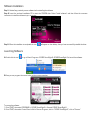
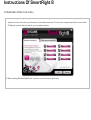
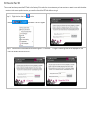
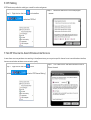
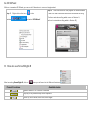
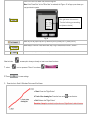
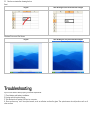
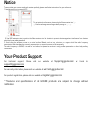
User Manual
2.4GHz Ultra Far Wireless Optical Mouse
Contents
Introduction……………………………………………………………………………...3
Know Your Product……………………………………………………………4
Getting Started………………………………………………………………………5--6
Hardware Installation…………………………………………………………………...5
Software Installation……………………………………………………………………..6
Launching Software…………………………………………………………………….6
Instructions Of SmartRight 8…………………………………….7—10
A. Illustration of the main menu………………………………………………………7
B. How to Pair ID…………………………………………………………………………….8
C. How to Indicate Battery Status……………………………………………………9
D. Three Shiftable Report Rates……………………………………………………..9
E. DPI Setting………………………………………………………………………………………10
F. Set RF Channel to Avoid Wireless Interference……………………………10
G. 4D Wheel…………………………..……………………………………………………………11
H. How to use SmartRight 8……………………………………………………………10-13
Troubleshooting…………………………………………………………………….13
Reminder……………………………………………………………………………………14
Your product support………………………………………………………14
Introduction
A group of young female technicians got together and decided it was time for ladies to be able to express
themselves with the hardware they used; G-Cube is specially designed by women for women. Our products are
not only stylish, but are also functional and meet the needs of women.
The computer peripheral market has traditionally offered products that leave consumers with little choice in
style and color. G-Cube has revolutionized the market by offering a refreshing line of computer peripherals that
are sleek, modern and colorful.
G-Cube is designed with YOU In Mind. G-Cube wants you to Express Who You Are at home, at school, at work,
the local coffee shop, the PTA or at your next national sales meeting.
G-Cube wants you to Be yourself…and…Inspire Others!
Know Your Product
1. Double Function Scroll Wheel
Scroll WheelA more convenient way to scroll up and down rather than to click the scroll bar on the side of the window.
Wheel ButtonClick the wheel button in the Microsoft Windows Applications, it performs the auto-scroll function by default .
2. Power Switch Button
A. To turn ON the mouse, press the Power Switch Button for 3 seconds and release.
B. To turn OFF the mouse, press the Power Switch Button and release.
3. Plug-and-Forget Nano-Receiver
The USB Nano-receiver is so small that you can plug it into a USB port and forget about it. No worries about broken or lost
receivers
Getting Started
Hardware Installation
Step 1: Insert the 2AAA batteries into the wireless mouse. Make sure that the positive(+) and negative ends of the battery match the
polarity indication on the middle cover.
Step 2: Pull out the Nano-receiver from the receiver housing.
Step 3: Plug Nano-receiver into USB port of your computer or notebook.
Step 4: Position the wireless mouse and Nano-Receiver as show in the picture.
Note: Operating distance may vary and depend on the working environments.
Software Installation
Step 1: Uninstall any previously mouse software before installing the software.
Step 2: Insert the enclosed installation CD to start the CD-ROM drive. Select “Install software” and then follow the on-screen
instruction to install the software to your computer.
Step 3: When the installation is completed, the icon “
” will appear on the desktop, then you have successfully installed the driver.
Launching Software
A: Double click the icon“
”or go to Start—Programs—G-CUBE SmartRight 8---G-CUBE SmartRight 8 to launch the software.
B: Now, you can program the mouse button on the mouse properties.
To remove the software:
1. Go to START, then select PROGRAMS >> G-CUBE SmartRight 8>> Uninstall G-CUBE SmartRight 8.
2. Go to START, then select Control Panel >>Add or Remove Programs, look for “G-CUBE SmartRight 8”, click on “Remove”.
Instructions Of SmartRight 8
A. Illustration of the main menu
1. When selecting SmartRight 8, “Right Button” will execute SamrtRight 8 function. Behind each arrow direction, you can select
“keyboard, mouse, office sets, key combinations, multimedia and internet” 6 main function categories and there are more than
30 different functions that are ready for your immediate selection.
2. When selecting Standard Right Button, it performs as normal mouse right button.
B. How to Pair ID
The mouse has been preset the ID Code in the factory. But under the circumstances you lose receiver or want to use with the other
receiver in the same product series, you need to refresh the ID Code before using it.
Step 2:
Step 1:
Right click on the icon
taskbar
Step 3:
Press “Start Pair ID” to refresh ID Code.
in the
and select “Pair ID Program”
Remove the mouse batteries and insert again in 15 seconds, 6 digits of matching code will be displayed on the
menu as shown “Mouse Pair ID OK”.
C. How to Indicate Battery Status
All of G7 series have Battery status Indicator in the software, click “
”in the
main menu of the software, then the battery power status will be displayed on the
screen. It is convenient that you can easily be aware when the battery power is
low and change battery in time.
Smart Mouse Battery Low Warning
When the mouse power is low, Figure. A will pop up in the right corner of your
screen to remind you to replace the battery right away.
Figure. A
D. Three Shiftable Report Rates
There are 3 report rates can be preset for high sensitive response time of 2/4/8 milliseconds, it improves cursor delay and
jumping problems of wireless mouse, saves power in working and increases accuracy when playing the games.
Mouse Report Rate
Response Time
Suitable Range
500Hz
2ms
Gaming
250Hz
4ms
Photo design
125Hz
8ms
Office
E. DPI Setting
4 DPI levels are provided to satisfy your needs for works and games.
Step 2:
Step 1:
Right click on the icon
in the taskbar
Choose the desired DPI from below popped
window.
and select “DPI Set”
F. Set RF Channel to Avoid Wireless Interference
In case there are many wireless mice working in the adjacent area, you may set a specific channel so as to avoid wireless interface,
hence ensures better wireless communication quality.
Step 2:
Step 1:
taskbar
Right click on the icon
in the
and select “RF Channel Setting”
Tick “Channel Lock“ and distribute each mouse a
different channel.
G. 4D Wheel
With our innovative 4D Wheel, you can scroll 4 directions in a normal single wheel.
Step 2:
Step 1:
Right click on the icon
in the
See instructions on the popped 4D Wheel window
to learn on how to execute vertical and horizontal scrolling.
(Perform vertical scrolling while cursor in Section A,
taskbar
and select “4D Wheel”.
perform horizontal scrolling while in Section B.)
H. How to use SmartRight 8
After launching SmartRight 8, click on “
Preset Functions
”, then you will see a list of different functions.
Available tasks
System default or no function is selected
Any key or any collective key on the keyboard
Scroll Up, Scroll Down, Scroll Left, Scroll Right
Zoom In & Zoom Out, Paste Text, Execute Program.
Note: If the” Paste Text” of the “Office Sets” is selected, the “Figure. A” will pop up as shown; you
may input texts to paste.
Click right button of the mouse in
“Text Area” will bring you text editing
tool (shown as the left)
Fig. A
New File (Ctrl+N), Open File(Ctrl+O), Save File (Ctrl+S), Redo (Ctrl+Y), Undo (Ctrl+Z).
Media Player, Previous Track, Next track, Stop, Play/Pause, Mute, Volume+, Volume -.
Back, Forward, Stop, Search, Refresh, My Favorite, Web Browser, E-mail
Now let’s take “
1. select “
2. Press “
3.
”as example to show you clearly on how to use these functions:
”icon to represent “Zoom In” as shown:
” to save settings.
Draw the line in Excel & Windows Picture and Fax Viewer.
a. Start: Press the “Right Button”
b. Track of the drawing line: Draw the lines as the
arrow direction.
c. End: Release the “Right Button”
Reminder: If step b is omitted, it will perform as “Right Button" default function.
4. See the contrast after drawing the line.
Excel:
Original
After Drawing Line, the column has been enlarged
Windows Picture and Fax Viewer:
Original
After Drawing Line, the picture has been enlarged
Troubleshooting
If your mouse doesn’t work properly, follow the steps below :
1. Check battery and battery installation.
2. Unplug and re-plug the receiver
3. Test the device on another USB port or computer.
4. Some surface may “trick” the optical sensor, such as reflective surface like glass. The optical sensor should perform well on all
other surface.
Notice
To ensure that your mouse sends and receives perfectly, please read below instructions for your reference:
1. Interference from iron panel of PC.
To get optimal performance, please plug the Nano-receiver into ③、
④ to avoid shielding wireless signal when placing at ①、②.
①②③④ USB Ports
2. Use USB extension wire to position the Nano-receiver at a far location to prevent electromagnetism interference from devices
which don’t pass safety standard.
3. Avoid using the wireless mouse on a metal surface. Metals such as iron, aluminum, or copper shield the radio frequency
transmission and slow down the mouse’s response time or cause the mouse to fail temporarily.
The radio frequency is 2.4GHZ, it is safe for our bodies, but please be cautious in using cardiac pacemaker or other body auxiliary
instruments.
Your Product Support
For
technical
support,
[email protected]
Please
visit
our
website
at
Support.gggcube.com
or
E-mail
to
For warranty information, please visit our website at warranty.gggcube.com
For product registration, please visit our website at register.gggcube.com
**Features and specifications of all G-CUBE products are subject to change without
notification.
THIS DEVICE COMPLIES WITH PART 15 OF THE FCC RULES. OPERATION IS
SUBJECT TO THE FOLLOWING TWO CONDITIONS:
(1) THIS DEVICE MAY NOT CAUSE HARMFUL INTERFERENCE AND
(2) THIS DEVICE MUST ACCEPT ANY INTERFERENCE RECEIVED, INCLUDING
INTERFERENCE THAT MAY CAUSE UNDESIRED OPERATION.
Federal Communications Commission Requirements
The equipment has been tested and found to comply with the limits for Class B Digital Device, pursuant to part
15 of the FCC Rules. These limits are designed to provide reasonable protection against harmful interference
in a residential installation. This equipment generates uses and can radiate radio frequency energy and, if not
installed and used in accordance with the instruction, may cause harmful interference to radio communication.
However, there is no guarantee that interference will not occur in a particular installation. If this equipment
does cause harmful interference to radio or television reception, which can be determined by turning the
equipment off and on, the user is encouraged to try to correct the interference by one or more of the following
measures:
●Reorient of relocate the receiving antenna.
●Increase the separation between the equipment and receiver.
●Connect the equipment into an outlet on a circuit different from that to which the receiver is connected.
●Consult the dealer or an experienced radio/TV technician for help.
THE CHANGES OR MODIFICATIONS NOT EXPRESSLY APPROVED BY THE PARTY
RESPONSIBLE FOR COMPLIANCE COULD VOID THE USER’S AUTHORITY TO OPERATE THE
EQUIPMENT.
This device complies with Part 15 of the FCC Rules. Operation is subject to the following two conditions:
(1) This device may not cause harmful interference, and
(2) This device must accept any interference received, including interference that may cause undesired
operation.