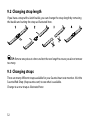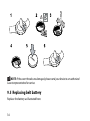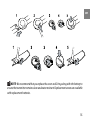
1
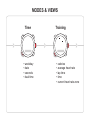
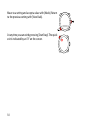
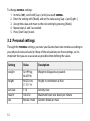
en
SUUNTO t1/t1c
USER GUIDE
MODES & VIEWS
Time
• weekday
• date
• seconds
• dual time
Training
• calories
• average heart rate
• lap time
• time
• current heart rate zone
1 Introduction . . . . . . . . . . . . . . . . . . . . . . . . . . . . . . . . . . . . . . . . . . . . . . . . . . . . . . . . . . . . . . . . . . . . . . . . . . . . 5
2 Getting started . . . . . . . . . . . . . . . . . . . . . . . . . . . . . . . . . . . . . . . . . . . . . . . . . . . . . . . . . . . . . . . . . . . . . . . . . 6
2.1 Basic settings . . . . . . . . . . . . . . . . . . . . . . . . . . . . . . . . . . . . . . . . . . . . . . . . . . . . . . . . . . . . . . . 6
2.2 Modes and views . . . . . . . . . . . . . . . . . . . . . . . . . . . . . . . . . . . . . . . . . . . . . . . . . . . . . . . . . . . 8
2.3 Menu navigation . . . . . . . . . . . . . . . . . . . . . . . . . . . . . . . . . . . . . . . . . . . . . . . . . . . . . . . . . . . 9
3 Defining main settings . . . . . . . . . . . . . . . . . . . . . . . . . . . . . . . . . . . . . . . . . . . . . . . . . . . . . . . . . . . . . . . 11
3.1 General settings . . . . . . . . . . . . . . . . . . . . . . . . . . . . . . . . . . . . . . . . . . . . . . . . . . . . . . . . . . . 11
3.2 Personal settings . . . . . . . . . . . . . . . . . . . . . . . . . . . . . . . . . . . . . . . . . . . . . . . . . . . . . . . . . . 12
3.2.1 Maximum heart rate . . . . . . . . . . . . . . . . . . . . . . . . . . . . . . . . . . . . . . . . . . . 13
4 Using TRAINING mode . . . . . . . . . . . . . . . . . . . . . . . . . . . . . . . . . . . . . . . . . . . . . . . . . . . . . . . . . . . . . . . 14
4.1 Putting on your transmitter belt . . . . . . . . . . . . . . . . . . . . . . . . . . . . . . . . . . . . . . . . . . 14
4.2 Starting a training session . . . . . . . . . . . . . . . . . . . . . . . . . . . . . . . . . . . . . . . . . . . . . . . . 15
4.3 During training . . . . . . . . . . . . . . . . . . . . . . . . . . . . . . . . . . . . . . . . . . . . . . . . . . . . . . . . . . . . 16
4.4 After training . . . . . . . . . . . . . . . . . . . . . . . . . . . . . . . . . . . . . . . . . . . . . . . . . . . . . . . . . . . . . . 17
4.4.1 Viewing training sessions . . . . . . . . . . . . . . . . . . . . . . . . . . . . . . . . . . . . . . 17
4.4.2 Viewing training totals . . . . . . . . . . . . . . . . . . . . . . . . . . . . . . . . . . . . . . . . . 17
4.5 Measuring your training intensity . . . . . . . . . . . . . . . . . . . . . . . . . . . . . . . . . . . . . . . . 18
5 Using heart rate limits and zones . . . . . . . . . . . . . . . . . . . . . . . . . . . . . . . . . . . . . . . . . . . . . . . . . . . . 21
5.1 Heart rate limits . . . . . . . . . . . . . . . . . . . . . . . . . . . . . . . . . . . . . . . . . . . . . . . . . . . . . . . . . . . 21
5.2 Heart rate zones . . . . . . . . . . . . . . . . . . . . . . . . . . . . . . . . . . . . . . . . . . . . . . . . . . . . . . . . . . . 22
6 Using TIME mode . . . . . . . . . . . . . . . . . . . . . . . . . . . . . . . . . . . . . . . . . . . . . . . . . . . . . . . . . . . . . . . . . . . . . 25
2
6.1 Setting time and dual time . . . . . . . . . . . . . . . . . . . . . . . . . . . . . . . . . . . . . . . . . . . . . . .
6.2 Setting the alarm . . . . . . . . . . . . . . . . . . . . . . . . . . . . . . . . . . . . . . . . . . . . . . . . . . . . . . . . . .
7 General features . . . . . . . . . . . . . . . . . . . . . . . . . . . . . . . . . . . . . . . . . . . . . . . . . . . . . . . . . . . . . . . . . . . . . .
7.1 Backlight . . . . . . . . . . . . . . . . . . . . . . . . . . . . . . . . . . . . . . . . . . . . . . . . . . . . . . . . . . . . . . . . . . .
7.2 Button lock . . . . . . . . . . . . . . . . . . . . . . . . . . . . . . . . . . . . . . . . . . . . . . . . . . . . . . . . . . . . . . . .
7.3 Sleep mode . . . . . . . . . . . . . . . . . . . . . . . . . . . . . . . . . . . . . . . . . . . . . . . . . . . . . . . . . . . . . . . .
7.4 Belt code . . . . . . . . . . . . . . . . . . . . . . . . . . . . . . . . . . . . . . . . . . . . . . . . . . . . . . . . . . . . . . . . . . .
8 Troubleshooting . . . . . . . . . . . . . . . . . . . . . . . . . . . . . . . . . . . . . . . . . . . . . . . . . . . . . . . . . . . . . . . . . . . . . .
9 Care and maintenance . . . . . . . . . . . . . . . . . . . . . . . . . . . . . . . . . . . . . . . . . . . . . . . . . . . . . . . . . . . . . . .
9.1 General guidance . . . . . . . . . . . . . . . . . . . . . . . . . . . . . . . . . . . . . . . . . . . . . . . . . . . . . . . . .
9.2 Changing strap length . . . . . . . . . . . . . . . . . . . . . . . . . . . . . . . . . . . . . . . . . . . . . . . . . . . .
9.3 Changing straps . . . . . . . . . . . . . . . . . . . . . . . . . . . . . . . . . . . . . . . . . . . . . . . . . . . . . . . . . . .
9.4 Replacing wristop battery . . . . . . . . . . . . . . . . . . . . . . . . . . . . . . . . . . . . . . . . . . . . . . . .
9.5 Replacing belt battery . . . . . . . . . . . . . . . . . . . . . . . . . . . . . . . . . . . . . . . . . . . . . . . . . . . .
10 Specifications . . . . . . . . . . . . . . . . . . . . . . . . . . . . . . . . . . . . . . . . . . . . . . . . . . . . . . . . . . . . . . . . . . . . . . .
10.1 Technical data . . . . . . . . . . . . . . . . . . . . . . . . . . . . . . . . . . . . . . . . . . . . . . . . . . . . . . . . . . .
10.2 Trademark . . . . . . . . . . . . . . . . . . . . . . . . . . . . . . . . . . . . . . . . . . . . . . . . . . . . . . . . . . . . . . . .
10.3 Copyright . . . . . . . . . . . . . . . . . . . . . . . . . . . . . . . . . . . . . . . . . . . . . . . . . . . . . . . . . . . . . . . .
10.4 CE . . . . . . . . . . . . . . . . . . . . . . . . . . . . . . . . . . . . . . . . . . . . . . . . . . . . . . . . . . . . . . . . . . . . . . . . .
10.5 Patent notice . . . . . . . . . . . . . . . . . . . . . . . . . . . . . . . . . . . . . . . . . . . . . . . . . . . . . . . . . . . . .
10.6 Disposal of device . . . . . . . . . . . . . . . . . . . . . . . . . . . . . . . . . . . . . . . . . . . . . . . . . . . . . . . .
25
26
27
27
27
28
28
30
31
31
32
32
33
34
36
36
37
37
38
38
38
3
en
11 Disclaimers . . . . . . . . . . . . . . . . . . . . . . . . . . . . . . . . . . . . . . . . . . . . . . . . . . . . . . . . . . . . . . . . . . . . . . . . . .
11.1 User’s responsibility . . . . . . . . . . . . . . . . . . . . . . . . . . . . . . . . . . . . . . . . . . . . . . . . . . . . .
11.2 Warnings . . . . . . . . . . . . . . . . . . . . . . . . . . . . . . . . . . . . . . . . . . . . . . . . . . . . . . . . . . . . . . . . .
Index . . . . . . . . . . . . . . . . . . . . . . . . . . . . . . . . . . . . . . . . . . . . . . . . . . . . . . . . . . . . . . . . . . . . . . . . . . . . . . . . . . .
4
39
39
39
41
1 INTRODUCTION
en
Thank you for choosing Suunto t1/t1c as your training companion. Suunto t1/t1c is a
high-precision heart rate monitor designed to make your training as beneficial and
enjoyable as possible.
Suunto t1/t1c provides heart rate zone training, accurately measures the calories you
burn, and records your training history. It is a device that can grow with you as your
fitness improves.
5
2 GETTING STARTED
2.1 Basic settings
Press any button to activate your Suunto heart rate monitor. You will be prompted to
set the display contrast, time, date, as well as your physical characteristics and activity.
Start Stop
Lap +
Mode
View Back
Light -
1. Change the setting values using the [Lap +] and [Light -] buttons.
2. Accept and move to the next setting by pressing the [Mode] button.
3. Return to the preceding setting, if needed, by pressing the [View Back] button.
When the last setting value is accepted, the device shows “settings ok”. You can now
start using the basic time and heart rate monitoring features.
NOTE: Your maximum heart rate is automatically calculated by default using the
formula 210 – (0.65 x AGE).
Use the following classifications to help you determine your Activity Class.
6
Easy going
en
If you do not participate regularly in recreational sports or heavy physical activity,
perhaps just walking or doing some light exercise, use 1.
Recreational
If you participate regularly in recreational sports or do physical work, and your weekly
exercise is:
● less than 1 hour, use 2.
● more than 1 hour, use 3.
Fitness
If you participate regularly in sports or other physical activity, and you exercise heavily:
● under 30 minutes per week, use 4.
● 30-60 minutes per week, use 5.
● 1-3 hours per week, use 6.
● over 3 hours per week, use 7.
Endurance or professional
If you train on a regular basis or participate in competitive sports, and your weekly
exercise is:
● 5-7 hours, use 7.5.
● 7-9 hours, use 8.
● 9-11 hours, use 8.5.
7
● 11-13 hours, use 9.
● 13-15 hours, use 9.5.
● over 15 hours, use 10.
2.2 Modes and views
Modes
The main modes are TIME and TRAINING. Switch modes with [Mode].
Views
Each mode has different views containing supplementary information, such as the day
in TIME mode or calories in TRAINING mode. Change views with [View Back].
20
8
In addition, your heart rate is displayed as a graph on the left edge of the screen.
en
Button lock and backlight
Lock the buttons by keeping [Light -] pressed. Pressing it briefly activates the backlight.
You can still change views and use the backlight when the button lock is activated.
2.3 Menu navigation
Enter menus by keeping [Mode] pressed.
There is one set of menus in Suunto t1/t1c.
Scroll through the menus using [Lap +] and [Light -].
9
Move to a setting and accept a value with [Mode]. Return
to the previous setting with [View Back].
At any time you can exit by pressing [Start Stop]. The quick
exit is indicated by an "X" on the screen.
10
3 DEFINING MAIN SETTINGS
en
Before you start training, you need to define GENERAL and PERSONAL settings. They
ensure accurate measurements and calculations.
You are prompted to define the main settings the first time you wake up the device (by
pressing any button). If you want to learn more about these settings and modify them,
continue reading. Otherwise, you can skip to the next chapter.
3.1 General settings
The GENERAL settings define measurement units, time and date format, as well as button
tone use. You should define these according to your own preferences.
Setting
Value
Description
tones
hr
on / off
bpm / %
weight
height
time
date
kg / lb
cm / ft
12h / 24h
dd.mm. /
mm.dd.
Button tones: on or off
Heart rate units: beats per minute or percent of
maximum heart rate
Weight units: kilograms or pounds
Height units: centimeters or feet
Time format: 12 hour or 24 hour
Date format: day-month or month-day
11
To change GENERAL settings:
1. In menu (SET), scroll with [Lap +] until you reach GENERAL.
2. Enter the setting with [Mode] and set the value using [Lap +] and [Light -].
3. Accept the value and move to the next setting by pressing [Mode].
4. Repeat steps 2 and 3 as needed.
5. Press [Start Stop] to exit.
3.2 Personal settings
Through the PERSONAL settings, you tune your Suunto heart rate monitor according to
your physical traits and activity. Many of the calculations use these settings, so it is
important that you are as accurate as possible when defining the values.
Setting
Value
Description
weight
30-199 kg;
66-439 lb
90-230 cm;
3''-7'11'' ft
1-10
100-230
female / male
Weight in kilograms or pounds
height
act class
max hr
sex
12
Height in centimeters or feet
Activity class
Maximum heart rate: beats per minute
Gender: female or male
Setting
Value
Description
birthday
year / month /
day
Date of birth: year, month and day
en
To change PERSONAL settings:
1. In TIME mode, enter the menu (SET) and scroll with [Lap +] until you reach
PERSONAL.
2. Enter the setting with [Mode] and set the value using [Lap +] and [Light -]. Keep
in mind the units you defined in GENERAL
3. Accept the value and move to the next setting by pressing [Mode].
4. Repeat steps 2 and 3 as needed.
5. Press [Start Stop] to exit.
TIP: Weigh yourself regularly and update the value in your settings. This helps keep the
training calculations accurate.
3.2.1 Maximum heart rate
Once you have entered your date of birth, your device automatically sets the maximum
heart rate (MAX HR) using the formula 210 – (0.65 x AGE). If you know your real maximum,
you should use that value.
13
4 USING TRAINING MODE
The TRAINING mode handles measurement of all your training activity.
4.1 Putting on your transmitter belt
Put on the belt as illustrated and switch to TRAINING mode to start monitoring your
heart rate. Moisten both contact areas (1) with water or gel before putting the belt on.
Ensure the belt is centered on your chest.
14
en
WARNING: If you have a pacemaker, defibrillator, or other implanted electronic device,
you use the transmitter belt at your own risk. Before using it, we recommend an exercise
test with your Suunto heat rate monitor and belt under a doctor’s supervision. Exercise may
include some risk, especially for those who have been inactive. We strongly advise you to
consult your doctor prior to beginning a regular exercise program.
4.2 Starting a training session
When you enter TRAINING mode, your Suunto heart rate monitor automatically searches
for signals from a transmitter belt. Once found, your heart rate is displayed on the
screen.
15
Recording a training session
To start recording your training session:
1. Start your training session by pressing [Start Stop].
2. While the timer is running, you can record/store laps by pressing [Lap +].
3. Stop the timer by pressing [Start Stop].
4. To reset the timer and clear the session, keep [Lap +] pressed.
If your peak heart rate exceeded the defined maximum, your Suunto heart rate monitor
will ask you if you want to update to the new peak value when you clear the session.
4.3 During training
Your Suunto t1/t1c has a number of visual and audio indicators to help guide you during
training. This information can be both helpful and rewarding.
Here are some ideas on what to do while training:
● Lock the buttons to avoid accidentally stopping your log recorder.
● Switch to average heart rate view to check your training intensity.
● Switch to calories view to watch them tick away. You may be surprised how
rewarding this can be!
● Switch to time view if you need to get back home for dinner.
16
4.4 After training
en
4.4.1 Viewing training sessions
After training, you can review the data recorded during the session. You can check, for
example, your peak heart rate, your average heart rate, calories burned, and more.
To view your latest training session summary:
1. Press [Lap +] while in TRAINING mode.
2. Scroll through the summary information using [Lap +] and [Light -].
3. Press [Start Stop] or [View Back] to exit.
4.4.2 Viewing training totals
Your Suunto t1/t1c stores your training sessions and summarizes the data according
to weeks and months.
The available time periods are:
● THIS WEEK: current week, Monday through Sunday
● LAST WEEK: previous week, Monday through Sunday
● THIS MONTH: current month according to current date
● LAST MONTH: previous month according to current date
The available summary information per time period is:
● COUNTS: number of training sessions
● KCAL: total calories burned
● TIME: total training time
17
● ZONE 1: % of time your average heart rate was within Zone 1
● ZONE 2: % of time your average heart rate was within Zone 2
● ZONE 3: % of time your average heart rate was within Zone 3
● ABOVE: % of time your average heart rate was above Zone 3
● BELOW: % of time your average heart rate was below Zone 1
To view your training totals:
1. Press [Lap +] while you are in TIME mode.
2. Scroll through the time periods using [Lap +] and [Light -].
3. Scroll through summaries for the time period using [View Back] and [Mode].
4. Exit TOTALS by pressing [Start Stop].
4.5 Measuring your training intensity
Training with heart rate monitors is traditionally based on heart rate zones. The intensity
of your training is determined by the time you spend in each of three zones. All Suunto
heart rate monitors support zone training.
● Zone 1 (60-70%): fitness zone; improves basic fitness and is good for weight
control.
● Zone 2 (70-80%): aerobic zone; improves aerobic fitness and is good for
endurance training.
● Zone 3 (80-90%): threshold zone; improves aerobic and anaerobic capacity and
is good for improving peak performance.
18
To provide even more useful and accurate guidance, Suunto t3d and t4d also use a
different measurement called Training Effect. This measurement determines the impact
of a training session on your aerobic fitness using a simple 1-to-5 scale.
Training Effect Result
Description
1.0-1.9
Minor
2.0-2.9
Maintaining
3.0-3.9
Improving
4.0-4.9
Highly
improving
5.0
Over-reaching
Improves recovery ability; in longer sessions (over
one hour) also improves basic endurance. Does not
significantly improve aerobic performance.
Maintains aerobic fitness. Builds base for harder
training in the future.
Improves aerobic performance if repeated 2-4 times
a week. No special recovery requirements.
Rapidly improves aerobic performance if repeated
1-2 times a week. Requires 2-3 recovery sessions
(TE 1-2) per week.
Extremely high effect on aerobic performance if
adequate recovery allowed; should not be done
often
To train with a TE target level (Suunto t3d and t4d only)
1. Press [View Back] in TRAINING mode until you see the TE view.
2. Adjust the target level by keeping [Light -] pressed while in TE view.
19
en
The countdown timer to the right of the TE target value indicates how much time
remains for you to reach the target at your current heart rate (training intensity).
NOTE: You can change the main view of TRAINING mode to show the current (achieved)
Training Effect by keeping [View Back] pressed. Repeat to switch back to the heart rate view.
20
5 USING HEART RATE LIMITS AND ZONES
en
5.1 Heart rate limits
Setting upper and lower heart rate limits for yourself can help you keep your exercising
at the correct intensity.
In the HR LIMITS menu, you can set the heart rate limits on or off, define the upper and
lower limits, and turn the heart rate alarm on or off.
Setting
Value
Description
hr limits
lower
on / off
bpm / %
upper
bpm / %
alarm
on / off
Heart rate limits feature: on or off
Lower heart rate limit: according to selected units
in GENERAL settings
Upper heart rate limit according to selected units
in GENERAL settings
Outside the limit alarm: on or off
To change HR LIMITS settings:
1. Enter the menu (SET) and scroll with [Lap +] until you reach HR LIMITS.
2. Enter the setting with [Mode] and set the value using [Lap +] and [Light -].
3. Accept the value and move to the next setting by pressing [Mode].
4. Repeat steps 2 and 3 as needed.
5. Press [Start Stop] to exit.
21
NOTE: The heart rate limits are displayed with dashes on the left outer rim of the display
if the limits are activated.
Possible real life situation: Staying in the zone
You want to have a good, tough training session today, so you set your heart rate limits to
equal your Zone 3 limits and turn the heart rate limit alarm on. Your Suunto heart rate
monitor notifies you when you go too slow, or push too hard!
5.2 Heart rate zones
Training with heart rate monitors is traditionally based on heart rate zones. The intensity
of your training is determined by the time you spend in each of three zones.
Heart rate zones are defined as percentages of your maximum heart rate. Zone training
is an established training method, so there are pre-set defaults as follows:
● Zone 1 (60-70%): fitness zone; improves basic fitness and is good for weight
control.
● Zone 2 (70-80%): aerobic zone; improves aerobic fitness and is good for
endurance training.
● Zone 3 (80-90%): threshold zone; improves aerobic and anaerobic capacity and
is good for improving peak performance.
If you are following a personal training program that uses zone training, enter the values
defined by the program.
22
NOTE: The zone defaults follow the guidelines of the American College of Sports Medicine
for exercise prescription.
In the HR ZONES menu, you can turn on the zone feature, define zone limits, and turn
tones on or off. When the zones feature and the tones are turned on, your device alerts
you with a beep when you move from one zone to another.
Setting
Value
Description
hr zones
z1
on / off
%-%
z2
z3
tone
%
%
on / off
Heart rate zone feature: on or off
Zone 1: upper and lower limit in percent of
maximum heart rate
Zone 2: upper limit
Zone 3: upper limit
Zone tone: on or off
To change HR ZONES settings:
1. Enter the menu (SET) and scroll with [Lap +] until you reach HR ZONES.
2. Enter the setting with [Mode] and set the value using [Lap +] and [Light -].
3. Accept the value and move to the next setting by pressing [Mode].
4. Repeat steps 2 and 3 as needed.
5. Press [Start Stop] to exit.
23
en
TIP: If your heart rate varies significantly during training, for example, when running
in hilly terrain, following your real-time average heart rate is better guidance than following
zone limits.
24
6 USING TIME MODE
en
TIME mode handles the time of day in two time zones: main time and dual time.
In the TIME-DATE menu, you have the following settings:
Setting
Value
Description
alarm
alarm
time
dual time
date
on / off
hours / minutes
hours / minutes / seconds
hours / minutes
year / month / day
Alarm feature: on or off
Alarm time: hours and minutes
Main time: hours, minutes and seconds
Dual time: hours and minutes
Current date: year, month and day
6.1 Setting time and dual time
To change time and dual time:
1. In menu (SET), scroll with [Lap +] until you reach TIME-DATE.
2. Enter the setting with [Mode] and set the value using [Lap +] and [Light -].
3. Accept the value and move to the next setting by pressing [Mode].
4. Repeat steps 2 and 3 as needed.
5. Press [Start Stop] to exit.
25
Possible real life situation: Knowing the time at home
You are traveling abroad and you set the dual time to be the time at home. The main time
is the time at your current location. Now you always know the local time and you can quickly
check what time it is at home.
NOTE: We recommend that you set the current time at your current location as the
main time because the alarm clock operates according to the main time.
6.2 Setting the alarm
To set the alarm:
1. In menu (SET), scroll with [Lap +] until you reach TIME-MODE.
2. Enter the setting with [Mode] and set the value using [Lap +] and [Light -].
3. Accept the value and move to the next setting by pressing [Mode].
4. Repeat steps 2 and 3 to set the alarm time.
5. Press [Start Stop] to exit.
Alarm snooze
Deactivate the alarm by pressing [View Back]. Pressing any other button activates the
alarm snooze function. Each snooze lasts 5 minutes. The snooze function can be activated
12 times.
26
7 GENERAL FEATURES
en
7.1 Backlight
You activate the backlight by pressing [Light -]. The backlight turns off automatically.
If you want to use the backlight when changing settings, you need to activate it before
entering the settings. The backlight will re-activate whenever a button is pressed. This
feature will stay on until you exit the settings.
NOTE: Heavy use of the backlight significantly reduces battery life. To save power,
backlight blinks when used in TRAINING mode.
7.2 Button lock
You can lock and unlock the buttons in any mode by keeping [Light -] pressed.
When the buttons are locked, you can still change views and turn on the backlight.
27
TIP: We recommend you lock the buttons, for example, after you have started a training
session or are storing the device in a travel bag.
7.3 Sleep mode
You put your Suunto heart rate monitor to sleep to extend battery life or to erase the
recorded training history. Personal settings are not erased.
1. To switch to sleep mode, simultaneously keep [Start Stop], [Lap +], [Light -] and
[View Back] pressed.
2. To reactive your device, press any button.
NOTE: Basic settings need to be set each time the device is reactivated.
7.4 Belt code
Your Suunto t1/t1c uses coded transmission technology to ensure accurate readings
from your heart rate transmitter belt.
To check your belt code:
1. Put on your heart rate transmitter belt.
2. Switch to TRAINING mode.
3. Keep [View Back] pressed until the code is shown.
To change your belt code:
1. Remove the battery from your belt.
28
2. Press the battery into the compartment positive side down to reset the belt.
3. Put the battery back in correctly and close the cover.
4. Switch to TRAINING mode.
Use this same procedure to pair your belt with your Suunto t1/t1c.
en
29
8 TROUBLESHOOTING
Suunto t1/t1c uses coded transmission to prevent reading disturbances. However,
exercising near overhead power lines or magnetic or electronic devices may cause
interference with the signal.
If you lose the signal, try the following:
● Exit and then re-enter TRAINING mode.
● Check that you are wearing the belt correctly.
● Check that the electrode areas of the belt are moist.
● Move away from any potential sources of interference.
● Replace the battery (of the belt and/or wristop) if problems persist.
● Check the code; if CODE NOT FOUND is shown, re-pair the belt.
30
9 CARE AND MAINTENANCE
en
9.1 General guidance
For all Suunto Training devices:
● Only perform the procedures described in Suunto guides.
● Do not disassemble or service your device yourself.
● Protect your device from shocks, hard and sharp objects, extreme heat and
prolonged exposure to direct sunlight.
● Store your device in a clean, dry environment at room temperature.
● Do not place the device where it could be scratched by hard objects.
Removing scratches
Use Polywatch to remove small scratches in the screen. It is available at authorized
Suunto dealers, in most watch stores, and from Suunto Web Shop (shop.suunto.com).
A protective plastic shield can also be placed over the screen to prevent scratches.
Cleaning and chemicals
Clean your device with a moist cloth. For stubborn marks, use a mild soap. Do not use
gasoline, cleaning solvents, acetone, alcohol, insect repellents, paint, or other strong
chemicals on your device.
31
9.2 Changing strap length
If you have a strap with a latch buckle, you can change the strap length by removing
the buckle and cutting the strap as illustrated here.
TIP: Remove one piece at a time and test the new length to ensure you do not remove
too many.
9.3 Changing straps
There are many different straps available for your Suunto heart rate monitor. Visit the
Suunto Web Shop (shop.suunto.com) to see what is available.
Change to a new strap as illustrated here:
32
en
9.4 Replacing wristop battery
Replace the battery with extreme care to ensure your Suunto heart rate monitor remains
water resistant. Careless replacement may void the warranty.
Replace the battery as illustrated here:
33
NOTE: If the cover threads are damaged, please send your device to an authorized
Suunto representative for service.
9.5 Replacing belt battery
Replace the battery as illustrated here:
34
en
NOTE: We recommend that you replace the cover and O ring along with the battery to
ensure the transmitter remains clean and water resistant. Replacement covers are available
with replacement batteries.
35
10 SPECIFICATIONS
10.1 Technical data
General
●
●
●
●
●
●
●
●
●
●
Operating temperature: -20°C to +60°C / -5°F to +140°F
Storage temperature: -30°C to +60°C / -22°F to +140°F
Weight (device): 45 g / 50 g / 65 g (depending on strap type)
Weight (belt): max. 61 g (depending on belt type)
Water resistance (device): 30 m / 100 ft (ISO 2281)
Water resistance (belt): 20 m / 66 ft (ISO 2281)
Transmission frequency (device/belt): 5.3 kHz
Coding: 29 codes
User-replaceable battery: (device / belt) 3V CR2032
Battery life: approximately 1 year in normal use (4 hours of exercise with HR per
week)
Log recorder
● Maximum lap time: 99 hours
● Lap/split times: 30 per session (log)
● Resolution: 0.1 second
36
Heart rate
en
● Display: 30 to 240
● Limits: 30 to 230
● Maximum for percentage display: 240
10.2 Trademark
Suunto and its product names, trade names, trademarks and service marks whether
registered or unregistered are protected by Suunto or respective third party owners.
All rights reserved.
Firstbeat & Analyzed by Firstbeat are registered or unregistered trademarks of Firstbeat
Technologies Ltd. All rights reserved.
10.3 Copyright
Copyright © Suunto Oy 2007. All rights reserved. This document and its contents are
proprietary to Suunto Oy and are intended solely for the use of its clients to obtain
knowledge and information regarding the operation of Suunto products. Its contents
shall not be used or distributed for any other purpose and/or otherwise communicated,
disclosed or reproduced without the prior written consent of Suunto Oy.
This document content is subject to change at any time without notice. Suunto shall
not give any warranties, whether express or implied, including without limitation that
this documentation is accurate, comprehensive or error-free. The latest version of this
documentation can be downloaded at www.suunto.com.
37
10.4 CE
The CE mark is used to mark conformity with the European Union EMC directives
89/336/EEC and 99/5/EEC.
10.5 Patent notice
This product is protected by the following patents and patent applications and their
corresponding national rights: US 11/432,380, US 11/181,836, US 7129835, US
11/808,391, US 7,526,840, USD 603,521, USD 29/313,029 and EU Design
000528005-0001/000528005-0010. Additional patent applications have been filed.
10.6 Disposal of device
Please dispose of the device in an appropriate way, treating it as electronic
waste. Do not throw it in the garbage. If you wish, you may return the device
to your nearest Suunto representative.
38
11 DISCLAIMERS
en
11.1 User’s responsibility
This instrument is intended for recreational use only. Suunto heart rate monitors must
not be used as a substitute for obtaining measurements that require professional or
laboratory-quality precision.
11.2 Warnings
If you have a pacemaker, defibrillator, or other implanted electronic device, you use
the transmitter belt at your own risk. Before using it, we recommend an exercise test
with your Suunto heat rate monitor and belt under a doctor’s supervision. Exercise may
include some risk, especially for those who have been inactive. We strongly advise you
to consult your doctor prior to beginning a regular exercise program.
39
40
Index
A
H
alarm, 26
snooze, 26
heart rate limits, 21
heart rate zones, 22
B
M
backlight, 27
belt code, 28
button lock, 27
changing strap, 32
changing strap length, 32
maximum heart rate, 13
menu
PERSONAL, 12
TIME-DATE, 25
modes
TIME, 25
TRAINING, 14, 15
D
P
dual time, 25
pair, 29
PERSONAL settings, 11
C
G
GENERAL settings, 11
R
replacing
41
belt battery, 34
wristop battery, 33
S
setting
dual time, 25
GENERAL values, 11
heart rate limits, 21
heart rate zones, 23
maximum heart rate, 13
time, 25
settings
GENERAL, 11
PERSONAL, 11
sleep mode, 28
T
training
during training, 16
starting training session, 15
training session, 16
training session summary, 17
training totals, 17
42
TRAINING mode, 14, 15
training session summary, 17
training totals, 17
transmitter belt
putting on, 14
replacing battery, 34
troubleshooting, 30
V
viewing
training sessions, 17
training totals, 17
SUUNTO HELP DESK
Global USA (toll free) Canada (toll free) +358 2 284 1160
1-800-543-9124
1-800-267-7506
www.suunto.com
Copyright © Suunto Oy 4/2010.
Suunto is a registered trademark of Suunto Oy.
All Rights reserved.