1
Register your product and get support at
www.philips.com/welcome
DCB7005
EN User manual
3
FR Mode d’emploi
71
DA Brugervejledning
25
IT
Manuale utente
95
DE Benutzerhandbuch
47
NO Brukerhåndbok
119
(in standby mode)
(in standby mode)
1
2
Important
4
Safety
Notice
4
5
Your Micro Hi-Fi System
7
Introduction
What’s in the box
7
7
8
Other features
20
Set the alarm timer
Set the sleep timer
20
20
Register your product
Perform the update
21
21
10 Product information
3
Preparations
11
Place the product
11
Connect
11
Install/replace the batteries of remote control 13
4
5
6
7
Get started
14
Turn on
Set clock
Demonstrate features
Adjust brightness of display panel
Turn on or off LED light
14
14
14
15
15
Play
15
Play a disc
!
"#
Basic operations
Program audio tracks
Adjust sound
15
$
16
16
16
Play from iPod/iPhone/iPad
17
Compatible iPod/iPhone/iPad
Load the iPod/iPhone/iPad
Listen to the iPhone/iPod/iPad
"#%%#
&#%%#
17
17
17
Listen to radio
18
'(!
#
!
22
USB playability information
Supported MP3 disc formats
RDS program types
22
23
23
11 Troubleshooting
24
EN
3
English
Contents
1 Important
Read and understand all instructions before you
#,8#"#9
.
#
,
Important notes for users in
the U.K.
Mains fuse
?
#
@",
? # # # G
## ", 8 . H
) "".
) !JK
.#
) (?(
,
Contact your dealer if you are not sure
9,
H? QV
#
XYYZ%Y%Q[.##
"
#,
How to connect a plug
? # # H9\
X*[.9
\X][,
8 # # colors on your plug, identify the terminals in
"H
1
9 #*
#9,
2
9
#]
#
#,
3
' ". # Q X
[ #"
X
"
#[,
!
" . #"
#
9#;
9,
4
EN
Safety
) *
+
##
,*
-#
..
#,
8-#
#.
#
#,
##9
,
) *
##
#:
.
#"#
",
) *
9;
"
#,
) Where the mains plug or an appliance
###.
##
#
9,
) '
#
9
""
,
) <#
#.
".
9,
) Before you connect the product to the
.
"
#
9
9
#,*
#
"#
,
) =9#9
#
,(#+
9,
) Do not touch the disc optical lens inside
#
,
) *
#
9;
#
-,
) If the product is transported in
9$>.
##
matches room temperature before
"
,
) '+9
X##
9#.,[,
) &9
+#
if the remote control is not to be used for
",
) Batteries contain chemical substances, they
#9##
,
!
) The product/remote control may contain a
9
.9#,
) Keep the battery out of reach of children
at all times!
Hearing safety
Listen at a moderate volume.
) "#"
",?
#
produce sounds in decibel ranges that may
cause hearing loss for a normal person,
+
,?
higher decibel ranges are offered for those
#+
#
",
) #9#",
"_
`#"
#,
"#
".#_
`
9##
",?
"
#".
9
"##
,
To establish a safe volume level:
) ",
) #
9#
.
#
,
Listen for reasonable periods of time:
) "#+
#.
_`.
"
,
) !
-
9
#
9
,
Be sure to observe the following guidelines
when using your headphones.
) ]
9
9
#,
) !
#;
"#,
) '
"
`
`
#,
) You should use caution or temporarily
discontinue use in potentially hazardous
,
Notice
("
##
#
+
#9
]#
`
-,
?
#
#
-
Q
,
Your product is designed and manufactured
"-
#.
9
##
#,
<
#G#99
attached to a product it means that the product
#9Q
'
YY%K%
Q,
EN
5
English
) *
##
,(
#
#
,
Make sure that curtains or other objects
#,
Please inform yourself about the local separate
collection system for electrical and electronic
#,
Please act according to your local rules and
##
#
#
#,
#
#
#
"-
#
,
{
#9
#9
Q
'
YYK%KK%Q.
9##
#
,
9
rules on separate collection of batteries
9
#
"-
#,
Environmental information
(
""9#,
<
#""
H
#9
#X9+[.
X9
[#
X9".
,[
{
be recycled and reused if disassembled by
|#,9
local regulations regarding the disposal of
packaging materials, exhausted batteries and old
-,
“Made for iPod,” “Made for iPhone,” and “Made
for iPad” mean that an electronic accessory
9#"#
#..
#.
.#
9
#9#
(
#
#,(
9
#
#
"
#
#,
#..
#
,
##
#
(8,.
"
#,,#
,#
#
(8,
This apparatus includes this label:
Class II equipment symbol:
](88
#9.#
##,
Note
) ?#
,
?"
|#G
protected material, including computer
"
..9
###
recordings, may be an infringement of
"#
,
?-#9#
,
6
EN
Congratulations on your purchase, and
}?9
support that Philips offers, register your product
,,%,
Introduction
What’s in the box
English
2 Your Micro HiFi System
Check and identify the contents of your
"H
) Main unit
) Speakers x 2
) (
#+
) Speaker connection cables x 2
) MP3 link cable
) DAB/FM antenna
) &
(((9
) User manual
With this unit, you can:
) ;#
#.!#.#.
.##
+
#
) listen to radio stations
You can enrich sound output with these sound
effects:
) Treble and Bass Control
) Loudness Control
The unit supports these media formats:
EN
7
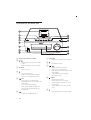
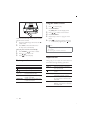
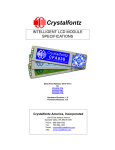
Overview of the main unit
a
b
i
c
j
d
k
e
f
l
g
m
h
n
a Dock for iPod, iPhone and iPad
b
/
)
)
%+
..
,
"
#
#,
g MP3-LINK
) +
##,
h
)
i
c SOURCE
) ,
)
)
e
?
#,
G
#9
#
#9#,
/OK
) ..
,
) 8'(!
V#.
,
) 8V##
##.
##9
#
,
)
j
)
EN
!:#
,
9
#
#,
?V
#,
%+
#'(!
#,
8'(!%V#."
",
/MENU
,
"
,
In the standby mode, turn on or off
'#,
) In the DAB or FM mode, access the
,
)
)
)
k
)
f
/
)
)
)
d
~#,
Q;
#
,
m Display panel
a
)
)
b DIM
) (#;9
"#,
) Press and hold to turn on or off the
LED light at the bottom of the unit
#9,
n Disc compartment
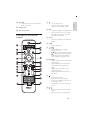
Overview of the remote
control
c SCAN
) 9V
'(!
#
,
a
y
b
d SLEEP
) ,
e
x
c
)
w
v
d
)
)
u
e
t
s
f
g
r
h
q
i
p
o
j
k
8'(!%V#."
",
H
%+9,
H
%+
#
'(!
#,8'(!%V
#."
",
f RDS/INFO
) Display the information of RDS/DAB
#
"
,
) |&'
radio station that transmits time
",
) Display the current status or the
#
,
) '98'J
VJ
,
g
)
)
)
l
n
?
#,
G
#9
#
#9#,
English
l VOLUME
) (#;..
9
.
9,
m
,
"
,
In the normal standby mode, turn on
'#,
In the DAB or FM mode, access the
,
)
h
/
)
)
%+
..
,
"
#
#,
EN
i
/
)
)
)
)
9
#
#,
?V
#,
%+
#'(!
#,
8'(!
V#."
",
j TREBLE
) (#;
9,
k BASS
) (#;9,
l Numeric keypad
) Q
9
,
) Enter the track number to select a
#
,
) Q
-9
"
#
#,
m SHIFT
) .
G#"9
9
#,
n PROGRAM
) "
#,
) "
#
,
o CLOCK
) ,
) '
,
p VOL +/) (#;..
9
.
9,
q LOUDNESS
) Turn on or off automatic loudness
#;,
r
)
V
,
)
)
..
,
8'(!
V#.
,
s
10
EN
t MENU
) (#%%#,
) In the DAB or FM mode, access the
,
u OK
) ,
) 8V##
##.
##9
#
,
v
)
Q;
#
,
w TIMER
) ,
x MODE
) #H
.
.
:,
y Source buttons
) ,
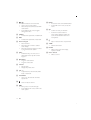
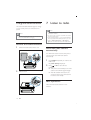
Connect speakers
English
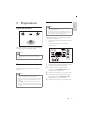
3 Preparations
Note
Place the product
) 8
#
,
)
#.#
,
) #
"
#
,
?
9
#,Q
99
,
) the red branch for the connectors marked
+”
) 9
#-”
Place the speakers at an angle of approximately
Z$#"
",
a
Note
b
) ?#"
#.
DEMO
#
#
#,
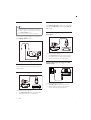
Connect
V"
#,
Note
) Refer to the type plate at the back or bottom of the
)
)
#
##
",
Before you make or change any connections, make sure
#
##
,
The DEMO jack is only applicable to the demo unit
##
,'
#
"
;,
c
a
b
c
1
9
##
,
2
Connect a speaker cable to the left
speaker and the SPEAKER OUT L (+/-)
#,
3
4
9,
5
9,
Connect the other speaker cable to the
right speaker and the SPEAKER OUT R
(+/-)
#,
EN
11
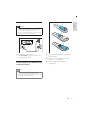
Connect the DAB/FM antenna
Tip
) V
##+##
Route audio from other devices
Press MP3-LINK/AUX to select the audio input
through the MP3-LINK socket or the AUX IN
L/R,
9
,
) For better reception, connect an outdoor FM antenna
to the DAB/FM AERIAL,
) ?#
V<
#
,
Route audio input through the AUX
IN sockets
#'(!%V
the DAB/FM AERIAL,
#9H
) the AUX IN L/R
#,
) the audio output sockets on the external
#X
+.?=.#
[,
Route audio to other devices
Route audio input through the MP3
LINK socket
You can route the audio from this product to
#,
Connect an analogue stereo system
MP3
MP3-LINK
VJ]9H
) the MP3-LINK
#,
) the headphone socket on the external
#X
+.VJ
[,
#9H
) the LINE OUT L/R;
#,
) #;#,
12
EN
Connect power
English
a
Caution
) &
##"}V
)
"
#"
#
9
#
#,
!
(
#.
#
,
b
c
(
#H
) the AC MAINS~
#,
) ,
Install/replace the batteries of
remote control
1
Press and push the battery compartment
#,
2
8
(((9
X%G[##,
3
Push and slide back the battery
,
Note
) &+}@9
.
,*
#
#9
,
) &9
9
#
+##
#,
EN
13
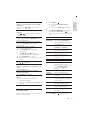
4 Get started
Set clock
1
In the normal standby mode, press and
hold CLOCK"
#,
» [CLOCK SET] scrolls on the display
panel, and then [CLOCK 24HR]XZG
[##
Z9",
2
Press VOL +/- to select [CLOCK 24HR]
or [CLOCK 12HR]XG
[.
and then press CLOCK
,
» ?
#"9"9,
3
4
Press VOL +/-
,
5
6
Press VOL +/-,
Caution
) Use of controls or adjustments or performance of
procedures other than herein may result in hazardous
#+
,
(
-,
Turn on
Press ,
» ?
##
,
Switch modes
Automatically switch the modes:
) (
#
$
.
#9#,
) After this product keeps in the normal
standby mode for 15 minutes, it
#9#,
Manually switch the modes:
) Press and hold #H
) "#
#9#
#9#,
) #9#
#9#,
) Press #
) 9
"##
#9#,
Note
) When an iPod/iPhone/iPad is connected, this product
#G
#9#,
14
EN
Press CLOCK
,
» ?#"9"9,
Press CLOCK
,
» ?##,
Tip
) To adjust the digits of hour or minute, you can also turn
the VOLUME knob on the main unit or press
,
/
on
Demonstrate features
1
In the normal standby mode, press ,
) [DEMO ON] is displayed, and then
feature names scroll on the display
9,
2
To exit the feature demonstration, press
",
Press DIM repeatedly to select different
9
",
5 Play
English
Adjust brightness of display
panel
Play a disc
Caution
Turn on or off LED light
) &#"
}'
".
,
8
"#.
##DIM to
turn on or off the LED light at the bottom of
#9,
) *
9;
##
,
) *
9#
,
) *
#
#9|
"
#
,
1
]##,
1) Press ;#
,
2) ##
9",
3) Press to close the disc
,
2
3
Press DISC#
,
Press
if the play does not start
,
Play from a USB storage
device
Note
) #"
9!
#,
) *?X*?"[#
#,
EN
15
Program audio tracks
V
!
"#
9#,
1
8
!
"#
X![,
2
Press USB!
,
» ,
If the play does not start automatically,
1
2
3
Press ALBUM/
Press
Press
/
1
2
Press ,
3
4
5
Press
6
Press
"
#
,
) To erase the program, press ,
Press PROGRAM,
» [PRG]9#,
/
9
,
Press PROGRAM,
Repeat steps 3 and 4 to program more
,
Note
) The programmed tracks must be stored on the same
#
#
,
) {
"
+Y
,
#
,
,
,
Adjust sound
Basic operations
'
".#;#
#
""
,
Buttons
Buttons
VOL +/-
/
/
MODE
RDS/INFO
16
EN
Actions
..
,
,
%+,
Press and hold to search
9
#%
#,
#H
.
.
:,
Display the current status and
#
,
Actions
Press to increase or decrease
,
Press to mute or restore the
#,
LOUDNESS Press to turn on or off the
#
,
BASS
Press BASS, and then press VOL
+/- to increase or decrease the
9,
TREBLE
Press TREBLE, and then press
VOL +/- to increase or decrease
9,
Load the iPod/iPhone/iPad
English
6 Play from iPod/
iPhone/iPad
You can enjoy audio from iPod/iPhone/iPad
",
Note
) No audio output from the headphone jack in this
,
Compatible iPod/iPhone/iPad
?
"#.
###,
) iPad 2
) iPad
) iPhone 4
) iPhone 3GS
) iPhone 3G
) iPhone
) #X.#.J
#.#Z
"
[
) #X.#.J
#.Z.$.#K
"
[
) iPod classic
) ##
) #
#
) iPod mini
1
2
&#,
#%%##,
Listen to the iPhone/iPod/
iPad
1
Press DOCK to select iPhone/iPod/iPad
,
2
Load your iPhone/iPod/iPad onto this
#,
3
#
%#%
#,
) To pause/resume the play, press
,
) To skip to a track, press / ,
) To stop the play, press ,
) ?9
H
press MENU to access the menu,
press / to select an item, and
then press OK
,
Note
) ?
"
,
EN
17
Charge the iPod/iPhone/iPad
7 Listen to radio
The docked iPod/iPhone/iPad begins to charge
as soon as this product is connected to AC
,
Note
) #
#.#.###
9#
"",
Note
) V
##
+##,
) You can program a maximum of 30 DAB radio stations
#JYV
#,
) ",<
#'(!,
"
9'(!
#
-
,
) Refer to “Product information” > “RDS program
types
9&'
#,
Remove the iPod/iPhone/iPad
1
%#%##,
Store DAB radio stations
automatically
If no DAB radio station is stored, this product
can search and store DAB radio stations
,
2
~##,
1
Press DAB/FM
#
'(!#,
» [FULL SCAN]##,
2
Press
or OK to start the auto
,
» This product automatically stores radio
"
",
» (
9
#
#.
#
#
9
#,
Basic operations
9
,
EN
1
» '(!#H[STATION]##,
2
Press / or
/
to select a menu
option, and then press OK or
to
G
,
FM mode
[SCAN
SETTINGS]
[AUDIO]
[SYSTEM]
DAB mode
[STATION]
[FULL
SCAN]
[MANUAL]
[DRC]
[SYSTEM]
Use the menu
When you listen to radio, you can access the
,
Press MENU or ,
» V#H[SCAN SETTINGS] is
##,
English
Tune to the next FM radio station with
"
frequencyH
Press and hold
/
to start the auto
,
#
$%
frequencyH
Press
/
#
-
#"
##,
Program FM radio stations automaticallyH
Press and hold SCAN or PROGRAM to start
"
",
Program DAB radio stations automatically:
Press and hold SCAN to start the auto
"
",
Program radio stations manuallyH
1) ?
#,
2) Press PROGRAM
"
",
3) Press / or / to assign a
-9
#,
4) Press PROGRAM
,
5) &GZ
"
#
,
Tune to a preset radio stationH
Press / #,
Switch the audio mode between [STEREO]
(stereo) and [MONO] (monophonic) for FM
radioH
Press OK
#,
Display available information about the
current radio stationH
Press RDS/INFO
#,
Synchronize the clock with an RDS radio
stationH
1) Tune to an RDS radio station that
",
2) Press and hold RDS until [CT SYNC] is
##,
3
Search and store radio stations
H[STRONG] for
#
""
only, [ALL]
,
##H
[STEREO] or [MONO],
[RESET]H&"
#,
[SW VER]H'
,
[UPGRADE]H"
#
,
(
#'(!
#,
Press
/
or
to select
a station, and
to start
",
Scan and store DAB radio
",
Tune to a DAB radio station
,
'&"
H
#
"
,
[RESET]H&"
#,
[SW VER]H'
,
[UPGRADE]H"
#
,
Press MENU or +,
EN
8 Other features
Note
) ?
9VJ]8*@#,
) 8
9.
#
Set the alarm timer
{
#
,{
can select CD, USB, Dock, iPod/iPhone/iPad
.V.
'(!
,
1
V
,
2
In the normal standby mode, press and
hold TIMER until [TIMER SET] scrolls on
#,
3
Press VOL +/-
H
CD, FM, DAB, USB, Dock, or iPod/iPhone/
#,
) To use iPod/iPhone/iPad playlist as the
alarm source, create a playlist named
“PHILIPS” in your iPod/iPhone/iPad
,
) If no playlist named “PHILIPS” exists
in the iPod/iPhone/iPad or the playlist
includes no playable track, this product
#%
%#,
4
Press TIMER
,
» ?
#"9"9,
5
Press VOL +/- repeatedly to set the hour,
and then press TIMER
,
» ?#"9"9,
6
Press VOL +/- to set the minute, and then
press TIMER
,
» [VOL] is displayed and the digits of
9"9,
7
Press VOL +/-#;
.
and then press TIMER
,
» ##,
)
20
EN
?#%
.
press TIMER
#,
V#,
Set the sleep timer
?#9
#,
8
"#.
SLEEP repeatedly
#X[,
) ?#
.
SLEEP
repeatedly until [SLEEP--OFF]##,
» <
#. is
##,
» <
##.
#
,
&
version
#,
Note
) 9
##
"
"
#,
) ?
"
#99
"
G!
9,
) <
"
##."
#
#,
1
2
3
Press DAB/FM
##,
4
5
Press OK or
6
Press OK or
,
» ?
on the display panel
Register your product
1
2
3
Press MENU or ,
Press / or
[SYSTEM],
Press /
VER],
or
/
to select
/
to select [SW
,
,,%,
Click the link of “Register my product”
X+
#"
#
""[,
]"
<9",
) 8
9
.
<9
",
4
#DCB7005/10”
#,
5
Click the link of search result to access the
<9"
"
"
#,
6
Fill in necessary information about this
#
"
,
» With the registration, you can get
9
##
#
9
your mailbox that is registered as the
9,
Perform the update
1
2
,,%,
3
Click the link of “Firmware Upgrade
Readme FileX+
#"
#
""[,
4
Read and understand the instructions on
"
#,
5
##
"
##"
#,
) If the upgrade fails, reconnect the
.
#.
#
"
#",
]"
9,
» Support information about your
"
#
###,
EN
21
English
9 Upgrade the
firmware
10 Product
information
DAB Tuner
Tuning Range
Note
) #
9;"
,
Speakers
Speaker Impedance
'
'
*
&#
-&
Signal to Noise Ratio
Aux Input
Semiconductor
%
'G'(.'G&.'G&<.
VJG'.<V(G'
Z!%ZZ,~|
Audio DAC
Total Harmonic
Distortion
Y,X~|[
-& Z~|GY~|XZZ,~|[
S/N Ratio
#!(
Tuning Range
Tuning grid
GV.K#!%*&
G
.ZK#!%*&
Total Harmonic Distortion
Signal to Noise Ratio
EN
(
Consumption
Headphone output
USB Direct
Dimensions
GV
X<+~+'[
G
!+
X<+~+'[
Weight
G<"
GV
G
!+
YGZY=.
50/60 Hz
J<
2X15 mW 32 Ohm
,Y
$Y++$
174 x 260 x 240 mm
Y,"
,$"
J,$"
USB playability information
FM Tuner
22
6ohm
J
,$
'
K#!%%
W ± 4dB/m/W
General information
2 X 50W RMS
YGYYYY~|.J#!
#!(
1000 mV RMS 22kohm
Disc
Laser Type
Disc Diameter
Support Disc
174–240 MHz
X!#888[
Y#!
,$GYV~|
50 kHz
< 22 dBf
< 43 dBf
#!
> 55 dB
Compatible USB devices:
) !:
X!,Y
!,[
) !:
X!,Y
!,[
) #X
-
##
#
#
[
Unsupported formats:
) Q9H99
#VJ%<V(.#
9#,
) #
#,
+.<
##X,#[
VJ
+,#
"
##
#,
) ((.<(=.V#
) '&V
#<V(X,.,Z.
,Z.,Z.,[
) <V(]
Supported MP3 disc formats
)
)
)
)
)
8KKY.
V+9
H$X##"
"[
V+99
H$$
#"
-HJ~|.
ZZ,~|.Z~|
#!G
HJJYX9[.
99
RDS program types
NO TYPE
NEWS
AFFAIRS
INFO
DRAMA
CULTURE
SCIENCE
VARIED
POP M
ROCK M
MOR M
LIGHT M
CLASSICS
OTHER M
WEATHER
FINANCE
CHILDREN
No RDS programme type
*
Politics and current affairs
Special information
programs
Sports
Q####
training
Radio plays and literature
Culture, religion and society
Science
Entertainment programs
Pop music
Rock music
Light music
Light classical music
Classical music
Special music programs
Weather
Finance
Children’s programs
SOCIAL
RELIGION
PHONE IN
TRAVEL
LEISURE
JAZZ
COUNTRY
NATION M
OLDIES
FOLK M
DOCUMENT
TES
ALARM
Social Affairs
Religion
Phone In
?
Leisure
Jazz Music
Country Music
National Music
Oldies Music
Folk Music
Documentary
Alarm Test
Alarm
SPORT
EDUCATE
EN
23
English
Supported formats:
) !
(?.(?K.
(?JX
|H$9[
) VJ9
X#
[HJGJY@9#
99
) <V(
) '
"+
) *9
9%#
H+
) *9
%H+
) 8'J",Y
) #?X+
"HKZ9[
11 Troubleshooting
;
;
Warning
) *
"
,
?
#.
,
8
9"
."9
-"
,8
9
#."9
X,,%[,<
Philips, ensure that the apparatus is nearby
and the model number and serial number are
9,
No power
;
Q
(
#
#
,
;
Q
(
,
;
(
G"
.
$
track play reaches the end and no control
#,
No sound or poor sound
;
(#;,
;
'#,
;
Check that the speakers are connected
,
;
#
#,
No response from the unit
;
'#
(
".
",
;
(
G"
.
$
track play reaches the end and no control
#,
Remote control does not work
;
!
9.
#,
24
EN
;
;
&##9
#,
8
9
X%
"["###,
&9
,
Aim the remote control directly at the
,
No disc detected
;
8
#,
;
#
###,
;
Wait until the moisture condensation at
#,
;
&
#,
;
|#'
#,
USB device not supported
;
?!#9
,?
,
Poor radio reception
;
8
#9#
?=
=&,
;
+#V,
;
#
V#,
Timer does not work
;
,
;
,
Clock/timer setting erased
;
9
#
#9##,
;
&%
,
© 2011 Koninklijke Philips Electronics N.V.
All rights reserved.
DCB7005_10_UM_V1.0