1
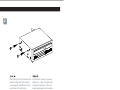
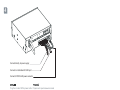
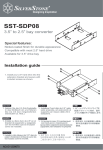
An incredible 3-in-1 small multimedia storage solution TS03 Manual Installation guide 1 Push 12.7mm slim optical drive into the slim drive bay. Вставьте тонкий оптический привод толщиной 12,7 мм в соответствующий отсек. Schieben Sie das 12,7 mm hohe optische Laufwerk in den Laufwerkschacht ein. ᇛPP㭘ൟܝ″ܹܝᶊЁDŽ Poussez le lecteur optique slim de 12.7mm dans la baie dédiée. ᇚPP㭘ൟܝ偅ܹⲬܝᶊЁDŽ ṛṜṘṡẗẗώᾮᾤҫࠓᾍᾭὨᾚὣώᾮᾤᾍᾭὨᾚᾝὨ Introduzca el dispositivo óptico delgado de 12,7mm en la bahía para ἿͳἼҸὝἪẪ dispositivo delgado. Spingere il drive ottico da 12,7mm all’interno del drive bay. ٻۈۈڒډڍ㏠⫰ٻṅ☐ٻ⢰㢨⽀⪰ٻ㏠⫰☐ٻ⢰㢨⽀ٻ ⷔ㢨㜄ⴴٻ㛨≗ٻ㏩⏼␘ٻډ 2 After pushing the slim optical drive into position to align with the front panel, use a magnetic screwdriver to secure two screws to the optical drive. Протолкните тонкий оптический привод так, чтобы он выровнялся с передней панелью, после чего закрутите два шурупа на оптическом приводе с помощью магнитной отвертки. Richten Sie das optische Laufwerk bündig zur Frontplatte aus, ziehen Sie die beiden Schrauben am optischen Laufwerk mit einem magnetischen Schraubendreher an. 䂟⺎䁡㭘ൟܝ″ᇡ⑪Ϻᆚড়ᮐࠡᵓˈ Ϻҹ㶎㍆䍋ᄤᇛܽ业ܝ″ᶊ㶎㍆䥪DŽ Après avoir poussé le lecteur optique 䇋⹂䅸㭘ൟܝ偅ᇍޚᑊᆚড়Ѣࠡᵓˈ slim, alignez-le avec le panneau ᑊҹ㶎ϱ䍋ᄤᇚϸ乫ܝ偅ᶊ㶎ϱ䫕DŽ frontal, utilisez un tournevis aimanté pour fixer les deux vis du lecteur optique. Tras introducir el dispositivo óptico delgado hasta alinearlo con el panel frontal, use un destornillador magnético para fijar los dos tornillos al dispositivo óptico. ώᾮᾤҫࠓᾍᾭὨᾚὣ૽ἨἷᾙᾱᾷᾌᾕᾑᾯἿ ᭼ἹװὠἬἰẩሩᾍᾭὨᾔ̵Ἰҫࠓ ᾍᾭὨᾚὣᾑὼṜಙἸࠪۊἨἪẪ Dopo aver inserito il drive ottico slim in posizione, per allinearlo al pannello frontale, utilizzare un cacciavite magnetico ed avvitare due viti al drive ottico. ㏠⫰ٻṅ☐ٻ⢰㢨⽀⪰ⴴٻ㛨≗ٻ㡴ٻ䟸ٻڇ 㤸⮨䑜≄Ḱٻ㥉⥠䚌Ḕٻڇ㣄㉑ٻ㏘䆠⪌ٻ ☐⢰㢨ⶸ⪰ٻ㢨㟝䚨▄ٻڇᵐ㢌⇌ٻ㇠⪰ٻṅٻ ☐⢰㢨⽀㜄ٻḔ㥉㐐䇩⏼␘ٻډ 3 Place TS03 into an available 5.25” bay in the chassis and secure with screws. Поместите TS03 в свободный 5,25-дюймовый отсек и закрепите шурупами Setzen Sie das TS03 in einen freien 5,25 Zoll-Laufwerkschacht des Computergehäuses ein, fixieren Sie das TS03 mit Schrauben. ᅝ㺱76ᮐ″←ϞⱘāED\Ϻҹ㶎㍆ 䥪ᮐ″←DŽ Mettez le TS03 dans une baie 5.25” disponible de votre boîtier et fixez-le avec des vis. ᅝ㺙76ѢᴎϞⱘāED\ᑊҹ㶎ϱ 䫕ѢᴎDŽ Coloque el TS03 en una bahía de 5,25” disponible en el chasis y fíjelo con los tornillos. ṾṽṚṝὣή̵ώӈἿЂᄄפᓞἻṟṘṜṟ ὨᾷᾅᾝὨἼҸὝẩᾑὼἸࠪۊἨἪẪ Posizionare quindi TS03 in un bay da 5,25” disponibile e serrarlo al case con le viti ڎڋڮگ㡸⽸ٻ㛨㢼⏈ڐڍډڐٻⷔٻ㢨㜄ٻ㣙㵝䚐ٻ 䟸⇌ٻڇ㇠⦐ٻḔ㥉㐐䇩⏼␘ٻډ 4 Connect directly to power supply Connect to motherboard's SATA port Connect to TS03's LED power connector Plug the included SATA+power cable to the TS03 and to corresponding connectors on the motherboard and the power supply. Подключите прилагаемый силовой SATA-кабель к TS03 и к соответствующим разъемам материнской платы и блока питания. Schließen Sie das TS03 über das 䂟⫼䱼䰘ⱘ6$7$䳏⑤㎮ᇛ76㟛䳏㜺Џ″ᵓ mitgelieferte SATA+-Stromversorgungskabel 㟛䳏⑤կឝ఼䗷ϞDŽ an die entsprechenden Anschlüsse am Motherboard und am Netzteil an. Branchez le câble SATA+alimentation 䇋⫼䱣䰘ⱘ6$7$⬉⑤㒓ᇚ76Ϣ䅵ㅫᴎЏᴎ inclus au TS03 et aux connecteurs ᵓϢ⬉⑤կᑨ఼䖲ϞDŽ correspondant sur votre carte mère et votre alimentation. Conecte el cable incluido SATA+potencia al TS03 y los conectores correspondientes a la placa base y la fuente de alimentación. ρἿṽṫṾṫṕ᭐༽ή̵ᾚᾯὣṾṽṚṝἼᏐ ἨẩἰࡠἪᾢὺ̵ᾠ̵ᾍἹ᭐༽Ἷ ίᾑέᾃἼᏐἨἪẪ Connettere quindi i cavi SATAed alimentazione a TS03 ed ai corrispondenti sulla scheda madre e alimentatore. ┍⸽═ٻچڜگڜڮٻ䑀㠀ٻ䀴㢨⽈㡸ڎڋڮگٻḰٻ ⮈㢬⸨☐㝴ٻ䑀㠀㉐ٻ䙀⢰㢨㢌ٻ䚨ٻ 䀘≙䉤㜄ٻ㜤ᷤ䚝⏼␘ٻډ 5 Adapter to Power Supply to Motherboard Plug your optical drive’s signal cable Подключите сигнальный кабель (SATA or PATA) and power cable to (SATA или PATA) оптического привода your motherboard and power supply. и силовой кабель к материнской плате и блоку питания. Verbinden Sie Signalkabel (SATA oder PATA) und Stromversorgungskabel mit Motherboard und Netzteil. 䂟ᇛܝ″ⱘ䳏⑤㎮6$7$3$7$ ᇡ⑪Ϻ䗷Ϟ䳏㜺Џ″ᵓ㟛䳏⑤կឝ఼DŽ Branchez le câble (SATA ou PATA) de 䇋ᇚܝ偅ⱘ⬉⑤㒓6$7$3$7$ votre lecteur optique à votre carte mère, ᇍޚᑊ䖲Ϟ䅵ㅫᴎЏᴎᵓϢ⬉⑤կᑨ఼DŽ et branchez également le câble de votre alimentation au connecteur du lecteur. ҫࠓᾍᾭὨᾚἿЫתή̵ᾚᾯṒṽṫṾṫἰὀṺṫṾṫṓ Conecte el cable de señal del dispositivo óptico (SATA ó PATA) y el ἛὙὄ᭐Նή̵ᾚᾯὣẩᾢὺ̵ᾠ̵ᾍἛὙὄ cable de potencia a su placa base y ᭐༽ἼᏐἨἪẪ fuente de alimentación. Connettere il cavo dati del drive ottico (SATA o PATA) ed il cavo di alimentazione rispettivamente alla scheda madre ed all’alimentatore ṅ☐⢰㢨⽀㢌ٻ⒤㢨䉤ٻ䀴㢨⽈ٻڜگڜڮڃ䝭㡴ڄڜگڜګٻ 㝴ٻ䑀㠀ٻ䀴㢨⽈㡸⮈ٻ㢬⸨☐㝴ٻ䑀㠀ٻ ㉐䙀⢰㢨㜄ٻ㜤ᷤ䚝⏼␘ٻډ Issue Date : October, 2009 NO.G11210910