1
User's Guide
Copyright © Acronis, Inc., 2000-2010. All rights reserved.
“Acronis” and “Acronis Secure Zone” are registered trademarks of Acronis, Inc.
"Acronis Compute with Confidence", “Acronis Startup Recovery Manager”, “Acronis Active Restore”
and the Acronis logo are trademarks of Acronis, Inc.
Linux is a registered trademark of Linus Torvalds.
VMware and VMware Ready are trademarks and/or registered trademarks of VMware, Inc. in the
United States and/or other jurisdictions.
Windows and MS-DOS are registered trademarks of Microsoft Corporation.
All other trademarks and copyrights referred to are the property of their respective owners.
Distribution of substantively modified versions of this document is prohibited without the explicit
permission of the copyright holder.
Distribution of this work or derivative work in any standard (paper) book form for commercial
purposes is prohibited unless prior permission is obtained from the copyright holder.
DOCUMENTATION IS PROVIDED "AS IS" AND ALL EXPRESS OR IMPLIED CONDITIONS,
REPRESENTATIONS AND WARRANTIES, INCLUDING ANY IMPLIED WARRANTY OF MERCHANTABILITY,
FITNESS FOR A PARTICULAR PURPOSE OR NON-INFRINGEMENT, ARE DISCLAIMED, EXCEPT TO THE
EXTENT THAT SUCH DISCLAIMERS ARE HELD TO BE LEGALLY INVALID.
Third party code may be provided with the Software and/or Service. The license terms for such thirdparties are detailed in the license.txt file located in the root installation directory. You can always find
the latest up-to-date list of the third party code and the associated license terms used with the
Software and/or Service at http://kb.acronis.com/content/7696
Table of contents
1
Introduction ..........................................................................................................................6
1.1
What is Acronis® True Image OEM Quick Backup? ...................................................................6
1.2
Acronis True Image OEM Quick Backup basic concepts ............................................................6
1.3
New in Acronis True Image OEM Quick Backup ........................................................................8
1.4
System requirements and supported media .............................................................................8
1.4.1
1.4.2
1.4.3
1.4.4
2
3
4
Acronis True Image OEM Quick Backup installation and startup ............................................10
2.1
Installing Acronis True Image OEM Quick Backup ...................................................................10
2.2
Running Acronis True Image OEM Quick Backup ....................................................................10
2.3
Activating Acronis True Image OEM Quick Backup .................................................................11
2.4
Upgrading Acronis True Image OEM Quick Backup.................................................................11
2.5
Removing Acronis True Image OEM Quick Backup .................................................................12
General information and proprietary Acronis technologies ...................................................13
3.1
Disk/partition images...............................................................................................................13
3.2
Full and incremental backups ..................................................................................................13
3.3
Backup file naming conventions ..............................................................................................14
3.4
Viewing disk and partition information ...................................................................................15
3.5
Booting from system image tib files ........................................................................................15
Preparing for disaster recovery ............................................................................................16
4.1
How to best prepare for a disaster ..........................................................................................16
4.1.1
4.1.2
5
6
Minimum system requirements .................................................................................................................... 8
Supported operating systems ........................................................................................................................ 9
Supported file systems.................................................................................................................................... 9
Supported storage media ............................................................................................................................... 9
Recommendations for testing that your backups can be used for recovery............................................ 16
Additional recommendations....................................................................................................................... 17
4.2
Testing bootable rescue media ...............................................................................................17
4.3
Creating a custom rescue CD ...................................................................................................19
Getting to know Acronis True Image OEM Quick Backup .......................................................21
5.1
Program workspace .................................................................................................................21
5.2
Main screens ............................................................................................................................22
5.3
Options screen .........................................................................................................................25
Creating backup archives .....................................................................................................27
6.1
Preparing for your first backup ................................................................................................27
6.2
Deciding what data to back up ................................................................................................27
6.3
Some typical backup scenarios ................................................................................................28
6.3.1
6.3.2
6.3.3
6.3.4
Backing up a system partition ...................................................................................................................... 28
Backing up an entire system disk ................................................................................................................. 28
Backing up a data partition or disk .............................................................................................................. 30
Backing up to a network share ..................................................................................................................... 30
7
Online backup......................................................................................................................32
7.1
Creating an Online backup account .........................................................................................32
7.2
Backing up to Acronis Online Storage......................................................................................33
7.3
Recovering data from Online Storage .....................................................................................35
7.4
Managing Online Storage ........................................................................................................36
7.5
Setting online backup options .................................................................................................37
7.5.1
7.5.2
7.5.3
7.5.4
7.6
8
Connection attempts .................................................................................................................................... 38
Storage connection speed ............................................................................................................................ 38
Storage cleanup ............................................................................................................................................. 39
Proxy settings ................................................................................................................................................ 40
Recommendations on selecting data for storing online..........................................................40
Additional backup features ..................................................................................................41
8.1
Archive to various places .........................................................................................................41
8.2
Backup Wizard – detailed information ....................................................................................44
8.2.1
8.2.2
8.2.3
8.2.4
8.2.5
8.2.6
8.3
Fine-tuning your backups ........................................................................................................47
8.3.1
8.3.2
9
Selecting what data to back up .................................................................................................................... 44
Selecting archive location ............................................................................................................................. 44
Backup method ............................................................................................................................................. 45
Selecting the backup options ....................................................................................................................... 46
Providing a comment .................................................................................................................................... 47
The backup process....................................................................................................................................... 47
Backup options .............................................................................................................................................. 47
Local storage settings.................................................................................................................................... 49
Data recovery with Acronis True Image OEM Quick Backup...................................................51
9.1
Recovering your system partition............................................................................................51
9.2
Recovering a disk backup to a different capacity hard disk ....................................................52
9.2.1
9.2.2
Recovering a disk without a hidden partition ............................................................................................. 53
Recovering a disk with a hidden partition ................................................................................................... 54
9.3
Recovering a data partition or disk..........................................................................................56
9.4
Recovering files and folders.....................................................................................................57
9.4.1
10
Recovering files and folders from image archives ...................................................................................... 57
Additional recovery information ..........................................................................................59
10.1 Recovery Wizard - detailed information..................................................................................59
10.1.1
10.1.2
10.1.3
10.1.4
10.1.5
10.1.6
10.1.7
10.1.8
10.1.9
10.1.10
Starting the Recovery Wizard ....................................................................................................................... 59
Archive selection ........................................................................................................................................... 59
Recovery method selection .......................................................................................................................... 60
Selecting a disk/partition to recover............................................................................................................ 60
Selecting a target disk/partition ................................................................................................................... 62
Changing the recovered partition type ....................................................................................................... 62
Changing the recovered partition size and location ................................................................................... 63
Assigning a letter to the recovered partition .............................................................................................. 63
Setting recovery options ............................................................................................................................... 64
Executing recovery ........................................................................................................................................ 64
10.2 Setting default recovery options .............................................................................................64
10.2.1
10.2.2
10.2.3
File recovery options ..................................................................................................................................... 64
Overwrite file options ................................................................................................................................... 64
Recovery priority ........................................................................................................................................... 65
11
Creating bootable media ......................................................................................................66
11.1 Creating Linux-based rescue media .........................................................................................66
12
Exploring archives and mounting images ..............................................................................69
12.1 Mounting an image..................................................................................................................69
12.2 Unmounting an image .............................................................................................................71
13
Searching backup archives and their content ........................................................................73
13.1 Searching .................................................................................................................................73
13.2 Windows Search and Google Desktop integration ..................................................................74
13.2.1
13.2.2
14
Using Google Desktop with Acronis True Image OEM Quick Backup ....................................................... 75
Using Windows Search with Acronis True Image OEM Quick Backup ...................................................... 77
Other operations .................................................................................................................81
14.1 Validating backup archives ......................................................................................................81
14.2 Viewing Tasks and Logs............................................................................................................81
14.3 Managing backup archives ......................................................................................................83
14.4 Removing backup archives ......................................................................................................84
14.5 Moving backup archives ..........................................................................................................84
15
Troubleshooting ..................................................................................................................85
15.1 General ....................................................................................................................................85
15.2 Installation issues.....................................................................................................................85
15.3 Backup and validation issues ...................................................................................................86
15.4 Recovery issues ........................................................................................................................87
15.5 Bootability after recovery issues .............................................................................................88
15.6 Other issues .............................................................................................................................89
16
Hard Disks and Boot Sequence .............................................................................................91
16.1 Arranging boot sequence in BIOS ............................................................................................91
16.2 Installing hard disk drives in computers ..................................................................................91
16.2.1
16.2.2
16.2.3
16.2.4
16.2.5
Installing an IDE hard disk drive, general scheme....................................................................................... 91
Motherboard sockets, IDE cable, power cable ........................................................................................... 92
Configuring hard disk drives, jumpers ......................................................................................................... 93
Installing a SATA hard drive .......................................................................................................................... 94
Steps for installing a new internal SATA drive............................................................................................. 94
16.3 Hard Disk Wiping methods ......................................................................................................95
16.3.1
16.3.2
17
Functioning principles of Information wiping methods ............................................................................. 95
Information wiping methods used by Acronis ............................................................................................ 96
Startup Parameters ..............................................................................................................97
17.1 Description...............................................................................................................................97
18
Index ...................................................................................................................................99
1 Introduction
1.1
What is Acronis® True Image OEM Quick Backup?
Acronis True Image OEM Quick Backup is an integrated software suite that ensures security of all
information on your PC. It can backup the operating system, applications, settings and all of your
data, while also securely destroying any confidential data you no longer need. With this software,
you can back up the entire disk drive or selected partitions. Acronis Online Backup will allow you to
store your most important files on a remote storage, so they will be protected even if your computer
gets stolen or your house burns down.
Should your disk drive become damaged or your system attacked by a virus or malware, you can
restore the back-up data quickly and easily, eliminating hours or days of work trying to rebuild your
disk drive's data and applications from scratch.
Acronis True Image OEM Quick Backup provides you with all the essential tools you need to recover
your computer system should a disaster occur, such as losing data, accidentally deleting critical files
or folders, or a complete hard disk crash. If failures occur that block access to information or affect
system operation, you will be able to restore the system and the lost data easily.
The unique technology developed by Acronis and implemented in Acronis True Image OEM Quick
Backup allows you to perform exact, sector-by-sector disk backups, including all operating systems,
applications and configuration files, software updates, personal settings, and data.
You can store backups on almost any PC storage device: internal or external hard drives, network
drives or a variety of IDE, SCSI, FireWire (IEEE-1394), USB (1.0, 1.1 and 2.0) and PC Card (formerly
called PCMCIA) removable media drives, as well as CD-R/RW, DVD-R/RW, DVD+R/RW, magnetooptical, Iomega Zip and Jaz drives.
Wizards and a Windows Vista-style interface will make your work easier. Just perform a few simple
steps and let Acronis True Image OEM Quick Backup take care of everything else! When a system
problem occurs, the software will get you up and running in no time.
1.2
Acronis True Image OEM Quick Backup basic
concepts
This section provides general information about basic concepts which could be useful for
understanding how the program works.
Backup
According to Wikipedia, "backup refers to making copies of data so that these additional copies may
be used to restore the original after a data loss event. Backups are useful primarily for two purposes.
The first is to restore a state following a disaster (called disaster recovery). The second is to restore
small numbers of files after they have been accidentally deleted or corrupted."
Acronis True Image OEM Quick Backup provides creating disk (or partition) images. By default,
Acronis True Image OEM Quick Backup stores in an image only those hard disk parts that contain
data (for supported file systems). However, you may use an option that lets you include in an image
all of the sectors of a hard disk (so called sector-by-sector backup).
Copyright © Acronis, Inc., 2000-2010
6
Backup archive components
Archive - Known as archive chain or archive group, it is the whole set of backup files managed by a
single backup task. The archive can consist of one or several slices.
Slice - It is a set of files created during each cycle of the task execution. The amount of slices created
is always equal to the amount of times the task is executed. A slice represents a point in time, to
which the system or data can be recovered.
Volume - It is a tib file associated with the slice. Usually there is only one volume per slice however,
each slice may consist of several volumes. If you have set archive splitting in the task options, the
resulting slice will be split into several files. In addition, Acronis True Image OEM Quick Backup
automatically splits a slice into several files of 4GB each (except the last file) when you make a large
backup to a FAT32 formatted hard disk. These files are the slice's volumes.
Snapshots
While creating disk images, Acronis True Image OEM Quick Backup uses "snapshot" technology that
allows creating even system partition backups while running Windows with files open for reading and
writing without the necessity to reboot the computer. Once the program starts the partition backup
process, it temporarily freezes all the operations on the partition and creates its "snapshot".
Snapshot creation usually takes just several seconds. After that the operating system continues
working as the imaging process is under way and you will not notice anything unusual in the
operating system functionality.
In its turn, the Acronis driver continues working to keep the point-in-time view of the partition.
Whenever the driver sees a write operation directed at the partition, it checks whether these sectors
are already backed up and if they are not, the driver saves the data on the sectors to be overwritten
to a special buffer, then allows overwriting. The program backs up the sectors from the buffer, so
that all the partition sectors of the point-in-time when the snapshot was taken will be backed up
intact and an exact "image" of the partition will be created.
Backup file format
Acronis True Image OEM Quick Backup saves backup data in the proprietary tib format using
compression. This provides for reducing the storage space requirements, as well as for backward
compatibility with the previous Acronis True Image OEM Quick Backup version. While creating a tib
file, the program calculates checksum values for data blocks and adds these values to the data being
backed up. These checksum values allow verifying the backup data integrity. However, using the
proprietary format means that the data from such backups can be recovered only with the help of
Acronis True Image OEM Quick Backup itself – either in Windows or in the recovery environment.
Backup archive validation
How can you be sure that you'll be able to recover your system if the need arises? The feature called
backup validation provides a high degree of such assurance. As was already said, the program adds
checksum values to the data blocks being backed up. During backup validation Acronis True Image
OEM Quick Backup opens the backup file, re-calculates the checksum values and compares those
values with the stored ones. If all compared values match, the backup file is not corrupted and there
is a high probability that the backup can be successfully used for data recovery. It is highly
recommended to validate system partition backups after booting from the rescue media. For users of
Windows 7 Enterprise and Windows 7 Ultimate Acronis True Image OEM Quick Backup provides a
unique way of ensuring that you will be able to boot from the recovered system partition. The
program allows booting from a tib file containing the system partition image, though it first converts
Copyright © Acronis, Inc., 2000-2010
7
the tib file into a VHD used for actual booting. So if you can boot from the converted vhd file, you will
be able to boot after recovering this backup to your disk.
Disaster recovery
Recovering from a disaster usually requires a rescue media, because such disaster often means that
your operating system does not boot either due to system data corruption (e.g. caused by a virus or
malware) or a hard disk failure. When the operating system fails to boot, you need some other
means of booting and using Acronis True Image OEM Quick Backup to recover the system partition.
So to be better prepared for a disaster, you absolutely must have a rescue media. Legal owners of
the program can create a rescue media using the tool called Media Builder.
To enable booting to the recovery environment, it is necessary to ensure that the BIOS boot
sequence includes the rescue media. See Arranging boot sequence in BIOS (p. 91).
1.3
New in Acronis True Image OEM Quick Backup
Online backup – you can make your critically important data much more secure by storing it offsite. Because files are stored on a remote storage, they are protected even if your computer gets
stolen or your house burns down. So the risk of data loss as a result of fire, theft, or other natural
disasters is practically eliminated. And you can safely recover any corrupted, lost or deleted files
on your computer. Integrating Online backup into Acronis True Image OEM Quick Backup
provides a single solution for all your data backup needs.
Acronis Online Backup might be unavailable in your region. To find more information, click here:
https://www.acronis.com/my/online-backup/
Selective validation – Earlier versions of Acronis True Image OEM Quick Backup could validate
only a whole backup archive. Sometimes this may be inconvenient. Suppose, you have a full
backup archive with a size of 20GB and a longish chain of incremental backups having sizes of
several gigabytes each and amounting to 100GB. In this case Acronis True Image OEM Quick
Backup validated the whole 120GB archive and this could take quite a long time. Now the
program will validate just a single selected incremental backup and the full one.
Booting from tib images containing Windows 7 – Users of the Windows 7 Enterprise and
Windows 7 Ultimate can boot from a tib image containing a backup of their system partition. This
will allow testing the bootability of the backed up system without actual recovery. If the
operating system boots from the tib file, then it will definitely boot after recovery from that tib
file.
1.4
1.4.1
System requirements and supported media
Minimum system requirements
The hardware requirements of Acronis True Image OEM Quick Backup correspond to the minimum
requirements for the operating system installed on the computer to be used for running Acronis True
Image OEM Quick Backup. In addition Acronis True Image OEM Quick Backup requires the following
hardware:
CD-RW/DVD-RW drive for bootable media creation
Mouse or other pointing device (recommended).
Acronis True Image OEM Quick Backup rescue media has the following hardware requirements:
8
256 MB RAM
Copyright © Acronis, Inc., 2000-2010
Processor Pentium 1 GHz or faster
The recommended minimum screen resolution is 1152 x 864.
1.4.2
Supported operating systems
Acronis True Image OEM Quick Backup has been tested on the following operating systems:
Windows XP SP3
Windows XP Professional x64 Edition SP2
Windows Vista SP2 (all editions)
Windows 7 (all editions)
Acronis True Image OEM Quick Backup also enables creation of a bootable CD-R/DVD-R that can back
up and recover a disk/partition on a computer running any Intel- or AMD- based PC operating
system, including Linux®. The only exception is the Intel-based Apple Macintosh, which is currently
not supported in native mode.
1.4.3
Supported file systems
FAT16/32
NTFS
Ext2/Ext3 *
ReiserFS *
If a file system is not supported or is corrupted, Acronis True Image OEM Quick Backup can copy data
using a sector-by-sector approach.
* The Ext2/Ext3, and ReiserFS file systems are supported only for disk or partition backup/recovery operations.
You cannot use Acronis True Image OEM Quick Backup for file-level operations with these file systems (file
backup, recovery, search, as well as image mounting and file recovering from images), as well as for backups to
disks or partitions with these file systems.
1.4.4
Supported storage media
Hard disk drives*
Networked storage devices
CD-R/RW, DVD-R/RW, DVD+R (including double-layer DVD+R), DVD+RW, DVD-RAM, BD-R, BDRE**
USB 1.0 / 2.0 /3.0, FireWire (IEEE-1394) and PC card storage devices
REV®, Jaz® and other removable media
* Acronis True Image OEM Quick Backup does not support dynamic and GPT disks.
** Burned rewritable discs cannot be read in Linux without a kernel patch.
Copyright © Acronis, Inc., 2000-2010
9
2 Acronis True Image OEM Quick Backup
installation and startup
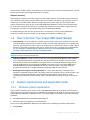
2.1
Installing Acronis True Image OEM Quick Backup
To install Acronis True Image OEM Quick Backup:
Run the Acronis True Image OEM Quick Backup setup file.
In the Install Menu, select the program to install: Acronis True Image OEM Quick Backup.
Follow the install wizard instructions on the screen.
Typical, Custom and Complete installation is available. Having pressed Custom, you can choose
not to install Rescue Media Builder.
With Rescue Media Builder you can create bootable rescue disks (see details in Creating
bootable media (p. 66)). Installing the Bootable Rescue Media Builder will allow you to create
bootable media or its ISO image at any time from the main program window or by running
Bootable Rescue Media Builder on its own.
When installed, Acronis True Image OEM Quick Backup creates a new device in the Device Manager
list (Control Panel → System → Hardware → Device Manager → Acronis Devices → Acronis True
Image Backup Archive Explorer). Do not disable or uninstall this device, as it is necessary for
connecting image archives as virtual disks (see Exploring archives and mounting images).
2.2
Running Acronis True Image OEM Quick Backup
You can run Acronis True Image OEM Quick Backup in Windows by selecting Start → Programs →
Acronis → Acronis True Image OEM Quick Backup → Acronis True Image OEM Quick Backup or by
clicking on the appropriate shortcut on the desktop.
Copyright © Acronis, Inc., 2000-2010
10
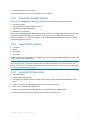
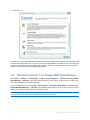
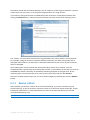
2.3
Activating Acronis True Image OEM Quick Backup
On the first launch of Acronis True Image OEM Quick Backup you will have to enter an Activation Key
to be able to run the product. Click Get Key! button to get to the Acronis website, where you can
register and enter your Acronis True Image OEM Quick Backup serial number. Enter the received
activation key in the respective field in the Acronis True Image OEM Quick Backup product activation
window and click Activate!.
Note, this button will be unavailable until you enter the correct activation key.
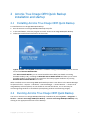
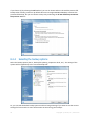
2.4
Upgrading Acronis True Image OEM Quick Backup
You can upgrade Acronis True Image OEM Quick Backup to Acronis True Image Home 2010 from the
Acronis web site.
The following features will be available only after upgrading to Acronis True Image Home 2010:
Acronis Try&Decide
System state backup
Application backup
Data backup (selected files/folders)
Scheduling
Archive protection
Cleanup utilities
Disk utilities
Consolidating backups
Differential backups
Copyright © Acronis, Inc., 2000-2010
11
Notifications.
Please keep in mind that the backups created by the later program version may be incompatible with
the previous program versions, so if you roll back True Image OEM to an older version, you likely will
have to re-create the archives using the older version. We strongly recommend that you create new
bootable media after each True Image OEM upgrade.
2.5
Removing Acronis True Image OEM Quick Backup
Select Start → Settings → Control panel → Add or remove programs → <Acronis True Image OEM
Quick Backup> → Remove. Then follow the instructions on the screen. You may have to reboot your
computer afterwards to complete the task.
If you use Windows Vista, select Start → Control panel → Programs and Features → <Acronis True
Image OEM Quick Backup> → Remove. Then follow the instructions on the screen. You may have to
reboot your computer afterwards to complete the task.
If you have Acronis Secure Zone on your computer, remove it before removing the program itself because
removing Acronis True Image OEM Quick Backup will not remove the zone.
12
Copyright © Acronis, Inc., 2000-2010
3 General information and proprietary Acronis
technologies
3.1
Disk/partition images
A backup archive is a file or a group of files (also called "backups" in this guide), that contains a copy
of all information stored on selected disks/partitions.
Backing up disks and partitions is performed in the following way: Acronis True Image OEM Quick
Backup stores a sector-by-sector snapshot of the disk, which includes the operating system, registry,
drivers, software applications and data files, as well as system areas hidden from the user. This
procedure is called "creating a disk image," and the resulting backup archive is often called a
disk/partition image.
By default, Acronis True Image OEM Quick Backup stores only those hard disk parts that contain data (for
supported file systems). Furthermore, it does not back up swap file information (pagefile.sys under Windows XP
and later) and hiberfil.sys (a file that keeps RAM contents when the computer goes into hibernation). This
reduces image size and speeds up image creation and recovery. However, you might use the Create an image
using the sector-by-sector approach option that lets you include all of the sectors of a hard disk in an image.
A partition image includes all files and folders. This includes all attributes (including hidden and system files),
boot record, and FAT (file allocation table); as well as files in the root directory and the zero track of the hard
disk with the master boot record (MBR).
A disk image includes images of all disk partitions as well as the zero track with the master boot record (MBR).
By default, files in all Acronis True Image OEM Quick Backup archives have a ".tib" extension. Do not
change this file extension.
It is important to note that you can recover files and folders from disk/partition images. To do so,
mount the image as a virtual disk (see Exploring archives and mounting images) or start the image
recovery and select Recover chosen files and folders.
3.2
Full and incremental backups
Acronis True Image OEM Quick Backup can create full and incremental backups.
A full backup contains all data at the moment of backup creation. It forms a base for further
incremental backup or is used as a standalone archive. A full backup has the shortest recovery time
compared to incremental one.
An incremental backup file only contains data changed since the last backup of any type (full or
incremental). Therefore, it is smaller and takes less time to create, but as it doesn't contain all the
data; all the previous backups and the initial full backup are required for recovery.
A standalone full backup might be an optimal solution if you often roll back the system to its initial
state or if you do not like to manage multiple files.
Incremental backups are most useful when you need frequent backups and the ability to roll back to
a specific point in time. Having created a full backup once, if you then create an incremental backup
each day of a month, you will get the same result as if you created full backups every day.
Incremental images are considerably smaller than full images.
Copyright © Acronis, Inc., 2000-2010
13
Why incremental?
In an incremental backup, only the files changed or added since the last time the backup ran are
added to the archive. When recovering from an incremental backup, the program must copy the
entire initial backup and then step through each of the previous backups to retrieve all the updated
files.
An incremental backup created after a disk is defragmented might be considerably larger than usual.
This is because the defragmentation program changes file locations on the disk and the backups
reflect these changes. Therefore, it is recommended that you re-create a full backup after disk
defragmentation.
3.3
Backup file naming conventions
Let's remember that Acronis True Image OEM Quick Backup may split a full or incremental archive
into volumes either when a user sets the splitting option or when a large backup having a size bigger
than 4GB is saved to a FAT32 disk. See "Backup archive components" in Acronis True Image OEM
Quick Backup basic concepts.
Though users may assign any name to backups, many would still prefer using automatic naming and
the below information may come in handy when viewing the contents of a backup archive storage in
Windows Explorer and trying to figure out, e.g. which are full and which are incremental.
1) When saved to a FAT32 disk, such backup may be split into volumes with the names
SystemBackup_mm_dd_yyyy1.tib, SystemBackup_mm_dd_yyyy2.tib,
SystemBackup_mm_dd_yyyy3.tib, etc., where mm_dd_yyyy is the date of backup creation in the
following format: month (one or two digits), day (one or two digits), year (four digits).
As in this case the subsequent automatically scheduled backups will replace the previous one (once
every seven days by default) only after the next backup finishes (to keep the old backup in the event
of the current backup's failure), the backup filename(s) will be alternately named
SystemBackup_mm_dd_yyyy.tib and SystemBackup_mm_dd_yyyy(1).tib.
2) In some cases when you create a new full backup task at a new destination, the backup gets the
name "MyBackup_mm_dd_yyyy.tib".
If a backup is split (either automatically, e.g. due to the 4GB file size limit on FAT32 disks or when
configuring a backup task), the constituent backup files (volumes) are named as follows:
MyBackup_mm_dd_yyyy1.tib…MyBackup_mm_dd_yyyyN.tib, where N is the number of volumes
Subsequent incremental backups to this full backup will get the names as follows –
MyBackup_mm_dd_yyyy2.tib, MyBackup_mm_dd_yyyy3.tib, etc. (if the full backup is not split) or
MyBackup_mm_dd_yyyyN+1.tib, MyBackup_mm_dd_yyyyN+2.tib, etc. For instance, if N=8,
incremental backups will get the names MyBackup_mm_dd_yyyy9.tib,
MyBackup_mm_dd_yyyy10.tib, etc.
3) When you back up, for example, partitions C and D, the backup gets the name
"System_C_D_mm_dd_yyyy.tib".
4) If you right-click on a folder in Windows Explorer and choose Back Up in the shortcut menu, the
backup file gets the name of the folder with appended date, e.g. My Documents_mm_dd_yyyy.tib.
If you right-click on a file in Windows Explorer and choose Back Up in the shortcut menu, the backup
file gets the name of the file with appended date, i.e. filename_mm_dd_yyyy.tib.
14
Copyright © Acronis, Inc., 2000-2010
If you select in Windows Explorer several files in the same folder and then choose Back Up in the
shortcut menu, the backup file gets the name of the folder with appended date, e.g. My
Documents_mm_dd_yyyy.tib.
If you select in Windows Explorer two or more folders and then choose Back Up in the shortcut
menu, the backup file gets the name of the parent folder or disk letter (when you selected folders in
the root directory) with appended date, e.g. My Documents_mm_dd_yyyy.tib or C_mm_dd_yyyy.tib.
6) When you rename backups on the Data recovery and backup management screen, a backup is
renamed only in the program's metadata database; however, backup file names on the disk remain
unchanged.
3.4
Viewing disk and partition information
You can change the way data is represented in all schemes you see in various wizards.
The header may have up to three icons: Columns, Arrange Icons by and Disk properties, the latter
duplicated in the context menu opened by right-clicking objects.
To sort messages by a particular column, click the header (another click will switch the messages to
the opposite order) or the Arrange Icons by button and select the column.
To select which columns to view, right-click the headers line or left-click the Columns button. Then
flag the columns you want to display. When left-clicking the Columns button, you can also change
the display order of columns using the Move Up and Move Down buttons.
If you click the Disk properties button, you will see the selected partition or disk properties window.
This window contains two panels. The left panel contains the properties tree and the right describes
the selected property in detail. The disk information includes its physical parameters (connection
type, device type, size, etc.); partition information includes both physical (sectors, location, etc.), and
logical (file system, free space, assigned letter, etc.) parameters.
You can change the width of a column by dragging its borders with the mouse.
3.5
Booting from system image tib files
Users of the Enterprise and Ultimate editions of Windows 7 can now test whether they will be able to
boot from the recovered system partition. Acronis True Image OEM Quick Backup allows booting
from a tib file containing a system partition image. So if you are able to boot from such backup, you
almost certainly will be able to boot after an actual system recovery from that backup. When you
choose a tib file to boot from, Acronis True Image OEM Quick Backup creates a temporary vhd file by
converting this tib file, so your hard disk must have enough free space for storing it. Then the
program adds a new item to the Windows boot loader list. When you select the tib file in the boot
loader list, your computer will actually boot from that temporary vhd file. After testing the
bootability of the tib file, you can remove the file from the boot loader list and delete the temporary
vhd file, though you can keep it.
Copyright © Acronis, Inc., 2000-2010
15
4 Preparing for disaster recovery
4.1
How to best prepare for a disaster
Let us remind you of Murphy's Law: "Whatever can go wrong will go wrong" (and at the worst
possible time, in the worst possible way). And some people say that Murphy was an incurable
optimist. So be warned – your computer may crash and will eventually crash (and maybe just at the
worst possible moment). We may interpret Murphy's Law the other way around – it is vitally
important to consider all the possible things that can go wrong and act so as to prevent them. The
best way to counteract a possible disaster is by taking the necessary precautionary measures:
1) To be better prepared for a disaster, you need to make a full backup of your system disk (or at the
very least the partition containing Windows and your applications).
2) Whenever possible, you should store your system drive image on a hard drive other than your
primary hard disk C:, preferably on an external one. This gives an additional guarantee that you will
be able to recover your system if your primary hard disk drive fails. Furthermore, it is usually better
to keep your personal data separate from your operating system and applications, for example, on
disk D:. Such an arrangement speeds up the creation of your system and data disks (or partitions)
images and reduces the amount of information you will need to recover. This makes the backup file
of your system disk much smaller and recovery can be easier. In its turn, the smaller the backup file
size, the less chance of its corruption and the less time required for your system recovery.
3) If you store your data (documents, videos, photos, etc.) on a non-system disk, e.g. using the
arrangement described in item 2), it needs to be backed up too. You can either back up the folders
containing your data or create a data disk image. Remember that the imaging procedure is much
faster than copying files and could speed up the backup process significantly when it comes to
backing up large volumes of data. Incidentally, if the image file becomes corrupted for some reason,
it is sometimes possible to mount the image and save most files and folders by copying them from
the mounted image using Windows Explorer.
4) As recovery of your system from a disaster in most cases will be done after booting from the
rescue media, you must test the rescue media as described in the next section - Testing bootable
rescue media.
4.1.1
Recommendations for testing that your backups can be
used for recovery
1) Even if you start recovery of the active partition in Windows, the program will reboot into the
Linux environment after the recovery process starts because Windows cannot be left running while
the recovery of its own partition is being carried out. So you will recover your active partition under
the recovery environment in all cases. If you have a spare hard drive, we strongly recommend you to
try a test recovery to this hard drive booting from the rescue media which uses Linux. If you do not
have a spare drive, please, at least validate the image in the recovery environment. A backup that
can be read during validation in Windows, may not always be readable under Linux environment.
When you use the Acronis True Image OEM Quick Backup rescue media, the product creates disk drive letters
that might differ from the way Windows identifies drives. For example, the D: drive identified in the standalone
Acronis True Image OEM Quick Backup might correspond to the E: drive in Windows. To be on the safe side, it is
advisable to assign unique names to all partitions on your hard drives. This will make finding the disk containing
your backups easier.
Copyright © Acronis, Inc., 2000-2010
16
2) It may also be useful to complete all the steps in the Recovery Wizard right up to the Summary
screen, but not click the Proceed button. This will allow you to simulate the recovery process and to
make sure that Acronis True Image OEM Quick Backup recognizes both the drive containing your
backups and the target drive. After completing all the Recovery Wizard's steps click Cancel on the
Summary screen. You may repeat this until you feel sure of your settings and choices.
3) Users of the Enterprise and Ultimate editions of Windows 7 now have a way of testing whether
they will be able to boot from the recovered system partition. Acronis True Image OEM Quick Backup
allows booting from a tib file containing a system partition image (though it is converted into a VHD,
which is used for actual booting). So if you are able to boot from such backup, you almost certainly
will be able to boot after an actual recovery from that backup.
4.1.2
Additional recommendations
1) Many IT professionals recommend that you have at least two copies of your system backup (three
are even better). To be on the safe side, it is further recommended to keep one copy of a backup in a
different location from the other (preferably on other premises – for example, at work or at a friend's
home, if you use the backed up computer at home). One more argument in favor of several backups:
when starting recovery, Acronis True Image OEM Quick Backup deletes the target partition (or disk),
so when you have just a single backup, the moment the system partition is deleted on the computer
being recovered you are at great risk - the only thing you have is the image being recovered and if it
is corrupted you are in big trouble.
2) It is better to format the hard drive used for storing your backups to the NTFS file system rather
than FAT32. This is due to the 4GB file size limit on FAT32 disks. So if your backup has a size of about
100GB, Acronis True Image OEM Quick Backup will split it into 25 files. When there are several such
full backups on the hard disk, the number of files will multiply accordingly. This may be inconvenient
if, for example, you would like to move the backup to another location using Windows Explorer.
3) If you have only one computer at home, it is advisable to print some information that may be
helpful in recovering from a disaster, because you may not be able to use the Internet. Keep the
printed material in a safe place along with the rescue CD/DVD or another rescue media.
4.2
Testing bootable rescue media
To maximize the chances of your computer's recovery if need arises, you must test that your
computer can boot from the rescue media. In addition, you must make sure that the recovery media
contains all drivers required for operation of your mass storage devices and network adapter.
1) If you purchased the program after downloading it, you absolutely must create a bootable rescue
CD (or other rescue media, for example, a USB stick) following the recommendations given in the
User's Guide or program's Help and then make sure this rescue media is bootable on your computer.
You must configure your computer so as to enable booting from the rescue media and make your
rescue media device (CD-ROM/DVD-ROM drive or USB stick) the first boot device. See Arranging boot
sequence in BIOS (p. 91);
In case you have a rescue CD, press a key to start booting from the CD, as soon as you see the
prompt “Press any key to boot from CD”. If you fail to press a key within five seconds, you will need
to restart the computer. When using other rescue media, the procedure will be similar.
2) After the computer boots into the recovery environment, check that it detects all the hard drives
you have in your system, including external ones, if you use them for storing backups. Incidentally,
Copyright © Acronis, Inc., 2000-2010
17
you must attach the external drive(s) before booting from the rescue media, otherwise the recovery
environment might not detect the drive(s).
3) If you store your backups on the network, you should also check that you can access the network
in the recovery environment. When booted from the rescue media, Acronis True Image OEM Quick
Backup might not detect the network. If no computers are visible on the network, but the Computers
near me icon is found under My Computer, ensure that a DHCP server is running on your network. If
you don't use a DHCP server, specify network settings manually in the window available at Tools &
Utilities ® Options ® Network adapters.
If the Computers near me icon is not available under My Computer, there may be problems either
with your network card or with the card driver shipped with Acronis True Image.
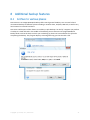
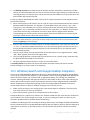
Selecting video mode when booting from the rescue media
When booting from the rescue media the optimal video mode is selected automatically depending
on the specifications of your video card and monitor. However, sometimes the program can select
the wrong video mode, which is unsuitable for your hardware. In such case you can select a suitable
video mode as follows:
1. Start booting from the rescue media. When the boot menu appears, hover the mouse over
Acronis True Image OEM Quick Backup (Full version) item and press the F11 key.
2. When the command line appears, type "vga=ask" (without quotes) and click OK.
3. Select Acronis True Image OEM Quick Backup (Full version) in the boot menu to continue booting
from the rescue media. To see the available video modes, press the Enter key when the
appropriate message appears.
18
Copyright © Acronis, Inc., 2000-2010
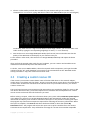
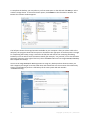
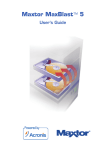
4. Choose a video mode you think best suitable for your monitor and type its number in the
command line. For instance, typing 338 selects video mode 1600x1200x16 (see the below figure).
Incidentally, when there is a digit or letter before a three-digit number, you can also select such
video mode by typing the corresponding single digit or letter ("v" in our instance).
5. Wait until Acronis True Image OEM Quick Backup (Full version) starts and make sure that the
quality of the Welcome screen display on your monitor suits you.
To test another video mode, close Acronis True Image OEM Quick Backup and repeat the above
procedure.
After you find the optimal video mode for your hardware, you can create a new bootable rescue
media that will automatically select that video mode.
To do this, start Acronis Media Builder, select the required media components, and type the mode
number with the "0x" prefix (0x338 in our instance) in the command line at the "Bootable media
startup parameters" step, then create the media as usual.
4.3
Creating a custom rescue CD
If the recovery environment cannot detect some of the hard disk drives or the network adapter,
usually there is a problem with the drivers. Acronis rescue CD cannot contain drivers for all hardware
on the market. So when the standard rescue CD lacks some of your hardware drivers, you need to
create a custom one.
The Linux-based recovery environment used by Acronis does not provide the ability for users to add
new drivers. Because of this, you should request Acronis Customer Service Department to create a
custom rescue CD that will have all the drivers you need.
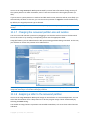
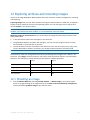
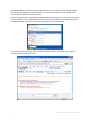
Before making a request, collect the information about your system. Select Generate System Report
in the Help menu. Acronis True Image OEM Quick Backup will automatically collect the required
information and display a list of what is collected in the report. In the process of creating the report
the program may install some components required for collecting the necessary information. When
the report is complete, click Save As and select the desired folder or leave the default My
Documents folder. The program will archive the report into a zip file. Send the file to the Acronis
Customer Service Department. They will build an iso image of a custom rescue media compatible
Copyright © Acronis, Inc., 2000-2010
19
with your computer hardware and send you an iso file. Burn this file to a CD/DVD using a program
that can handle iso files such as Nero. Incidentally, this report may also be useful when you request
the Acronis Customer Service Department to help you with a problem.
After burning your custom rescue CD, test it to make sure that your hard disk drives and network
adapter are now detected in the recovery environment.
20
Copyright © Acronis, Inc., 2000-2010
5 Getting to know Acronis True Image OEM Quick
Backup
5.1
Program workspace
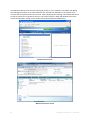
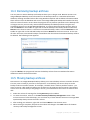
Starting Acronis True Image OEM Quick Backup takes you to the Welcome screen. This screen
provides quick access to backup and recovery features, as well as highlights any issues with your
system's protection.
Your system is considered fully protected when it is backed up and a bootable rescue media is
created. If some of the aforementioned have not been done, Acronis True Image OEM Quick Backup
shows the following links allowing to solve the protection issues: Back Up My System, Create
Bootable Rescue Media. After an issue is solved, the corresponding link disappears.
Clicking the items in the right pane takes you to the corresponding screen where you can either start
the backup or recovery task immediately or make further selections.
The My favorites area in the right pane lists the features you have used most often and provides
shortcuts to them in case you would like to use the features again. The Recent backups area lists the
backups you have recently run and allows you to update the backup archives with just one click.
You can easily access the Acronis True Image OEM Quick Backup features through the so called
sidebar occupying the left side of the screen. Choosing an item on the sidebar takes you to a screen,
where you can access the corresponding features.
Copyright © Acronis, Inc., 2000-2010
21
Acronis True Image OEM Quick Backup uses wizards, which guide you through many operations. Like
the main program window, wizards also have the sidebar listing all the steps (both required and
optional) needed for completing the operation. For example, see the Backup Wizard screen shot
below.
The completed steps are marked with green checkmarks. The green arrow shows the current step.
After you complete all the required steps and come to the Finish step, the program displays the
Summary screen. If you wish to omit the optional steps, read the summary of the operation to be
performed (to make sure that the default settings satisfy you) and then click Proceed to start the
task. Otherwise, click Options to go to the optional steps where you can change the default settings
for the current task.
Taskbar notification area icons
During most of the operations, special indicator icons appear in the Windows taskbar notification
area (the right portion of the status bar with the clock). If you mouse over the icon, you will see a
tool tip indicating the operation's progress or state. Right-clicking on the icon opens a shortcut menu
where you can change operation's status or cancel the operation if necessary. This icon doesn't
depend on the main program window being open.
5.2
Main screens
And now let's get acquainted with some of the other screens you will use while working with Acronis
True Image OEM Quick Backup.
22
Copyright © Acronis, Inc., 2000-2010
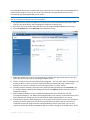
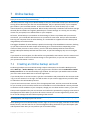
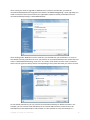
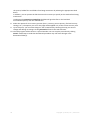
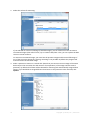
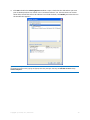
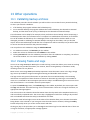
To go to one more screen of interest, click Recovery on the sidebar.
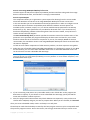
The Data recovery and backup management screen gives detailed information on your backup
archives and provides for quickly performing operations on these archives – Recover, Validate, Move,
Remove, Explore backup archives, as well as Mount image backups by right-clicking on an archive and
choosing the required operation. This starts the appropriate wizard or performs the appropriate
action.
In addition, this screen provides for recovery of your data from Online Backup storages by clicking
the appropriate link.
Here you can also edit comments for backups, see detailed information on the backups, and assign
ratings to your backups. For instance, you may want to assign a high rating to an important backup. A
backup rating is indicated by the number of "stars" in the Rating column (more stars means a higher
rating). The default rating is three stars, but you can raise or lower it by clicking on the stars in the
column. Ratings might save you a lot of time you will otherwise spend on exploring multiple files in
your backup archives, trying to guess which of the outdated backups can be deleted without losing
important data.
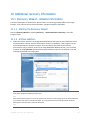
Furthermore, this screen shows the results of searches for backup archives and their content. To
perform a search, enter a search string into the Search field at the top right of the Acronis True Image
OEM Quick Backup window and then click the magnifying glass icon. For more information see
Searching.
Copyright © Acronis, Inc., 2000-2010
23
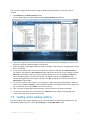
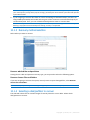
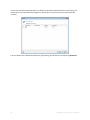
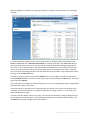
Another useful screen shows the log of program operations. A calendar provides quick access to the
logs (for past dates). You just click on a desired date. For more information see Viewing Tasks and
Logs.
We will not bore you with a description of other screens, because many of them are self-explanatory
and some are described in the appropriate chapters of this guide. In addition, you can always open
contextual help by clicking the corresponding button.
Incidentally, you can also select most of the features through the main program menu, which is
always at your disposal on the toolbar.
24
Copyright © Acronis, Inc., 2000-2010
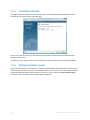
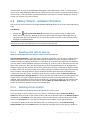
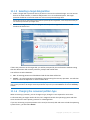
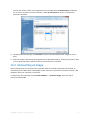
5.3
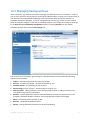
Options screen
Acronis True Image OEM Quick Backup has options related to its appearance and various program
functions. To view or edit the default options, choose Tools & Utilities→ Options in the main
program menu.
The Backup options item provides for making settings to be used by default in any backup task. You
can modify the settings depending on your backup needs. For detailed information on the backup
options and possible settings see Fine-tuning your backups. In addition, you can change the backup
options while configuring a specific backup task. In such case the changed options will be used only
for this task.
Similarly, the Recovery options item provides for making settings to be used by default by any
recovery task. For detailed information on the recovery options and possible settings see Setting
default recovery options. As with the backup options, you can change the recovery options for a
specific recovery task.
The Local storage settings item provides for making other settings related to the backup process, for
example, they may have a more or less noticeable effect on the backup process speed. For more
information see Fine-tuning your backups.
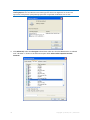
The Search options allow you to enhance the Search function by integrating it with Windows Search
or Google Desktop search engines. If you have one of those search engines installed, you can include
tib files in their index files by selecting the appropriate box in the Desktop search options window.
For more information see Windows Search and Google Desktop integration
The Appearance options allow modifying the appearance of the program's user interface by selecting
a font to be used on screens, in dialogs, etc. You can also modify a font to be used in the menu items.
To view the appearance of a concrete font, click the "..." button, select the font and have a look at
the sample text. If you are satisfied with the font's appearance, click OK, otherwise try another font
or click Cancel. In addition, the Appearance options let you filter all tasks created on your computer.
By default you see only your own tasks, but you have the option to view or manage tasks created by
other users. To do so, choose Filter and unselect the Show only tasks created by a current user box.
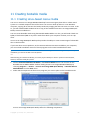
The Feedback option allows you to quit the Acronis Customer Experience Program, if you decided to
join it during Acronis True Image OEM Quick Backup installation or join the program by selecting the
Copyright © Acronis, Inc., 2000-2010
25
Yes, I want to participate in the program radio button. If you want to know more about the
Customer Experience Program, click the Learn more link.
If modifying the default options does not provide the desired results or if you just want to restore the
default options values set during Acronis True Image OEM Quick Backup installation, click Reset all to
default on the toolbar. When you need to set the default values only for a selected option, click
Reset the current to default on the toolbar.
26
Copyright © Acronis, Inc., 2000-2010
6 Creating backup archives
6.1
Preparing for your first backup
First of all you should decide where to store your backups. Acronis True Image OEM Quick Backup
supports quite a lot of storage devices. For more information see Supported storage media. Since
hard disk drives are now quite inexpensive, in most cases purchasing an external hard drive for
storing your backups will be an optimal solution. In addition to enhancing the security of your data –
you can keep it off-site (for example, at home if you back up your office computer and vice versa),
many models are hot-pluggable, so you can attach and detach the drive as required. You can choose
various interfaces – USB, FireWire, eSATA depending on the configuration of your computer ports
and the required data transfer rate. In many cases the best choice will be an external USB hard drive.
If you have a Gigabit Ethernet home network and a dedicated file server or NAS, for example, Buffalo
TeraStation 1.0 TB NAS Gigabit Ethernet Home Server, you can store backups on the file server or
NAS practically like onto an internal drive. Blank optical discs such as DVD-R, DVD+R are very cheap,
so they will be the lowest cost solution for backing up your data, though the slowest one, especially
when backing up directly to DVDs. Furthermore, if your backup consists of several DVDs, data
recovery from such backup will require a lot of disc swapping.
Due to the necessity of swapping discs, it is strongly recommended to avoid backing up to DVDs if the number of
discs is more than three.
If you decide to use an external hard drive, NAS, etc., you will need to check whether Acronis True
Image OEM Quick Backup detects the selected backup storage.
Some external hard drives are sold preformatted FAT32. If so, it is better to convert the external hard
drive for backups from FAT32 into NTFS, because of the 4GB file size limit of the FAT32 system. Due
to this limitation, large backup files will automatically split into 4GB chunks, thus increasing the
chance that something will go wrong during data recovery.
If you plan to use an external USB hard drive with your desktop PC, connecting the drive to a rear
connector using a short cable will usually provide the most reliable operation, reducing the chance of
data transfer errors during backup/recovery.
6.2
Deciding what data to back up
As operating systems and application software become ever larger (for example, Windows Vista x64
requires 15GB of free space on a hard disk), usually it will take you several hours to reinstall your
operating system and application software from original CDs or DVDs on a new hard disk.
Furthermore, the practice of buying application software by downloading from the Internet is
becoming more and more popular. If you lose your registration information, for example, the
activation key and/or registration number, which are usually sent by software vendors by e-mail, you
may have problems with restoring your right to use the application. So making a backup of your
entire system disk (making a disk image) will save you a lot of valuable time in case of a disaster, as
well as safeguard you against other possible problems.
Backing up the entire system disk takes more disk space, but enables you to recover the system in
minutes in case of a system crash or hardware failure. Moreover, the imaging procedure is much
faster than copying files and could speed up the backup process significantly when it comes to
backing up large volumes of data (for details see Disk/partition images (p. 13)).
Copyright © Acronis, Inc., 2000-2010
27
You might think it would take a while to make a copy of your entire hard disk, but the proprietary
technologies used in Acronis True Image OEM Quick Backup ensure that image creation is quite fast.
You should create images of your primary disk and any other partition you normally use. If you have
multiple partitions on a drive, it is advisable to include all of them in the image, because failure of the
hard drive in most cases will mean that all the partitions it contains also fail.
Although we strongly recommend you to create images of your hard disk on a regular basis, that is
just part of a reliable backup strategy.
6.3
Some typical backup scenarios
Below are several scenarios of "classic" backups describing frequently used backup tasks. Depending
on your backup strategy, you may find some of them useful.
6.3.1
Backing up a system partition
It is recommended to back up the system partition when your C: disk consists of a single partition,
though in this case partition backup is equivalent to system disk backup. It is also makes sense to
back up the system partition if it contains all your applications and important data or if you do not
have enough free space for backing up the entire system disk. A system partition backup would be
most helpful when you need to recover the operating system corrupted by a virus, malware or, for
example, after Windows update installation. Recovery on a new hard disk drive is possible too,
though it may be a bit complicated in case you want to create more than one partition on the new
hard disk. Otherwise it is better to back up the entire system disk, especially if it has hidden recovery
or diagnostic partitions created by your computer's manufacturer. Furthermore, a system disk
backup is more convenient when recovering on a new disk. Backing up the system partition may also
be advisable when you like testing a lot of applications or games. Most applications cannot be
uninstalled without a trace, including Acronis True Image OEM Quick Backup itself. You can make a
basic system partition backup containing your operating system and main applications like MS Office
and Outlook. Thereafter you will always be able to recover that basic system state after trying new
programs – if you don't like them or if something goes wrong.
6.3.2
Backing up an entire system disk
When your backup storage device has enough free space, it is advisable to back up the entire system
disk. Such a backup is most suitable for recovering your system and applications both when you need
to recover them on the original hard disk drive or a new one, e.g. after your hard drive failed.
Incidentally, if your system disk contains several partitions, an entire disk backup also provides for
recovery of any individual partition.
Because system disk backups are the most important for disaster recovery, it is advisable to check
both the system disk and the hard disk to be used as the backup storage for errors with the help of
Microsoft's Chkdsk utility, which is part of Windows. The utility can repair errors and locate bad
sectors.
You can back up the system disk both in Windows and in the recovery environment. Before starting a
system disk backup in Windows it is advisable to close such applications as MS Outlook and DBMS
programs.
Though the program locks the system partition while making a so called "snapshot" (see Acronis True
Image OEM Quick Backup basic concepts), some users still prefer backing up the system disk when
Windows is not running.
28
Copyright © Acronis, Inc., 2000-2010
The subsequent description is made under the assumption that you boot from your bootable rescue
media and the program "sees" all your hard drives and other storage devices in the recovery
environment. See Testing bootable rescue media.
Attach the external drive if it is to be used for backup storage and make sure that the drive is powered on. This
must be done before booting from Acronis rescue media.
1. Arrange the boot sequence in BIOS so as to make your rescue media device (CD, DVD or USB
stick) the first boot device. See Arranging boot sequence in BIOS (p. 91).
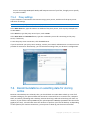
2. Boot from the rescue media and select Acronis True Image OEM Quick Backup (Full version).
3. Click the My Disks link under Back Up on the Welcome screen.
4. Select the system disk as the source for backup by checking the appropriate disk box (this will
select all partitions on the disk, including the hidden ones).
5. Choose a target archive for the backup being configured – you can either add a new backup to an
existing archive or create a new one. Choose the backup location and assign a name to the
backup to be created. It is better to use meaningful names, e.g. Disk1_full.tib.
6. Carefully read the Summary of actions to be performed during backup and click Proceed if you
are satisfied with the backup task settings, otherwise click Options on the Summary screen to
change the settings.
7. Select a backup method. For a more detailed explanation of the methods see Full and
incremental backups (p. 13). When performing backups in the recovery environment many users
prefer full backups, though you may choose another method depending on your needs.
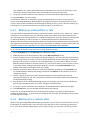
8. Set the backup options. When backing up in the recovery environment you must set the options
manually for each backup task. You can encrypt the backup for data protection and select a
compression level (the program shows estimated backup sizes for each level). You can also
choose to validate the backup immediately after its creation, though it can be done later. In any
Copyright © Acronis, Inc., 2000-2010
29
case validation of a system disk backup is best performed in the recovery environment, as you
will use the recovery environment when recovering the system partition or disk.
9. If you wish, provide comments to the backup. You will also be able to add comments later.
10. Click Proceed to start the backup.
It is extremely important to validate the system disk backup before trying to recover, because
Acronis True Image OEM Quick Backup deletes the original partition(s) on the disk before starting
recovery and if it finds a problem with the backup file during recovery, you are left with nothing. It is
even better to try system disk recovery to a spare hard drive, if you have one.
6.3.3
Backing up a data partition or disk
Your personal data (MS Office documents, financial documents, pictures, music, videos, etc.) require
protection in no less degree than your operating system. Such data is better kept separately from
your operating system and applications on a dedicated partition or disk. This speeds up data partition
or disk image backup, as well as recovery. It is recommended to perform data disk backup in
Windows, because in most cases Windows drivers for storage devices operate better and faster than
the respective Linux drivers used in the recovery environment. In addition, recovery of data disks and
partitions usually occurs in Windows. Let's create a data disk backup task in Windows.
Attach the external drive if it is to be used as the backup destination and make sure that the drive is powered
on. This must be done before starting Acronis True Image OEM Quick Backup.
1. Click the My Disks link under Back Up on the Welcome screen.
2. Select the box of your data partition or disk on the What to back up screen.
3. Choose a target archive for the backup task being configured – you can either add a new backup
to an existing archive or create a new one. Choose the backup location and assign a name to the
backup to be created. It is better to use meaningful names, e.g. Data_disk.tib. When you store
different backup archives in the same location, e.g. on an external drive, you may want to create
a new folder when creating a new backup archive. To do this, click Create new folder in the
toolbar, then assign a meaningful name to the folder.
4. Carefully read the Summary of actions to be performed during backup and click Proceed if you
are satisfied with the backup task settings, otherwise click Options on the Summary screen to
change the settings.
5. Choose a backup method. For a more detailed explanation of the methods see Full and
incremental backups (p. 13). Let's reiterate that selection of the backup method may depend on
the desired backup strategy.
6. Set the options for the backup task being created. For example, you can choose to validate the
backup right immediately after its creation, though it can be done later.
7. If you wish, provide comments to the backup. You will also be able to add comments later.
8. Click Proceed when you are satisfied with the backup task settings.
If you have not included validation into the backup task settings, it is strongly recommended to
validate the backup later – by performing the validation task manually. You should get into the habit
of validating your backups.
6.3.4
Backing up to a network share
With Acronis True Image OEM Quick Backup you can back up your data to a network share. This may
be desirable, for example, when you have a file server and want to use it for backing up data from
PCs in your home network. Depending on your backup strategy, you may want to back up just files
30
Copyright © Acronis, Inc., 2000-2010
and folders or entire disks. One more consideration is the data transfer rate provided by your
network. For example, a Gigabit Ethernet network has a bandwidth sufficient for all amounts of data
to be backed up. However backing up over Wi-Fi connection may be time-consuming when you need
to back up a hundred gigabytes.
Files and folders or data partitions can be backed up and recovered in Windows. If you plan to back
up your system disk or partition, please, make sure that the standalone version of Acronis True
Image OEM Quick Backup can "see" the network share to be used for backups as system recovery
will be done in the recovery environment. After booting from the rescue media make sure that you
can browse to the share in the Backup wizard or Recovery wizard.
It may be advisable to first back up and recover some files to ensure that you can perform those
operations over the network. In addition, it is not recommended to map the drive containing the
network share. Specifying the UNC path makes it easier to establish network connection in most
cases.
Let's suppose you want to back up your system partition.
1. Start Acronis True Image OEM Quick Backup and click the My Disks link under Back Up on the
Welcome screen.
2. Select the check box of your system partition on the Source selection screen.
3. When you are connecting to a networked computer, in most cases you will need to provide the
network credentials (user name and password) to access a network share. To do this, select the
Use NT authentication box and enter the user name and password into the appropriate fields.
Pressing the Test authentication and connection button allows testing the ability of the
computer to connect to the selected network share. If testing results in an error message, check
whether you provided the correct credentials and enter the right credentials for the network
share. When the Use NT authentication box is left unselected, the computer will try to log on to
the share with the credentials used for logging on to Windows. Having provided the required
information, click OK to continue. Choose a target archive for the backup task being configured –
you can either add a new backup to an existing archive or create a new one. It is better to use
meaningful names, e.g. Disk_C.tib.
4. Carefully read the Summary of actions to be performed during backup and click Proceed if you
are satisfied with the backup task settings, otherwise click Options on the Summary screen to
change the settings.
5. Choose a backup method. For a more detailed explanation of the methods see Full and
incremental backups (p. 13). Let's reiterate that selection of the backup method may depend on
the desired backup strategy.
6. Set the options for the backup task being created. You can choose to validate the backup
immediately after its creation, though it can be done later.
7. If you wish, provide comments to the backup. You will also be able to add comments later.
8. Click Proceed when you are satisfied with the backup task settings.
Copyright © Acronis, Inc., 2000-2010
31
7 Online backup
Acronis Online Backup might be unavailable in your region. To find more information, click here:
https://www.acronis.com/my/online-backup/
The main reason for using Acronis Online Backup is that you will be able to keep your data secure by
storing off-site. Because your files are stored elsewhere, they are protected even if your computer
gets stolen or your house burns down. So the risk of data loss as a result of theft, fire, or other
natural disasters is practically eliminated. Online backup is basically a method of off-site data storage
whereby files and folders are regularly backed up on a remote storage. As a result, you can safely
recover any corrupted, lost or deleted files on your computer.
Of course, online backup is not without its shortcomings. If there is a problem with your Internet
connection, you could be left without access to your data for some time. And you won't be able to
boot up your computer from an online backup, so it is advisable to supplement online backup with
image backups to local hard disks.
The biggest drawback of online backup is speed. Even through a fast broadband connection, backing
up your data online will be much slower than backing up to a local hard drive. Depending on the
amount of data you want to store off-site, your first full online backup could last several hours,
though subsequent backups will take much less time, as you'll be backing up only new or changed
files.
If you decide to use encryption, the files will be encrypted before transmission over the Internet and
data will be stored on the Acronis Online Storage in encrypted form, so you can rest assured that
your private information is secure.
7.1
Creating an Online backup account
Performing backups to Acronis Online Storage requires subscription to the Online Backup service.
Select Back Up → Online Backup in the main program menu and then click the Subscribe to Online
Backup service link on the Online Backup Login window. This will open your web browser and take
you to the main Acronis Web site to continue registration.
If you already have an Acronis account, type the e-mail address and password for that account under
"Log in to Your Account" to the right. You will be taken to your account page where you will be able
to subscribe to the Online Backup Service.
If you do not have an Acronis account, fill in the appropriate fields, and the account will be created
for you. Provide your first and last names and e-mail address. You will be offered a country selected
on the basis of the IP address of your computer, though you can select another country, if you wish.
Then provide a password for your new account and confirm the password by retyping it once more in
the appropriate field. When you perform all actions necessary for account registration, please, wait
for an e-mail message that will confirm opening of the account.
To keep your personal data secure, choose a strong password for your online backups, guard it from getting into
the wrong hands, and change it from time to time.
After opening an Acronis Online Backup account, log in to your account page, subscribe to the Online
Backup service, and then wait for an e-mail message describing the details of your subscription plan
and expiration date. Now you can perform your first online backup.
Copyright © Acronis, Inc., 2000-2010
32
7.2
Backing up to Acronis Online Storage
To perform an online backup, log on to your Online Backup service account by clicking Backup →
Online Backup on the sidebar and entering your e-mail address used for opening the account and the
password. In order to not enter the password during subsequent logons, you may want to select the
Remember the password check box. Make these settings and click Log In.
After the program connects to Acronis Online Backup Server, select a computer for connection to the
Online Storage. When logged on to the online backup service for the first time, register a computer
for work with Online Backup. To do this, click New computer, then type in the computer name.
If you want to use encryption for the data to be stored on the Online Storage, enter an encryption
key to be used for encrypting your data. Entering the encryption key automatically enables
encryption of all data stored on the Online Storage. The encryption key is similar to a password, but it
is used for unlocking access to your encrypted data. Acronis Online Backup uses the industrystandard AES-256 encryption algorithm. The data will be encrypted before transferring through the
Internet to the Online Storage and will be stored in encrypted form. You need to enter the
encryption key for the computer only once during its registration, though it will be required if you try
to recover files backed up from this computer when connected to the Online Storage from another
computer. Having made all the necessary settings, click Continue.
Until you log off, subsequent connections to the Online Storage from this computer will occur
automatically - you just need to select Online Backup.
If you already registered the computer, select it from the list of registered computers, then click
Continue. By default your current computer is selected for registration.
Copyright © Acronis, Inc., 2000-2010
33
When the computer connects to the online storage, the Online storage screen with your storage
space quota appears.
If you have performed backup on this computer before, you will see how much Online storage space
is occupied by the backed up files and folders. The screen also shows the space occupied by the data
backed up from other computers (if any) and the remaining free space on the Online storage in
accordance with your quota.
When you are going to back up from the current computer for the first time (or need to change the
files and folders selected for online backup), click What to Back Up. This will open the What to Back
Up window with two tabs: Include and Exclude.
The Include tab displays your computer's file and folder tree. The area to the right of the tree shows
the contents of a selected folder. This tab allows you to select individual files and folders for backing
up, as well as data categories. For more information on categories see Selecting what data to back
up. Furthermore, you can create a custom category by clicking Add new category. For more
information see Creating a custom data category for backups. Select the files and folders that need to
be backed up.
The Exclude tab enables hidden and system files and folders to be excluded from online backup, as
well as files meeting the criteria you specify. Excluding unnecessary files may be useful for backups to
the Online storage as the data transfer rate and available space are limited.
You can also exclude/include files and folders by selecting them in Windows Explorer and choosing Storages →
Exclude from Online Backup (or Include in Online Backup ) in the shortcut menu that opens by right-clicking on
the selected file or folder. This shortcut is only available when you are logged on to the Online Backup service.
Having finished selecting files and folders for backing up to the Online storage and for excluding from
backup click OK. If you do not unselect the Run the updated online backup task now check box that
is selected by default, the online backup task will start immediately. Otherwise it will run according
to the schedule you set.
To schedule online backups, click the Edit schedule... link. For instance, you may want the backups to
be performed at night in order to not interfere with your web surfing. For more information see
34
Copyright © Acronis, Inc., 2000-2010
Scheduling tasks. When you finish scheduling and click OK, the schedule information will be shown
above the Edit schedule... link.
By default Acronis True Image OEM Quick Backup schedules daily backups to the Online Storage with randomly
selected backup start time.
You can quickly start updating the files and folders backed up on the Online storage without creating
a backup schedule. To do so, click Update Backup Now. This may be useful when you want to back
up immediately some important changes to the files backed up on the Online Storage. Incidentally, if
the last scheduled online backup has failed, this link changes to Update Backup Now (Last backup
failed), allowing you to repeat the failed backup task right away. If you have suspended the previous
online backup for any reason, the link text will be as follows: Update Backup Now (Last backup
suspended).
7.3
Recovering data from Online Storage
Log on to your online backup account by clicking Backup → Online Backup on the sidebar and
entering your e-mail address used for opening the account and the password. After the program
connects to Acronis Online Backup Server, select a computer for registration on the Online Storage.
By default your current computer is selected for registration. Click the Continue button. The Online
storage screen opens with this computer selected. If you have data backed up from more than one
computer, you can select on this screen the computer from which to recover required files. Naturally,
you can only browse and recover the data backed up from other computers.
If you encrypted data on another computer, you will be asked to enter the encryption key for the
computer to get access to its data on the Online Storage.
1. Click Browse on the Online storage screen.
Acronis Time Explorer will be opened with the Online Storage tab selected.
Copyright © Acronis, Inc., 2000-2010
35
2. This window also allows choosing the computer from which you backed up the files and folders
you need to recover. Select the computer by its name on the directory tree under Online Storage
in the left pane.
3. By default the state of the Online Storage after the latest backup is displayed, so the latest
versions of the files and folders will be recovered. If you need to recover earlier versions, select
the date and time on which you want to recover the state of the files and folders.
4. Select the folder containing the files you want to recover in the left pane. The right pane lists the
files in that folder. Select the files to recover. When selecting multiple files you can use the Ctrl
and Shift keys like in Windows Explorer. Having finished selection, click the Recover icon on the
toolbar.
5. Acronis True Image OEM Quick Backup opens the Browse for folder dialog. By default the
original location from which the files were backed up will be selected. If necessary, you can select
another folder or create a new folder for the files to be recovered to by clicking the Make New
Folder button. After selecting the folder click OK.
If you recover the files to the original folder and Acronis True Image OEM Quick Backup finds a file
with the same name there, it will open a dialog window where you can choose what to do with the
file: Recover and replace the file on the disk, Do not recover (to keep the file on the disk), and
Recover, but keep both files (the recovered file will be renamed). If you want to use the choice for all
files with identical names, select the Apply to all files check box.
It is impossible to Recover and replace files on the disk which are being used or locked by the operating system
at the moment of recovery.
If you need to recover a specific version of a file, select the file, right click and choose View Versions
in the shortcut menu. This opens the File Versions window. Select the required version by its backup
time and click Recover on the toolbar. You can also recover the version by dragging it into a selected
folder.
To choose the correct version, you can open the version in the associated application and view the
file contents. Select the file in the right pane and the bottom line of Time Explorer will show the
times of backing up all its versions kept on the Online Storage. Choose a version by its backup time,
then right-click on the file in the right pane and choose Open in the shortcut menu. Acronis True
Image OEM Quick Backup will recover the file version to a temporary folder and then will open the
file using the associated application.
7.4
Managing Online Storage
As the available space on Acronis Online Storage is limited depending on the chosen backup plan,
you need to manage your Online Storage space by cleaning up the obsolete data. Cleanup can be
done in a variety of ways. The most "drastic" one is removing a computer registered on the Online
Storage, if you have registered more than one. Removing a computer results in deleting all data that
was backed up from that computer, so such an operation must be carried out with caution. To
remove a computer, select it on the Online storage screen by its name and click Remove
<Computer_name>, then click Yes in the confirmation window. After the deletion finishes, click
Refresh on the toolbar to refresh the storage state shown.
The Online backup options provide for automatic cleanup of the Online Storage. You can specify
deletion of files that have been kept on the storage longer than the specified number of months or
days. In addition, you can set the maximum number of file versions to be kept on the Online Storage.
You can accept the default settings for those options shown above the Change cleanup options...
link or set the values you need. To change the above options, click the link and set the desired values.
36
Copyright © Acronis, Inc., 2000-2010
You can also manage Acronis Online Storage by deleting individual files or even some of their
versions.
1. Click Browse on the Online storage screen.
Acronis Time Explorer will be opened with the Online Storage tab selected.
2. Select the computer from which you backed up the files you need to manage by its name on the
directory tree under Online Storage in the left pane.
3. Select the folder containing the files you want to manage in the left pane. The right pane lists the
files in that folder.
4. If you want to delete some versions of a specific file, select the file and click View Versions on
the toolbar. This opens the File Versions window. Select the version you want to delete and click
Remove on the toolbar. When you want to delete several versions, use the Ctrl and Shift keys
like in Windows Explorer to select the versions for deletion and then click Remove on the
toolbar. Having finished removing the versions, click OK. To delete all versions of the file click
Remove All on the toolbar.
5. If you want to delete a file, select it in the right pane. When selecting multiple files for deletion
you can use the Ctrl and Shift keys like in Windows Explorer. Having finished selection, right-click
on the selection and choose Delete in the shortcut menu.
6. After you finish managing the Online Storage, close the Acronis Time Explorer window.
7. To see how much space you have freed up, click Refresh on the toolbar of the Storage state
screen and check the new value of free space.
7.5
Setting online backup options
You can set these options after logging on Acronis Online Backup and selecting a computer for use
with Online backup service. To do so, click Settings on the Storage state screen.
Copyright © Acronis, Inc., 2000-2010
37
7.5.1
Connection attempts
This page allows you to optimize the settings Acronis True Image OEM Quick Backup uses when
establishing connection to the Online Storage.
Here you can specify how many connection attempts will be made if the first attempt fails (the
default number is 10).
In addition you can specify a time interval between connection attempts (30 seconds by default).
7.5.2
Storage connection speed
One more option gives you the ability to "throttle" the bandwidth allocated for data transfer to the
Online Storage. Set the connection speed that will allow you to send e-mail or surf the Web without
annoying slowdowns while online backup is running. To do this, select the Limit transfer rate to:
check box and set the connection speed (8 Mbps by default).
38
Copyright © Acronis, Inc., 2000-2010
To back up your data to the Online storage at the maximum speed your Internet connection can
provide, unselect the Limit transfer rate to: check box.
7.5.3
Storage cleanup
The Storage cleanup page is intended for setting the options that enable automatic cleanup of
obsolete file versions from the online storage to keep the storage from overfilling.
You can:
Delete versions that are older than the specified time period - 6 months by default.
Specify how many versions of your files must be kept on the Online Storage. This will allow you
to return to a previous file version if your changes in a file turn out to be erroneous. By default
Copyright © Acronis, Inc., 2000-2010
39
Acronis True Image OEM Quick Backup will keep 10 versions of your files, though you can specify
any other number.
7.5.4
Proxy settings
If your computer is connected to the Internet using a proxy server, enable use of the proxy server
and enter its settings.
Acronis Online Backup supports only http and https proxy servers.
In the Host name box, type the name or IP address of the proxy server, such as proxy.example.com
or 192.168.0.1.
In the Port box, type the proxy server's port, such as 8080.
In the User name and Password boxes, type the credentials you use for connecting to the proxy
server, if necessary.
To test the proxy server connection, click the Test button.
If you do not know your proxy server settings, contact your network administrator or Internet service
provider for assistance. Alternatively, you can take these settings from your browser's configuration.
7.6
Recommendations on selecting data for storing
online
Because online backups are relatively slow, you should think over what data to back up. First of all
consider backing up your personal data that cannot be recovered if lost as a result of fire, computer
theft, etc. Before proceeding with a backup, estimate how long it will take to back up your data. For
instance, if your folders take up 10GB and your upload speed is 1000 Kbps (somewhat less than half a
gigabyte per hour), it should take more than 20 hours to perform your first full backup. So depending
on the speed of your Internet connection, you may want to back up just the most critical files.
40
Copyright © Acronis, Inc., 2000-2010
8 Additional backup features
8.1
Archive to various places
Now Acronis True Image OEM Quick Backup offers much greater flexibility. You can save full and
incremental backups to different places including a network share, CD/DVD, USB stick, as well as any
local internal or external hard drive.
One more useful aspect of this feature is its ability to split backups "on-the-fly". Suppose you perform
a backup to a hard disk and in the middle of the backup process Acronis True Image OEM Quick
Backup finds out that the disk, to which you are backing up, does not have sufficient free space for
completing the backup. The program displays a message warning you that the disk is full.
Copyright © Acronis, Inc., 2000-2010
41
To complete the backup, you may either try to free some space on the disk and click Retry or select
another storage device. To choose the latter option, click Browse in the information window. The
Browse for Location window appears.
The left pane shows the storage locations available on your computer. After you select a disk in the
left pane, the program shows the free space on that disk in the right pane. If the free space is enough
for completing the backup, assign a name for the file that will contain the remaining data being
backed up. You can either enter the name manually (for example, "Tail_end.tib") or use the file name
generator (a button to the right of the line). Then click OK and Acronis True Image OEM Quick Backup
will complete the backup.
Acronis True Image OEM Quick Backup permits to assign any backup archive whatever name you
wish. Suppose you bought a new hard disk drive and transferred to it the contents of the old one by
cloning. You decided to perform a full backup of the new system disk and named it
"DiskCafterCloning".
42
Copyright © Acronis, Inc., 2000-2010
After a while you chose to upgrade to Windows Vista. To be on the safe side, you made an
incremental backup before the upgrade and named it "DiskCBeforeUpgrading". Upon upgrading you
made sure that the new system and all your applications operate normally and made one more
incremental backup naming it "DiskCWindowsVista".
After working under Windows Vista for some time you decided that you would like to try Linux as
well. Before creating a partition for Linux you perform an incremental backup of the system disk and
name it "DiskCBeforePartitioning", and so on. As a result, if the need to recover arises, you will be
able to find at a glance a backup archive corresponding to the system disk state you want to recover.
As was already mentioned, you can save full and incremental backups to different locations. For
example, you can save the initial full backup to an external USB hard drive, and then burn the
subsequent incremental backups to CDs or DVDs. It is also possible to save such backups to a
Copyright © Acronis, Inc., 2000-2010
43
network share. If you have saved backups belonging to the same backup "chain" to various places,
Acronis True Image OEM Quick Backup may prompt you for the locations of previous backups during
data recovery, in the case when the selected backup archive does not contain the files you want to
recover (or contains only a part of them).
8.2
Backup Wizard – detailed information
The current version of Acronis True Image OEM Quick Backup allows you to choose only Disk backup
type:
Disk backup:
Choose the
Disk and Partition Backup parameter if you need to create an image of the
entire disk or its partitions. Backing up the entire system disk (creating a disk image) takes up
significant disk space, but enables you to recover the system in minutes in case of severe data
damages or hardware failure.
We do not recommend backing up any data from drives protected by the BitLocker Drive Encryption feature,
because in most cases recovering data from such backups will be impossible.
8.2.1
Selecting what data to back up
When the Backup Wizard screen appears, select what data to back up.
Disk and Partition Backup - select the disks or partitions to back up. You can select a random set of
disks and partitions. The wizard's right pane shows the hard drives of your computer. Selecting a
hard drive results in selecting all partitions on that drive. If a hard drive has more than one partition,
you may want to select individual partitions for backing up. To do so, click on the Down arrow at the
right of the drive's line. Select the desired partition(s) in the displayed partition list. By default the
program copies only the hard disk sectors that contain data. However, sometimes it might be useful
to make a full sector-by-sector backup. For example, perhaps you deleted some files by mistake and
want to make a disk image before trying to undelete them because sometimes un-deleting may
create havoc in the file system. To make a sector-by-sector backup, select the Back up sector-bysector (requires more storage space) box. Please note that this mode increases processing time and
usually results in a larger image file because it copies both used and unused hard disk sectors. In
addition, when configuring a sector-by-sector backup of a complete hard disk you can include in the
backup unallocated space on the hard disk by selecting Back up unallocated space. Thus you will
include in the backup all physical sectors on the hard drive.
8.2.2
Selecting archive location
Select the location for the backup archive and specify the archive name.
If you are going to create a new archive (i.e. perform a full backup), select Create new backup
archive and enter the path to the archive location and new archive file name in the Backup Location:
field below or click Browse, select the archive location on the directory tree and enter the new file
name in the File name line, or use the file name generator (a button to the right of the line).
If you want to append an incremental backup file to an existing archive, select Add to existing
backup archive and click the Select button to select the existing archive you are going to update. If
44
Copyright © Acronis, Inc., 2000-2010
the archive already has incremental backups, you can select any of the target archive files. It doesn't
matter which one you select, as the program recognizes them as a single archive.
If you want to change the location of added backup files, browse for a new backup location after
clicking the Browse button, otherwise leave the location the same as that of the existing archive.
The "farther" you store the archive from the original folders, the safer it will be in case of disaster.
For example, saving the archive to another hard disk will protect your data if the primary disk is
damaged. Data saved to a network disk or removable media will survive even if all your local hard
disks are damaged.
After selecting the archive location and naming the backup archive to be created, you have
completed all the required steps for a backup task and this is confirmed by the fact that you come to
the Finish step with the Summary of the backup task being displayed on the right pane. All the
remaining steps are optional and in many cases you may omit them and just click Proceed.
Now let's see what optional steps you can set up while configuring a backup task. Click the Options
button.
8.2.3
Backup method
Select whether you want to create a full or incremental backup. If you have not backed up the
selected data yet, or the full archive is old and you want to create a new master backup file, choose
full backup. Otherwise it is recommended that you create an incremental backup (see Full and
incremental backups (p. 13)).
If you are adding a backup to the existing backup archive, the Full method will be unselectable.
Copyright © Acronis, Inc., 2000-2010
45
If you choose (1) by selecting the Full method, you can also choose what to do with the previous full
backup when creating a new one. By default Acronis True Image OEM Quick Backup overwrites the
previous full backup, but you can choose to keep it by unselecting the A new full backup overwrites
the previous one box.
8.2.4
Selecting the backup options
Select the backup options (that is, backup file-splitting, compression level, etc.). The settings of the
options will be applied only to the current backup task.
Or, you can edit the default backup options and local storage settings if you want to save the current
settings for future tasks. For more information see Fine-tuning your backups.
46
Copyright © Acronis, Inc., 2000-2010
8.2.5
Providing a comment
Providing a comment for the archive can help identify the backup and prevent you from recovering
the wrong data. However, you can choose not to make any notes. The backup file size and creation
date are automatically appended, so you do not need to enter this information.
In addition, you can provide or edit a comment after the backup has been executed. To edit or add a
comment, go to the Data recovery and backup management screen by clicking Recovery on the
sidebar, choose the appropriate backup, right-click and select Edit comments in the shortcut menu.
8.2.6
The backup process
Clicking Proceed after completing all the optional steps you need for configuring the current backup
task will start the task execution.
The task progress will be shown in a special window. You can stop the procedure by clicking Cancel.
You can also close the progress window by clicking Hide. The backup creation will continue, but you
will be able to start another operation or close the main program window. In the latter case, the
program will continue working in the background and will automatically close once the backup
archive is ready. If you prepare some more backup operations, they will be queued after the current
one.
8.3
Fine-tuning your backups
You can fine-tune your backups to specific tasks. Such fine-tuning is made by configuring backup
options before starting a backup task.
You can set temporary backup options by changing the default backup options while creating a
backup task. If you would like to use the changed options for future tasks, make appropriate changes
in the default backup options after selecting Tools & Utilities → Options → Backup options.
Incidentally, you can always restore the default backup options to the values preset during
installation of Acronis True Image OEM Quick Backup. To do this, click Reset all to default on the
toolbar of the Options window. To reset just a single backup option, select it on the left pane and
click Reset the current to default.
Clicking Reset all to default will reset all the default options (for backup, recovery, etc.) to their preset values, so
this button should be used with caution.
8.3.1
8.3.1.1
Backup options
Compression level
The preset is Normal.
Let's consider such an example - you need to backup to a USB stick some files with a total size
comparable to or exceeding the USB stick's capacity and want to make sure that the stick
accommodates all the files. In this case use the Maximum compression for the files to be backed up.
However, you should take into account that the data compression ratio depends on the type of files
stored in the archive, for example, even the Maximum compression will not significantly reduce the
backup size if it contains files with already compressed data like .jpg, .pdf or .mp3. It does not make
any sense to select the Maximum compression for such files because in this case the backup
operation will take significantly longer and you will not get an appreciable reduction of backup size. If
Copyright © Acronis, Inc., 2000-2010
47
you are not sure about the compression ratio of a file type, try to back up a couple of files and
compare the sizes of the original files and backup archive file. A couple of additional tips: generally,
you can use the Normal compression level, because in most cases it provides an optimal balance
between backup file size and backup duration. If you select None, the data will be copied without
any compression, which may significantly increase the backup file size, while making the fastest
backup.
8.3.1.2
Backup priority
The preset is Low.
The priority of any process running in a system determines the amount of CPU usage and system
resources allocated to that process. Decreasing the backup priority will free more resources for other
CPU tasks. Increasing the backup priority might speed up the backup process by taking resources
from the other currently running processes. The effect will depend on total CPU usage and other
factors.
8.3.1.3
Error handling
Ignore bad sectors
The preset is disabled.
This option lets you run a backup even if there are bad sectors on the hard disk. Although most disks
do not have bad sectors, the possibility that they might occur increases during the course of the hard
disk's lifetime. If your hard drive has started making strange noises (for example, it starts making
quite loud clicking or grinding noises during operation), such noises may mean that the hard drive is
failing. When the hard drive completely fails, you can lose important data, so it is necessary to back
up the drive as soon as possible. There may be a problem though – the failing hard drive might
already have bad sectors. If the Ignore bad sectors box is left unselected, a backup task is aborted in
case of read and/or write errors that could occur on the bad sectors. Selecting this box lets you run a
backup even if there are bad sectors on the hard disk ensuring that you save as much information
from the hard drive as possible.
Do not show messages and dialogs while processing (silent mode)
The preset is disabled.
You can enable this setting to ignore errors during backup operations. This feature was mainly
designed for unattended backups when you cannot control the backup process. In this mode no
notifications will be displayed if errors occur during backup. Instead you can view the detailed log of
all operations after the task finishes by selecting Tasks and Log on the sidebar and then clicking the
Log tab. You may use this option when configuring a backup task to be run during the night.
8.3.1.4
Removable media settings
When backing up to removable media, you can make this media bootable by writing additional
components to it. Thus, you will not need a separate bootable disk.
Here the following settings are available:
48
Acronis True Image OEM Quick Backup (Full version) - includes support of USB, PC Card
(formerly PCMCIA) and SCSI interfaces along with the storage devices connected via them, and
therefore is strongly recommended.
Copyright © Acronis, Inc., 2000-2010
Acronis System Report - the component allows you to generate system report that is used for
collecting information about your system in case of any program problem. Report generation will
be available before you start Acronis True Image OEM Quick Backup from the bootable media.
The generated system report can be saved to a USB flash drive.
Ask for first media while creating backup archives on removable media
You can choose whether to display the Insert First Media prompt when backing up to removable
media. With the default setting, backing up to removable media may not be possible if the user is
away, because the program will wait for someone to press OK in the prompt box.
8.3.2
Local storage settings
These settings also affect the backup process, for example, they may have a more or less noticeable
effect on the backup process speed. Their values also depend on the physical characteristics of the
local storage devices.
8.3.2.1
Free space threshold
The preset is disabled.
You may want to be notified when the free space on the backup storage becomes less than the
specified value. To enable such notification, select the On insufficient free disk space box, then
specify the free space threshold value in the below fields.
When this option is enabled, Acronis True Image OEM Quick Backup will monitor free space on your
backup storage. If after starting a backup task Acronis True Image OEM Quick Backup finds out that
the free space on the selected backup archive location is already less than the specified value, the
program will not begin the actual backup process but will immediately inform you by displaying an
appropriate message. The message offers you three choices - to ignore it and proceed with the
backup, to browse for another location or to cancel the task. In case of choosing to cancel the backup
you can either free some space on the storage and restart the task or create a new task with another
location for the backup archive. If you choose Browse, select another storage, click OK and the
backup file will be created on that storage.
If the free space becomes less than the specified value while the backup task is being run, the
program will display the same message and you will have to make the same decisions. However, if
you choose to browse for another location, you will need to assign a name for the file that will
contain the remaining data being backed up (or you may accept the default name assigned by the
program).
Acronis True Image OEM Quick Backup can monitor free space on the following storage devices:
Local hard drives
USB cards and drives
Networks shares (SMB/NFS)
This option cannot be enabled for FTP servers and CD/DVD drives.
The message will not be displayed if the "Do not show messages and dialogs while processing (silent
mode)" box is selected in the "Error handling" settings.
8.3.2.2
Archive splitting
Sizeable backups can be split into several files that together form the original backup. A backup file
can be split for burning to removable media.
Copyright © Acronis, Inc., 2000-2010
49
Suppose you have a full backup of your PC on an external hard disk, but want to make one more
backup copy of the system to keep it in a different location from the first one for added security.
However, you do not have one more external hard disk, and a USB stick would not accommodate
such a large backup. Using Acronis True Image OEM Quick Backup you can make a reserve backup
copy on blank DVD-R/DVD+R discs, which are very cheap nowadays. The program can split large
backups into several files that together form the original backup. If you have enough space on your
PC's hard disk, you can first create a backup archive consisting of multiple files with a specified size
on the hard disk and burn the archive to DVD+R discs later on. To specify the split file size, select
Fixed size mode for Archive splitting and enter the desired file size or select it from the drop-down
list.
If you do not have enough space to store the backup on your hard disk, select Automatic and create
the backup directly on DVD-R discs. Acronis True Image OEM Quick Backup will split the backup
archive automatically and will ask you to insert a new disc when the previous one is full.
Creating backups directly on CD-R/RW or DVD+R/RW might take considerably more time than it
would on a hard disk.
8.3.2.3
Archive validation
Validate backup archive when it is created
The preset is disabled.
When enabled, the program will check the integrity of the just created or supplemented archive
immediately after backup. When setting up a backup of critical data or a disk/partition backup, we
strongly recommend you to enable the option to ensure that the backup can be used to recover lost
data.
50
Copyright © Acronis, Inc., 2000-2010
9 Data recovery with Acronis True Image OEM
Quick Backup
The ultimate purpose of data backup is recovery of the backed up data when the original is lost due
to hardware failure, fire, theft or just erroneous deletion of some important files.
There may be various reasons for recovering your system - from unstable operation after installing a
new application, driver or Windows update to complete failure of the system hard drive or
replacement of the old hard drive by a new larger one. In addition, it may be necessary to recover
either only the system partition or the entire system disk comprising several partitions including
hidden ones. Acronis True Image OEM Quick Backup provides for all these cases, though details of
recovery may differ. In any case, it is better to perform system recovery when booting from the
rescue media.
On the other hand, recovery of a data disk/partition or files and folders is usually performed in
Windows.
9.1
Recovering your system partition
Let's first consider the simplest case - recovery of the system partition to the original location on the
original hard disk drive.
As recovery of the system partition is one of the most important operations, it requires careful
preparation even when you just want to recover a previous "known good" Windows state. While
preparing for recovery you need to:
a) create and test Acronis bootable rescue media. For more information on testing media see Testing
bootable rescue media;
b) boot from the rescue media and validate the backup you want to use for recovery. Such validation
is very important because Acronis True Image OEM Quick Backup deletes the target partition (the
system partition in this case) when starting partition recovery, so you may find yourself without your
system and applications if the backup file is corrupted. In addition, there were reports from users
that a backup archive that has been successfully validated in Windows is declared corrupted when
being validated in the recovery environment. This may be due to the fact that Acronis True Image
OEM Quick Backup uses different device drivers in Windows and the recovery environment.
c) assign unique names to the disks and partitions used on your computer. This is strongly
recommended because the drive lettering in Windows and in the recovery environment may differ. If
you have not done this before making the backup, you can assign names now. The names will help
you in finding the drive containing your backups as well as the target system partition.
d) optionally check the system hard drive for errors using Microsoft's Chkdsk utility, which is part of
Windows.
Assuming that you have carried out the above, let's proceed with recovery.
Attach the external drive if it contains the backup archive to be used for recovery and make sure that the drive is
powered on. This must be done before booting from Acronis rescue media.
1. Arrange the boot sequence in BIOS so as to make your rescue media device (CD, DVD or USB
stick) the first boot device. See Arranging boot sequence in BIOS (p. 91).
Copyright © Acronis, Inc., 2000-2010
51
2. Boot from the rescue media and select Acronis True Image OEM Quick Backup (Full version).
3. Select Recovery → Disk and Partition Recovery in the main menu and then choose the image
backup of your system partition (or entire system disk) that you want to use for recovery. Rightclick on the backup and choose Recover in the shortcut menu.
If the disks have different disk letters in Windows and the recovery environment, the program
will display the following error message: "Acronis True Image OEM Quick Backup cannot detect
volume N of "Name" archive", where Name is the name of the required image backup archive
and volume number (N) may be different depending on the number of backups in the archive.
Click Browse and show the path to the archive.
4. Select Recover whole disks and partitions at the Recovery method step.
5. Select the system partition (usually C) on the What to recover screen. If the system partition has
a different letter, select the partition using the Flags column. It must have the Pri, Act flags. As
you are recovering the system partition to the original hard drive, there is no need to select the
"MBR and track 0" box.
6. At the "Settings of partition C" (or the letter of the system partition, if it is different) step check
the default settings and click Next if they are correct. Otherwise change the settings so as to suit
you before clicking Next.
7. Carefully read the summary of operations at the Finish step. If you have not resized the partition,
the sizes in the Deleting partition and Recovering partition items must match. If you do not want
to validate the backup, click Proceed, otherwise click Options and select the "Validate backup
archive before recovery" box before clicking Proceed.
8. When the operation finishes, exit the standalone version of Acronis True Image OEM Quick
Backup, remove the rescue media and boot from the recovered system partition. After making
sure that you recovered Windows to the state you need, restore the original boot sequence.
9.2
Recovering a disk backup to a different capacity
hard disk
Recovery of a disk backup containing several partitions to a hard disk that has a different capacity
using manual resizing of the partitions can be considered as one of the most complicated operations
in Acronis True Image OEM Quick Backup. This is especially true when you have backed up the
original hard disk containing a hidden diagnostic or recovery partition.
Recovering a dual/multiboot system disk e.g. with Windows and some flavor of LINUX may be even
more fraught with difficulties. Quite often it requires some research on the appropriate forums
before attempting to perform a recovery so this section does not cover such case.
Make the preparations described at the beginning of the previous section Recovering your system
partition (p. 51). In case of upgrading the healthy system disk to a larger capacity new one, if you
have not assigned unique names to the partitions on the system disk before making a system disk
backup, it might make sense to assign such names and create a new backup of the entire disk. This
will allow identifying the partitions by their names and not by the letters which may differ when
booting from the rescue media. If you are recovering from a system disk drive failure, assign names
now anyway. The names will help you find the drive containing your backups, as well as the target
(new) drive.
The information on partition sizes, drive capacities, their manufacturers, and model numbers can
also help in correctly identifying the drives.
One more recommendation - it is highly recommended to install the new hard drive to the same
position in the computer and use the same cable and the same connector as for the original drive
52
Copyright © Acronis, Inc., 2000-2010
(though this is not always possible, e.g. the old drive may be an IDE and the new drive may be a
SATA). In any case, install the new drive to where it will be used.
9.2.1
Recovering a disk without a hidden partition
At first let's consider recovery of a system disk containing two partitions (none of them hidden) using
a disk backup. In addition, we assume that the system disk does not contain a recovery partition
which may not be hidden. If the disk contains, for example, three partitions, the procedure will be
similar. We will describe recovery using the rescue media (as this approach usually gives the best
recovery results).
Attach the external drive if it contains the backup archive to be used for recovery and make sure that the drive is
powered on. This must be done before booting from Acronis rescue media.
1. Arrange the boot sequence in BIOS so as to make your rescue media device (CD, DVD or USB
stick) the first boot device. See Arranging boot sequence in BIOS (p. 91).
2. Boot from the rescue media and select Acronis True Image OEM Quick Backup (Full version).
3. Select Recovery → Disk and Partition Recovery in the main menu, then choose the image
backup of your system disk that you want to use for recovery.
If the disks have different disk letters in Windows and the recovery environment, the program
will display the following error message: "Acronis True Image OEM Quick Backup cannot detect
volume N of "Name" archive", where Name is the name of the required image backup archive
and volume number (N) may be different depending on the number of backups in the archive.
Click Browse and show the path to the archive.
4. Select Recover whole disks and partitions at the Recovery method step.
5. At the What to recover step select the boxes of the partitions to be recovered. Do not select the
MBR and Track 0 box, as this will result in selecting the entire disk for recovery. Recovering the
entire disk does not allow you to resize partitions manually. If necessary, you can recover the
MBR later. Select the partitions and click Next.
Selecting partitions leads to appearance of the relevant steps "Settings of partition ...". Take note
that these steps are in ascending partition drive letter order and that this order cannot be
changed. The order may differ from the physical order of the partitions on the hard disk. In the
case being considered (no hidden or recovery partitions), the physical order of the partitions on
the new disk does not have special importance as Acronis True Image OEM Quick Backup
automatically fixes the appropriate Windows loader files.
Incidentally, this step allows you to find out whether the disk you are going to recover contains a
hidden partition. Hidden partitions do not have disk letters and they go first in the "Settings of
partition ..." steps. If you find a hidden partition, see Recovering a disk with a hidden partition.
6. You can specify the following partition settings: location, type, and size. Most likely you will first
specify the settings of the system partition as it usually has the letter C. Because you are
recovering to the new disk, click New location. Select the destination disk by either its assigned
name or capacity.
If you have not assigned names to the disks and have any doubts when selecting the destination
disk, you may abort the recovery by clicking Cancel and try to identify the target disk by its model
number, interface, etc.
7. Clicking Accept will return you to the "Settings of partition ..." screen. Check the partition type
and change it, if necessary. You should remember that the system partition must be primary and
marked as active.
8. Proceed to specifying the partition size by clicking Change default in the Partition size area. By
default the partition will occupy the entire new disk. You can resize and relocate the partition by
Copyright © Acronis, Inc., 2000-2010
53
dragging it or its borders with a mouse on the horizontal bar on the screen or by entering
corresponding values into the appropriate fields (Partition size, Free space before, Free space
after). While specifying the partition size remember that you need to leave as much unallocated
(free) space after the newly resized partition as will be needed for the second partition. Usually
the free space before partitions is equal to zero. Click Accept when the partition has the size you
have planned for it, then click Next.
9. Begin specifying the settings for the second partition. Click New location, then select unallocated
space on the destination disk that will receive the second partition. Click Accept, check the
partition type (change, if necessary) and then proceed to specifying the partition size which by
default is equal to the original size. Usually there is no free space after the last partition, so
allocate all the unallocated space to the second partition, click Accept and then click Next.
10. Carefully read the summary of operations to be performed. If you do not want to validate the
backup, click Proceed, otherwise click Options and select the "Validate backup archive before
recovery" box before clicking Proceed.
11. When the operation finishes, exit the standalone version of Acronis True Image OEM Quick
Backup.
Windows should not "see" both the new and old drive during the first boot after recovery. If you upgrade the old
drive to a larger capacity new one, disconnect the old drive before the first boot otherwise there may be
problems booting Windows.
Switch off the computer, if you need to disconnect the old drive, otherwise just reboot the computer
after removing the rescue media.
Boot the computer to Windows. It may report that new hardware (hard drive) is found and Windows
needs to reboot. After making sure that the system operates normally, restore the original boot
sequence.
9.2.2
Recovering a disk with a hidden partition
Recovering a backup of the system disk with a hidden partition (e.g. created by the PC manufacturer
for diagnostics or system recovery) to a different capacity hard drive, requires to take into account
some additional factors. First of all, for the best chance of success, it is necessary to keep on the new
drive the physical order of the partitions that exist on the old drive and place the hidden partition to
the same location - usually at the start or the end of the disk space. In addition, it is better to recover
the hidden partition without resizing to minimize the risk of possible problems.
So before proceeding with recovery, you need to know about all partitions existing on the system
disk, their sizes, and physical order. To see this information, start Acronis True Image OEM Quick
Backup and choose Recovery → Disk and Partition Recovery in the main menu. Select a backup of
your system disk and click Details on the toolbar. Acronis True Image OEM Quick Backup will display
information about the backed up disk, including a graphical view of all partitions the disk contains
and their physical order on the disk. If any partition display is too small for accommodating the
relevant information, hover the mouse pointer over the partition to see the information.
Assuming that you have got the information, let's proceed with recovery of a system disk using the
rescue media.
Attach the external drive if it contains the backup archive to be used for recovery and make sure that the drive is
powered on. This must be done before booting from Acronis rescue media.
1. Arrange the boot sequence in BIOS so as to make your rescue media device (CD, DVD or USB
stick) the first boot device. See Arranging boot sequence in BIOS (p. 91).
2. Boot from the rescue media and select Acronis True Image OEM Quick Backup (Full version).
54
Copyright © Acronis, Inc., 2000-2010
3. Select Recovery → Disk and Partition Recovery in the main menu and then choose the image
backup of your system disk that you want to use for recovery.
If the disks have different disk letters in Windows and the recovery environment, the program
will display the following error message: "Acronis True Image OEM Quick Backup cannot detect
volume N of "Name" archive", where Name is the name of the required image backup archive
and volume number (N) may be different depending on the number of backups in the archive.
4. Select Recover whole disks and partitions at the Recovery method step.
5. At the What to recover step select the boxes of the partitions to be recovered. Do not select the
MBR and Track 0 box, as this will result in selecting the entire disk for recovery. Recovering the
entire disk does not allow you to resize partitions manually. You will recover the MBR later.
Select the partitions and click Next.
Selecting partitions leads to appearance of the relevant steps "Settings of partition ...". Take note
that these steps start with partitions without an assigned disk letter (as usually is the case with
hidden partitions), then go in ascending order of partition disk letters and this order cannot be
changed. The order may differ from the physical order of the partitions on the hard disk.
6. You can specify the following partition settings: location, type, and size. You will first specify the
settings of the hidden partition as it usually does not have a disk letter. Because you are
recovering to the new disk, click New location. Select the destination disk by either its assigned
name or capacity.
If you have not assigned names to the disks and have any doubts when selecting the destination
disk, you may abort the recovery by clicking Cancel and try to identify the target disk by its model
number, interface, etc.
7. Clicking Accept will return you to the "Settings of partition ..." screen. Check the partition type
and change it, if necessary.
8. Proceed to specifying the partition size by clicking Change default in the Partition size area. By
default the partition will occupy the entire new disk. You need to keep the hidden partition size
unchanged, as well as place it to the same location on the disk (at the start or the end of disk
space). To do this, resize and relocate the partition by dragging it or its borders with a mouse on
the horizontal bar on the screen or by entering corresponding values into the appropriate fields
(Partition size, Free space before, Free space after). Click Accept when the partition has the
required size and location and then click Next.
Specify the settings for the second partition which in this case is your system partition. Click New
location, then select unallocated space on the destination disk that will receive the partition.
Click Accept, check the partition type (change, if necessary). You should remember that the
system partition must be primary and marked as active. Specify the partition size which by
default equals the original size. Usually there is no free space after the partition, so allocate all
the unallocated space on the new disk to the second partition, click Accept and then click Next.
9. Carefully read the summary of operations to be performed. If you do not want to validate the
backup, click Proceed, otherwise click Options and select the "Validate backup archive before
recovery" box before clicking Proceed.
10. When the operation finishes, proceed to MBR recovery. In this case you need to recover the MBR
as the PC manufacturer could change the generic Windows MBR or a sector on the track 0 to
provide access to the hidden partition.
11. Select the same backup once more, right-click and select Recover in the shortcut menu, choose
Recover whole disks and partitions at the Recovery method step and then select the MBR and
Track 0 box.
12. At the next step select the destination disk as the target for MBR recovery, click Next and then
Proceed. After MBR recovery is complete, exit the standalone version of Acronis True Image
OEM Quick Backup.
Copyright © Acronis, Inc., 2000-2010
55
Windows should not "see" both the new and old drive during the first boot after recovery. If you upgrade the old
drive to a larger capacity new one, disconnect the old drive before the first boot otherwise there may be
problems booting Windows.
Switch off the computer, if you need to disconnect the old drive, otherwise just reboot the computer
after removing the rescue media.
Boot the computer to Windows. It may report that new hardware (hard drive) is found and Windows
needs to reboot. After making sure that the system operates normally, restore the original boot
sequence.
9.3
Recovering a data partition or disk
As we already said, data partitions and disks are usually recovered in Windows because this allows
you to avoid such issues as the program not detecting your hard drives, changing disk letters, etc. To
reduce the risk of problems during recovery even more, validate the backup archive to be recovered
and check the destination disk for errors using chkdsk.
Attach the external drive if it contains the backup archive to be used for recovery and make sure that the drive is
powered on. This must be done before starting Acronis True Image OEM Quick Backup.
1. Start Acronis True Image OEM Quick Backup.
2. Select Recovery → Disk and Partition Recovery in the main menu, then choose the image
backup containing the data partition you want to recover.
3. Select Recover whole disks and partitions at the Recovery method step.
4. As you are going to recover a data partition, there is no need to select the "Recover MBR and
track 0" box at the What to recover step. Select just the data partition you want to recover.
5. The next step allows you to select settings for the partition to be recovered. When recovering the
partition to the original location, you only need to check the settings. If you want to recover the
partition to another location, select the new location and set the partition type you need (or
leave the default setting). When the new location is an existing partition, usually you may leave
its disk letter and size unchanged. When the new location is unallocated space e.g. after installing
a new hard drive you intend to use for your data, specify the size of the new partition and assign
a logical disk letter.
6. Carefully read the Summary. After making sure that you have made the correct settings, click
Proceed, if you do not need to change the default recovery options, otherwise click Options.
7. The Options step allows setting the recovery options, for example, to check the file system after
recovery. For more information about the recovery options see Setting default recovery options.
After setting the recovery options click Proceed.
Recovering the entire data disk backup requires similar steps with few minor differences, for
example, there is no "Check file system after recovery" option. When recovering to the original hard
drive the steps of the Recovery Wizard are straightforward - just make sure that you select the disk
with the same number as the backed up disk, as the destination.
Recovering your data disk backup to a hard drive with a different capacity has some nuances
depending on its capacity and geometry (the number of heads and sectors per track). When
recovering to a smaller capacity hard drive, the partition(s) size will be proportionally reduced. When
recovering to a larger capacity hard drive, there are two cases: 1) if the hard drive has the same
geometry, the backed up disk will be recovered "as is" thus leaving unallocated space; and 2) if the
hard drive has different geometry, the partition(s) size will be proportionally enlarged.
56
Copyright © Acronis, Inc., 2000-2010
9.4
Recovering files and folders
Depending on the backup types you have used, there may be several methods of recovering files and
folders. In most cases you recover files and folders in Windows. You can recover files and folders
from a disk/partition image. To recover files/folders from an image, you can mount the image (see
Mounting an image) and copy files/folders to a desired location using Windows Explorer.
If you need to recover just a single file/folder or a few files, double-click on the required image
backup archive. Then drill-down to the folder containing the file(s) you need to recover, select the
file(s), right-click and choose Copy in the shortcut menu, open a folder for saving the files to be
recovered, right-click in the folder and choose Paste in the shortcut menu. You can also drag the files
from the backup archive into the destination folder.
One more method of recovering files/folders from an image is described below. See Recovering files
and folders from image archives.
9.4.1
Recovering files and folders from image archives
Image archives provide recovery of not only entire disks/partitions, but files/folders too.
1. Start the Recovery Wizard by selecting Recovery → Disk and Partition Recovery in the main
program menu.
2. Select the archive.
Data recovery directly from an FTP server requires the archive to consist of files of no more than 2GB. If you
suspect that some of the files are larger, first copy the entire archive (along with the initial full backup) to a
local hard disk or a network share disk.
3. If you are going to recover files from an archive containing incremental backups, Acronis True
Image OEM Quick Backup will enable selecting one of the successive incremental backups by its
creation date/time. Thus, you can roll back the file/folder state to a certain date.
To recover data from an incremental backup, you must have all the previous backup files and the initial full
backup. If any of the successive backups are missing, recovery is not possible.
4. At the Recovery method step select Recover chosen files and folders.
5. Select where you want to recover the chosen files/folders. You can recover data to its original
location or choose a new one, if necessary.
When recovering files/folders under bootable rescue media, the Original location option is disabled,
because drive letters in standalone Acronis True Image OEM Quick Backup might differ from the way
Windows identifies drives.
Choosing a new location results in appearance of one more required step, namely, Destination.
When you choose a new location, by default the selected items will be recovered without
recovering the original, absolute path. You may also wish to recover the items with their entire
folder hierarchy. If this is the case, select Recover absolute path.
At the Destination step select a new location on the directory tree. You can create a new folder
for the files to be recovered by clicking Create new folder.
6. Select the files and folders to recover. Make sure that you unselect all unnecessary folders.
Otherwise you will recover a lot of excess files.
7. The first optional step allows you to keep useful data changes made since the selected backup
was created. Choose what to do if the program finds a file in the destination folder with the same
name as in the archive. By default, the program will overwrite existing files and folders, though
more recent files and folders are protected from being overwritten. If necessary, you can protect
Copyright © Acronis, Inc., 2000-2010
57
the system, hidden files and folders from being overwritten by selecting the appropriate check
boxes.
In addition, you can protect the files that meet the criteria you specify in this window from being
overwritten.
Unselecting the Overwrite existing files checkbox will give the files on the hard disk
unconditional priority over the archived files.
8. Select the options for the recovery process (that is, recovery process priority, file-level security
settings, etc.). The options you set on this page will be applied only to the current recovery task.
9. Up to this point, you can make changes in the created task by choosing the step you want to
change and editing its settings. Clicking Proceed will launch the task execution.
10. The task progress will be shown in a special window. You can stop the procedure by clicking
Cancel. Please keep in mind that the aborted procedure may still cause changes in the
destination folder(s).
58
Copyright © Acronis, Inc., 2000-2010
10 Additional recovery information
10.1 Recovery Wizard - detailed information
The below description of the Recovery Wizard refers to recovering partitions/disks from image
backups. If you need to recover files and folders, see Recovering files and folders.
10.1.1 Starting the Recovery Wizard
Start the Recovery Wizard by selecting Recovery → Disk and Partition Recovery in the main
program menu.
10.1.2 Archive selection
1. Select the archive. Acronis True Image OEM Quick Backup will show the list of backup archives
whose locations it knows from the information stored in its database. If the program has not
found the backup you need (for example, when the backup was made in the recovery
environment or by a previous Acronis True Image OEM Quick Backup version), you can find it
manually by clicking Browse and then selecting the backup location on the directory tree and
choosing the backup in the right pane.
If the archive is located on removable media, e.g. CD, first insert the last CD and then insert disks in reverse
order when the Recovery Wizard prompts you.
***
Data recovery directly from an FTP server requires the archive to consist of files of no more than 2GB each.
If you suspect that some of the files are larger, first copy the entire archive (along with the initial full
backup) to a local hard disk or network share disk.
***
Copyright © Acronis, Inc., 2000-2010
59
When recovering a backup of Windows Vista or Windows 7 system disk containing restore points, some of
your restore points (or all of them) may be missing if you boot from the recovered system disk and open the
System Restore tool.
2. If you are going to recover data from an archive containing incremental backups, Acronis True
Image OEM Quick Backup will enable selecting one of the successive incremental backups by its
creation date/time. Thus, you can roll back the disk/partition state to a certain date.
To recover data from an incremental backup, you must have all previous backup files and the initial full
backup. If any of the successive backups are missing, recovery is not possible.
10.1.3 Recovery method selection
Select what you want to recover:
Recover whole disks and partitions
Having chosen a disk and partition recovery type, you may need to select the following option.
Recover chosen files and folders
If you are not going to recover the system, but only want to repair damaged files, select Recover
chosen files and folders.
You can recover files from disk/partition images only if they have the FAT or NTFS file systems.
10.1.4 Selecting a disk/partition to recover
The selected archive file can contain images of several partitions or even disks. Select which
disk/partition to recover.
60
Copyright © Acronis, Inc., 2000-2010
During a single session, you can recover several partitions or disks, one by one, by selecting one disk
and setting its parameters first and then repeating these actions for every partition or disk to be
recovered.
Disk and partition images contain a copy of track 0 along with the MBR (master boot record). It
appears in this window in a separate line. You can choose whether to recover the MBR and track 0 by
selecting the corresponding box. Recover the MBR if it is critical to your system booting.
When MBR recovery is chosen, the "Recover disk signature" box will appear in the bottom left corner
at the next step. Recovering disk signature may be desirable due to the following reasons:
1. Acronis True Image OEM Quick Backup creates scheduled tasks using the signature of the source
hard disk. If you recover the same disk signature, you don't need to re-create or edit the tasks
created previously.
2. Some installed applications use disk signature for licensing and other purposes.
3. If you use Windows Restore Points, they will be lost when the disk signature is not recovered.
4. In addition, recovering disk signature allows to recover VSS snapshots used by Windows Vista
and Windows 7's "Previous Versions" feature.
If the box is unselected, Acronis True Image OEM Quick Backup generates a new disk signature for
the recovered drive. This may be needed when you use an image backup not for disaster recovery
but for cloning your Windows Vista hard drive to another one. Trying to boot Windows after cloning
with both drives connected will result in a problem. During Windows booting, its loader checks the
disk signatures of all the connected drives, and if it finds two identical disk signatures, the loader
changes the signature of the second disk, which would be the clone disk. Once this happens, the
clone disk would not be able to boot up independently of the original disk, because the
MountedDevices fields in the clone's registry reference the disk signature of the original disk, which
will not be available if the original disk is disconnected.
Copyright © Acronis, Inc., 2000-2010
61
10.1.5 Selecting a target disk/partition
1. Select a target disk or partition where you want to recover the selected image. You can recover
data to its initial location, to another disk/partition or to an unallocated space. The target
partition should be at least the same size as the uncompressed image data.
All the data stored on the target partition will be replaced by the image data, so be careful and watch for
non-backed-up data that you might need.
2. When recovering an entire disk, the program will analyze the target disk structure to see
whether the disk is free.
If there are partitions on the target disk, you will be prompted by the confirmation window stating
that the destination disk contains partitions, perhaps with useful data.
You will have to select between:
OK – all existing partitions will be deleted and all their data will be lost.
Cancel – no existing partition will be deleted, discontinuing the recovery operation. You will then
have to cancel the operation or select another disk.
Note that no real changes or data destruction will be performed at this time! For now, the program will just
map out the procedure. All changes will be implemented only when you click Proceed in the wizard's Summary
window.
10.1.6 Changing the recovered partition type
When recovering a partition, you can change its type, though it is not required in most cases.
To illustrate why you might need to do this, let's imagine that both the operating system and data
were stored on the same primary partition on a damaged disk.
If you are recovering a system partition to the new (or the same) disk and want to load the operating
system from it, you will select Active.
62
Copyright © Acronis, Inc., 2000-2010
Acronis True Image OEM Quick Backup automatically corrects boot information during recovery of
the system partition to make it bootable, even if it was not recovered to the original partition (or
disk).
If you recover a system partition to another hard disk with its own partitions and OS, most likely you
will need only the data. In this case, you can recover the partition as Logical to access the data only.
By default, the original partition type is selected.
Selecting Active for a partition without an installed operating system could prevent your computer from
booting.
10.1.7 Changing the recovered partition size and location
You can resize and relocate a partition by dragging it or its borders with a mouse on the horizontal
bar on the screen or by entering corresponding values into the appropriate fields.
Using this feature, you can redistribute the disk space among partitions being recovered. In this case,
you will have to recover the partition to be reduced first.
These changes might be useful if you are going to copy your hard disk to a new high-capacity one by creating its
image and recovering it to a new disk with larger partitions.
10.1.8 Assigning a letter to the recovered partition
Acronis True Image OEM Quick Backup will assign an unused letter to a recovered partition. You can
select the desired letter from a drop-down list or let the program assign a letter automatically by
selecting the Auto setting.
You should not assign letters to partitions inaccessible to Windows, such as to those other than FAT
and NTFS.
Copyright © Acronis, Inc., 2000-2010
63
10.1.9 Setting recovery options
Clicking Options at the Finish step allows selecting the options for the recovery process (that is,
recovery process priority, etc.). The settings will be applied only to the current recovery task. Or, you
can edit the default options. See Setting default recovery options for more information.
10.1.10 Executing recovery
Up to this point, you can make changes in the created task by choosing the step you want to change
and editing its settings. If you click Cancel, no changes will be made to the disk(s). Clicking Proceed
will launch the task execution.
The task progress will be shown in a special window. You can stop the procedure by clicking Cancel.
However, it is critical to note that the target partition will be deleted and its space unallocated – the
same result you will get if the recovery is unsuccessful. To recover the "lost" partition, you will have
to recover it from the image again.
10.2 Setting default recovery options
To set the recovery options to be used by default during any data recovery, select Tools & Utilities →
Options → Recovery options. You can always restore the default recovery options to the values
preset during installation of Acronis True Image OEM Quick Backup. To do this, click Reset the
current to default on the toolbar of the Options window. To reset just a single recovery option,
select it on the left pane and click Reset the current to default.
Clicking Reset all to default will reset all the default options (for backup, recovery, etc.) to their preset values, so
this button should be used with caution.
10.2.1 File recovery options
You can select the following file recovery options:
Recover files with their security settings - if the file security settings were preserved during
backup (see Backup security settings), you can choose whether to recover them or let the files
inherit the security settings of the folder where they will be recovered to. This option is effective
only when recovering files from file/folder archives.
Validate backup archive before recovery - if you suspect that the archive might have been
corrupted, check this option to verify the backup before recovery. To check archive data integrity
you must have all the incremental backups belonging to the archive and the initial full backup. If
any of the successive backups are missing, validation is not possible.
Check the file system after recovery - check this parameter to verify the integrity of the file
system after recovery. Verification of the file system is available only when recovering
disks/partitions under Windows and for FAT16/32 and NTFS file systems. Note, that the file
system will not be checked if a reboot is required during recovery, for example, when recovering
the system partition to its original place.
10.2.2 Overwrite file options
This option is not applicable to recovery of disks and partitions from images.
By default, the program will overwrite existing files and folders, though more recent files and folders
are protected from overwriting.
64
Copyright © Acronis, Inc., 2000-2010
You can set default filters for the specific types of files you wish to preserve during archive recovery.
For example, you may want hidden and system files and folders, newer files and folders, as well as
files matching selected criteria not to be overwritten by the archive files.
While specifying the criteria, you can use the common Windows wildcard characters. For example, to
preserve all files with extension .exe, add *.exe. My???.exe will preserve all .exe files with names
consisting of five symbols and starting with "my".
Unselecting the Overwrite existing files check box will give the files on the hard disk unconditional
priority over the archived files.
10.2.3 Recovery priority
The preset is Low.
The priority of any process running in a system determines the amount of CPU usage and system
resources allocated to that process. Decreasing the recovery priority will free more resources for
other CPU tasks. Raising recovery priority may speed up the recovery process as it takes resources
from other currently running processes. The effect will depend on total CPU usage and other factors.
Copyright © Acronis, Inc., 2000-2010
65
11 Creating bootable media
11.1 Creating Linux-based rescue media
You can run Acronis True Image OEM Quick Backup from an emergency boot disk on a bare-metal
system or a crashed computer that cannot boot. You can even back up disks on a non-Windows
computer, copying all its data into the backup archive by imaging the disk one sector at a time. To do
so, you will need bootable media that has a copy of the standalone Acronis True Image OEM Quick
Backup version installed on it.
You can create bootable media using the Bootable Media Builder. For this, you will need a blank CDR/RW, a blank DVD+R/RW or any other media from which your computer can boot, such as a Zip
drive.
Acronis True Image OEM Quick Backup also provides the ability to create an ISO image of a bootable
disc on the hard disk.
If you have other Acronis products, such as Acronis Disk Director Suite installed on your computer,
you can include standalone versions of these programs on the same bootable disk as well.
If you have chosen not to install the Bootable Media Builder during Acronis True Image OEM Quick Backup
installation, you will not be able to use this feature.
***
When booting from the Rescue Media, you cannot perform backups to disks or partitions with Ext2/Ext3,
ReiserFS, and Linux SWAP file systems.
1. Choose Create Bootable Rescue Media in the Tools & Utilities menu. You can also run the
Bootable Rescue Media Builder without loading Acronis True Image OEM Quick Backup by
choosing Programs → Acronis → Acronis True Image OEM Quick Backup → Bootable Rescue
Media Builder from the Start menu.
2. Select which components of the Acronis programs you want to place on the bootable media.
Acronis True Image OEM Quick Backup offers the following components:
Copyright © Acronis, Inc., 2000-2010
66
Acronis True Image OEM Quick Backup full version
Includes support of USB, PC Card (formerly PCMCIA) and SCSI interfaces along with the storage
devices connected via them, and therefore is strongly recommended.
Acronis System Report
This component allows you to generate a system report after booting from the rescue media
when both Windows and Acronis True Image OEM Quick Backup full version cannot start.
In the next window you can set Bootable media startup parameters in order to configure rescue
media boot options for better compatibility with different hardware. Several options are
available (nousb, nomouse, noapic, etc.). For all the available startup parameters see Startup
Parameters (p. 97). These parameters are provided for advanced users. If you encounter any
hardware compatibility problems while testing boot from the rescue media, it may be best to
contact Acronis Technical Support.
The Start automatically after parameter specifies the timeout interval for the boot menu. If this
parameter is not specified, the program will display the boot menu and wait for you to select
whether to boot the OS or the Acronis component. If you set, for example, 10 sec for Acronis
rescue media, the standalone Acronis True Image OEM Quick Backup will launch 10 seconds after
the menu is displayed.
To find out more about components of other Acronis products, see their respective user guides.
3. Select the type of bootable media (CD-R/RW, DVD+R/RW or 3.5” diskettes) to create. If your BIOS
has this feature, you can create other bootable media such as removable USB flash drives. You
can also choose to create a bootable disk ISO image.
When using 3.5" diskettes, you will only be able to write one component at a time (for example, the full
version of Acronis True Image OEM Quick Backup) on a set of diskettes. To write another component, start
Bootable Media Builder again.
4. If you are creating a CD, DVD or any removable media, insert a blank disc so the program can
determine its capacity. If you choose to create a bootable disc ISO image, specify the ISO file
name and the folder in which to place it.
5. Next, the program will estimate how many blank diskettes are required (in case you have not
chosen ISO or CD/DVD) and give you time to prepare them. When you are finished, click Proceed.
After you create a bootable media, mark it and keep it in a safe place.
Please keep in mind that the backups created by the later program version may be incompatible with
the previous program versions. Due to this reason, we strongly recommend that you create a new
Copyright © Acronis, Inc., 2000-2010
67
bootable media after each Acronis True Image OEM Quick Backup upgrade. One more thing you
should remember – when booting from the rescue media and using a standalone version of Acronis
True Image OEM Quick Backup, you cannot recover files and folders encrypted with use of the
encryption feature available in Windows XP and later operating systems. On the other hand, backup
archives encrypted using the Acronis True Image OEM Quick Backup encryption feature can be
recovered.
68
Copyright © Acronis, Inc., 2000-2010
12 Exploring archives and mounting images
Acronis True Image OEM Quick Backup offers two kinds of archive contents management: mounting
and exploring.
Exploring images lets you view their contents and copy the selected files to a hard disk. To explore a
backup archive, double-click on the corresponding tib file. You can also right-click on the file and
choose Explore in the shortcut menu.
When you copy files from a backup being explored, the copied files lose the "Compressed" and "Encrypted"
attribute. If you need to keep these attributes, it is recommended to recover the backup.
Mounting images as virtual drives lets you access them as though they were physical drives. Such
ability means that:
a new disk with its own letter will appear in the drives list
you will be able to use the virtual disk in the same way as the real one: open, save, copy, move,
create, delete files or folders. If necessary, the image can be mounted in read-only mode.
using Windows Explorer and other file managers, you can view the image contents as if they
were located on a physical disk or partition
The operations described in this chapter are supported only for the FAT and NTFS file systems.
Please keep in mind that, though both file archives and disk/partition images have a default ".tib"
extension, only images can be mounted. If you want to view file archive contents, use the Explore
operation. The following is a brief summary of the Explore vs Mount operation:
Explore
Mount
Archive type
Disk or partition image
Partition image
Assigning a letter
No
Yes
Archive modification
No
No
File extraction
Yes
Yes
12.1 Mounting an image
1. Start the Mount Wizard by selecting Tools & Utilities → Mount Image in the main program
menu or by right-clicking on an image archive on the Data recovery and backup management
screen and selecting Mount Image in the shortcut menu.
Copyright © Acronis, Inc., 2000-2010
69
2. Select the archive for mounting.
If you selected an archive containing incremental images, you can select one of the successive
incremental images (also called "slices") by its creation date/time. Thus, you can explore the data
state at a certain moment.
To mount an incremental image, you must have all previous images and the initial full image. If
any of the successive images are missing, mounting is not possible. By default the program will
mount the latest incremental image.
3. Select a partition to mount as a virtual disk. (Note that you cannot mount an image of the entire
disk except in the case when the disk consists of one partition). If the image contains several
partitions, by default all of them will be selected for mounting with automatically assigned drive
letters. If you would like to assign different drive letters to the partitions to be mounted, click
Options.
70
Copyright © Acronis, Inc., 2000-2010
You can also select a letter to be assigned to the virtual disk from the Mount letter drop-down
list. If you do not want to mount a partition, select Do not mount in the list or unselect the
partition's checkbox.
4. Having finished the settings, click Proceed to connect the selected partition images as virtual
disks.
5. After the image is connected, the program will run Windows Explorer, showing its contents. Now
you can work with files or folders as if they were located on a real disk.
12.2 Unmounting an image
We recommend that you unmount the virtual disk after all necessary operations are finished, as
maintaining virtual disks takes considerable system resources. If you do not unmount the disk, it will
disappear after your computer is turned off.
To disconnect the virtual disk, choose Tools & Utilities → Unmount Image, select the disk to
unmount and click OK.
Copyright © Acronis, Inc., 2000-2010
71
If you have mounted several partitions, by default all of them will be selected for unmounting. You
can disconnect all mounted drives together or disconnect only those you do not need mounted
anymore.
You can also do this in Windows Explorer by right-clicking on the disk icon and choosing Unmount.
72
Copyright © Acronis, Inc., 2000-2010
13 Searching backup archives and their content
13.1 Searching
In addition to the ability to explore backup archives, Acronis True Image OEM Quick Backup provides
a search facility for tib archives themselves, for files in tib archives only, as well as offering full-text
search in the comments to archives. This facilitates searching for the information you need for using
Acronis True Image OEM Quick Backup and for recovering files from your backup archives. Here's
how you can search for the data you need.
1. Enter a search string into the Search field at the top right of the Acronis True Image OEM Quick
Backup window and then click the magnifying glass icon. You will be taken to the Data recovery
and backup management screen. The search results are output in the corresponding tab of the
window.
2. By default the search is performed in all the sources where Acronis True Image OEM Quick
Backup can search information. You can select an information source of interest by choosing the
appropriate area among Backup names and Backup contents.
Acronis True Image OEM Quick Backup cannot perform search on network shares, Acronis Online Storage, and
devices that are recognized by Windows as Devices with removable storage.
The Backup names area shows the results of the search for tib archives by archive filename.
Double-clicking on a filename opens the corresponding archive in Windows Explorer where you
can explore the archive contents. You can validate or recover the archive by right-clicking on its
filename and choosing the appropriate item in the shortcut menu. The shortcut menu contains
the following items: Recover, Mount (for image backups), Validate, Move, Remove, Explore
backup, Edit Comments, and Details buttons for tib archives.
Copyright © Acronis, Inc., 2000-2010
73
The Backup contents area shows results of searches for files and folders in tib archives. Doubleclicking on a filename opens the file. You can recover the file by right-clicking on its filename and
choosing Recover in a shortcut menu. This shortcut menu also enables you to open the file or the
parent folder that contains that file.
To help you better understand the search results, here is some information on the algorithms used
by the Search feature.
1. When searching files in tib archives you can type all or part of the filename and use the common
Windows wildcard characters. For example, to find all batch files in the archives, type "*.bat".
Typing my???.exe will allow you to find all .exe files with names consisting of five symbols and
starting with "my". It should be noted that search is case-insensitive, i.e. "Backup" and "backup"
is the same search string. Furthermore, the search stops after the program finds 100 files
corresponding to a search criterion you have typed. If the search results do not contain the file
you need, you will have to refine the search criterion.
When a file is included in several backups and it has not been modified, the search results will show it only
once in the oldest backup file. If such a file has been changed, the search results will show all backup files
containing differing versions of the file.
2. Search in the comments to backup archives is carried out differently. First of all, you cannot use
"*" and "?" as Windows wildcard characters. As in this case the program uses full text search, it
will just find all occurrences of these characters in the comments (if any). The full text search
uses the following rules:
Search criteria consist of words separated by space character(s) or by a logical operator: "AND",
"OR", "NOT" (please, take note of the upper case).
Only one logical operator is allowed (the first one that occurs in a search string), otherwise they
are ignored and interpreted as search words.
All space-separated words must be in a topic for successful match.
The Backup names area shows the archive files whose comments satisfy the search criterion.
Double-clicking on an archive opens it for exploring.
13.2 Windows Search and Google Desktop integration
Acronis True Image OEM Quick Backup has plug-ins for Google Desktop and Windows Search (WDS).
If you use any of these search engines on your computer, Acronis True Image OEM Quick Backup will
detect the search engine you use and install an appropriate plug-in for indexing your tib backup
archives. Indexing of backups will speed up searches in the backup archives. After such indexing you
will be able to search archive content by entering a filename into the Google Desktop or Windows
Search deskbar query field without opening Acronis True Image OEM Quick Backup. The search
results will be shown in a browser window. Using the search results you can:
Select any file and open it for viewing and/or save that file back to anywhere in the file system
(not in the archive) or where it was before
See in which archive a given file is stored and recover that archive
Google Desktop has a "Quick Find" window. This window is filled with the most relevant results from
your computer. The results change as you type, so you can quickly get to what you want on your
computer. Windows Search provides similar functionality.
In addition to indexing the files in backup archives by their names, the Google Desktop and Windows
Search provide Acronis True Image OEM Quick Backup with the ability to perform full-text indexing of
many files in tib archives, so you will be able to use this feature and perform searches of the files'
content.
74
Copyright © Acronis, Inc., 2000-2010
Full-text indexing of files in backup archives is provided only for the file types recognizable by Google Desktop
and Windows Search. They recognize text files, Microsoft Office files, all Microsoft Office Outlook and Microsoft
Outlook Express items, and more.
13.2.1 Using Google Desktop with Acronis True Image OEM Quick
Backup
If you do not have Google Desktop, it can be downloaded for free from Google's Web site. Click
Google Desktop and follow the instructions for download and installation.
To enable using Google Desktop for searching files in tib archives:
1. To install the plug-in, choose Tools & Utilities on the sidebar. Then click Search settings on the
right pane and select the appropriate check box in the Desktop Search Options window. The
following window appears.
2. Verify that the plug-in is installed. Right-click on the Google Desktop icon in your system tray and
select Options in the context menu. Google Desktop opens the Preferences window in your
browser. Make sure that Acronis Indexer (Acronis Backups) is selected in the Indexing Plug-ins
area.
3. Right-click on the Google Desktop icon in your system tray once more and select Indexing → ReIndex. Click Yes in the confirmation window that appears. Google Desktop will add all the new
content to the existing index.
Copyright © Acronis, Inc., 2000-2010
75
Give Google Desktop some time for indexing all tib files on your computer's hard disks and adding
the indexing information to its index database. The required time depends on the number of tib
archives and the number of files they contain.
After for example an hour, check whether Google Desktop has indexed the tib archives by entering in
its query field the name of a file which you know for sure that you backed up. If Google Desktop has
completed indexing, it will show you the tib archives where it has found the file.
If you want to see all the search results, click the "See all N results in a browser" and you will see
something like the screen shot below.
76
Copyright © Acronis, Inc., 2000-2010
Clicking in the browser window on a line related to the desired file version opens a small dialog with
just two options: View and Recover.
Choosing View starts the application associated with this file type and opens the file. Choosing
Recover starts Acronis True Image OEM Quick Backup and you can then recover the file to a desired
location.
13.2.2 Using Windows Search with Acronis True Image OEM Quick
Backup
WIf you use any edition of Windows Vista or Windows 7 that has built-in Desktop Search
functionality or Windows Desktop Search 3.0 or later, you can enable Windows Search support for tib
files.
If you do not have Windows Search installed, but would like to use it, you can download Windows
Search 4.0 for free from Microsoft's Web site. To download, click Windows Search 4.0. Double-click
on the downloaded file and follow the instructions for installation.
Windows Search does not support indexing of zip files content.
To use Windows Search support:
1. To register the plug-in, choose Tools & Utilities on the sidebar. Click Search settings on the right
pane and select the appropriate check box in the Desktop Search Options window. After
successful registration of the plug-in Acronis True Image OEM Quick Backup will display the
"Plug-in registration succeeded" information window.
2. You can verify that the tib support is enabled. Right-click on the Windows Search icon in your
system tray and select Windows Desktop Search Options… in the context menu. The following
window appears. Make sure that the "tib://..." item is present in the Included Locations list.
Copyright © Acronis, Inc., 2000-2010
77
To open the Indexing Options window in Windows Vista, open the Control Panel and then double-click the
Indexing Options icon. The Windows Vista indexing options have some differences in content and
appearance, though most of the following information is applicable to Windows Vista as well.
3. Click Advanced, select the File Types tab and then make sure that the tib extension is selected
and ".tib IFilter" is shown in the Filter Description field. Select Index Properties and File
Contents.
78
Copyright © Acronis, Inc., 2000-2010
4. Click OK and while the Indexing Options window is open, check that the disks where you store
your tib backup archives are shown in the "Included Locations" list. If the list does not contain
those disks, the tib files will not be indexed. To include the disks, click Modify and select them in
the window that appears.
If you store backups on a network share, Windows Search can index them too. You just have to add the share to
the Indexed Locations list by typing the appropriate UNC path after selecting the Add UNC Location tab of
Advanced Options.
Copyright © Acronis, Inc., 2000-2010
79
Give Windows Search some time for indexing all tib files on your computer's hard disks and adding
the indexing information to its index database. The required time depends on the number of tib
archives and the number of files they contain. After completing the indexing, the Desktop Search will
be able to search files in tib backup archives. The search engines in WDS and Windows Vista have
similar functionalities, though search results are presented somewhat differently:
Windows Search results
Windows Vista Search results
80
Copyright © Acronis, Inc., 2000-2010
14 Other operations
14.1 Validating backup archives
The validation procedure checks whether you will be able to recover data from a particular backup,
so when you select for validation:
a full backup, the program validates the full backup only.
an incremental backup, the program validates the initial full backup, the selected incremental
backup, and the whole chain (if any) of backups to the selected incremental backup.
This information can be helpful, for example, when you find out that a backup archive comprising a
full backup and a chain of incremental ones is corrupted. To troubleshoot the archive, do as follows.
First of all validate the full backup. If it is damaged, all the archive will be useless. When it is not
damaged, proceed to validating incremental backups starting from the oldest, until you find the
culprit. All incremental backups made after the corrupted one will be unusable, but you will be able
to recover the data at least from the previous backups.
You can perform such validations using the Validate Wizard.
1. To validate an archive, click Recovery on the sidebar.
2. Select the archive to validate and click Validate on the toolbar.
3. Clicking Proceed will start the validation procedure. After the validation is complete, you will see
the results window. You can cancel validation by clicking Cancel.
14.2 Viewing Tasks and Logs
Acronis True Image OEM Quick Backup has a Tasks and Log screen that allows you to view its working
logs. The logs can provide information, for instance, about creating backup or validation results,
including reasons for any failures.
Most Acronis True Image OEM Quick Backup operations write their own entries in the logs, though
logs are not provided for image mounting/unmounting and bootable media creation.
The logs contain only partial information on operation of Acronis Online Backup. The remaining
information on operation of those features is written to their own log. That log is not available to
users as it is intended for Acronis Support personnel to help in troubleshooting the issues users have
with those features. It is included in Acronis System Report.
To open the Tasks & Log screen, click Tasks & Log on the sidebar. By default, the screen opens with
the Logs tab selected. The tab shows logs for the selected date. If there are no logs for that date, an
appropriate message appears.
The color marks in the calendar show information about the days with tasks completed with errors,
and successfully completed tasks. The current day is highlighted in bold font. Clicking a day marked
with a scheduled task shows the task(s) scheduled for this date.
The buttons with left and right arrows at the sides of the calendar allow you to browse the months
being shown in the calendar. If you have gone several months back or forward, clicking the Today
button will quickly return you to the current month and date.
Clicking any day in the past takes you to the Log tab and shows logs for the selected date. If there are
no logs for that date, an appropriate message appears.
Copyright © Acronis, Inc., 2000-2010
81
When the Log tab is selected, the upper pane shows the calendar, while the lower one shows logs'
contents.
To view the logs for a specific period, select the period by clicking the right arrow buttons in the
From: and To: fields of the Show for the period area. Clicking the arrow in the From: field opens a
pop-up calendar where you can set the start day of the period by double-clicking the appropriate
day. Then set the end day using the same procedure for the To: field. You can change months and
years in the pop-up calendars using the left and right arrows in the month name area. In addition,
you can enter the desired period start and end dates directly in the fields. If you would like to see all
the logs, click the Show all button.
To delete a log entry, select it and click the Delete button on the toolbar. To delete all log entries,
click the Delete all button. You can also save a log entry to file by clicking the Save button. To save all
logs to file, click Save all.
If any step shown in the logs was terminated by an error, the corresponding log will be marked with a
red circle with a white cross inside.
The three buttons to the right control message filters: the white cross in the red circle filters error
messages, the exclamation mark in a yellow triangle filters warnings, and the "i" in the blue circle
filters information messages.
To better view the details of the current step, you can hide the calendar by clicking the Up arrow at
the top right of the calendar pane. This will enlarge the logs area. To view the calendar again, click
the Down arrow at the top right of the calendar pane.
82
Copyright © Acronis, Inc., 2000-2010
14.3 Managing backup archives
After a while you may wish (or be forced) to manage your backup archives, for example, in order to
free up some space for new backups by removing the oldest backups or those you no longer need. As
now Acronis True Image OEM Quick Backup stores information about the backup archives in a
metadata information database, you must manage backup archives (e.g. delete or move some of
them) by using the program's tools and not Windows Explorer. To manage your backup archives, go
to the Data recovery and backup management screen by selecting Recovery on the sidebar.
All backup archives are located in Disk backups tab.
The shortcut menu opened by right-clicking on a desired backup archive provides the following
operations with backups:
Explore - see Exploring archives and mounting images
Recover - see Recovery Wizard - detailed information (p. 59)
Validate Archive - see Validating backup archives
Mount Image (only for images) - see Mounting an image (p. 71)
Edit Comments - editing comments made during backup creation or adding comments for a
scheduled backup that ran unattended
Rename - renaming backup archives or individual backups (a backup is renamed only in the
program's metadata database, however, the backup filename remains unchanged)
Move - see Moving backup archives (p. 84)
Remove - see Removing backup archives
Details - viewing detailed information on the selected backup
Copyright © Acronis, Inc., 2000-2010
83
14.4 Removing backup archives
You may want to remove backups and backup archives you no longer need. Because Acronis True
Image OEM Quick Backup stores information on the backup archives in a metadata information
database, deleting unneeded archive files using Windows Explorer will not delete information about
these archives from the database and Acronis True Image OEM Quick Backup will consider that they
still exist. This will result in errors when the program tries to perform operations on the backups that
no longer exist. So you must only remove obsolete backups and backup archives using the tool
provided by Acronis True Image OEM Quick Backup. To remove the entire backup archive, select it
and click Remove on the toolbar or right-click on the full backup of the backup archive and choose
Remove in the shortcut menu. To remove an incremental backup, select it and click Remove on the
toolbar or right-click on the selected backup and choose Remove in the shortcut menu. In this case
all other successive incremental backups created later than the selected incremental backup will also
be deleted. The following screen appears:
If you click Delete, the program will remove the backup archive from its metadata information
database as well as from the hard disk.
14.5 Moving backup archives
Now Acronis True Image OEM Quick Backup allows you to move backup archives to another location.
This may come in handy if you want to free space for a new backup, but want to keep an earlier
backup archive at another location, for example, a network share. Another possible scenario - you
want to recover a disk used for keeping your archives. As the program cannot recover if the backup
archive is on the same disk you are going to recover, you need to move the archive to another hard
disk.
1. Select the archive for moving after clicking Recovery on the sidebar.
2. To move the archive, select it on the Data recovery and backup management screen. If the
archive consists of several backups, you can select any of them because Acronis True Image OEM
Quick Backup always moves the entire archive.
3. After making your selection, right-click and choose Move in the shortcut menu.
4. When moving is complete, the path to the archive will change in the Path column of the Data
recovery and backup management screen.
84
Copyright © Acronis, Inc., 2000-2010
15 Troubleshooting
15.1 General
The below sections may help you in troubleshooting issues encountered during installation and use
of Acronis True Image OEM Quick Backup. Among other information the Troubleshooting chapter
includes links to Acronis Support Knowledge Base (KB) articles intended for helping to solve issues
with Acronis products. If the appropriate Troubleshooting section does not provide a solution to your
issue, you can click any link to go to the KB and then use the Search funstion – just enter the key
words related to your problem. Since the Troubleshooting chapter covers just the most common
issues, maybe the KB has recommendations on solving your specific problem. Furthermore, Acronis
Support team continuously adds new articles to the KB. When you are not able to find the solution to
your problem in the KB or the suggested solution does not help, feel free to contact Acronis
Customer Central (http://www.acronis.com/support/).
Acronis Support personnel may request you to provide the system report. To create the report,
select Generate System Report in the Help menu (if you are able to start the program in Windows),
then save the report and send it to Acronis Customer Central. If the issue prevents booting to
Windows, try booting from Acronis rescue media and create the report in the standalone version of
Acronis True Image OEM Quick Backup, selecting the same item in the Help menu.
You can also start system report generation by simultaneously pressing the Ctrl+F7 keys both in
Windows and the standalone version of Acronis True Image OEM Quick Backup, even when a wizard
is opened, a task is running or an error message is displayed.
Furthermore, now you can add to your rescue media Acronis System Report tool that allows you to
generate the system report after booting from the rescue media when both Windows and Acronis
True Image OEM Quick Backup (full version) cannot start. In this case you will need a USB flash drive
that will be used for saving the report.
Quite often the cause of an issue may be trivial, for example, a loose connection of an external hard
drive. Before trying other solutions described in this chapter, it is advisable to check if the issue is
caused by one of the following:
loose connections to the external drive;
poor quality connecting cable;
When using an external USB hard drive, try the following additional suggestions:
if the drive is connected through a hub, connect it directly to a rear connector of your PC;
to prevent conflict with other USB devices attached to your PC, try disconnecting all the USB
devices (except the mouse and keyboard).
15.2 Installation issues
When you cannot install Acronis True Image OEM Quick Backup, try the following solutions:
1. If you selected "Install for the current user only" during the installation, try to select "Install for
all users that share this computer" and vice versa.
2. Launch the installation file in the following way: right-click on the file and select "Run as
administrator".
3. Log in to Vista’s built-in administrator account and try to install the program:
Copyright © Acronis, Inc., 2000-2010
85
a. Click Start → All Programs, then find and open the "Accessories" folder.
b. Right-click on the "Command Prompt" item and select "Run as administrator".
c. Type the following command line in to the opened window:
net user administrator /active:yes
Take note that there is a space between "Administrator" and "/active:yes".
d. Log off the current account and log in to the “Administrator” account.
e. Try to install the application again.
If these solutions do not help, an AcronisSupport Knowledge base article may help you in
troubleshooting and resolving the issue. Just follow the steps in the appropriate scheme. See
Troubleshooting Installation Issues of Acronis Software
15.3 Backup and validation issues
1) When you get a problem with backup or validation, first of all make sure that you have the latest
build of Acronis True Image OEM Quick Backup. You can download it through your Acronis account.
This is because Acronis are continuously working on improving our products. The latest build may
contain bug fixes and provide enhanced hardware compatibility.
2) Errors encountered while backing up data or validating backup archives may be caused by hard
disk errors and/or bad sectors, so check the source and destination disks if you encounter an issue
when backing up or check the backup archive storage disk when validating a backup archive. To do
this, use the Windows chkdsk utility as follows:
- Go to the Command Prompt (Start → Run → cmd)
- Enter the following command: "chkdsk DISK: /r" (where DISK is the partition letter you need to
check, e.g. D:). Please note, that checking the C: drive may require you to reboot the PC.
3) The reason for errors may be defective RAM modules. To test the memory modules of your PC,
please download one of the archives depending on what media type you are going to use:
- memtest archive for diskette
- memtest archive for USB Flash drive
- memtest archive for CD
Unpack the archive and create bootable media with the memory test. Instructions on how to do it
can be found in README.txt in the archive.
4) Check whether this section contains a solution to your problem:
The RPC server is unavailable
When a backup task is supposed to run after starting a task manually, you get an error message:
Error #1722 - "The RPC server is unavailable". In such case try the solution provided in Acronis
Support KB article "RPC Server is Unavailable (Error Code: 1722)" by clicking the following link:
http://kb.acronis.com/content/1521.
Network backup issues
Instructions on how to troubleshoot issues with backing up to a network share in Windows can by
found in the Acronis Support KB article "Troubleshooting Network Backup Issues in Windows"
through the following link: http://kb.acronis.com/content/1684.
86
Copyright © Acronis, Inc., 2000-2010
Backups to a mapped drive fail from time to time
Explanation of why saving an image to a mapped drive may sometimes fail and how to prevent this
can be found in the Acronis Support KB article "Saving an Image to a Mapped Drive from an Acronis
True Image Task Fails Sporadically" through the following link: http://kb.acronis.com/content/1545.
"Insert next volume" message when backing up to a USB flash drive
Acronis True Image OEM Quick Backup treats your USB flash drive as removable media. If it is
formatted in FAT32, the size of one file is limited to 4GB, so when your backup exceeds this size the
program automatically splits it into 4GB volumes and waits for insertion of the next media for the
next volume. Just click OK and the backup process will continue. Repeat this if the message is
displayed again until your backup finishes. For more detailed information see the Acronis Support KB
article "Acronis True Image Asks to Insert Next Volume When Backing Up to USB Flash Drive" at
http://kb.acronis.com/content/1805.
Issue with backing up an NTFS-compressed partition
Acronis True Image may fail to back up an NTFS-compressed partition due to some limitations on
working with such partitions. If it is possible, decompress the partition before backing it up. For more
detailed information, see the Acronis Support KB article "Acronis True Image Fails to Back Up a
Compressed Partition" available at http://kb.acronis.com/content/1811.
Acronis True Image OEM Quick Backup states that a backup is corrupted
Instructions on how to troubleshoot and resolve issues with corrupt backups can be found in the
Acronis Support KB article"Troubleshooting Issues with Corrupt Backups" available at
http://kb.acronis.com/content/1517.
Incremental backup files have large sizes
You find out that incremental backup files have sizes comparable with that of the full backup file. This
can have several causes. For more information and possible solutions see the Acronis Support KB
article "Acronis True Image Creates Large Incremental or Differential Backup Archives" available at
http://kb.acronis.com/content/2712.
15.4 Recovery issues
System and/or data recovery after a disaster is the most important operation performed with Acronis
True Image OEM Quick Backup. Indeed what's the value of a backup program that cannot recover
backed up data? If you have problems with recovery, try the following actions:
1) First of all make sure that you have the latest build of Acronis True Image OEM Quick Backup. You
can download it through your Acronis account.
2) If you recover the image from an external drive, try to copy that image to another storage and
retry recovery as the issue may be related to the hardware.
3) If you have tried recovery in Windows, boot to the rescue media and try the recovery procedure
once more.
4) If this is a data partition backup, you can try mounting it to recover at least some files and folders.
5) If the above suggestions have not helped to solve the problem, check whether this section gives a
solution to your problem.
Copyright © Acronis, Inc., 2000-2010
87
Network share with a backup not found by standalone Acronis True Image OEM Quick Backup
There can be several reasons why you are not able to locate the desired network share when using a
standalone version of Acronis True Image. See the Acronis Support KB article "Standalone Version of
Acronis True Image Cannot Find Network Share with an Image Archive
(http://kb.acronis.com/content/1550)".
You cannot log on to a network share after booting to rescue media
How to solve the problem when a standalone version of Acronis True Image OEM Quick Backup
cannot log you on to the network where the image archive is, and keeps asking for the user name
and password again and again. See the Acronis Support KB article "Standalone Version of Acronis
True Image Recovery Wizard Keeps Asking for User Name and Password When Trying to Restore an
Image from a Network Share (http://kb.acronis.com/content/1551)".
New user profile created after recovering My mail backup of Microsoft Outlook
You can find the solution in the Acronis Support KB article "Restoring E-Mail Backup of Microsoft
Outlook Creates a New Profile (http://kb.acronis.com/content/1804)".
You cannot get access to recovered files or folders
After recovering files/folders with Acronis True Image you get "Access denied" message when trying
to access them. To solve the issue, see the Acronis Support KB article "Access Denied to Files or
Folders Restored with Acronis True Image (http://kb.acronis.com/content/1520)".
15.5 Bootability after recovery issues
If a system was bootable at the time of backup, you expect that it will boot after recovery. However,
the information the operating system stores and uses for booting up may have become outdated at
the time of recovery, especially if you change partition sizes, locations or destination drives. Acronis
True Image OEM Quick Backup automatically updates Windows loaders after recovery. Other loaders
might also be fixed, but there are cases when you have to re-activate the loaders. Specifically when
you recover Linux volume in a dual boot configuration, it is sometimes necessary to apply fixes or
make booting changes so that Linux can boot and load correctly. Below is a summary of typical
situations that require additional user actions when the recovered operating system becomes
unbootable.
The machine BIOS is configured to boot from another hard disk drive (HDD).
Solution: Configure the BIOS to boot from the HDD where the operating system resides.
In some cases BIOS has two menus for setting the boot sequence: one for setting the boot devices priority and
the other - for setting the HDD boot order.
Windows was recovered to a dynamic volume that cannot be set bootable
Solution: Recover Windows to a basic or simple dynamic volume.
A system partition was recovered to a disk that does not have an MBR
When you configure recovery of a system partition to a disk that does not have an MBR, the program
prompts whether you want to recover the MBR along with the system partition. Opt for not
recovering only if you do not want the system to be bootable.
Solution: Recover the partition once again along with the MBR of the corresponding disk.
88
Copyright © Acronis, Inc., 2000-2010
Windows fails to boot with "NTLDR is missing" error message
Solution: Instructions on how to make Windows XP bootable if it reports "NTLDR is missing" after
being recovered with Acronis True Image OEM Quick Backup, can by found in the Acronis Support KB
article "Windows Fails to Boot With "NTLDR is missing" at http://kb.acronis.com/content/1759.
15.6 Other issues
Installation of Acronis True Image OEM Quick Backup makes shared folders inaccessible
To learn why local shared folders on the machine cannot be accessed after installation of Acronis
True Image OEM Quick Backup on this computer, see the Acronis Support KB article "Shared Folders
Cannot be Accessed after Installation of Acronis True Image" at http://kb.acronis.com/content/1554
(http://kb.acronis.com/content/1554).
Acronis True Image OEM Quick Backup does not find any hard disks in Windows
If the Acronis product reports that it has not found any hard disks in Windows, the issue is probably
in a third party software blocking access to the hard disks. For more details see the Acronis Support
KB article "Acronis Product Does Not Detect Hard Disks in Windows" at
http://kb.acronis.com/content/1515 (http://kb.acronis.com/content/1515).
Acronis True Image OEM Quick Backup and Windows BitLocker
To back up and recover the system encrypted with BitLocker you need to create a sector-by-sector
image after booting from Acronis rescue media. For more detailed information see the "Compatibility
of Acronis True Image with Windows Vista BitLocker" article at http://kb.acronis.com/content/1734
(http://kb.acronis.com/content/1734).
The standalone version of Acronis True Image OEM Quick Backup does not detect your hard
drive(s) or NIC card.
This is because the recovery environment does not have the appropriate drivers. The issue can be
solved as follows:
- Create Acronis System Report and request Acronis Customer Central
(http://www.acronis.com/support/) to provide you with an iso file of the rescue media that contains
the required drivers.
- Create a Windows-based recovery environment that includes the required drivers. See "Working
with Acronis True Image Plug-In for BartPE" at http://kb.acronis.com/content/1506
(http://kb.acronis.com/content/1506).
Partition analysis is accompanied by multiple "Failed to read from sector…" error messages
To resolve the issue, try running chkdsk and updating Acronis drivers. For more details see the
following Acronis Support KB article: "Multiple "Failed to read from sector..." Error Messages During
Partition Analysis" at http://kb.acronis.com/content/1514 (http://kb.acronis.com/content/1514).
The "Access denied" message appears when exploring a mounted image archive
Why you may get this message while trying to explore some folders in a mounted image and
solutions to this issue can be found through the following link to the Acronis Support KB article:
"When Trying to Explore Certain Folders of a Mounted Image Archive, Access Denied Message
Appears" at http://kb.acronis.com/content/1549 (http://kb.acronis.com/content/1549).
Copyright © Acronis, Inc., 2000-2010
89
You fail to mount an image spanned over several CD/DVDs
For an explanation of the issue with mounting a spanned image see "Mounting an Image Spanned
over Several CD or DVD Discs Fails" at http://kb.acronis.com/content/1546
(http://kb.acronis.com/content/1546).
It takes a long time to start Acronis True Image OEM Quick Backup
Try the following solutions to resolve this issue:
make sure that you have the latest build of Acronis True Image OEM Quick Backup
disable the "Distributed Link Tracking Client" service
90
install the latest Acronis drivers. If you do not have them, request them from Acronis Customer
Central (http://www.acronis.com/support/)
add Acronis executable files to trusted applications in your antivirus software
delete Vista restore points, if you do not need them
Copyright © Acronis, Inc., 2000-2010
16 Hard Disks and Boot Sequence
16.1 Arranging boot sequence in BIOS
BIOS has a built-in setup utility for initial computer configuration. To enter it, you have to press a
certain key combination (Del, F1, Ctrl+Alt+Esc, Ctrl+Esc, or some other, depending on your BIOS)
during the POST (power-on self test) sequence that starts immediately after you turn your computer
on. Usually the message with the required key combination is displayed during the startup test.
Pressing this combination takes you to the menu of the setup utility that is included in your BIOS.
The menu can differ in appearance, sets of items and their names, depending on the BIOS
manufacturer. The most widely known BIOS makers for PC motherboards are Award/Phoenix and
AMI. Moreover, while items in the standard setup menu are mostly the same for various BIOSes,
items of the extended (or advanced) setup heavily depend on the computer and BIOS version.
Among other things, the BIOS menu allows you to adjust the boot sequence. Boot sequence
management differs for various BIOS versions, e.g. for AMI BIOS, AWARDBIOS, and brand-name
hardware manufacturers.
Computer BIOS allows booting operating systems not only from hard disks, but also from CD-ROMs,
DVD-ROMs, and other devices. Changing the boot sequence may be required, for example, to make
your rescue media (CD, DVD or USB stick) device the first booting device.
If there are several hard disks installed in your computer labeled as C:, D:, E:, and F:, you can reorder
the boot sequence so that an operating system is booted from, for example, disk E:. In this case, you
have to set the boot sequence to look like E:, CD-ROM:, A:, C:, D:.
This does not mean that booting is done from the first device in this list; it only means that the first attempt to
boot an operating system will be from this device. There may be no operating system on disk E:, or it may be
inactive. In this case, BIOS queries the next device in the list.
The BIOS numbers disks according to the order in which they are connected to IDE controllers
(primary master, primary slave, secondary master, secondary slave); next go the SCSI hard disks.
This order is broken if you change the boot sequence in BIOS setup. If, for example, you specify that
booting has to be done from hard disk E:, numbering starts with the hard disk that would be the third
in usual circumstances (it is usually the secondary master for IDE hard drives).
After you have installed the hard disk in your computer and have configured it in BIOS, one can say
that the PC (or the motherboard) "knows" about its existence and its main parameters. However, it is
still not sufficient for an operating system to work with the hard disk. In addition, you have to create
partitions on the new disk and format the partitions using Acronis True Image OEM Quick Backup.
See Adding a new hard disk.
16.2 Installing hard disk drives in computers
16.2.1 Installing an IDE hard disk drive, general scheme
To install a new IDE hard disk, you should do the following (we will assume you have powered OFF
your PC before you start!):
Copyright © Acronis, Inc., 2000-2010
91
1. Configure the new hard disk as slave by properly installing jumpers on its controller board. Disk
drives generally have a picture on the drive that shows the correct jumper settings.
2. Open your computer and insert the new hard disk into a 3.5'' or 5.25'' slot with special holders.
Fasten down the disk with screws.
3. Plug the power cable into the hard disk (four-threaded: two black, yellow and red; there is only
one way you can plug in this cable).
4. Plug the 40- or 80-thread flat data cable into the sockets on the hard disk and on the
motherboard (plugging rules are described below). The disk drive will have a designation on the
connector or next to it that identifies Pin 1. The cable will have one red wire on the end that is
designated for Pin 1. Make sure that you place the cable in the connector correctly. Many cables
are also "keyed" so that they can only go in one way.
5. Turn your computer on and enter BIOS setup by pressing the keys that are displayed on the
screen while the computer is booting.
6. Configure the installed hard disk by setting the parameters type, cylinder, heads, sectors and
mode (or translation mode; these parameters are written on the hard disk case) or by using the
IDE autodetection BIOS utility to configure the disk automatically.
7. Set the boot sequence to A:, C:, CD-ROM or some other, depending on where your copy of
Acronis True Image OEM Quick Backup is located. If you have a boot diskette, set the diskette to
be the first; if it is on a CD, make the boot sequence start with the CD-ROM.
8. Quit BIOS setup and save changes. Acronis True Image OEM Quick Backup will automatically start
after reboot.
9. Use Acronis True Image OEM Quick Backup to configure hard disks by answering the wizard's
questions.
10. After finishing the installation, turn off the computer, set the jumper on the disk to the master
position if you want to make the disk bootable (or leave it in slave position if the disk is installed
as additional data storage).
16.2.2 Motherboard sockets, IDE cable, power cable
There are two slots on the motherboard to which the hard disks can be connected: primary IDE and
secondary IDE.
Hard disks with an IDE (Integrated Drive Electronics) interface are connected to the motherboard via
a 40- or 80-thread flat marked cable: one of the threads of the cable is red.
Two IDE hard disks can be connected to each of the sockets, i.e. there can be up to four hard disks of
this type installed in the PC (there are three plugs on each IDE cable: two for hard disks and one for
the motherboard socket).
As noted, IDE cable plugs are usually designed so that there is only one way to connect them to the
sockets. Usually, one of the pinholes is filled on the cable plug, and one of the pins facing the filled
hole is removed from the motherboard socket, so it becomes impossible to plug the cable in the
wrong way.
In other cases, there is a jut on the plug on the cable, and an indentation in the sockets of the hard
disk and the motherboard. This also ensures that there is only one way to connect the hard disk and
the motherboard.
In the past, this design of plug did not exist, so there was an empirical rule: the IDE cable is
connected to the hard disk socket so that the marked thread is the closest to the power cable, i.e.
92
Copyright © Acronis, Inc., 2000-2010
the marked thread connected to pin #1 of the socket. A similar rule was used for connecting cables
with the motherboard.
Incorrect connection of the cable with either the hard disk or the motherboard does not necessarily
damage the electronics of the disk or the motherboard. The hard disk is simply not detected or
initialized by BIOS.
There are some models of hard disks, especially the older ones, for which incorrect connection damaged the
electronics of the drive.
***
We will not describe all the types of hard disks. Currently the most widely used are those with IDE or SCSI
interfaces. Unlike IDE hard disks, there can be from six to 14 SCSI hard disks installed in your PC. However, you
need a special SCSI controller (called a host adapter) to connect them. SCSI hard disks are not usually used in
personal computers (workstations), but are found mostly in servers.
Aside from an IDE cable, a four-thread power cable must be connected to the hard disks. There is
only one way to plug in this cable.
16.2.3 Configuring hard disk drives, jumpers
A hard disk drive can be configured in a computer as master or as slave. The configuring is done
using special connectors (called jumpers) on the hard disk drive.
The jumpers are either located on the electronic board of the hard disk or a special socket that
provides for the connection of the hard disk and the motherboard.
There is usually a sticker on the drive that explains the markings. Typical markings are DS, SP, CS and
PK.
Each jumper position corresponds to one hard disk(s) installation mode:
DS – master/factory default
SP – slave (or no jumper required)
CS – cable select for master/slave: the purpose of the hard disk is determined by its physical
position with respect to the motherboard
PK – jumper parking position: the position where one can put the jumper if it is not necessary in
the existing configuration
The hard disk with the jumper in master position is treated by the basic input/output system (BIOS)
as bootable.
The jumpers on hard disks that are connected to the same cable can be in the cable select for
master/slave position. In this case, BIOS will deem as "master", the disk that is connected to the IDE
cable, which is closer to the motherboard than the other one.
Unfortunately, hard disk markings were never standardized. You might well find that markings on your hard
disk differ from the ones described above. Moreover, for old types of hard disks, their purpose could be defined
by two jumpers instead of one. You should study the markings carefully before installing your hard disk in the
computer.
It is not enough to physically connect the hard disk to the motherboard and set the jumpers properly
for the hard disk to function — hard disks have to be properly configured with the motherboard
BIOS.
Copyright © Acronis, Inc., 2000-2010
93
16.2.4 Installing a SATA hard drive
Most recently manufactured PCs use the SATA interface for hard drives. In general, installing a SATA
hard drive is easier than an IDE drive, as it is not necessary to configure master-slave jumpers. SATA
drives use a thin interface cable with seven-pin keyed connectors. This improves airflow through the
PC case. Power is supplied to SATA drives through 15-pin connectors. Some SATA drives also support
legacy four-pin power connectors (Molex) — you can use a Molex or SATA connector but do not use
both at the same time, because this could damage the hard drive. You'll also need a free power lead
fitted with a SATA power connector. Most systems that come with SATA ports have at least one SATA
power connector. If this is not the case, you will need a Molex-to-SATA adapter. In case your system
has the SATA power connector but it is already occupied, use a Y-adapter that splits a lead in two.
16.2.5 Steps for installing a new internal SATA drive
1. Find an unused SATA port using the documentation provided with your PC. If you are going to
connect your new SATA drive to a SATA controller card, install the card. If you are going to
connect the SATA drive to the motherboard, enable applicable motherboard jumpers, if any.
Most hard drive kits include a SATA interface cable and mounting screws. Attach one end of the
SATA interface cable to a SATA port on the motherboard or interface card, and the other to the
drive.
2. Then plug the power-supply lead or use a Molex-to-SATA adapter.
3. Prepare your drive. If you're installing a SATA 300 hard drive, check your PC's (or SATA host
adapter's) documentation to make sure it supports SATA 300 drives. If it doesn't, you might need
to change a jumper setting on the drive (see the drive's manual for instructions). If you have a
SATA 150 hard drive, you don't need to change any settings.
4. Turn on the PC and look for the new drive in the boot-up messages. If you don't see it, enter the
PC's CMOS setup program and search the BIOS configuration menu for an option that will let you
enable SATA for the ports you are using (or maybe you will just need to enable SATA). See your
motherboard documentation for instructions specific to your BIOS.
5. If the operating system does not recognize the SATA drive, you need the appropriate drivers for
your SATA controller. If the drive is recognized, go to step 8.
Usually, it is best to obtain the latest driver version from the motherboard or SATA controller
manufacturer's Web site.
If you download a copy of the SATA controller drivers, place the driver files to a known location
on your hard drive.
1. Boot from the old hard drive.
The operating system should detect the SATA controller and install the appropriate software. You
might need to provide the path to the driver files.
1. Ensure that the SATA controller and the connected SATA hard drive are correctly detected by the
operating system. To do this, go to the Device Manager.
SATA controllers usually appear under the SCSI and RAID controllers section of Device Manager,
while hard drives are listed under the Disk drives section.
The SATA controller and SATA hard drive must not be displayed in the Device Manager with a
yellow exclamation mark or any other error indication.
1. After you have installed the hard disk in your computer and have configured it in BIOS, one can
say that the PC "knows" about its existence and its main parameters. However, it is still not
enough for the operating system to work with the hard disk. In addition, you have to create
partitions on the new disk and format the partitions using Acronis True Image OEM Quick
94
Copyright © Acronis, Inc., 2000-2010
Backup. See Adding a new hard disk. Then configure your BIOS to boot from the SATA controller
and boot from the SATA hard drive to ensure it works.
16.3 Hard Disk Wiping methods
Information removed from a hard disk drive by non-secure means (for example, by simple Windows
delete) can easily be recovered. Utilizing specialized equipment, it is possible to recover even
repeatedly overwritten information. Therefore, guaranteed data wiping is more important now than
ever before.
The guaranteed wiping of information from magnetic media (e.g. a hard disk drive) means it is
impossible to recover data by even a qualified specialist with the help of all known tools and recovery
methods.
This problem can be explained in the following way: Data is stored on a hard disk as a binary
sequence of 1 and 0 (ones and zeros), represented by differently magnetized parts of a disk.
Generally speaking, a 1 written to a hard disk is read as 1 by its controller, and 0 is read as 0.
However, if you write 1 over 0, the result is conditionally 0.95 and vice versa – if 1 is written over 1
the result is 1.05. These differences are irrelevant for the controller. However, using special
equipment, one can easily read the «underlying» sequence of 1's and 0's.
It only requires specialized software and inexpensive hardware to read data "deleted" this way by
analyzing magnetization of hard disk sectors, residual magnetization of track sides and/or by using
current magnetic microscopes.
Writing to magnetic media leads to subtle effects summarized as follows: every track of a disk stores
an image of every record ever written to it, but the effect of such records (magnetic layer) becomes
more subtle as time passes.
16.3.1 Functioning principles of Information wiping methods
Physically, the complete wiping of information from a hard disk involves the switching of every
elementary magnetic area of the recording material as many times as possible by writing specially
selected sequences of logical 1's and 0's (also known as samples).
Using logical data encoding methods in current hard disks, you can select samples of symbol (or
elementary data bit) sequences to be written to sectors in order to repeatedly and effectively wipe
confidential information.
Methods offered by national standards provide (single or triple) recording of random symbols to disk
sectors that are straightforward and arbitrary decisions, in general, but still acceptable in simple
situations. The most effective information-wiping method is based on deep analysis of subtle
features of recording data to all types of hard disks. This knowledge speaks of the necessity of
complex multipass methods to guarantee information wiping.
The detailed theory of guaranteed information wiping is described in an article by Peter Gutmann.
Please see:
Secure Deletion of Data from Magnetic and Solid-State Memory.
Copyright © Acronis, Inc., 2000-2010
95
16.3.2 Information wiping methods used by Acronis
The table below briefly describes information wiping methods used by Acronis. Each description
features the number of hard disk sector passes along with the number(s) written to each sector byte.
The description of built-in information wiping methods
No.
Algorithm (writing method)
Passes
Record
1.
United States Department of
Defense 5220.22-M
4
1 pass – randomly selected symbols to each byte of
each sector, 2 – complementary to written during the
st
1 pass; 3 – random symbols again; 4 – writing
verification.
2.
United States: NAVSO P-5239- 4
26 (RLL)
1 pass – 0x01 to all sectors, 2 – 0x27FFFFFF, 3 –
random symbol sequences, 4 – verification.
3.
United States: NAVSO P-5239- 4
26 (MFM)
1 pass – 0x01 to all sectors, 2 – 0x7FFFFFFF, 3 –
random symbol sequences, 4 – verification.
4.
German: VSITR
7
1 – 6 – alternate sequences of: 0x00 and 0xFF; 7
– 0xAA; i.e. 0x00, 0xFF, 0x00, 0xFF, 0x00, 0xFF, 0xAA.
5.
Russian: GOST P50739-95
1
Logical zeros (0x00 numbers) to each byte of each
th
th
sector for 6 to 4 security level systems.
st
st
st
st
th
th
Randomly selected symbols (numbers) to each byte
rd
st
of each sector for 3 to 1 security level systems.
6.
Peter Gutmann's method
35
Peter Gutmann's method is very sophisticated. It's
based on his theory of hard disk information wiping
(see Secure Deletion of Data from Magnetic and
Solid-State Memory).
7.
Bruce Schneier's method
7
Bruce Schneier offers a seven-pass overwriting
st
method in his Applied Cryptography book. 1 pass –
nd
0xFF, 2 pass – 0x00, and then five times with a
cryptographically secure pseudo-random sequence.
8.
Fast
1
Logical zeros (0x00 numbers) to all sectors to wipe.
96
Copyright © Acronis, Inc., 2000-2010
17 Startup Parameters
Additional parameters that can be applied prior to booting Linux kernel.
17.1 Description
Additional parameters that can be applied prior to booting Linux kernel
Description
The following parameters can be used to load Linux kernel in a special mode:
acpi=off
Disables ACPI and may help with a particular hardware configuration.
noapic
Disables APIC (Advanced Programmable Interrupt Controller) and may help with a particular
hardware configuration.
nousb
Disables loading of USB modules.
nousb2
Disables USB 2.0 support. USB 1.1 devices still work with this option. This option allows using some
USB drives in USB 1.1 mode, if they do not work in USB 2.0 mode.
quiet
This parameter is enabled by default and the startup messages are not displayed. Deleting it will
result in the startup messages being displayed as the Linux kernel is loaded and the command shell
being offered prior to running the Acronis program.
nodma
Disables DMA for all IDE disk drives. Prevents kernel from freezing on some hardware.
nofw
Disables FireWire (IEEE1394) support.
nopcmcia
Disables PCMCIA hardware detection.
nomouse
Disables mouse support.
[module name]=off
Disables the module (e.g. sata_sis=off).
pci=bios
Forces to use PCI BIOS, and not to access the hardware device directly. For instance, this parameter
may be used if the machine has a non-standard PCI host bridge.
pci=nobios
Copyright © Acronis, Inc., 2000-2010
97
Disallows use of PCI BIOS; only direct hardware access methods are allowed. For instance, this
parameter may be used if you experience crashes upon boot-up, probably caused by the BIOS.
pci=biosirq
Uses PCI BIOS calls to get the interrupt routing table. These calls are known to be buggy on several
machines and they hang the machine when used, but on other computers it is the only way to get
the interrupt routing table. Try this option, if the kernel is unable to allocate IRQs or discover
secondary PCI buses on your motherboard.
vga=ask
Gets the list of the video modes available for your video card and allows selecting a video mode most
suitable for the video card and monitor. Try this option, if the automatically selected video mode is
unsuitable for your hardware.
98
Copyright © Acronis, Inc., 2000-2010
Compression level • 47
18 Index
Configuring hard disk drives, jumpers • 94
A
Creating a custom rescue CD • 19
Connection attempts • 38
Acronis True Image OEM Quick Backup
basic concepts • 6
Creating an Online backup account • 32
Acronis True Image OEM Quick Backup
installation and startup • 10
Creating bootable media • 10, 66
Activating Acronis True Image OEM Quick
Backup • 11
Additional backup features • 41
Creating backup archives • 27
Creating Linux-based rescue media • 66
D
Additional recovery information • 59
Data recovery with Acronis True Image
OEM Quick Backup • 51
Archive selection • 59
Deciding what data to back up • 27
Archive splitting • 49
Description • 98
Archive to various places • 41
Disk/partition images • 13, 27
Archive validation • 50
E
Arranging boot sequence in BIOS • 8, 17,
29, 51, 53, 54, 92
Error handling • 48
Assigning a letter to the recovered
partition • 63
B
Executing recovery • 64
Exploring archives and mounting images •
69
Backing up a data partition or disk • 30
F
Backing up a system partition • 28
File recovery options • 64
Backing up an entire system disk • 28
Fine-tuning your backups • 47
Backing up to a network share • 30
Free space threshold • 49
Backing up to Acronis Online Storage • 33
Full and incremental backups • 13, 29, 30,
31, 45
Backup and validation issues • 87
Backup file naming conventions • 14
Backup method • 45
Backup options • 47
Functioning principles of Information
wiping methods • 96
G
Backup priority • 48
General • 86
Backup Wizard – detailed information • 44
General information and proprietary
Acronis technologies • 13
Bootability after recovery issues • 89
Booting from system image tib files • 15
Getting to know Acronis True Image OEM
Quick Backup • 21
C
H
Changing the recovered partition size and
location • 63
Hard Disk Wiping methods • 96
Changing the recovered partition type • 62
Hard Disks and Boot Sequence • 92
How to best prepare for a disaster • 16
Program workspace • 21
I
Providing a comment • 47
Proxy settings • 40
Information wiping methods used by
Acronis • 97
Installation issues • 86
Installing a SATA hard drive • 95
Installing Acronis True Image OEM Quick
Backup • 10
Installing an IDE hard disk drive, general
scheme • 92
Installing hard disk drives in computers •
92
Introduction • 6
L
R
Recommendations on selecting data for
storing online • 40
Recovering a data partition or disk • 56
Recovering a disk backup to a different
capacity hard disk • 52
Recovering a disk with a hidden partition •
54
Recovering a disk without a hidden
partition • 53
Recovering data from Online Storage • 35
Recovering files and folders • 57
Local storage settings • 49
M
Main screens • 22
Managing backup archives • 83
Managing Online Storage • 36
Minimum system requirements • 8
Motherboard sockets, IDE cable, power
cable • 93
Mounting an image • 69
Recovering files and folders from image
archives • 57
Recovering your system partition • 51, 52
Recovery issues • 88
Recovery method selection • 60
Recovery priority • 65
Recovery Wizard - detailed information •
59, 83
Removable media settings • 48
Moving backup archives • 83, 84
Removing Acronis True Image OEM Quick
Backup • 12
N
Removing backup archives • 84
New in Acronis True Image OEM Quick
Backup • 8
O
Online backup • 32
Options screen • 25
Other issues • 90
Other operations • 81
Overwrite file options • 64
Running Acronis True Image OEM Quick
Backup • 10
S
Searching • 73
Searching backup archives and their
content • 73
Selecting a disk/partition to recover • 60
Selecting a target disk/partition • 62
Selecting archive location • 44
P
Selecting the backup options • 46
Preparing for disaster recovery • 16
Selecting what data to back up • 44
Preparing for your first backup • 27
Setting default recovery options • 64
100
Copyright © Acronis, Inc., 2000-2010
Setting online backup options • 37
Setting recovery options • 64
Some typical backup scenarios • 28
Starting the Recovery Wizard • 59
Startup Parameters • 67, 98
Steps for installing a new internal SATA
drive • 95
Storage cleanup • 39
Storage connection speed • 38
Supported file systems • 9
Supported operating systems • 9
Supported storage media • 9
System requirements and supported
media • 8
T
Testing bootable rescue media • 17
The backup process • 47
Troubleshooting • 86
U
Unmounting an image • 71, 83
Upgrading Acronis True Image OEM
Quick Backup • 11
Using Google Desktop with Acronis True
Image OEM Quick Backup • 75
Using Windows Search with Acronis True
Image OEM Quick Backup • 77
V
Validating backup archives • 81
Viewing disk and partition information • 15
Viewing Tasks and Logs • 81
W
What is Acronis® True Image OEM Quick
Backup? • 6
Windows Search and Google Desktop
integration • 74
Copyright © Acronis, Inc., 2000-2010
101