1
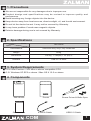
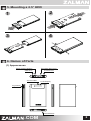
Quick Guide
ZM-VE200
Please read this Manual before use
www.ZALMAN.com
Ver. 1.1
1. Precautions
■ We are not responsible for any damages due to improper use.
■ Product design and specifications may be revised to improve quality and
performance.
■ Avoid inserting any foreign objects into the device.
■ Keep device away from heat sources, direct sunlight, oil, and humid environment.
■ Do not let the device be wet. It may not be covered by Warranty.
■ It may have problem if used near magnetic objects.
■ Exterior damage during use is not covered by Warranty.
2. Specifications
Model
Spec.
ZM-VE200
Case Material
Aluminum Alloy, Acryl, Poly Carbonate
Weight
98.5g
Dimensions
135.3(L) × 78.6(W) × 13.1(H) ㎜
Interface
USB 2.0 / e-SATA
3. System Requirements
■ CPU: Intel Pentium / 350 Mhz or above compatible CPU
■ O.S: Windows XP SP3 or above / Mac OS X 10.0 or above
4. Components
ZM-VE200
Pouch
Screw Driver & Bolts 2pcs
Quick Guide
Quick Guide
e-SATA Cable
.COM
USB 2.0 Cable
1
5. Mounting a 2.5” HDD
2
1
2.5
3
D
D
”H
4
DD
”H
2.5
6. Names of Parts
(1) Appearances
Write Protect Switch
USB Port
Access LED
Firmware Recovery
e-SATA Port
LCD Display
Jog Switch
Serial Number
.COM
2
(2) Display and Modes
‘iso File’ Mount Status
Protection Mode
Current Mode
D
HDD Status
23℃
HDD Temp.
‘Folder’ or ‘iso File’ Name
D Dual Mode (Push the Jog Switch and connect USB cable.)
H HDD Mode (Wheel-down the Jog Switch and connect USB cable.)
O ODD Mode (Wheel-up the Jog Switch and connect USB cable.)
iso File Mounted to Virtual ODD
Write Protected
Read & Write Enabled
Select ‘name’ folder.
Select ‘name.iso’ file.
HDD Status (Good / Warning / Critical)
7. Connecting to PC
(1) Connect / Disconnect with USB cable
Connect device to PC’s USB port using enclosed USB cable.
When disconnecting, please use “Hardware Safety Removal” on tray.
(2) Connect / Disconnect with e-SATA cable
Connect device to PC’s USB port and e-SATA port using enclosed USB cable
and e-SATA cable.
When removing, right mouse click on ‘My Computer’ → ‘Manage’
→ ‘Device Manager’ → ‘Disk Drive’, then ‘remove’ with right mouse button.
.COM
3
Caution
▶ This device supports Hot Swap using e-SATA. To use Hot Swap function, please
check in advance if PC motherboard supports Hot Swap function.
▶ Connect e-SATA cable first, then USB cable.(When removing, use reverse order.)
▶ If cable is unplugged with force while operating, it may cause fatal error to the
system and device.
8. Introduction
(1) Using Jog Switch
To previous file
Select file
To next file
(2) Menu Navigation
Begin of List
:
Folder
:
:
Folder
:
▶ *.iso
:
▶ *.iso
Desired mode is set after waiting 3 seconds
Dual Mode
HDD Mode
ODD Mode
▶ *.iso
▶ *.iso
:
▶ *.iso
HDD Model
End of List
Firmware Version
HDD S/N
VE200 S/N
Move to previously selected iso file
Caution
To use Virtual ODD, iso file must be located in the “_iso” folder of device.
.COM
4
MEMO
.COM
5