1
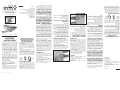
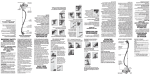
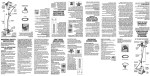
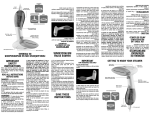
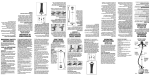
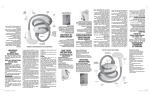
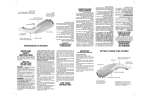
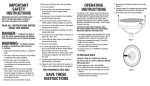
READ ALL INSTRUCTIONS
BEFORE USING
KEEP AWAY FROM WATER
When using electrical appliances, especially
when children are present, basic safety precautions should always be taken, including
the following:
IMPORTANT
SAFETY
INSTRUCTIONS
Steam ready indicator
"Continuous steam" button
20. Do not iron a garment while it is on
person.
21. Do not use continuous steam for more
than 10 seconds. A flooding of the steam
chamber may occur, causing hot water to
drip from the soleplate.
SPECIAL
INSTRUCTIONS
FILLING INSTRUCTIONS
1. Place the unit on a stable surface.
2. While holding the water reservoir with
one hand, move the release lever toward the
power cord.
3. With the reservoir released, pull up on
the reservoir to remove it from the body of
the unit.
4. Turn the reservoir over, revealing the rubber inlet cover.
5. Open the inlet cover and fill the tank
with everyday tap water (filtered water may
reduce hard water problems).
6. Close the inlet cover and return the
reservoir to its place, making sure that the
reservoir is secure.
Removeable
Lint/Fabric
Bristle
& Soleplate
cover
Crease
Attachment
Removable
water tank
Water tank
release lever
FOR HOUSEHOLD USE ONLY
SAVE THESE
INSTRUCTIONS
IMPORTANT
Handle release
button
Rotating handle
Variable temperature
control dial
GETTING TO KNOW YOUR STEAMER
1
FAMILIARÍCESE CON SU PLANCHA
Control de
temperatura
PARA USO DOMÉSTICO
SOLAMENTE
LLENADO DEL DEPÓSITO
1. Ponga la plancha sobre una superficie
segura.
2. Sostenga el depósito con una mano y
deslice el botón de liberación del depósito
hacia atrás.
3. Saque el depósito.
4. Voltee el depósito y retire el tapón de
caucho.
5. Llene el depósito con agua corriente o
filtrada (si el agua está dura).
6. Cierre el tapón y regrese el depósito sobre
la plancha, asegurándose que esté debidamente instalado.
DANGER
Stainless steel soleplate
08NP221_GS19_IB.indd
20. Nunca desarrugue prendas mientras
alguien las tenga puestas.
21. No utilice la función de vapor continuo
durante más de 3 segundos. Esto podría
provocar un derrame interior y hacer que la
suela gotee.
— Any appliance is
electrically live even when the switch is off.
To reduce the risk of death by electric shock:
1. Always unplug appliance immediately after
using.
2. Do not place or store appliance where it
can fall or be pulled into a tub or sink.
3. Do not place in, or drop into water or
other liquid.
4. If an appliance falls into water, unplug it
immediately. Do not reach into the water.
esté apagado. Para reducir el riesgo de muerte
o herida por descarga.
1. Siempre desconecte el aparato
inmediatamente después de usarlo.
2. No coloque ni guarde el aparato donde
pueda caer o ser empujado a una bañera o
un lavabo.
3. No coloque el aparato ni lo deje caer al
agua u otro líquido.
4. Si el aparato cayera al agua, desconéctelo
inmediatamente. No toque el agua.
INSTRUCCIONES
ESPECIALES
GUARDE ESTAS
INSTRUCCIONES
IMPORTANTE
WARNING
PELIGRO — Cualquier aparato
enchufado permanece bajo tensión, aunque
19. Cambie los accesorios con cuidado,
puesto que podrían estar calientes o contener
agua caliente proveniente de condensación.
Asegúrese que estén secos y fríos antes de
manipularlos.
10. Surfaces of this appliance may be hot
when in use. Do not let heated surfaces
touch eyes or bare skin.
11. Do not let the soleplate sit on any surface or on the appliance power cord while it
is hot or plugged in.
12. Unplug this appliance before filling or
emptying. Do not overfill.
13. While emitting steam, this appliance
may cause burns if it is used too close
to the skin, scalp or eyes, or if it is used
incorrectly. To reduce the risk of contact
with hot water coming from steam vents,
test appliance before each use by holding it
away from body.
14. Do not operate steamer without properly
filling the water tank.
15. Never yank cord to disconnect from
outlet; instead, grasp plug and pull to
disconnect.
16. Burns could occur from touching hot
parts, hot water, or steam. Use care when
removing water tank or when you turn a
steam appliance upside down – there may
be hot water in reservoir.
17. To reduce likelihood of circuit overload,
do not operate another high wattage appliance on the same circuit.
18. When installing or removing attachment, please be sure the unit is off and no
steam is being released to avoid contact
with hot water.
19. Use caution when installing or removing attachment as it may contain hot water
from condensation. Ensure the attachment
is dry or cooled off to avoid contact with
hot water.
LEA TODAS LAS
INSTRUCCIONES ANTES
DE USARLO
MANTÉNGALO ALEJADO
DEL AGUA
electrocución, incendio o heridas:
1. Nunca deje este aparato desatendido
mientras esté conectado o sobre una
mesa de planchar.
2. Se debe supervisar cuidadosamente el
uso de este aparato cuando esté utilizado
por o cerca de niños o personas con alguna
discapacidad. El uso sin supervisión podría
resultar en un incendio o heridas.
3. Utilice este aparato únicamente con
el propósito para el cual fue diseñado y
solamente según las instrucciones. Sólo
use accesorios recomendados por el
fabricante.
4. Nunca utilice el aparato si el cordón
o la clavija estuviesen dañados, si no
funcionase correctamente, si hubiese
caído, si estuviese dañado o si hubiese
caído al agua. No intente reparar el
aparato. El ensamblar las partes de manera
incorrecta aumenta los riesgos de incendio,
electrocución y heridas. Regrese el aparato
a un centro de servicio autorizado para que
lo examinen y lo reparen.
5. Mantenga el cordón alejado de las
superficies calientes. No jale ni retuerza
el cordón alrededor. Enrolle el cordón sin
apretar alrededor del aparato para guardarlo.
Permita que el aparato enfríe completamente
antes de guardarlo.
6. El cable de este aparato está dotado
de una clavija polarizada (una pata es
más ancha que otra). Como medida de
seguridad, se podrá enchufar de una sola
manera en el tomacorriente. Si no entrara
en el tomacorriente, inviértela. Si aún no
entrara completamente, comuníquese
con un electricista. No intente vencer esta
función de seguridad.
7. Nunca deje caer ni inserte un objeto en
ninguna de las aberturas.
8. No lo utilice en exteriores, ni lo haga
funcionar donde se estén usando productos
en aerosol (spray) o donde se esté
administrando oxígeno.
9. No utilice una extensión con este
aparato.
10. No permita que las partes calientes del
aparato o el vapor hagan contacto con la
piel o los ojos.
11. No deje la suela sobre ninguna superficie
durante un tiempo prolongado y no permita
que haga contacto con el cordón mientras
la plancha esté conectada, encendida o
caliente.
12. Desconecte el aparato antes de llenar o
vaciar el depósito de agua. No sobrellene el
depósito.
13. Este aparato produce vapor muy caliente,
el cual puede provocar quemaduras si el
aparato se usa de manera indebida o muy
cerca de la piel, de cuero cabelludo o de los
ojos. Siempre pruebe la función vapor antes
de usarlo, manteniendo el aparato alejado
de su cuerpo.
14. Nunca haga funcionar la plancha con el
depósito de agua vacío.
15. Nunca jale el cordón para desconectarlo
del tomacorriente. Cójalo por la clavija.
16. El contacto con las partes calientes,
el agua caliente o el vapor caliente puede
provocar quemaduras. Tenga cuidado al
extraer el depósito de agua o al voltear la
plancha al revés, puesto que puede quedar
agua en el depósito.
17. Para prevenir las sobrecargas eléctricas,
no opere ningún otro aparato de alto vataje
en el mismo circuito.
18. Asegúrese que el aparato esté apagado
y que no esté emitiendo vapor antes de
cambiar los accesorios.
— To reduce the
risk of burns, electrocution, fire, or injury to
persons:
1. This appliance should never be left
unattended when plugged in or on an
ironing board.
Please become well acquainted with the
GS19 before use. If you have any questions
about this product, please call our help line
at 1-800-3CONAIR.
Siempre que use aparatos eléctricos,
especialmente en la presencia de niños, debe
tomar precauciones básicas de seguridad,
entre las cuales las siguientes:
ADVERTENCIA
—
Para reducir el riesgo de quemaduras,
2. Close supervision is necessary when
this appliance is used by, or near children or individuals with certain disabilities.
Unsupervised use could result in fire or
personal injury.
3. Use this appliance only for its intended
use as described in this manual. Do not
use attachments not recommended by the
manufacturer.
4. Never operate this appliance if it has
a damaged cord or plug, if it is not working properly, or if it has been dropped or
damaged, or dropped into water. Do not
attempt to repair the appliance. Incorrect
reassembly or repair could cause a risk of
fire, electric shock, or injury to persons
when the appliance is used. Return the
appliance to an authorized service center
for examination and repair.
5. Keep the cord away from heated surfaces. Do not allow cord to contact heated
surfaces. Do not pull or twist cord. Let
appliance cool completely before putting
away. Loop cord loosely around appliance
when storing.
6. This appliance has a polarized plug (one
blade is wider than the other). As a safety
feature, this plug will fit in a polarized outlet
only one way. If the plug does not fit fully
in the outlet, reverse the plug. If it still does
not fit, contact a qualified electrician. Do not
attempt to defeat this safety feature.
7. Never drop or insert any object into any
opening.
8. Do not use outdoors or operate where
aerosol (spray) products are being used or
where oxygen is being administered.
9. Do not use an extension cord to operate
appliance.
MEDIDAS DE
SEGURIDAD
IMPORTANTES
Depósito de
agua extraíble
Cepillo para
pelusa
(también
protector
de suela)
Botón de
liberación
del depósito
Botón de liberación
del mango
Mango giratorio
Accesorio
para formar
la raya de los
pantalones
Botón para producir vapor continuo
Suela de acero inoxidable
Luz de listo
Le invitamos a que se familiarice con el
GS19 antes de usarlo. Si tiene preguntas
acerca de su uso, llame a nuestro servicio
posventa al 1-800-3-CONAIR.
11/17/08
11:18:07 AM
El accesorio para formar la raya de los
pantalones está diseñado para usarse con
una mano. No toque ninguna parte del
accesorio durante el uso.
Para formar la raya del pantalón:
1. Cuelgue el pantalón al revés.
2. Estire la tela e insértela en el accesorio,
como se indica.
3. Desplace la plancha lentamente desde
arriba hasta abajo y viceversa hasta formarse
la raya.
CONSEJOS PARA FORMAR LA
RAYA DE LOS PANTALONES
continua hasta que afloje el botón. No
mantenga el botón oprimido durante más
de 10 segundos a la vez.
Nota: Para iniciar el flujo de vapor, mantenga
el botón oprimido durante 2 a 5 segundos.
Después de terminar, ponga el ajuste
de temperatura en la posición “MIN”,
desconecte la plancha y permita que enfríe
antes de guardarla. Le recomendamos que
instale el accesorio para pelusa sobre la suela
para protegerla durante el almacenaje.
CONSEJOS PARA DESARRUGAR
PRENDAS
1. Turn off and unplug applicance after
using.
2. Allow to cool before starting.
3. Empty any remaining water from the tank
to avoid leakage.
4. Store in a cool, dry place, out of reach
of children.
INSTALACIÓN/REMOCIÓN DE
LOS ACCESORIOS
Para lograr resultados óptimos:
1. Escoja el ajuste de temperatura adecuado,
según el tipo de tela. Véase las etiquetas de
sus prendas para más información.
2. No permita que la suela permanezca en
un solo lugar durante un tiempo prolongado
porque podría quemar la tela.
3. Para lograr resultados óptimos y no
dañar ninguna superficie, le recomendamos
que utilice una tabla de planchar.
4. Cuando planche prendas hechas de
diferentes tipos de tela, empiece por la
tela más delicada, usando la temperatura
más baja, luego suba progresivamente la
temperatura.
STORAGE
steam ,n iron
multi-purpose
Conair will repair or replace (at our option)
your unit free of charge for 12 months from
the date of purchase if the appliance is defective in workmanship or materials.
To obtain service under this warranty, return
the defective product to the service center
listed below that is nearest you, together
with your purchase receipt and $3.00 for
postage and handling. California residents
need only provide proof of purchase and
should call 1-800-366-0937 for shipping
instructions. In the absence of a purchase receipt, the warranty period shall be
12 months from the date of manufacture.
ANY IMPLIED WARRANTIES, INCLUDING
BUT NOT LIMITED TO THE IMPLIED
WARRANTY OF MERCHANTABILITY AND
FITNESS FOR A PARTICULAR PURPOSE,
SHALL BE LIMITED IN DURATION TO THE
12 MONTH DURATION OF THIS WRITTEN
WARRANTY. Some states do not allow limitations on how long an implied warranty lasts,
so the above limitations may not apply to you.
IN NO EVENT SHALL CONAIR BE LIABLE
FOR ANY SPECIAL, INCIDENTAL, OR
CONSEQUENTIAL DAMAGES FOR BREACH
OF THIS OR ANY OTHER WARRANTY,
EXPRESS OR IMPLIED, WHATSOEVER.
Some states do not allow the exclusion
or limitation of special, incidental, or
consequential damages, so the above
limitation may not apply to you.
This warranty gives you specific legal rights,
and you may also have other rights, which
vary from state to state.
INSTRUCCIONES
DE USO
ALMACENAJE
LIMITED ONE YEAR WARRANTY
When using the soleplate for pressing
fabrics, follow these steps to ensure professional results:
1. Be sure the temperature control dial
is set to the correct temperature for the
fabric you are pressing. Fabric type and
care recommendations are found on the
fabric label.
2. Do not let the soleplate sit in one place
on the fabric as it may scorch the fabric.
3. When pressing, it is recommended that
you use an ironing board to achieve good
results and prevent damage to furniture
and other surfaces.
4. If pressing different types of fabrics,
start by pressing delicate fabrics first at
lower temperatures and gradually
progress to higher temperatures.
El cepillo para pelusa y el accesorio para
formar la raya de los pantalones han sido
diseñados para instalarse fácilmente sobre
la suela. Para evitar quemarse, siempre
instale y retire los accesorios con sumo
cuidado. Le aconsejamos que permita que
la suela enfríe antes de instalar o retirarlos.
Instalación:
Gire el botón de bloqueo ubicado en la
parte trasera del accesorio y deslice el
mismo sobre a suela, sosteniéndolo por la
superficie lateral resaltada. Afloje el botón
de bloqueo.
Remoción:
Gire el botón de bloqueo ubicado en la parte
trasera del accesorio y deslícelo fuera de la
suela, sosteniéndolo por la superficie lateral
resaltada.
IRONING TIPS
CONSEJOS PARA PLANCHAR
The crease attachment is designed for use
with one hand. Fabric and garments should
easily slide into the attachment.
Do not touch any part of the crease attachment when in use.
1. Hang your garment or fabric.
2. Pull the fabric taut from the bottom and
insert into the crease attachment.
3. Pass the steamer up and down around
the fabric until the desired crease is
achieved and/or wrinkles are removed.
Accesorio
para formar
la raya
de los
pantalones
Conair reparará o remplazará (a su opción) su
aparato sin cargo por un período de 12 meses
a partir de la fecha de compra si presentara
defectos de materiales o fabricación.
Para obtener servicio técnico bajo esta
garantía, regrese su aparato al Centro de
Servicio indicado a continuación, junto con su
recibo de compra y un cheque o giro postal
de $3.00US por gastos de manejo y envío.
Los residentes de California sólo necesitan
dar una prueba de compra y deben llamar al
1-800-366-0937 para recibir instrucciones
de envío. En ausencia del recibo de compra,
el período de garantía será de 12 meses a
partir de la fecha de fabricación.
ANY IMPLIED WARRANTIES, INCLUDING
CUALQUIERA GARANTÍA, OBLIGACIÓN
O
RESPONSABILIDAD
IMPLÍCITAS,
INCLUYENDO PERO NO LIMITADAS A LA
GARANTÍA IMPLÍCITA DE COMERCIABILIDAD
Y APTITUD PARA UN PROPÓSITO ESPECÍFICO,
ESTARÁN LIMITADAS POR LOS 12 MESES DE
LA PRESENTE GARANTÍA ESCRITA. Algunos
Estados no permiten limitaciones sobre la
duración de una garantía implícita, de modo
que las limitaciones mencionadas pueden no
regir para usted.
Para más información sobre los productos
de Conair, llame al 1-800-3-CONAIR o visite
http://www.conair.com
©2008 Conair Corporation
East Windsor, NJ 08520, Glendale, AZ 85307
Centro de Servicio
Conair Corporation
Service Department
7475 N. Glen Harbor Blvd.
Glendale, AZ 85307
Para su seguridad y para disfrutar plenamente
de este producto, siempre lea las instrucciones
cuidadosamente antes de usarlo.
Manual de instrucciones
Modelo GS19
steam ,n iron
plancha de vapor multiuso
GARANTÍA LIMITADA DE UN AÑO
1. Turn the variable temperature control
dial to the High 3 dots (···) setting. The
unit will take approximately two minutes
to reach this temperature. When the temperature has been achieved, the green light
will turn off.
2. Holding the steam vents away from you
and anyone else in the room, engage the
1. Turn off and unplug applicance after 1.
Apague y desconecte el aparato después
de usarlo.
2. Permita que enfríe.
3. Vacíe el agua remanente en el depósito
antes de guardarlo.
4. Guárdelo en un lugar seguro, fuera del
alcance de los niños.
®
FOR UPRIGHT STEAMING
1. Cepille las prendas con el cepillo para
pelusa antes de aplicar vapor. Esto relajará
las fibras de la tela para permitir una mejor
penetración del vapor.
2. Cuelgue las prendas.
3. Aplique vapor lentamente en las zonas
arrugadas. Puede que sea necesario pasar
la plancha varias veces.
4. Siempre vacíe el agua remanente en
el depósito de agua antes de guardar la
plancha.
Made in China
Crease
Attachment
1. To prepare your fabric for steaming,
brush it with the (included) fabric brush.
This will loosen the fibers and allow better
steam penetration.
2. Hang your garment or fabric.
3. Pass the steam jets just above the
fabric where the wrinkles are. It may
take a few passes to remove the
wrinkles completely.
4. After use, empty any remaining water
from the tank to avoid leakage.
CREASE ATTACHMENT TIPS
Cepillo para
pelusa
(también
protector
de suela)
IB-8761
Removeable
Lint/Fabric
Bristle
& Soleplate
cover
STEAMING TIPS
PLANCHADO CON VAPOR
08NP221
2
CONAIR NO SERÁ RESPONSABLE EN
NINGÚN CASO POR ALGÚN DAÑO ESPECIAL,
INCIDENTAL O CONSECUENTE DEBIDO AL
INCUMPLIMIENTO DE ESTA O CUALQUIER
OTRA GARANTÍA, EXPRESA O IMPLÍCITA.
Algunos Estados no permiten la exclusión o
limitación de daños especiales, incidentales o
consecuentes, de modo que las limitaciones
mencionadas pueden no regir para usted.
Esta garantía le otorga derechos legales
específicos y usted puede tener otros
derechos que varían de un Estado a otro.
08NP221_GS19_IB.indd
The lint/fabric brush and crease attachments are designed to attach to the soleplate for easy use.
1. Use caution when removing or replacing the attachments to avoid touching a
hot surface. It is recommended that the
appliance cools off before attachments are
changed.
2. Holding the unit in one hand, turn it over
so the attachment is facing up.
3. Using the other hand, turn the locking
cover tab and push the attachment away
from the handle. Grab the ribbed surface
on the side of the attachment and pull off.
4. After use, reverse the process in step two.
trigger. Steam should now be released
from the vents in the soleplate.
The unit is equipped with a convenient
trigger for continuous steam. To start flow
of steam, press and hold trigger. Initial use
may need 2-5 seconds to wait for steam to
come out. Steam will emit until the trigger
is released. Do not press the steam button
for longer then 10 seconds; otherwise hot
water may leak from the soleplate.
When you have finished using the unit,
or are resting, be sure to elevate the
soleplate. Please be sure to turn the variable temperature control dial to the “min”
position. Unplug the unit and replace the
soleplate cover for storage.
1. Escoja el ajuste de temperatura más alto
(3 puntos). Espere hasta que la luz verde
se apague (aproximadamente 2 minutos).
2. Sostenga la plancha de tal forma que la
suela no apunte hacia su cuerpo ni hacia
otra persona y oprima el botón de vapor
continuo. El vapor saldrá por los orificios
en la suela y seguirá saliendo de manera
1. The GS19 Fabric Steamer functions
as both a steamer and an iron. Simply
depress the rotating handle release button
and rotate the handle out for steaming and
in for ironing.
2. Plug the unit into your electrical outlet.
Both red and green lights will glow. Red
light indicates the appliance is plugged in
and the green light indicates the appliance
is heating up. When the green light goes
off, the appliance is ready. The appliance
can be used continuously, regardless of
the status of the green light. Do not press
the steam button before the green light
goes off for the first time.
3. Remove the soleplate cover/attachment;
rest unit vertically with soleplate elevated.
4. If using the unit for pressing, turn the
Variable Temperature Control Dial to the
appropriate setting for the fabric that you
will be pressing. Check the fabric label to
confirm your fabric type.
Settings are as follows:
Low: 1 dot (·) for synthetic fabrics
Medium: 2 dots (··) for wool and silk
High: 3 dots (···) for cotton and linen
Steam becomes available at the
high setting.
5. When first using the device, test on an
old cloth, as there may be sediment left
from transportation or manufacturing.
Unplug the device when it is not in use.
REMOVING OR REPLACING
THE SOLEPLATE COVER WITH
LINT FABRIC BRUSH AND
CREASE ATTACHMENTS
1. El GS19 puede usarse como plancha
tradicional o como desarrugador de
prendas. Por eso está equipado con un
mango giratorio que puede posicionarse
de dos manera distintas según el uso
deseado. Para cambiar la posición del
mango, simplemente oprima el botón
de despejo del mismo y muévalo en la
posición deseada.
2. Enchufe el cordón en el tomacorriente.
La luz roja y la luz verde se encenderán
para indicar que el aparato está encendido
y calentando. Cuando la plancha llegue a la
temperatura deseada, la luz verde se apagará.
No oprima el botón para producir vapor hasta
que la luz verde se haya apagado.
3. Permita que el aparato caliente en
posición vertical, sin que la suela haga
contacto con ninguna superficie.
4. Escoja el ajuste de temperatura deseado:
Bajo: un punto (•) para los sintéticos
Medio: dos puntos (••) para la lana y la seda
Alto: tres puntos (•••) para el algodón y el lino
Nota: La plancha producirá vapor solamente
con el nivel de temperatura alto.
5. Antes de utilizar la plancha por primera
vez, pruébela sobre un paño viejo para
remover el polvo y otros residuos
acumulados en la suela durante la
fabricación y el transporte.
6. Desconecte el aparato después de usarlo.
OPERATING
INSTRUCTIONS
Service Center
Conair Corporation
Service Department
7475 N. Glen Harbor Blvd.
Glendale, AZ 85307
For information on any Conair products call:
1-800-3-CONAIR or visit us on the web at
http://www.conair.com
©2008 Conair Corporation
East Windsor, NJ 08520, Glendale, AZ 85307
Instruction Booklet
Model GS19
For your safety and continued enjoyment
of this product, always read the instruction
book carefully before using.
®
Made in China
08NP221
IB-8761
11/17/08
11:18:09 AM