1
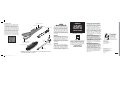
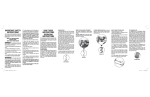
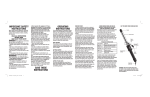
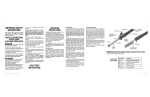
IMPORTANT SAFETY
INSTRUCTIONS
When using electrical appliances, especially
when children are present, basic safety precautions should always be followed, including
the following:
READ ALL INSTRUCTIONS
BEFORE USING
KEEP AWAY FROM WATER
DANGER – Any appliance is
electrically live even when the switch is off.
To reduce the risk of death by electric shock:
1. Always unplug appliance immediately
after using.
2. Do not use while bathing or in a shower.
3. Do not place or store appliance where it
can fall or be pulled into a tub or sink.
4. Do not place in, or drop into water or other
liquid.
5. If an appliance falls into water, unplug it
immediately. Do not reach into the water.
WARNING
– To reduce the risk of burns,
electrocution, fire, or injury to persons:
1. This appliance should never be left unattended when plugged in. Do not pull, twist, or
wrap line cord around appliance.
2. This appliance should not be used by, on,
or near children or individuals with certain
disabilities. Unsupervised use could result in
fire or personal injury.
08PC119 CB600TCS IB.indd
1
3. Use this appliance only for its intended
use as described in this manual. Do not use
attachments not recommended by the manufacturer.
4. Never operate this appliance if it has a
damaged cord or plug, if it is not working
properly, if it has been dropped or damaged, or dropped into water. Return the
appliance to an authorized service center
for examination and repair.
5. Keep the cord away from heated surfaces.
6. Never place the appliance on a soft
surface, such as a bed or couch, where
the air openings may be blocked. Keep the
air openings free of lint, hair, and the line.
Unplug before storing.
7. Never use while sleeping.
8. Never drop or insert any object into any
opening.
9. Do not use outdoors or operate where
aerosol (spray) products are being used or
where oxygen is being administered.
10. Do not use an extension cord with this
appliance.
11. This curling iron is hot when in use. Do
not touch heated surfaces of the appliance.
Use handles or knobs. Do not let eyes and
bare skin touch heated surface.
12. Do not place the heated iron directly on
any surface or on the appliance power
cord while it is hot or plugged in.
SAVE THESE
INSTRUCTIONS
OPERATING
INSTRUCTIONS
This appliance is intended for household use.
Use on Alternating Current (60 Hertz) only.
Standard appliances are designed to operate at
120 volts AC.
This appliance has a polarized plug (one blade
is wider than the other). As a safety feature,
this plug will fit in a polarized outlet only one
way. If the plug does not fit fully in the outlet,
reverse the plug. If it still does not fit, contact
a qualified electrician. Do not attempt to
defeat this safety feature.
GETTING STARTED
The iron’s multi-attachment feature is
designed to provide you with styling versatility
for all hair textures. Your special styles combo
unit includes a 3/4" curling iron, straightener/
crimper plates, brush sleeve and spiral sleeve
attachments – all of these different styling
options in one tool.
CURLING BASICS
1. Plug the curling iron cord into any household outlet (120V). The ready dot will let you
know when it is ready to begin styling. You
can adjust the temperature to high or low
depending upon your hair type and styling
needs. Never leave your curling iron on and
unattended.
2. Section dry hair evenly, and comb each section before curling. Pressing the curl release,
place curling iron midway up the hair section,
then spread hair evenly between spoon and
barrel. Release automatic curl release to hold
hair in place. Gently slide curling iron down to
hair ends. To avoid crimped ends, make sure
they are securely wound under the spoon in
the direction of the desired curl.
3. Wind the hair up as far as you want it
curled, being careful not to let the iron touch
the scalp; when using the brush sleeve, do
not roll hair around it more than two times, to
avoid tangling. Hold in place for 8-12 seconds,
depending on the texture and length of your
hair. For tighter, bouncier curls, roll less hair.
For looser, free flowing curls, roll more hair.
4. To remove curling iron, unwind the hair and
press the automatic curl release. To set the
curl, do not comb or brush hair until it cools.
5. If you prefer to use the brush sleeve for
more control, be sure to slide it over the
curling iron while the iron is cool or off. Use
of the hot styling sleeve brush is very easy
to master. Roll one section of hair at a time
around the hot styling brush from the bottom
up. TO AVOID TANGLING, NEVER ROLL THE
HAIR AROUND THE HOT STYLING BRUSH
MORE THAN TWO TIMES. When hair is warm
(not hot) to the touch, the curl is set. For hair
that is harder to curl, leave the hot styling
brush sleeve in place a little longer. A hot styling brush sleeve generally gives a lighter curl
than a curling iron – for very hard-to-curl hair,
try switching to the curling iron.
6. The hot styling brush sleeve attachment
can be used for quick touch-ups without
shampooing. After heating the hot styling
brush, simply brush the hair back to its original style. To change the style, mist the hair
lightly with water before using the hot styling
brush. No combing is necessary!
7. For fun spiral, textured curls use the spiral
sleeve attachment.
HOW TO CHANGE STYLING HEADS:
Changing styling heads is easy.
1. Make sure appliance is unplugged and cool.
2. Turn locking dial to the right to unlock.
3. Pull attachment straight off.
4. To put new attachment on power handle,
make sure counter rest faces in opposite
direction of switch and light.
5. Push attachment into power handle.
6. Turn locking dial to the left to lock securely
in place.
TO STRAIGHTEN HAIR
To straighten hair, use straightener styling
plates. Start with a hair section that is 1" wide
and no more than 1/2" thick. Open the barrel
and place a hair section between the two hot
plates close to your scalp. Trap hair between
plates by firmly squeezing the handles together.
While maintaining the tension, slowly pull the
unit down along the hair section toward end
of hair. At the end of the hair section, release
the pressure on the handle and allow the hair
section to slide out. Continue this process on
additional sections of hair until you achieve the
hair style you desire.
For extra styling, turn the straightening iron
under when nearing the end of the hair
section. This will give a nice flip to your hair.
Some experience is necessary when first
using this straightening iron. After a few uses,
you will learn the ideal way to straighten and
style your hair easily.
TO CRIMP HAIR
To create fun, trendy crimp styles use the
crimper plates. Start with a hair section that is
2" wide and no more than 1/2" thick. Open the
barrel and place a hair section between the two
hot plates close to your scalp. Trap hair between
plates by firmly squeezing the handles together.
While maintaining the tension, slowly pull the
unit down along the hair section toward end
of hair. At the end of the hair section, release
the pressure on the handle and allow the hair
section to slide out. Continue this process on
additional sections of hair until you achieve the
hair style you desire.
Some experience is necessary when first
using this crimping iron. After a few uses, you
will learn the ideal way to crimp and style
your hair easily.
TO WAVE HAIR
For flowing waves, use curling iron. Separate a
wider section of hair than you normally do for
curling, and roll it as you usually do. For best
results, hair should be at least 6-8" long.
FOR TOUSLED HAIR
Create soft, tousled waves by curling each
hair section in a random direction. Then, turn
head upside down, shake, and gently scrunch
hair with fingers. Bring head back to position
and repeat for fullest volume.
WIDE WAVES
Pick up a section of hair and place the curling iron under it close to the scalp, making
half a turn downward. Remove the curling
iron. Working with the same hair section, start
where you left off and place the curling iron
on top of the hair, curling it up half a turn.
Proceed down the same hair section, alternating the curl upward and downward. Repeat
procedure with remaining sections of hair. For
best results, hair should be about 6-8" long.
11/3/08
9:30:49 AM
FOR SPIRAL CURLS
Attach spiral sleeve to the curling iron barrel
by sliding over the barrel when the iron is
cool. Work with 1" sections of hair, one at
a time. Hold iron horizontally, and wrap hair
around the barrel, twisting like a barber pole;
continue toward scalp. Leave hair wrapped
for approximately 10-15 seconds, when hair
is warm to the touch (not hot), the spiral
curl is set. For hair that is hard to curl, leave
the hot spiral sleeve in place a little longer.
Unwind hair from barrel. Repeat procedure,
styling small sections at a time, layering the
spiral curls as you go, until all hair is curled.
USER
MAINTENANCE
High/Low/Off switch
On/Off light
3/4" spiral iron sleeve
Curl
release
Your curling iron is virtually maintenance-free.
No lubrication is needed. Keep all vents and
openings clear of dirt and dust. If cleaning
becomes necessary, disconnect the curling
iron from the power source and wipe exterior
with a cloth. If any abnormal condition occurs,
unplug the curling iron, allow it to cool, and
return it for repair to an authorized service
center only. No repairs should be attempted by
the consumer.
WARNING:
IF YOU THINK
THE POWER IS
OFF WHEN THE
SWITCH IS OFF,
YOU'RE WRONG.
KEEP AWAY FROM WATER
CAUTION
Reversible straightener
and crimping plates
NEVER allow the power supply cord to be
pulled or twisted. Never wrap the cord around
the curling iron. Damage will occur at the high
flex point of entry into the curling iron, causing it to rupture and short. Inspect the cord
frequently for damage. Stop use immediately
if damage is visible or if unit stops or operates
intermittently.
Ready
dot
STORAGE
3/4" brush sleeve
Counter rest
3/4" curling iron
WARNING: The unit will get very hot within a few seconds and should not be placed in
contact with the skin when it is turned on.
08PC119 CB600TCS IB.indd
2
When not in use, your appliance should be
disconnected, allowed to cool and stored in a
safe, dry location out of reach of children. Do
not jerk or strain cord at plug connections. Do
not wrap the line cord around the appliance.
Allow the cord to hang or lie loose and straight
at the point of entry into the appliance.
Everyone knows that electricity and water are
a dangerous combination. But did you know
that an electric appliance is still electrically
live even if the switch is off? If the plug is in
the power is on. So when you are not using
your appliances, keep them unplugged.
ALWAYS UNPLUG
SMALL APPLIANCES
LIMITED ONE-YEAR WARRANTY
Conair will repair or replace, at our option,
your appliance free of charge for 12 months
from the date of purchase if the appliance is
defective in workmanship or materials.
To obtain service under this warranty, return
the defective product to the service center
listed below, together with your sales slip and
$5.00 for postage and handling. California
residents need only provide proof of purchase
and should call 1-800-3-CONAIR for shipping
instructions. In the absence of a receipt, the
warranty period shall be 12 months from the
date of manufacture.
ANY IMPLIED WARRANTIES, OBLIGATIONS,
OR LIABILITIES, INCLUDING BUT NOT
LIMITED TO THE IMPLIED WARRANTY OF
MERCHANTABILITY AND FITNESS FOR A
PARTICULAR PURPOSE, SHALL BE LIMITED
IN DURATION TO THE 12-MONTH DURATION
OF THIS WARRANTY. Some states do not
allow limitations on how long an implied
warranty lasts, so the above limitations may
not apply to you.
IN NO EVENT SHALL CONAIR BE LIABLE
FOR ANY SPECIAL, INCIDENTAL, OR
CONSEQUENTIAL DAMAGES FOR BREACH OF
THIS OR ANY OTHER WARRANTY, EXPRESS
OR IMPLIED, WHATSOEVER. Some states do
not allow the exclusion or limitation of special,
incidental, or consequential damages, so the
above limitation may not apply to you. This warranty gives you specific legal rights, and you
may also have other rights which vary from
state to state.
Specially designed to create
multiple styles with
one powerful tool!
Service Center
Conair Corporation
Service Department
7475 N. Glen Harbor Blvd.
Glendale, AZ 85307
Instruction & Styling Guide
For your safety & continued enjoyment of this
product, always read the instruction book
carefully before using.
®
©2008 Conair Corporation
150 Milford Rd.
East Windsor, NJ 08520
7475 N. Glen Harbor Blvd.
Glendale, AZ 85307
www.conair.com
08PC119
5-in-1 Styling Kit
IB-8263
Model CB600TCS
11/3/08
9:30:50 AM