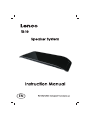
1
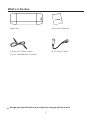
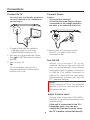
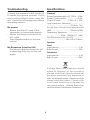
EN What’s in the Box Main Unit Instruction Manual 3.5mm to 3.5mm Cable (For TV Headphone Output) AC Power Cable Design and specifications are subject to change without notice. 1 Important Safety Instructions Safety 14The mains plug is used as the disconnect device, the disconnect device shall remain readily operable. 1 Read these instructions. 2 Keep these instructions. 3 Heed all warnings. 4 Follow all instructions. 5 Do not use this apparatus near water. 6 Clean only with dry cloth. 7 Do not block any ventilation openings. Install in accordance with the manufacturer’s instructions. 8 Do not install near any heat sources such as radiators, heat registers, stoves, or other apparatus (including amplifiers) that produce heat. 9 Protect the power cord from being walked on or pinched particularly at plugs,convenience receptacles, and the point where they exit from the apparatus. 10 Unplug this apparatus during lightning storms or when unused for long periods of time. 11Refer all servicing to qualified service personnel. Servicing is required when the apparatus has been damaged in any way, such as power-supply cord or plug is damaged, liquid has been spilled or objects have fallen into the apparatus, the apparatus has been exposed to rain or moisture, does not operate normally, or has been dropped. 12Unit shall not be exposed to dripping or splashing. 13Do not place any sources of danger on the apparatus (e.g. liquid filled objects, lighted candle). Warning 1 2 3 4 Before operating this system, check the voltage of this system to see if it is identical with the voltage of your local power supply. Do not place this unit close to strong magnetic field. If the system is brought directly from a cold to a warm location, or is placed in a very damp room, moisture may condense on the lens inside the player. Should this occur, the system will not operate properly. Leave the system turned on for about an hour until the moisture evaporates. Should any solid object or liquid fall into the system, unplug the system and have it checked by qualified personnel before operating it any further. 5 Do not attempt to clean the unit with chemical solvents as this might damage the finish. Use a clean, dry or slightly damp cloth. 6 When removing the power plug from the wall outlet, always pull directly on the plug, never yank on the cord. 2 Identifying the Parts Main Unit: Top View Rear View 4 LINE IN Terminal Connect to an external audio device. 5 AC~ Connect to a power source. 1 /SOURCE Select LINE IN 1 or LINE IN 2. 2 AUTO POWER Light Indicate mode of auto power. Red light: Standby mode. Green light: play through LINE IN 1. Yellow light: play through LINE IN 2. 3 + VOLUME Increase or decrease the volume level. 3 Connections Connect to TV Connect Power This unit is very user friendly, please just connect it directly to TV’s headphone jack as below : Caution: - Risk of product damage! - Ensure that the power supply voltage corresponds to the voltage printed on the back or the underside of the unit. 1 2 3 Connect the LINE IN cable to: - LINE IN socket on the unit. - HEADPHONE socket on TV. Unit turn on automatically. Press the /SOURCE button to select source. Turn on your TV. Tip: You can simply use your TV’s inherent Remote Control set to control Vol+/Vol-. Connect the AC power cord to: - the AC ~ socket on this unit. - the wall socket. Turn On/Off When you connect TV or an external device to the unit, unit will turn on automatically. Auto Power indication light is green (connect to LINE IN 1) or yellow (connect to LINE IN 2). And will turn red when disconnected or when you turn off TV / external device. NOTE: If the volume of TV or an external device is too low, the unit also turn off automatically. Adjust Volume Level 4 During play, press the VOLUME+/buttons to increase/decrease the volume level. If the unit is connected to the TV’s headphne jack, you can also control the Volume Level by using the TV’s remote control set directly. Troubleshooting Specifications To keep the warranty valid, never try to repair the system yourself. If you encounter problems when using this unit, check the following points before requesting service. General Power Requirements.. AC 230V ~ 50Hz Power Consumption..................... 6.5W Output Power...............7.5W x 2 + 15W Total Harmonic Distortion...................... ..........................................1%(1kHz, 1W) Audio Input Sensitivity/Impedance LINE: ................................. 500mV/47kΩ Frequency Response............................. ......................... 40Hz - 20kHz(+0 / -3dB) Unit Dimensions (W x H x D)................... .................................. 584 x 50 x 218mm Speaker No power - - - Ensure that the AC cord of the apparatus is connected properly. Ensure that there is power at the AC outlet. Press standby button to turn the unit on. Front Impedance.......................................3 Ω Rate Power..................................... 10W Subwoofer Impedance.......................................6 Ω Rate Power..................................... 30W No Response From the Unit - Disconnect and reconnect the AC power plug, then turn on the unit again. If at any time in the future you should need to dispose of this product please note that: Waste electrical products should not be disposed of with household waste. Please recycle where facilities exise. Check with your Local Authority or retailer for recycling advise. (Waste Electrical and Electronic Equipment Directive.) 5