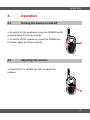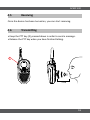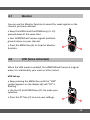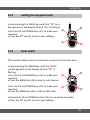
1
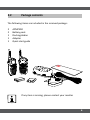
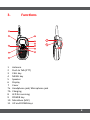
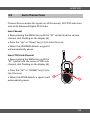
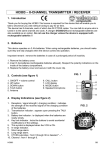
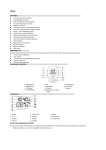
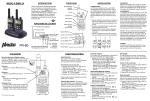
Walkie Talkie
APMP500
User manual
Table of contents
1.
1.1
1.2
1.3
2.
2.1
2.2
2.3
2.4
3.
4.
4.1
4.2
4.3
4.4
4.5
4.6
4.7
4.8
4.9
4.10
4.11
4.12
4.13
4.14
4.15
4.16
SAFETY
4
Intended use
Labels in this manual
General safety instructions
4
4
5
5
Unpacking
Package contents
Place the battery
Charge the battery
Functions
5
6
7
7
8
Operation
9
Preparations for use
Turning the device on and off
Adjusting the volume
Selecting a channel
Selecting the CTCSS Sub Channel
Receiving
Transmitting
Monitor
VOX (Voice Activated)
Auto Channel Scan
Call-Ringtone
Roger Beep
Setting the keypad sound
Dual watch
Key lock
Stopwatch
External microphone and headset
5.
6.
Cleaning and maintenance
9
9
10
10
11
11
12
12
13
14
14
15
15
16
16
16
17
Technical data
17
7.
Disposal of used electrical and
electronic equipment
18
2
APMP 500
Copyright notice
Design and specifications are subject to change without notice.
3
1.
Safety
1.1
Intended use
The APMP500 is intended for sending voice messages and signals to
other APMP500 users.
Read the manual carefully before the first use.
1.2
Labels in this manual
CAUTION
A caution means that damage to the equipment is possible.
A note gives additional information, e.g. for a procedure.
4
APMP 500
1.3
General safety instructions
CAUTION
Do not spill any liquid on the appliance.
2.
Preparations for use
2.1
Unpacking
• Unpack the appliance carefully.
• Check the package contents as described below. If any item is missing, please contact your reseller.
• Remove the labels from the front panel carefully if present.
We recommend that you retain the original carton and
packing materials in case it ever becomes necessary to
return your product for service. This is the only way to
safely protect the product against damage in transit. If you
do dispose of the carton and the packing materials, please
remember to recycle with due care to the environment.
5
2.2
Package contents
The following items are included in the received package:
2
2
1
1
1
APMP500
Battery pack
Dockingstation
Adapter
Quick start guide
If any item is missing, please contact your reseller.
6
APMP 500
2.3
a
Place the battery
b
c2
1
2
1
Insert the battery according to the (+) and (-) polarity
markings.
2.4
Charge the battery
Place the APMP500 in the battery charger.
7
3.
Functions
1
2
6
7
8
3
9
7a
7b
10
4
11
5
1
2
3
4
5
6
7
7a
7b
8
9
10
11
Antenna
Push to Talk (PTT)
CALL key
MENU key
Speaker
Display
Cover
Headphone jack/ Microphone jack
Charging
LED for receiving
POWER key
Microfoon (MIC)
UP and DOWN keys
8
APMP 500
4.
Operation
4.1
Turning the device on and off
• To switch on the appliance, keep the POWER key(9)
pressed down for three seconds.
• To switch off the appliance, press the POWER key
(9) down again for three seconds.
4.2
9
Adjusting the volume
• Press the UP or DOWN key (11) to adjust the
volume.
11
9
4.3
Selecting a channel
The APMP500 has eight channels. In order to communicate with other
APMP500 users, all devices must be set to the same channel.
• Press the MENU key once (4).
• The current channel starts flashing on the display
(6).
• Use the UP and DOWN keys (11) to make your
selection.
• Press the PTT key (2) to store your settings.
4.4
6
2
4
11
Selecting the CTCSS Sub Channel
Each channel also has 30 sub channels, which allow you to set up a
private group within a channel.
• Keep pressing the MENU key until the current
CTCSS sub channel starts flashing on the display (6).
• The current CTCSS sub channel starts flashing on
the display (6).
6
2
• Use the UP and DOWN keys (11) to make your
selection.
• Press the PTT key (2) to store your settings.
4
11
10
APMP 500
4.5
Receiving
Once the device has been turned on, you can start receiving.
4.6
Transmitting
• Keep the PTT key (2) pressed down in order to send a message.
• Release the PTT key when you have finished talking.
2
5 cm
11
4.7
Monitor
You can use the Monitor function to search for weak signals on the
channel you have selected.
• Keep the MENU and the DOWN key (4 + 12)
pressed down at the same time.
• Your APMP500 will receive signals and background noises on your channel.
• Press the MENU key (4) to stop the Monitor
function.
4.8
4
12
VOX (Voice Activated)
When the VOX mode is enabled, the APMP500 will transmit a signal
when it is activated by your voice or other noises.
VOX set-up
• Keep pressing the MENU key until the “VOX”
symbol appears on the display (6) and “OF” is
flashing.
• Use the UP and DOWN keys (11) to make your
selection.
• Press the PTT key (2) to store your settings.
4
12
12
APMP 500
4.9
Auto Channel Scan
Channel Scan searches for signals on all 8 channels, 38 CTCSS sub channels or 83 Advanced Digital DCS Codes.
Scan Channel
• Keep pressing the MENU key until the “SC” symbol and the current
channel start flashing on the display (6).
• Press the “Up” or “Down” key (11) to start the scan.
• When the APMP500 detects a signal it
will automatically pause.
Scan CTCSS Sub Channel
6
• Keep pressing the MENU key until the
“SC” symbol and the current CTCSS sub
channel start flashing on the display (6).
• Press the “UP” or “DOWN” key (11) to
start the scan.
• When the APMP detects a signal it will
automatically pause.
4
11
13
4.10
Call-Ringtone
You can use the Call Ringtone to notify other APMP500 users on your
channel that you wish to send them a message.
• To do this, press the CALL key (3).
Call Ringtone set-up
The APMP500 has 5 Call Ringtones to choose from.
6
• Keep pressing the MENU key until the “CA” symbol appears on the display and “01” is flashing.
• Use the UP and DOWN keys (11) to make your
selection.
• Press the PTT key (2) to store your settings.
4.11
2
3
4
11
Roger Beep
The Roger Beep is a tone that is automatically transmitted when the
PTT key (2) is released.
This way the receiver knows that the message has been completed.
Roger Beep set-up
• Continue to press the MENU key until the “RO”
symbol appears on the display (6) and “On” is
flashing.
• Use the UP and DOWN keys (11) to make your
selection.
• Press the PTT key (2) to store your settings.
6
2
3
4
11
14
APMP 500
4.12
Setting the keypad sound
• Keep pressing the MENU key until the “TO” symbol appears on the display (6) and “On” is flashing.
• Use the UP and DOWN keys (11) to make your
selection.
• Press the PTT key (2) to store your settings.
6
2
4
11
4.13
Dual watch
This function allows you to receive two channels at the same time.
• Keep pressing the MENU key until the “DCM”
symbol appears on the display (6) and “OF” is
flashing.
• Use the UP and DOWN keys (11) to make your
selection.
• Press the MENU key (4) to select a sub channel.
• Use the UP and DOWN keys (11) to make your
selection.
• Press the MENU key (4) to select a DCS code.
6
2
4
11
• Gebruik de UP en DOWN toetsen (11) om uw keuze te maken.
• Press the PTT key (2) to store your settings.
15
4.14
Key lock
The key lock function locks the keys.
6
• Keep the MENU key (4) pressed down until the
key symbol appears on the display (6).
The key lock function has now been enabled.
• Keep the MENU key (4) pressed down once more
in order to disable the key lock.
4.15
4
Stopwatch
• Keep the CALL key (3) pressed down for three
seconds and the Stopwatch symbol will appear on
the display (6).
• Press the UP key (13) to start and stop the stopwatch.
• Press the DOWN key (12) to reset the stopwatch.
3
13
• Once more, press the CALL key (3) down for
three seconds to exit the Stopwatch mode.
4.16
12
External microphone and headset
• Open the cover (a) on the side without the
antenna.
• Use the Mic/Spk Jack (7a) to connect your
external microphone or headset.
• Use the Charge Jack (7b) to connect your
adapter.
7a
7b
x
16
APMP 500
5.
Cleaning and maintenance
• Clean the outside of the appliance with a soft cloth. When the appliance is very dirty, dampen the cloth slightly with water and a neutral
solution.
6.
Technical data
Number of channels
Frequency band
Transmitting power
Coverage
8
446Mhz
500mW
MAX 8 km
Digital volume control
VOX-technology hands-free conversations
Roger Beep; conversation confirmation tone
Channel scan function
Call signal (5x)
Stopwatch
Accessories
Battery pack
Adapter
Dockingstation
Can be used without a licence in, for instance, the Benelux.
This device may be used in the following countries:
Austria
Belgium
Bulgaria
Croatia
Cyprus
Czech
Denmark
Estonia
Finland
France
Germany
Greece
Hungary
Iceland
Ireland
Italy
Latvia
Liechtenstein
Luxemburg
The Netherlands
Norway
Poland
Portugal
Slovenia
Spain
Sweden
Switzerland
Turkey
UK
Romania
17
7.
Disposal of used electrical and
electronic equipment
The meaning of the symbol on the material, its accessory or packaging
indicates that this product shall not be treated as household waste.
Please, dispose of this equipment at your applicable collection point for
the recycling of electrical and electronic equipments waste. In the European Union and Other European countries which there are separate
collection systems for used electrical and electronic product. By ensuring the correct disposal of this product, you will help prevent potentially hazardous to the environment and to human health, which could
otherwise be caused by unsuitable waste handling of this product. The
recycling of materials will help conserve natural resources. Please do
not therefore dispose of your old electrical and electronic equipment
with your household waste.
For more detailed information about recycling of this product, please
contact your local city office, your household waste disposal service or
the shop where you purchased the product.
For more information and warranty conditions, please visit:
www.akai.eu
18