1
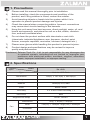
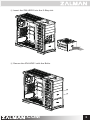
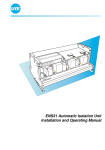
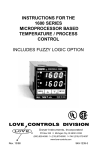
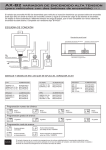
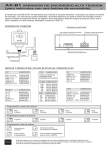
1)
1. Precautions
Please read this manual thoroughly prior to installation.
2)
Before installing, check the components and condition of the
product, and if any problem is found, contact the retailer.
3)
Avoid inserting objects or hands into the system while it is in
operation to prevent product damage and injuries.
4)
Check the manual when connecting cables. Incorrect connections
may cause short circuits leading to fire hazards.
5)
Keep this unit away from heat sources, direct sunlight, water, oil, and
humid environments, and place the unit on a flat, stable, vibrationfree, and well-ventilated area.
6)
Do not clean the product surface with chemicals or wet cloth.
(chemicals: industrial brightener, wax, benzene, alcohol, paint
thinner, mosquito repellent, aromatics, lubricant, detergent etc.)
7)
Please wear gloves while handling this product to prevent injuries.
8)
Product design and specifications may be revised to improve
quality and performance.
Disclaimer) Zalman Tech Co., Ltd. is not responsible for any damages due
to external causes, including but not limited to, improper use,
problems with electrical power, accident, neglect, alteration,
repair, improper installation, or improper testing.
2. Specifications
Model
Spec.
ZM-HDR1
Type
Modular HDD Rack
Dimensions
149(L) Ⅹ 127.5(W) Ⅹ 244.5(D)㎜
Weight
1.1㎏
Material
Steel(GI) 0.8T, ABS
Color
Black / White
Drive Bay
3.5” S-ATA HDD Hot-Swap × 3
LED Color
Blue
Supports Hot Swap
SATA I, SATA II
Fan
Dimensions
92(L) Ⅹ 92(W) Ⅹ 25(D)㎜
RPM
Low(5V) = 1100rpm / High(12V) = 2400rpm
Connector
3-Pin
Input Voltage
12V
.COM
1
3. Components
Modular HDD Rack (ZM-HDR1)
User’s Manual
HDD Trays
Bolts
4. Installation
1) ZM-HRD1 Installation
① Remove three 5.25” bay covers from the case.
.COM
2
② Insert the ZM-HDR1 into the 3-Bay slot.
③ Secure the ZM-HDR1 with the Bolts.
.COM
3
2) Installing HDDs into ZM-HDR1
① HDD Tray Disassembly
Tip
▶ Press the Tray’s button to the
left and pull the lever to release,
then pull the Tray’s chassis.
② Installing 3.5” HDDs
2
2
1
1
Tip
<Unlocked>
D
1
2
H
D
H
D
D
<Locked>
1
2
.COM
4
③ HDD Tray Installation
HDD
Tip
LED
▶ The blue LEDs will indicate properly
installed trays.
3) Cable Connections
Connect S-ATA / FAN POWER / HDD POWER cables.
.COM
5
Warning
▶ To use the Hot-Swap feature, the S-ATA Cable(s) and a 4-Pin power
cable must be connected to the Hot-Swap PCB.
▶ For HDD stability, please power the system OFF before removing the
HDD.
▶ Frequent installation and removal of an HDD can wear connectors.
▶ To use the Hot-Swap feature, set motherboard BIOS to AHCI and format
the HDD using AHCI.
▶ Please refer to Zalman’s website for further details.
.COM
6