1
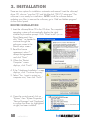
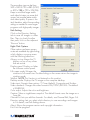
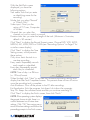
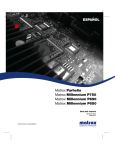
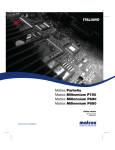
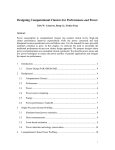
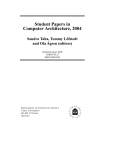
Hi-Speed
USB 2.0
Analog
TV Stick
User
Manual
Model 176668
MAN-176668-UM-0907-02
Contents
section
page
1. Introduction........................................................................3
Package Contents......................................................................................3
System Requirements................................................................................3
2. Installation.........................................................................4
Driver Installation......................................................................4
3. Operation...........................................................................5
User Functions..........................................................................5
Function Setup.........................................................................5
Recording & Playback...............................................................8
Remote Control...................................................................... 11
4. Specifications................................................................... 11
2
CONTENTS
1. INTRODUCTION
Thank you for purchasing the MANHATTAN ® Hi-Speed USB 2.0 Analog TV
Stick, Model 176668.
The Hi-Speed USB 2.0 Analog TV Stick brings analog television to your
notebook or desktop computer, allowing you to schedule and record television
programs directly onto hard drives for replay or transfer to CDs and portable
media devices.
Among the many quality features and convenient benefits you’ll enjoy with this
Hi-Speed USB 2.0 Analog TV Stick:
• Receive analog television broadcasts on notebook and desktop computers —
supports most TV standards
• Compact design enables clear, crisp reception almost anywhere — no external power required
• Easily schedule and directly save programs to hard drive for replay or
transfer to CD
• Digital video recording, automatic channel scanning, customizable favorites and time-shifting enhanced program viewing
• Plug and Play and USB installation; Windows compatible
• Lifetime Warranty
NOTE: This device is designed for office or home use only. Do not place it near
any heat source, nor in any location that does not provide adequate air
circulation. Do not attempt to repair this device — if damage to the device
occurs, contact your local distributor for assistance.
Package Contents
• Hi-Speed USB 2.0 Analog TV Stick
• USB extension cable
• Remote control (CR 2025 battery included)
• User manual and software/driver CD
system requirements
• Pentium 4 2.4 GHz, 256 MB RAM and 30 MB HDD space recommended
• DirectX 9.0 or above
• VGA graphics with overlay support
• Windows XP SP2/Vista/7
INTRODUCTION
3
2. installation
There are two options for installation: automatic and manual. Insert the software/
driver CD, choose “scan the CD” and double-click “PEN TV\setup.exe.” The
software is now ready for installation. NOTE: Install the software before
updating your files. to remove the software, go to “Add and delete program”
on the control panel.
driver installation
1.Insert the software/driver CD in the CD drive. The computer’s operating system will automatically display the initial
installation procedure prompt. Click “Driver Install” (or run Driver\Setup.exe), then
click “Next ” as needed to
continue through the
welcome screen to the
DirectX setup screen.
2. Read the license
agreement, select “I
accept the agreement” and click “Next.”
3.When the “Restart
Computer” screen
displays, click “Finish.”
4.If the “Hardware Installation” screen
displays, click “Continue Anyway.”
5.Select “Yes, I want to restart my computer now,” then click “Finish.”
6. Open the control panel; click on
“System,” then “System Properties,”
“Device Manager” and “Hardware”
to confirm the driver (as highlighted at right) has been installed.
4
INSTALLATION
3. operation
user functions
The user interface functions are defined below. NOTE: Functions listed with an
asterisk (*) are not featured on this product.
1. Record
11.Exit
2. Play
12. Channel up
3. Pause
13. Channel down
4. Stop
14. TAB/Back to
previous channel
5. Reverse
15. 10 channels
6. Fast forward
16. Numeric keys
7. Hue
17. Time-shift
8. Status window
18. * Switch to/from 9. Minimize
stereo
10. Full-screen window & video desktop switch 19. * TeleText
20. * Shift video source
21.Open recorded file
22. Search (Auto-scan)
23. * Radio (switch to FM)
24. 16-channel preview
25. Setup menu
26. Snapshot
27. Schedule recording
28. Mute
29. Volume down
30.Volume up
function setup
Click on the “Setup”
button (#25 above) to
change settings for any of
the functions.
Auto Scan
Channel Edit
Click on the Channel Edit
tab to change the
channel list so that
favorites are easier to
find and access. Before
editing the list, select your
country in the “Region”
window.
OPERATION
5
Click “Auto Scan” to automatically scan all the channels available in your area.
NOTE: The volume is muted during a channel scan.
To rename a channel:
1. Click on a channel to highlight it.
2. Right-click to enable the name change.
3. Enter the new name in the “Name” window.
4. Re-position the channel as desired using the “Up” and “Down” buttons.
To fine tune a channel:
1. Click on a channel to highlight it.
2.Slide the Fine Tune control left or right to adjust. NOTE: Normally, the
program automatically provides the best quality possible.
To activate or skip a channel:
1. Click on a channel to highlight it.
2.Click the box in the “Index” column (as shown in the screen image on Page 5) to keep the channel on the active list; click a box with a check mark (thereby removing the check mark) to skip that channel in
the list.
To add a channel:
1. Click the “Add” button.
2. Enter a name and frequency.
3. Click “OK.”
Color/Image Control
Click on the Video ProcAmp tab to
adjust the settings for Brightness,
Contrast, Hue, Saturation and
Sharpness. Simply click on the slider
control and move it left or right to suit
your preferences. Click “Default” to
return to the original settings.
NOTE: Should the TV screen go blank
or black during any of these
adjustments, click “Default.”
Recording Options
Click on the Record tab to select a recording format: DVD, VCD, SVCD, MPEG4,
AVI, WMV, MP3 or WMA.
NOTE: TV standards and their control vary by country/region.
NTSC (National Television Systems Committee): America, Taiwan, Canada,
Japan and Central and South America. PAL (Phase Alteration Line): Europe,
China, Central Africa, Australia and South Africa. SECAM: France, Africa
and the Middle East.
6
OPERATION
The recording size can be from
352 x 240 to 720 x 480 (NTSC)
or 352 x 288 to 720 x 576 (PAL).
Keep in mind that larger audio
and video bit rates use more disk
space, but provide better audio
and video quality. If space is limited, therefore, adjust the recording
setting as needed to save longer
programs with high-quality images.
Path Setting
Click on the Directory Setting
tab to save still images or video
files. Then, to check/confirm
their path, click on the adjacent
“Browse” button.
Right-Click Options
Other options and menu access
routes are available by right-clicking,
which displays a pop-up menu
with the following selections.
Always on top: Keeps the TV display on top of any others that are active.
Display panel: Displays or hides the software control panel.
Full-screen mode: Enlarges the window to full-screen size. Double-clicking on the screen returns the image to window mode.
TeleText: NOTE: This function is not featured on this product.
Desktop mode: Displays the TV image on the computer desktop.
Video input: Presents three options: TV Tuner (default), Composite and S-video.
Video standard: Changes the video format to PAL/NTSC/SECAM. The default is PAL-BDGHI.
Color adjust: Adjusts the color and brightness.
Capture: Takes a single-frame snapshot. The default format saves the image as a .bmp file.
Channel list: Lets you edit the channels. For details, see Channel Edit, Pages 5-6.
Directory setting: Lets you select which directory to save recordings and images to. For details, see Path Setting above.
About: Shows the program version and copyright information.
Exit: Exits the program.
OPERATION
7
recording & playback
This device supports MPEG-1 and MPEG-2 formats. To record while watching
a TV program, click on the “Record” button (see Page 5). To stop recording,
click on “Record” again. Name the file or default save. The status panel will
show real-time recording information (and will shield some information).
Recording File Space Requirements
Space required for recording depends on the format, as shown below. Note:
Recording a DVD requires much more space than a VCD does, but it doesn’t
mean the DVD’s quality will be better. Recording a super video CD (SVCD)
provides the same quality as a DVD and is good enough for recording since
the quality of a normal TV signal doesn’t have the same definition as DVD.
Format
Resolution Video bit rate
NTSC DVD 720 x 480 6
Mbps
NTSC SVCD 480 x 480 2.42 Mbps
NTSC VCD 320 x 240 1.15 Mbps
PAL DVD
720 x 576 6
Mbps
PAL SVCD
480 x 576 2.42 Mbps
PAL VCD
352 x 288 1.15 Mbps
AVI
352 x 288
MPEG-4
352 x 288
WMV
352 x 288 1.2 Mbps
MP3
WMA
Audio bit rate 224 Kbps
224 Kbps
224 Kbps
224 Kbps
224 Kbps
224 Kbps
224 Kbps
224 Kbps
224 Kbps
224 Kbps
224 Kbps
Disk space
2.6 GB/hr
1 GB/hr
600 MB/hr
2.6 GB/hr
1 GB/hr
600 MB/hr
About 650 MB/hr
Schedule Recording
You can also set the program to record in advance, specifying the channel to
record; the time of day and the day of the week to begin recording; and the
recording duration period. Click “Schedule Recording” (see Page 5) to display the
“Schedule” screen, which features the following options buttons.
New: Lets you add a new Schedule Recording task.
Modify: Lets you make
changes to a selected task.
Delete: Lets you delete the selected task.
OK: Activates the status of all Schedule Recording tasks that’ve been entered.
8
OPERATION
With the Add Task screen
displayed, you have the
following options.
Task name: Asks that you enter
an identifying name for the
recording.
Mode: Lets you select “Record”
or “Watch Only.”
Video input: Gives you the
option of TV Tuner, Composite
or S-Video.
Channel: Lets you select the
channel you wish to watch or record.
Duration time: Lets you enter the length of the task. (Minimum is 3 minutes;
default is 30 minutes.)
Click “Next” to display the Record Format screen. Choose DVD, VCD, SVCD,
MPEG4, AVI, WMV, MP3 or WMA (see “Recording Options” on Page 7 for
a similar screen display).
Click “Next” to display the Time
Setting screen, which presents
these options.
Only once: Limits the task to a
one-time recording.
Every week: Repeatedly records
each week as scheduled.
Every day: Repeatedly records
each day as scheduled.
NOTE: Time of day is a 24-hour
(vs. 12-hour) format.
When finished, click “Next” to activate the Schedule Recording settings and
display the After Task Completed screen. This presents three courses of action
once the recording task is complete.
Auto Shutdown: Turns off the power to the PC after recording.
Exit Application: Exits the program, but doesn’t shut down the computer.
Stay On: Keeps the software active and lets you continue watching TV.
Click “Next” to display the Finish screen, then click “Finish.”
NOTE: If the operating system displays
the prompt shown at right, there is a
conflict between two or more time
settings. Click “OK,” then revise one or
more of the time settings and follow the
preceding prompts to the Finish screen.
OPERATION
9
Video Playback
To play a recorded file, click on the
“Open recorded file” button (see Page
5) to access the file (in whichever
folder it was saved to). Double-click
on the file, or highlight it and click
“Open.” While the file plays, the
control panel will display time
information and the status of
associated playback functions.
Snapshot
To capture a
picture while
watching TV
(and save it as
a .bmp file),
click on the “Snapshot” button (see Page 5). Save the image when prompted,
and double-click on the image to perform edits. If you don’t wish to save the
image, click on “Delete.”
TV Channel Preview
Complete the channel scan before previewing. Most channel preview/selection
functions are controlled with standard keys and buttons.
To view the next or previous channel on the menu list while watching TV: Click on the Channel Up/Channel Down buttons.
To view a specific channel: Enter the channel number using the numeric keys.
To return to the previous channel: Click on the “TAB” button.
To preview 16 channels simultaneously: Click on the “16” button. To select one of these 16 channels for viewing, click on the channel image.
Time-Shifting
Time-shift lets you skip commercials (not automatically, however), pause and
replay while watching real-time TV — without interrupting any ongoing recording
— by temporarily saving the “live” video to your hard disk for a specified period
of time.
In Time-shift, you are recording to and playing back from the same video file or
buffer. You can play back from various locations in that buffer. As with video
playback, you can pause, fast-forward and rewind. A major difference,
however, is that the software is simultaneously recording real-time television
while playing back from the buffer.
NOTE: Time-shift can use a significant amount of disk space. There is greater CPU
utilization during Time-shift because you are simultaneously recording and playing
recorded videos. At full DVD quality, Time-shift can require up to a 1.7-GHz CPU.
10
OPERATION
Click on the “Time-shift” button to active it (see Page 5). A time monitoring bar
will appear, informing you how much of the Time-shift buffer is in use. You can
also use your mouse to drag the Time Control Shuttle to jump to a specific time.
To exit Time-shift, click on the “Stop” button (see Page 5).
remote control
1. Mute
2. Input source: TV, Composite & S-Video
3. * FM: Switch to
CardTV3 FM
4. * On/Off: CardTV3 FM
application software
5. Single/double/triple
digit
6. Snapshot: Take a picture of the on-screen image
7. Full Screen/Restore: Switches between full
& default screens
8. Numeric keys
9. Return to previous channel
10. Play, Record, Stop &
Pause
11. Volume Up/Down
12. Channel Up/Down
13. Reverse/Fast Forward
* Not available with this device.
4. specifications
Standards
Physical
•Hi-Speed USB 2.0 compliant
• Meets worldwide TV and PAL/
SECAM/NTSC video standards
• TM5600 chipset
• Dimensions, overall: 8.5 x 2.9 x 1.5 cm (3.3 x 1.1 x 0.5 in.)
• USB extension cable: 80 cm
(31.5 in.)
• Weight: 28 g (1 oz.)
Input
•Connection: TV cable with adapter
•PAL/SECAM/NTSC video standards
• 125-channel support
•S-video and AV-video image input
•MPEG-1 or MPEG-2 capture format
output
•USB A-type male
•MPEG-1/2/4, DVD, VCD, SVCD, AVI, WMV, MP3 and WMA (BMP for snapshot)
• 10-bit GigaColor provides 8-, 9-, 10-bit colors
•30 fps @ 720 x 480 /
25 fps @ 720 x 576
System Requirements
• Pentium 4 2.4 GHz, 256 MB RAM and 30 MB HDD space recommended
• DirectX 9.0 or above
• VGA graphics with overlay support
• Windows XP SP2/Vista/7
Package Contents
• Hi-Speed USB 2.0 Analog TV Stick
• USB extension cable
• Remote control (CR 2025 battery
included)
• User manual and software/driver CD
SPECIFICATIONS
11
MANHATTAN offers a complete line
of PC Components, Peripherals, Cables and Accessories.
Ask your local computer dealer for more information
or visit us online at
®
www.manhattan-products.com
Copyright © MANHATTAN
All products mentioned are trademarks or registered trademarks of their respective owners.