1
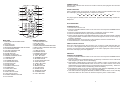
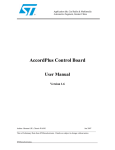
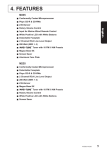
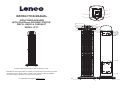
3
INSTRUCTION MANUAL
HIGH POWER SPEAKER
WITH iPod/iPhone DOCKING STATION,
FM PLL RADIO & CARDSLOT
MODEL: IPT-2
6
7
8
11
1
4
2
5
12
14
15
9
10
17
13
16
19
20
21
22
23
Please read these instructions while operating your unit.
Manufacturer of this unit follows a principle of constant improvement and is not held
responsible for any changes that are made to the unit nor accepts any liabilities
for these changes. Thanks for your choice of our products.
For information and support, www.lenco.eu
24
18
18
1
1
12
2
3
4
5
6
13
7
16
14
15
8
POWER SUPPLY
Plug one end of the AC cord into the AC socket on the unit, then plug the other end into the
AC wall outlet.
SLEEP FUNCTION
Press a SLEEP button on the remote in power on mode. Each time SLEEP button is pressed,
the LCD display changes Sleep time in a sequence as follows:
90
80
70
60
50
40
30
20
10
off
The player goes to standby mode in the moment playback or broadcasting reaches the set
Sleep time.
17
18
19
9
20
21
22
23
10
11
MAIN UNIT
1. PREV/FAST BACKWARD/TUNEBUTTON
2. STOP BUTTON
3. IPOD DOCKING
4. NEXT/FASTFORWARD/TUNE+ BUTTON
5. PLAY/PAUSE BUTTON
6. VOLUME CONTROLLER
7. REMOTE SENSOR
8. STORE BUTTON
9. PRESET UP BUTTON
10. PRESET DOWN BUTTON
11. TONE BUTTON
12. LCD DISPLAY
13. STANDBY BUTTON
14. FUNCTION BUTTON
15. MUTE BUTTON
16. PTY BUTTON
17. SD/MMC CARD SLOT
18. STAND FEET
19. VIDEO OUT JACK
20. FM ANTENNA
21. RIGHT AUX IN JACK
22. LEFT AUX IN JACK
23. POWER ON/OFF BUTTON
24. AC SOCKET
REMOTE CONTROL
1. FUNCTION BUTTON
2. INFO BUTTON
3. SLEEP BUTTON
4. PREV/FASTBACKWARD BUTTON
5. NEXT /FAST FORWARD BUTTON
6. M+ BUTTON
7. TUNE- BUTTON
8. ENTER BUTTON
9. NUMERIC BUTTON
10. STORE BUTTON
11. VOL- BUTTON
12. STANDBY BUTTON
13. MUTE BUTTON
14. PLAY/PAUSE BUTTON
15. STOP BUTTON
16. TUNE+ BUTTON
17. M- BUTTON
18. MENU BUTTON
19. PTY BUTTON
20. RAN BUTTON
21. REP/ST BUTTON
22. TONE BUTTON
23. VOL+ BUTTON
2
iPod OPERATING
PLAYING AN iPod
1. Dock an iPod onto the unit.
2. Press the POWER ON/OFF button on the rear of the unit and press STANDBY button to
turn the unit on.
3. Press the FUNCTION button continuously to toggle the unit to iPod mode.
4. Press PLAY/PAUSE button to play and pause the docked iPod .
5. During normal playback, Press PREV/NEXT button to skip the tracks ahead or backward.
Long press the NEXT or PREV button to search through the current track at a high speed
forward or backward.
6. Press MENU button on the remote to return back the menu the inserted iPod.
7. Use STOP button to cease the iPod playback.
VIDEO OUTPUT FOR iPod
There is a video output jack on the rear of the unit, so that you could make the video output to
a TV set or other appliance with video input jack for enjoying video. To output the video,
connect one end of the video cable(included) to the video output jack of the unit, the other
end to the video input jack of the appliance.
FM RADIO
TUNING THE FM RADIO
1. Press the POWER ON/OFF button on the rear of the unit and press STANDBY button to
turn the unit on.
2. Press and release the FUNCTION button continuously to switch the unit to radio mode (the
radio frequency is shown on the LCD display).
3. Press PREV or NEXT button on the main unit or TUNE+/- button on the remote to tune the
radio. Press and hold PREV/NEXT button on the unit or TUNE-/+ button on the remote to
automatically tune the radio frequency backward and forward respectively . When the tuning
goes to one available station, broadcasting starts immediately.
4. Press REP/ST button on the remote to switch the radio between FM(MONO) and FM(ST).
If the signal is not strong enough, you cannot select FM(ST).
5. If the unit broadcast a program with RDS, the RDS icon will be shown on the LCD display.
Press INFO button on the remote to check the frequency of the current station.
3
SAVING FM RADIO STATIONS TO THE UNIT'S MEMORY
1. After tuning the FM radio to the desired stations, press STORE button until "MEM" is shown
on the LCD display with a flashing number of a memory cell.
2. Press the M+/ M- button on the remote or press PRESET UP/DOWN button on the unit to
select the radio memory cell.
3. Press STORE button again to save the current radio station to the selected memory cell.
4. To recall the preset station frequency, press M+ or M- button on the remote or PRESET
UP/DOWN button on the unit repeatedly.
PTY BUTTON
If you want to tune to a radio station of your favorite type, please set the program type first
before tuning. Press and hold PTY button until a certain program type flashes on the LCD
display.
Select your desired program type by pressing PTY button repeatedly until your desired
program type shows on the screen, then press PREV/NEXT button on the unit or TUNE-/+
button on the remote to start tuning. When a station of the selected program type, the unit will
broadcast it immediately.
PLAYING THE EXTERNAL STORAGE MEDIA DEVICE (SD/MMC CARD)
1. Power on the unit. Insert a SD/MMC card onto the unit, and press FUNCTION button
repeatedly until toggle the unit to card mode.
2. After the unit scan the inserted card, playback will start automatically.
3. Press REP/ST button repeatedly to change the play mode.
4. Press RAN button to play the inserted media device in the random order, press the button
again to exit random play.
5. Press PLAY/PAUSE button to pause playback, press the button again to resume normal
play.
6. During playback, short press NEXT button or PREV button to skip the track forward or
backward.
Long press the NEXT or PREV button to search through the current track at a high speed
forward or backward.
7. Press numeric buttons to select your favorite track directly.
Note: The card reader can only play MP3 files.
TONE SETTING FOR THE UNIT
During playback, press TONE button once, and use VOL+/-button on the remote or VOLUME
CONTROLLER on the unit to adjust the bass. Press TONE button twice repeatedly for
adjusting treble effect by pressing VOL+/- button on the remote or rotate VOLUME
CONTROLLER on the unit as adjust bass effect. After adjusting the treble effect, press the
TONE button again to resume the previous display.
AUX IN
Your player can be used as a power amplifier to playback an audio signal from portable radio,
TV set or MP3 player or whatever provided this appliance is so designed that audio signal may
be produced through a LINE-OUT jack or the like.
Observe the following steps to connect the player to another appliance:
1. Connect the appliance into the player's left & right AUX IN jacks with the supplied LINE OUT
cables.
2. Press STANDBY button to turn the unit on.
3. Press FUNCTION button repeatedly to switch the unit to AUX mode.
4. Power on the appliance and begin play.
At this time you will be able to hear the sound produced from the connected appliance.
IMPORTANT SAFETY INSTRUCTIONS
The apparatus shall not be exposed to dripping or splashing and that no objects filled with
liquids, such as vases, shall be placed on the apparatus.
When the mains plug or an appliance coupler is used as the disconnect device, the disconnect
device shall remain readily operable. To be completely disconnected the power input, the
mains plug of the apparatus or the appliance coupler shall be disconnected from the mains
completely.
No naked flame sources, such as lighted candles, should be placed on the apparatus.
Minimum distances 2.0cm around the apparatus for sufficient ventilation. The ventilation
should not be impeded by covering the ventilation openings with items, such as newspapers,
table-cloths, curtains, etc.
The use of apparatus is in tropical and/or moderate climates.
Attention should be drawn to the environmental aspects of battery disposal.
CAUTION: Danger of explosion if battery is incorrectly replaced. Replace only with the same
or equivalent type.
Battery shall not be exposed to excessive heat such as sunshine, fire or the like.
The marking plate is located at the back of the apparatus.
SPECIFICATIONS
Power source: AC 230V 50Hz
Power consumption: 90W
Remote control: AAA1.5V x 2
Receiving bands: FM 87.5 -108 MHz
Speaker Size: AROUND 3.0 INCH SUB 6.5 INCH
Dimensions: 305(L) x 315(W) x 933(H)mm
Operating Humidity Range:10 % to 75 %
Compatible with SD/MMC CARD
MUTE THE UNIT
During playback, press MUTE button to switch off the audio output. Press the button again to
resume normal play.
If at any time in the future you should need to dispose of this product please note
that: Waste electrical products should not be disposed of with household waste.
Please recycle where facilities exist. Check with your Local Authority or retailer for
recycling advice. (Waste Electrical and Electronic Equipment Directive)
4
5