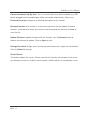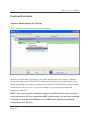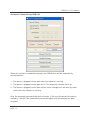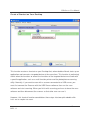
1
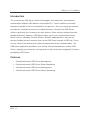
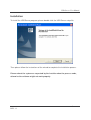
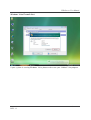
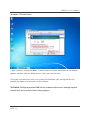
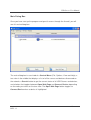
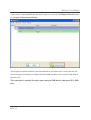
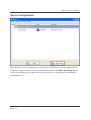
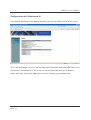
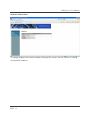
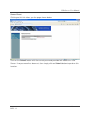
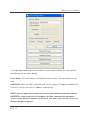
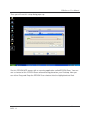
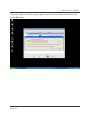
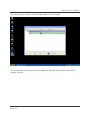
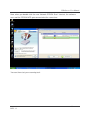
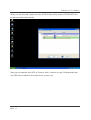
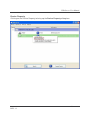
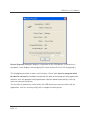
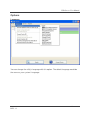
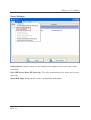
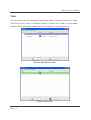
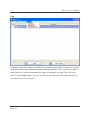
USB Server User Manual
IP USB Sharing Station
(USB Server)
User Manual
REV: 1.3
-1-
USB Server User Manual
Copyright Notice
Copyright Incorporated 2010. All rights reserved.
Disclaimer
Incorporated shall not be liable for technical or editorial errors or omissions contained
herein; nor for incidental or consequential damages resulting from furnishing this
material, or the performance or use of this product.
Incorporated reserves the right to change product specifications without notice.
Information in this document may change without notice.
Trademarks
Microsoft, Windows XP, Windows VISTA and Windows 7 are registered trademarks of
the Microsoft Corporation. All other brand and product names mentioned herein may be
registered trademarks of their respective owners.
Customers should ensure that their use of this product does not infringe upon any
patent rights. Trademarks mentioned in this publication are sued for identification
purposes only and are properties of their respective companies.
REV: 1.3
-2-
USB Server User Manual
Table of Content
Introduction ..................................................................................................................................... 4
Features ........................................................................................................................................... 4
Installation....................................................................................................................................... 5
Running Program ............................................................................................................................ 6
System Firewall ...................................................................................................................... 7
Main Dialog Box................................................................................................................... 10
Status of EST USB Servers and Devices .............................................................................. 11
Accessing a Device ....................................................................................................................... 14
Server Configuration..................................................................................................................... 16
Configuration with Web-based UI ........................................................................................ 17
Configuration with the Utility............................................................................................... 21
Featured Functions ........................................................................................................................ 24
Connect Automatically for Printing ...................................................................................... 24
Create a Shortcut on Your Desktop ...................................................................................... 27
Auto Disconnect Printer/MFP/Storage Device ..................................................................... 35
Device Property .................................................................................................................... 38
File ................................................................................................................................................ 40
Options .......................................................................................................................................... 41
Language ............................................................................................................................... 41
Server Settings ...................................................................................................................... 42
Device Settings ..................................................................................................................... 43
Search............................................................................................................................................ 44
View .............................................................................................................................................. 45
Help ............................................................................................................................................... 46
About..................................................................................................................................... 46
Log ........................................................................................................................................ 47
Extract Log File .................................................................................................................... 48
FAQs……………………………………………………………………………………………. 49
REV: 1.3
-3-
USB Server User Manual
Introduction
The revolutionary USB Server utilizes technologies that streamlines and enhances
functionalities between USB devices and multiple PCs. Current solutions from other
companies provide minimum functionalities at high costs. They use significant amounts
of resources and effort to achieve the required features, whereas the USB Server
utilizes significantly less resources for more features. Most solutions allow printer-only
peripheral devices. However, USB Server allows you to use a multifunction combo
device such as a Multiple Function Printers. Another added benefit is that you can
connect multiple printers/scanners/faxes to the USB Server through a USB Hub. These
are just some of the features that make our product one of the standards today. The
USB Server application provides a user friendly interface between you and the USB
Server, enabling you to monitor, manage and use the convenient and powerful functions
provided by USB Server.
Features
•
Centralized remote USB Server Management
•
Centralized remote USB Server Status Monitoring
•
Centralized remote USB Device Management
•
Centralized remote USB Device Status Monitoring
REV: 1.3
-4-
USB Server User Manual
Installation
To install the USB Server program, please double click the USB Server setup file.
Then please follow the instructions of the wizard to complete the installation process.
Please reboot the system as requested by the installer when the process ends,
otherwise the software might not work properly.
REV: 1.3
-5-
USB Server User Manual
Running Program
To start the USB Server program, please double click the shortcut icon of the USB
Server on the Desktop.
This would bring up the main dialog box.
REV: 1.3
-6-
USB Server User Manual
System Firewall
When you start the program for the time, your Windows OS will prompt you for Firewall
Access. Please make sure you unblock the software or grant it access, otherwise the
program will not work correctly.
Windows XP Firewall Access Alert
Please make sure you “Unblock” the program.
REV: 1.3
-7-
USB Server User Manual
Windows Vista Firewall Alert
If your system is running Windows Vista, please make sure you “Unblock” the program.
REV: 1.3
-8-
USB Server User Manual
Windows 7 Firewall Alert
If your system is running Windows 7, please make sure you check both of the network
options and then click on “Allow access” when you see this alert.
Once you have done this once, the system will remember your setting and will not
prompt you again next time you run the software.
WARNING: Failing to provide USB Server software with access through system
firewall will cause malfunction in the program.
REV: 1.3
-9-
USB Server User Manual
Main Dialog Box
Once you have start up the program and grant it access through the firewall, you will
see this main dialog box.
The main dialog box is consisted of a Control Menu (File, Options, View and Help), a
tree view in the middle that displays a list of all the server and devices discovered on
the network, a Search button to get the current status of all USB Servers and devices,
and a button that toggles between Open Web Page and Connect Device depending
on the node you select on the tree view. The Open Web Page button toggles to
Connect Device when a device is highlighted.
REV: 1.3
- 10 -
USB Server User Manual
Status of USB Servers and Devices
The tree view also tells you the status of all the USB Servers and devices that are
discovered on the network. An inaccessible USB Servers might or might now show up
on the list. It is either disconnected from the network, powered off or suffering from other
technical difficulties.
The device might be in one of the following states and there are different things you can
do with it in each of the states. Each status is represented by a specific icon.
Device Free
A device with Device Free status is unoccupied and ready to be connected.
REV: 1.3
- 11 -
USB Server User Manual
Occupied by Yourself
When the device has been occupied, the icon and Status change to indicate so.
REV: 1.3
- 12 -
USB Server User Manual
Occupied By Other User
This status icon indicates the device is occupied by another user on your network and
you can not connect to that device at the moment.
Device on Different Segment
This icon with question mark indicates that the server’s IP address is on a different
network segment from your PC. You can NOT connect to a device attached to such
server. Please check your network settings. However you can still change its network
settings.
Unsupported Device
Some of the devices are not supported by USB server. Such device will be identified by
a stop sign icon as shown. Of course, connecting to an unsupported device is not
allowed.
REV: 1.3
- 13 -
USB Server User Manual
Accessing a Device
To connect to a USB device, please select it on the tree view and click on Connect
Device button or double-click on it. This process might take a few seconds up to a
minute, depending on the complexity of the device. Then you can operate a
connected USB device as if it is connected to your PC’s USB port directly.
REV: 1.3
- 14 -
USB Server User Manual
If you select a connected device on the UI, you can see that the Connect Device button
is changed to Disconnect Device:
Clicking on this button releases the selected device for other users. Once you see the
icon turns back, the device has been disconnected and other users will then be able to
connect to it.
This operation is exactly like when you unplug a USB device from your PC’s USB
port.
REV: 1.3
- 15 -
USB Server User Manual
Server Configuration
We allow the users to configure the settings of the USB Servers via the web-based UI.
Select the target server on the tree view and then click on the Open Web Page button
or the same option on the right-click menu of server icon, to bring up the web-based
configuration UI.
REV: 1.3
- 16 -
USB Server User Manual
Configuration with Web-based UI
Your default web browser will pop up and take you into the web-based UI of the server.
This is the main page. You can see the important information about the USB Server and
the device(s) connected to it. The 4 links at the left-hand side take you to different
pages with other information about this server or functions you could perform.
REV: 1.3
- 17 -
USB Server User Manual
Network Information
This page displays the current network setting of the server, like the current IP setting
and the MAC address.
REV: 1.3
- 18 -
USB Server User Manual
Server Reset
Clicking on this link takes you the page shown below:
Click on the Submit button with the correct password provided will reboot this USB
Server. If no password has been set, then simply click on Submit button to perform this
function.
REV: 1.3
- 19 -
USB Server User Manual
Change Password
Clicking on this link takes you to the password update page below:
To change the password, you must enter current password, enter new password and
enter it again for confirmation, and then click on Submit to set the new Password. If you
are setting the password for the first time, you don’t have to provide current password.
REV: 1.3
- 20 -
USB Server User Manual
Configuration with the Utility
Another way to configure the server is via the configuration dialog of USB Server. To
bring up the configuration dialog, please RIGHT-CLICK on the server icon to bring up
this menu, and select Server Configurations
REV: 1.3
- 21 -
USB Server User Manual
You might be prompted to enter password if a password has been set. If not, you will
immediately see the above dialog.
Sever Name: This field allows you change the Server name. Change it whatever you
want.
USE DHCP: When this field is checked, your server acquires IP address automatically.
Uncheck it and you can enter IP address automatically.
NOTE: You can apply this function to a server under different network segment.
HOWEVER, some router/switch hub does not allow communication between
servers under different segment. In this case, you won’t even see the server on a
different network segment.
REV: 1.3
- 22 -
USB Server User Manual
Connect Automatically By Port: This is a new function that, when enabled, any USB
device plugged into the enabled port will be connected automatically. Please see
Featured Functions chapter for a detailed description of this function.
Backup Firmware: this function is a fail-save mechanism for the Update Firmware
function. Just browse to where you want to save the backup file and click on Save to
save the file.
Update Firmware: update firmware with this function. Use the Browse button to
choose the firmware to update. Click on Open to start.
Change Password: Simply enter the new password and enter it again for confirmation.
Click on Submit to change.
Restart Server
This button reboots the server. Please note that this function will not work if the server
you attempt to reset has a device connected to it and the device is occupied by a user.
REV: 1.3
- 23 -
USB Server User Manual
Featured Functions
Connect Automatically for Printing
This is another one of our very convenient functions.
What this function does it that when you send a printing task to this printer, it detects
this printing task and AUTOMATICALLY connect this printer to print out the document.
When the printing task is done, the printer will then be AUTOMATICALLY disconnected
so that other users can use it. The user no longer has to manually connect and
disconnect the printer.
NOTE: This function will be enabled for printers or MFPs that has been installed
and used on your PC. For a new printer/MFP, please make sure you have installed
it (has been connected via USB port or via USB Server software and worked
correctly) on your PC first.
REV: 1.3
- 24 -
USB Server User Manual
Automatic Connection
There two ways to automatically connects USB devices: automatic connection by
device and automatic connection by USB port.
Automatic Connection by Device
Once enabled, THIS PARTICULAR DEVICE will be automatically connected when:
1. The software starts up and the device is online and Free.
2. The software is running and the device comes online.
3. The software is running and the device status changes to Free from any other type
of status.
HOWEVER, if the user manually disconnects the device, it will NOT be automatically
connected again until the software has been restarted.
REV: 1.3
- 25 -
USB Server User Manual
Automatic Connection by USB Port
When this function is enabled for the port, the USB devices will be automatically
connected when:
1. The device is plugged into the port when the software is running.
2. The device is plugged into the port and is Free when the software starts up.
3. The device is plugged into the port and the status changes to Free from any other
status when the software is running.
Also, like automatic connection by device function, if the user disconnects the device
manually, it will NOT be automatically connected again until the software has been
restarted.
REV: 1.3
- 26 -
USB Server User Manual
Create a Shortcut on Your Desktop
This function creates a shortcut on your Desktop that, when double clicked, starts up an
application and connects a targeted device at the same time. This function is particularly
useful when the functions or one of the functions of the targeted device must work with
a specific application, such as a multi-function printer and the photo/picture scanning
utility. Normally, if you want to scan with a scanner connected to a USB server, you
must first connect the Scanner with the USB Server software, then run the scan
software and start scanning. When you finish with scanning you have to close the scan
software and then disconnect the scanner so that other user can use it.
However, this shortcut function consolidates these steps into two quick double-click.
Let’s see a sample use case.
REV: 1.3
- 27 -
USB Server User Manual
Take this EPSON MFP as an example.
Right click on it and select the “Create a Shortcut on Your Desktop” option.
REV: 1.3
- 28 -
USB Server User Manual
Then you will see this setup dialog pops up.
So, this EPSON MFP comes with a scanning application called EPSON Scan. You can
see a shortcut of this EPSON Scan software being placed on your Desktop. Now you
can either Drag-and-Drop the EPSON Scan shortcut into the highlighted text filed.
REV: 1.3
- 29 -
USB Server User Manual
Or you can use the browse button to select the shortcut.
REV: 1.3
- 30 -
USB Server User Manual
Either way, observe that the program path has been correctly captured and then click
on the OK button.
REV: 1.3
- 31 -
USB Server User Manual
Then you will see a new shortcut being created on the Desktop.
The naming rule of the new shortcut is adding a “Network” prefix to the name of the
original shortcut.
REV: 1.3
- 32 -
USB Server User Manual
Now, when you double click the new “Network EPSON Scan” shortcut, the software
runs and the EPSON MFP gets connected at the same time.
You can then start your scanning task.
REV: 1.3
- 33 -
USB Server User Manual
When you are finished, simply close the EPSON Scan utility and the EPSON MFP will
be disconnected automatically.
Now you can operate your MFP or Scanner with a shortcut on your Desktop and keep
the USB Server software minimized at the system tray.
REV: 1.3
- 34 -
USB Server User Manual
Auto Disconnect Printer/MFP/Storage Device
These functions are there to prevent the case when one user connected a Printer or
Storage device but forget to disconnect when he/she is done with the device.
REV: 1.3
- 35 -
USB Server User Manual
When these two functions are enabled, you will see this message when you connect a
Storage device or a printer:
REV: 1.3
- 36 -
USB Server User Manual
When the Idle time is up and the device has been disconnected, you get another
notification:
NOTE: This function might not work with Storage device such as pen driver/flash
driver. These devices tend to periodically (on a millisecond base) communicate
with the OS even when the user is not reading data from it or writing data to it. So
it never actually stays “Idle” and will never be automatically disconnected by this
function. External USB HDD type storage device does not have this problem.
REV: 1.3
- 37 -
USB Server User Manual
Device Property
Clicking on the Device Property to bring up the Device Property dialog box.
REV: 1.3
- 38 -
USB Server User Manual
Device Property dialog box displays information of the USB device. If the device is
occupied, it also displays the occupying PC name and the IP of the PC occupying it.
This dialog box provides a quite useful function. Check the Launch a program when
this device connects checkbox and provide the path to that program/utility/application
software, then the program/utility/application software would automatically starts up
after you connect the device.
This function is particularly useful when the USB device you connect works with an
application, such as scanning utility with a multiple function printer.
REV: 1.3
- 39 -
USB Server User Manual
File
The Quit function exits the program.
REV: 1.3
- 40 -
USB Server User Manual
Options
Language
You can change the utility’s language with this option. The default language would be
the same as your system’s language.
REV: 1.3
- 41 -
USB Server User Manual
Server Settings
Setting Server: Same function as the Setting Server option on the server icon’s right
click menu.
Run USB Server When PC Starts Up: This utility automatically runs when your system
starts up.
Open Web Page: Brings up the server’s configuration web pages.
REV: 1.3
- 42 -
USB Server User Manual
Device Settings
Connect Device and Disconnect Device: Connects and disconnects the selected
device.
Request Disconnect Device: When you want to use a device occupied by other user,
you can highlight that device and use this function. This sends a message to the
occupying user with your request. The occupying user would either release the device
or deny the request if s/he is still using the device.
Device Properties: Brings up the device properties dialog the same way as the Device
Properties option when you right click on the device icon.
REV: 1.3
- 43 -
USB Server User Manual
Search
When you are in need of knowing the status of all the servers and devices immediately,
use the Search button.
Clicking on the Search button triggers the program to immediately poll the network for
the status of all the servers and devices. The result will be updated to the tree view.
REV: 1.3
- 44 -
USB Server User Manual
View
The tree view in the main dialog has two display modes: “Servers and Devices” mode
and “Devices Only” mode. The default setting is “Devices Only” mode. You can toggle
between these two display modes with the View option on the control menu:
Servers and Devices view
Device Only View
REV: 1.3
- 45 -
USB Server User Manual
Help
About
About option brings up a dialog box with legal and other relative information displayed:
REV: 1.3
- 46 -
USB Server User Manual
Log
Enabling Log function allows the USB Server software to generate a log file that records
data which might help software developers debug a problem. So if you want to report a
bug, enable this function and repeat the steps to reproduce the bug. Once you have
seen the bug happen again, you can use the Extract log file function to extract the file
and send the file in for analysis.
REV: 1.3
- 47 -
USB Server User Manual
Extract Log File
Clicking on this option brings up the folder where the log file is kept.
REV: 1.3
- 48 -
USB Server User Manual
FAQs
General Questions
Q. How come I don’t see any device on the utility?
Besides the obvious reason that your PC or the USB Server might not be connected to
the network correctly and or the product is not powered-on, using a personal firewall on
your PC might block the program from accessing the network. Please make sure your
personal firewall/anti-virus software is not blocking USB Server application. If this is the
case, you need to consult the manual of personal firewall/anti-virus software on how to
allow a program to go through.
Q. What language(s) does this product support?
The product’s software, including the utility and the installer, supports 11 languages:
English
Portuguese
French
Russian
German
Simplified Chinese
Italian
Spanish
Japanese
Traditional Chinese
Polish
The product’s web page supports 5 languages currently:
English
Portuguese
Italian
Traditional Chinese
Japanese
Q. How come I can’t see any USB device on the USB Server GUI?
First of all, of course, check and if your USB device has been correctly connected to the
product and powered on.
Another possible reason is that, even though the USB server does support USB hub,
the combination of a Full Speed Hub with a Low Speed Device (such as mouse,
keyboard, etc), is NOT supported by this product.
Q. OK, I have connected the USB device, now what?
Once a USB device is connected, simply use it the way you use it as if it is connected to
your PC’s USB port. The usage is and should be the same.
REV: 1.3
- 49 -
USB Server User Manual
Q. I connected to the device but it doesn’t work?
There are a few things you can check when you run into this problem.
1. Some USB devices requires device driver to work properly. You should check and
see if the device driver is correctly installed. To do so, simply connect the USB
device to your PC directly via a USB cable and see if the USB device works. If it
does not work, then it wouldn’t work when connected via USB server either.
2. USB devices that are in use for a long time might suffer from component
deterioration and hence does not provide USB signal that is strong enough to
interact with our USB Server. Putting a USB hub in between the USB server and the
USB device might help.
3. Please note that some USB devices are not supported by our USB server. Please
make sure your USB device is listed as supported on our released document
Q. How come I don’t see the USB hub on the utility?
By the product’s design, USB hub is not considered as a USB device in the common
sense. The reason for this design is that, connecting to the USB Hub is quite
meaningless since it provides no meaningful function as connecting the device behind
the USB hub would, hence we simply do not show USB hub on the utility. You could still
connect to the USB device behind the USB hub.
Q. What does “Device not supported due to limited bandwidth” message
mean?
You may see this message when attempting to connect MORE THAN 1 USB web cam,
audio device or other multimedia device on the same server.
USB 2.0 device by specification could be transmitting data at 480 Mbps during
operation, though in reality they are usually transmitting at a rate of 200+ Mbps.
Connecting more than of such device would exceed the available bandwidth provided
by this product hence is not allowed.
Q. Oops, I forgot the password. What can I do?
On the product, there is a Reset switch that allows you to reset all configurations back
to the default settings as it was when you purchased this product. This function resets
the password as well. To do this, simply hold down the Reset button for three seconds
and let go.
REV: 1.3
- 50 -
USB Server User Manual
Supported USB Devices
Q. What USB devices does this product support?
Please contact your vendor for a supported device list if the product package does not
contain one already. Please note that the supported devices are not limited to those that
are on this list. The devices on the list are those that has been tested and verified
to work. Devices that are not on this list MAY or MAY NOT be supported by this
product.
Q. How many USB printers can I connect to this product?
Depending on the product design, you should be able to connect at least one and up to
four USB printers. Please consult the supported device list for all the supported
printers.
Q. How many USB multi-function printers can I connect to this product?
Depending on the product design, you should be able to connect at least one and up to
four USB multi-function printers. Please consult the supported device list for all the
supported multi-function printers.
Q. Does this product support USB scanner?
Yes, it does. Depending on the product design, you should be able to connect at least
one and up to four USB scanners. Please consult the supported device list for all
the supported USB scanners.
Q. Does this product support USB external HDD/storage?
Yes, it supports USB pen drive, card reader and USB HDD device. Depending on the
product design, you should be able to connect at least one and up to four USB storage
devices. Most of the USB mass storage device on the market should be supported.
Q. Does this product support USB external CD/DVD reader/recorder?
Yes, it supports USB external CD/DVD reader/recorder. Depending on the product
design, you should be able to connect at least one and up to four USB external CD/DVD
reader/recorder devices. Most of the USB external CD/DVD reader/recorder on the
market should be supported.
Q. Does this product support USB web cam?
This product supports only one USB web cam. Many web cams on the market today
are what we called USB 2.0 device. USB 2.0 devices, by specification, could be
REV: 1.3
- 51 -
USB Server User Manual
transmitting data at 480 Mbps during operation. The bandwidth provided by this USB
Server product is at most 320 Mbps. Though in reality a single webcam may not require
480 Mbps bandwidth, the required bandwidth of two or more web cam definitely
exceeds the 320 Mbps this product could provide. Hence only 1 USB web cam is
supported on each USB server.
Q. Does this product support USB Speaker/Mic.?
Yes it does. However, ONLY 1 USB speaker/audio input/output device is
supported per product. Please consult the supported device list for all the
supported USB audio devices.
Q. How come my USB device does not work with this product?
Though this product supports a lot of USB devices, it is not without limitation. Please
contact your vendor for a list of all the supported devices. This list contains devices that
has been tested and verified to be compatible with this product. Those devices that are
not on this list might or might not be supported.
You may also contact your vendor for any device firmware and software update, which
might improve device compatibility of this product to support your device that didn’t work
with the current firmware and software.
REV: 1.3
- 52 -