Transcript
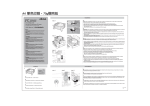
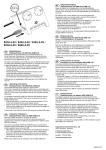
A3( 420 x 297mm)
70g模照紙 單色印刷
1
3
GB
Contents
• 1 x USB 3.0 4-Port PCI Express Card
• 1 x Driver CD
• 1 x User Manual
USB 3.0
System Requirements
Windows® XP, Vista or Windows 7 (32/64 bit)
One available single PCI Express slot (PCI Express version 2.0
recommended)
four port PCI express card
GB
FR
D
PT
ES
TR
GB
specification
• supports 4 downstream ports (external x 3, internal x 1) for all speeds
• compliant with Universal serial bus 3.0 specification revision 1.0
• supports simultaneous operation of multiple USB 3.0, USB 2.0 and
USB 1.1 devices
• fully compliant with PCI express base specification revision 2.0
• single-lane (x1) PCI Express throughput rates up to 5 Gbps
• data speed rates:
Low-speed (1.5Mbps) / Full-speed (12Mbps) / High-speed (480Mbps) /
Super-speed (5Gbps)
• built-in 4-pin power connector for receiving extra power supply from system
• operating system support: Windows XP/Vista/7 (32/64 bit)
contents
• PCIe card
• Multi-language manual and driver CD
FR
Spécifications
• prend en charge 4 ports dans le sens descendant (3 externes, 1 interne) pour
toutes les vitesses
• conforme à la spécification Universal Serial Bus 3.0 Révision 1.0
• supporte l'utilisation simultanée de plusieurs périphériques USB 3.0, USB 2.0 et USB 1.1
• entièrement conforme aux spécifications PCI Express Base Révision 2.0
• Débit de PCI Express une voie (x1) jusqu'à 5 Gbps
• supporte les débits de données suivants:
Basse vitesse (1,5Mbps) / Pleine vitesse (12Mbps) / Haute vitesse (480Mbps) /
Super vitesse (5Gbps)
• Connecteur d'alimentation 4 broches intégrés pour recevoir du courant supplémentaire
provenant du système
• systèmes d'exploitation pris en charge: Windows XP/Vista/7 (32/64 bits)
contenu
• Carte PCIe
• manuel multilingue et CD de pilotes
D
Spezifikationen
• Unterstützt 4 Downstream-Ports (extern x 3, intern x 1) für alle Geschwindigkeiten
• Kompatibel mit der USB 3.0-Spezifikation Rev. 1.0
• unterstützt den gleichzeitigen Betrieb mehrerer USB 3.0-, USB 2.0- und USB 1.1-Geräte
• voll kompatibel mit der PCI Express Base-Spezifikation Rev. 2.0
• einspurige (x1) PCI Express-Durchsatzraten bis 5 Gbps
• unterstützt die folgenden Datenübertragungsraten:
langsame Geschwindigkeit (1,5 Mbps) /
volle Geschwindigkeit (12 Mbps) / Hochgeschwindigkeit (480 Mbps) /
Extremgeschwindigkeit (5 Gbps)
• eingebauter 4-Pin-Stromanschluss für den Empfang zusätzlichen Stroms vom System
• Unterstützte Betriebssysteme: Windows XP/Vista/7 (32/64 bit)
Packungsinhalt
• PCIe-Karte
• Benutzerhandbuch in mehreren Sprachen und Treiber-CD
Systemvoraussetzungen
Windows® XP, Vista oder Windows 7 (32/64 bit)
ein freier PCI Express-Einzelsteckplatz (PCI Express Version 2.0
empfohlen)
PT
conteúdo
• 1 x Placa PCI Express com 4 Portas USB 3.0
• 1 x CD com driver
• 1 x Manual do usuário
Requerimentos do sistema
Windows® XP, Vista ou Windows 7 (32/64 bit)
Um slot simples PCI Express disponível (É recomendável a PCI Express
versão 2.0)
ES
contenido
• 1 x PCI Express Card USB 3.0 de 4 puertos
• 1 x CD de controladores
• 1 x Manual del usuario
Requisitos del sistema
Windows® XP, Vista o Windows 7 (32/64 bits)
Una ranura PCI Express disponible (PCI Express versión 2.0
recomendada)
TR
Kutu İçeriği
• 1 x 4 adet USB 3.0 portlu PCI Express kartı
• 1 x Sürücü CD’si
• 1 x Kullanım Kılavuzu
Sistem Gereksinimleri
Windows XP, Vista veya Windows 7 (32/64 bit)
Boş bir PCI Express yuvası (Anakartınızın PCI Express 2.0 destekli olması
önerilir)
2
a
b
PT
especificações
• Suporta 4 portas downstream (3x externas, 1x interna) para todas as velocidades
• Compatível com Universal Serial Bus 3.0 especificações Rev. 1.0
• supports simultaneous operation of multiple USB 3.0, USB 2.0 and
USB 1.1 devices
• Compatível com PCI Express Base Especificações Rev. 2.0
• Linha simples (x1) PCI Express transferências até 5 Gbps
• Suporta as velocidades de transferência abaixo:
Baixa (1.5Mbps) /Média(12Mbps) / Alta (480Mbps) / Super (5Gbps)
• Conector de força embutido 4-pinos para alimentação extra à partir do sistema
• Sistemas operacionais suportados: Windows XP/Vista/7 (32/64 bit)
conteúdo
• Placa PCIe
• manual multi-idioma e CD com driver
ES
especificaciones
• soporta 4 puertos de bajada (externas x 3, interna x 1) para todas las velocidades
• compatible con la especificación Universal Serial Bus 3.0 Revisión 1.0
• soporta la operación simultánea de varios dispositivos USB 3.0, USB 2.0 y USB 1.1
• compatible por completo con la especificación PCI Express Base Revisión 2.0
• PCI Express de una pista (x1) con velocidades de paso de hasta 5 Gbps
• soporta las siguientes velocidades de datos: Baja velocidad (1.5Mbps) /
Velocidad completa (12Mbps) /Alta velocidad (480Mbps) / Súper velocidad (5Gbps)
• conector de corriente de 4 contactos para recibir alimentación extra del sistema
• sistemas operativos soportados: Windows XP/Vista/7 (32/64 bits)
contenido
• tarjeta PCIe
• CD de controladores y manual multilingüe
TR
Özellikler
• Hepsi USB 2.0/1.1 ile geriye uyumlu 4 adet girişe sahiptir
• USB 3.0 Revizyon 1 standardı ile uyumlu
• USB 3.0, USB 2.0 ve USB 1.1 aygıtlarıyla aynı anda çalısabilir
• PCI Express 2.0 standardı ile uyumlu
• Tek (x1) PCI Express hattı üzerinden 5 Gbps’ye kadar veri aktarım hızı
• Desteklenen maksimum veri hızları asagıdaki gibidir:
Low-speed (1.5 Mbps) / Full-speed (12 Mbps) / High-speed (480 Mbps) /
Super-speed (5 Gbps)
• 4-pin güç girişiyle sistemden extra güç alır
• Desteklenen işletim sistemleri Windows XP/Vista/7 (32/64-bit)
Kutu İçeriği
• PCIe card
• kullanım Kılavuzu ve sürücü CD'si
Precaución:
La descarga electroestática (ESD) puede dañar los componentes del
sistema. Utilice una estación de trabajo con control de ESD. Si no hay
una estación de trabajo disponible, colóquese una muñequera
antiestática o toque una superficie conectada a tierra antes de tocar
cualquier componente del PC.
Windows® XP/Vista/7 (32/64 bit)
1. Legen Sie die mitgelieferte Software-CD in das optische Laufwerk
des PC ein. Öffnen Sie die Datei “VIA USB3.0 HOST diver” auf der
CD und klicken Sie anschließend doppelt auf die Datei Setup.exe.
2. Der Installationsassistent erscheint. Klicken Sie auf Next (Weiter).
3. Nehmen Sie die Bedingungen an, und klicken Sie auf Next
(Weiter).
4. Wählen Sie “VIA xHCI HOST controller driver”und
drücken Sie auf Next (Weiter).
5. Bestätigen Sie die Einstellung und drücken Sie auf Next (Weiter).
6. Wenn die Installation abgeschlossen ist, klicken Sie auf Finish
(Fertig stellen).
TR
Kartın Montajı
GB
Hardware Installation
D
Packungsinhalt
• 1 x USB 3.0 4-Port PCI Express-Karte
• 1 x Treiber-CD
• 1 x Benutzerhandbuch
User Manual
D
Installieren des Treibers
1. Apague el ordenador, desenchufe el cable y quite la tapa del
ordenador.
2. Seleccione una ranura PCIe no usada y quite su tapa protectora.
3. Inserte con cuidado la tarjeta y presiónela hasta que todos los
conectores del borde estén bien asentados dentro de la ranura.
Luego, atornille el soporte de la tarjeta en el chasis del PC.
4. Coloque un conector PSU Molex en el zócalo de corriente de
la tarjeta.
5. Vuelva a colocar la tapa del ordenador y conecte el cable de
corriente.
FR
contenu
• 1 x Express Card PCI de port USB 3.0 4
• 1 x CD de pilotes
• 1x manuel de l'utilisateur
Configuration requise
Windows® XP, Vista ou Windows 7 (32/64 bits)
Un logement simple PCI Express disponible
(PCI Express version 2.0 recommandé)
ES
Instalación del hardware
c
a
GB
Card Layout
a USB3.0 ports b 4-pin power connector c PCIe bus connector
FR
Implantation de la carte
a ports USB3.0 b connecteur d'alimentation 4 broches
c connecteur de bus PCIe
D
Karten-Layout
a USB 3.0-Ports b 4-Pin-Stromanschluss c PCIe-Busanschluss
PT
Layout do cartão
a Portas USB3.0 b Conector de força 4-pinos c Conector PCIe bus
Caution:
Electrostatic discharge (ESD) can damage system components. Use an
ESD-controlled workstation. If such a workstation is not available,
wear an antistatic wrist strap or touch an earthed surface before
handling any PC components.
1. Switch off the computer, unplug the power cord, and remove the
computer’s cover.
2. Select an unused PCIe slot and remove its protective cover.
3. Carefully insert the card and press until all the edge connectors
are firmly seated inside the slot. Then, screw the card’s bracket
securely into the PC’s chassis.
4. Attach a four-pin PSU Molex connector to the card power socket.
5. Replace the computer’s cover and reconnect the power cord.
FR
Installation matérielle
Uyarı:
Elektrostatic deşarj (ESD) sistem bileşenlerine zarar verebilir. ESD korumalı bir
bilgisayar kasası kullanın. Eğer böyle bir kasanız yoksa anti-statik bir eldiven
giyin veya topraklanmış bir yüzeye dokunun.
1. Bilgisayarı kapatın, güç kablosunu prizden sökün ve bilgisayar kasanızın
yan kaoağını çıkarın.
2. Boşta duran herhang bir PCIe yuvasını seçin.
3. Kartı dikkatlice bu yuvayatakın ve tüm konektör içine girinceye kadar
üzerine bastırın. Kasanızın PCI bölmesi vidalıysa tornavida yardımıyla kartı
anakarta sabitleyin.
4. Dört pinli Molex güç kablosunu kartın güç girişine takın.
5. Kasanın kapağını kapatarak güç kablosunu yeniden prize takıp kartınızı
kullanmaya başalayabilirsiniz.
4
Attention :
Les décharges électrostatiques (ESD) peuvent endommager les
composants du système. Utilisez une station de travail contrôlée par
ESD. Si vous ne disposez pas d'une telle station de travail, portez un
bracelet antistatique ou touchez une surface reliée à la terre avant
de manipuler tout composant du PC.
Vorsicht:
Die elektrostatische Entladung (ESD) kann Systembestandteile
beschädigen. Arbeiten Sie an einem vor elektrostatischer Entladung
geschützten Arbeitsplatz. Falls solch ein Arbeitsplatz nicht
vorhanden ist, tragen Sie ein antistatisches Gelenkband oder
berühren Sie eine geerdete Oberfläche, bevor Sie die PCKomponenten berühren.
Windows® XP/Vista/7 (32/64 bit)
1. Insert the software CD provided to the PC’s optical drive. Explore
the CD and open “VIA USB3.0 HOST diver”file then double click
on the Setup.exe file.
2. Installation wizard should appear, press Next.
3. Accept terms and conditions, press Next.
4. Choose “VIA xHCI HOST controller driver”, press Next.
5. Confirm the setting, press Next.
6. Once installation is completed press Finish.
1. Desligue o computador, solte o cabo de força, e remova a laterial
do computador.
2. Selecione um slot PCIe vazio e remova a tampa protetora
3. Inisira a placa cuidadosamente aé que os conectores dela estejam
alinhados firmemente com os do slot. Em seguida, fixe o suporte
da placa no gabinete com um parafuso.
4. Conecte o contector quatro-pinos PSU Molex no soquete da placa.
5. Tampe a lateral do gabinete e ligue o cabo de força.
Windows® XP/Vista/7 (32/64 bit)
1. Insira o CD que acompanha o produto, no drive óptico.
Explore o CD e abra o arquivo “VIA USB3.0 HOST diver” em
seguida dê um duplo clique
no arquivo Setup.exe.
2. Vai aparecer o Assistente de instalação, clique em Next.
3. Aceite os Termos e Condições, clique em Next.
4. Selecione “VIA xHCI HOST controller driver”, clique em Next.
5. Confirme a configuração, clique em Next.
6. Quando a instalação for completada clique em Finish.
Verificação da instalação do Driver
Para verificar se o driver foi instalado corretamente, vá em
Gerenciador de dispositivos. O “VIA USB eXtensible HOST
controller”, “VIA USB3.0 Root HUB” e “VIA USB2.0 HUB” deve
aparecer abaixo do “Universal Serial Bus controllers”.
Verificación de la instalación de los controladores
GB
Driver Installation
Atenção:
Descargas eletroestáticas (ESD) podem danificar os componentes do
sistema. Utilize uma bancada com controle de ESD. Caso não tenha
uma bancada disponível, utilize uma pulseira antiestática ou toque
uma superfície aterrada antes de manusear qualquer componente
do PC.
PT
Instalação do Driver
Windows® XP/Vista/7 (32/64 bits)
1. Inserte el CD de software incluido en la unidad óptica del PC.
Explore el CD y abra el archivo “VIA USB3.0 HOST diver”, luego
haga doble clic en el archivo Setup.exe.
2. El Asistente para la instalación debería aparecer,
presione Siguiente.
3. Acepte los términos y condiciones, presione Siguiente.
4. Elija “VIA xHCI HOST controller driver”, presione Next (Siguiente).
5. Confirme la configuración, presione Next (Siguiente).
6. Una vez completada la instalación, presione Finalizar.
D
Hardwareinstallation
PT
Instalação do Hardware
Um zu prüfen, ob die Treiber richtig installiert wurden, gehen Sie
zum Gerätemanager. Der “VIA USB eXtensible HOST controller”,
“VIA USB3.0 Root HUB”und “VIA USB2.0 HUB” sollten unter
“Universal Serial Bus controllers” erscheinen.
ES
Instalación de los controladores
1. Éteignez l'ordinateur, débranchez le cordon d'alimentation, et
enlever le capot de l'ordinateur.
2. Sélectionnez un logement PCIe non utilisé et retirez le couvercle
de protection.
3. Insérez soigneusement la carte et appuyez jusqu'à ce que tous les
connecteurs latéraux soient bien en place dans le logement.
Ensuite, vissez le support de carte en toute sécurité dans le
châssis du PC.
4. Fixez un connecteur de bloc d'alimentation Molex à quatre
broches à la prise d'alimentation de la carte.
5. Replacez le capot de l'ordinateur et rebranchez le cordon
d'alimentation.
1. Schalten Sie den Computer aus, trennen Sie das Netzkabel ab, und
entfernen Sie das Computergehäuse.
2. Wählen Sie einen freien PCIe-Steckplatz, und entfernen Sie dessen
Schutzabdeckung.
3. Setzen Sie die Karte vorsichtig ein, und drücken Sie sie so weit
hinein, bis alle Anschlüsse fest im Steckplatz sitzen.
Schrauben sie die Kartenhalterung am Chassis des PC fest.
4. Befestigen Sie einen vierpoligen PSU Molex-Anschluss an den
Stromanschluss der Karte.
5. Setzen Sie das Computergehäuse wieder auf, und schließen Sie
das Netzkabel an.
Prüfen der Treiberinstallation
Verification of Driver Installation
To verify the driver are installed correctly, go to Device Manager.
The “VIA USB eXtensible HOST controller”, “VIA USB3.0 Root
HUB”and “VIA USB2.0 HUB” should appear under the “Universal
Serial Bus controllers”.
FR
Installation du pilote
Windows® XP/Vista/7 (32/64 bits)
1. Insérez le CD de logiciels fourni avec le lecteur optique du PC.
Explorez le CD et ouvrez le fichier “VIA USB3.0 HOST driver” puis
cliquez sur le fichier Setup.exe.
2. L'assistant d'installation devrait apparaître, appuyez sur
Next (Suivant).
3. Acceptez les termes et conditions, appuyez sur Next (Suivant).
4. Choisissez “VIA xHCI HOST controller driver”, appuyez sur Suivant.
5. Confirmez la configuration, appuyez sur Suivant.
6. Quand l'installation est terminée appuyez sur Finish (Terminé).
Para verificar que el controlador se ha instalado correctamente, vaya
a Administrador de dispositivos. Debería aparecer “VIA USB
eXtensible HOST controller”, “VIA USB3.0 Root HUB” y “VIA USB2.0
HUB” bajo “Universal Serial Bus controllers”.
TR
Sürücü Kurulumu
Windows® XP/Vista/7 (32/64 bit)
1. Kartla beraber gelen sürücü CD’sini bilgisayarınızın optik sürücüsünün
içine yerleştirin. CD’yi çalıştırın ve “VIA USB3.0 HOST driver” adlı
klasöre girip Setup.exe dosyasını çift tıklayarak açınız.
2. Kurulum sihirbazı karşınıza geldiği zaman Next (veya İleri) düğmesine
basınız.
3. Kullanım şartlarını kabul edip bir sonraki pencereye geçin.
4. ”VIA xHCI HOST controller driver” seçip ileriye (next) tıklayın
5. Ayarı onaylayı ileriye (next) tıklayın.
6. Kurulum tamamlandığı zaman Finish düğmesine basınız.
Kartın Bilgisayarınız Tarafından Tanınması
Sürücünün doğru bir biçimde yüklendiğini doğrulamak için Aygıt
Yöneticisi’ni açınız. Bu işlemleri yaptıktan sonra “VIA USB eXtensible HOST
controller”, “VIA USB3.0 Root HUB” ve “VIA USB2.0 HUB”, aygıt
yöneticisinde yer alan “Evrensensel Seri Veri Yolu Denetleyicileri”
listesinde görünüyor olmalıdır.
Vérification de l'installation du pilote
Pour vérifier que les pilotes sont correctement installés, allez à
Gestionnaire des périphériques. “VIA USB eXtensible HOST
controller”, “VIA USB3.0 Root HUB”et “VIA USB2.0 HUB” devraient
apparaître sous “Universal Serial Bus controllers”.
ES
Diseño de la tarjeta
a Puertos USB3.0 b Conector de corriente de 4 contactos
c Conector PCIe bus
TR
Kartın Tasarımı
a USB 3.0 girişleri b 4-pin güç girişi (opsiyonel) c PCI Express konektörü
AK-PCCU3-03
2011.01