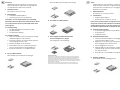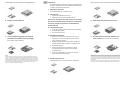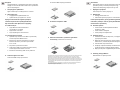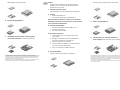
1
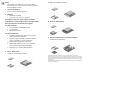
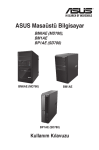
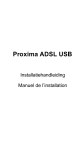
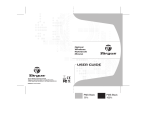
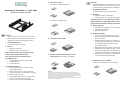
A. Install one 2.5" HDD
Set HDD on the bottom of bracket.
Einleitung
Herzlichen Glückwunsch zum Kauf unseres Produkts!
Um das Produkt besser kennenzulernen, lesen Sie bitte
vor der Benutzung dieses Handbuch sorgfältig durch.
I.
Mounting KIT: Dual HDD 2.5 -> one 3.5 BAY
User Manual - Model No. DA-70431
Hardwareanforderungen
Computer mit freiem 3,5"-Laufwerkschacht
II. Merkmale:
• Unterstützt zwei 2,5" Festplatten
• Verwendet einen 3,5" Laufwerkschacht des Gehäuses
Set HDD on the top of bracket.
Überprüfen Sie bitte vor Verwendung des Produkts, ob
folgende Artikel in der Verpackung enthalten sind. Falls
nicht, wenden Sie sich bitte rechtzeitig an Ihren Händler.
III. Verpackungsinhalt
• Festplatten-Montagekit für zwei 2,5" Festplatten
• Plastiktüte mit Schrauben
• Bedienungsanleitung
Foreword
Congratulations on your purchase of our product!
Before using the product, please read this manual
carefully for further recognizing of the product.
I.
B. Install the second 2.5" HDD
Hardware Requirement
One computer with free 3.5" bay
II. Features:
• Support dual HDD 2.5"
• Application for one 3.5" bay of case
Before using the product, please check the fittings
in the package compliant with the below.
If not, please contact the local dealers timely.
C. Possibly to add one 80mm cooling fan on the
mounting kit. (Not including in the package).
III. Package content
• One HDD Mounting Kit for dual 2.5" HDD
• One Screws bag
• One User Manual
IV. Hardware Installation
1. Correctly put 2.5" HDD on bracket, and then
mount HDD by screws.
2. Switch off the power of computer, take off
panels of two sides, and set bracket to 3.5" bay
3. Mount bracket by screws
4. Connect HDD appropriately, install side panels
of case, and then connect power cable.
5. Switch on the computer, then HDD will work
IV. Hardwareinstallation
1. Setzen Sie die 2,5" Festplatte richtig in den
Rahmen und befestigen Sie sie anschließend
mit den Schrauben.
2. Schalten Sie den Computer aus, nehmen Sie
die beiden Seitenverkleidungen des Gehäuses
ab und schieben Sie den Rahmen in einen
3,5"-Laufwerkschacht.
3. Befestigen Sie den Rahmen mit den Schrauben.
4. Schließen Sie die Festplatte richtig an, montieren
Sie die Seitenverkleidungen des Gehäuses und
stecken Sie anschließend den Netzstecker ein.
5. Schalten Sie den Computer ein. Anschließend
nimmt die Festplatte ihre Arbeit auf.
A. Installation einer 2,5" Festplatte
Setzen Sie die Festplatte unten in den Rahmen.
Disclaimer
All the information in this document is subject to change without prior notice. The
manufacturer makes no representations or any warranties regarding the contents of this
manual. The information contained in this manual is provided for the general use by the
customers. No part of this document may be reproduced or transmitted in any form by any
means without the express written permission of the manufacturer. .
All brand names and product names used in this document are trademarks or registered
trademarks of their respective holders.
Setzen Sie die Festplatte oben in den Rahmen.
Avant-propos
Nous vous remercions d'avoir acheté notre produit ! Lisez
complètement ce guide d'utilisateur avant de l'utiliser.
I.
Installation en haut du berceau.
Configuration minimale requise
Un ordinateur avec un logement pour périphérique
3,5 pouces disponible
II. Caractéristiques :
• Peut loger jusqu'à deux disques durs 2,5 pouces
• S'adapte dans un logement pour périphérique
3,5 pouces
B. Installation der zweiten 2,5" Festplatte
Avant d'utiliser cet accessoire, vérifiez que la boîte qui vous
a été remise contient tous les éléments indiqués ci-dessous.
Si un élément manque, contactez sans tarder votre
revendeur local.
B. Installation du deuxième disque dur 2,5 pouces
III. Contenu de la boîte
• Un berceau pour deux disques durs 2,5 pouces
• Un sachet de vis
• Une notice utilisateur
C. Montieren eines zusätzlichen 80mm-Lüfters am
Montagekit, falls erforderlich. (Nicht mitgeliefert).
Haftungsausschluss
Alle in diesem Dokument enthaltenen Informationen können ohne vorherige Ankündigung
geändert werden. Der Hersteller gibt keine Zusicherungen oder Gewährleistungen im Hinblick
auf den Inhalt dieses Handbuchs. Die in diesem Handbuch enthaltenen Informationen dienen
der allgemeine Nutzung durch den Kunden. Kein Teil dieses Dokuments darf in irgendeiner
Form und mit irgendwelchen Mitteln ohne die ausdrückliche schriftliche Genehmigung des
Herstellers reproduziert oder übertragen werden.
Alle in diesem Dokument benutzten Marken- und Produktnamen sind Warenzeichen oder
eingetragene Warenzeichen ihrer jeweiligen Inhaber.
IV. Installation matérielle
1. Posez les disques durs à l'intérieur du berceau
et fixez-les à l'aide des vis fournies.
2. Éteignez l'ordinateur, enlevez ses panneaux latéraux
et insérez le berceau dans un logement libre pour
périphérique 3,5 pouces.
3. Fixez-le berceau sur le châssis de l'ordinateur à
l'aide des vis fournies.
4. Branchez un fil d'alimentation et un fil de données
sur chaque disque dur, refermez l'ordinateur avec
les panneaux latéraux et branchez l'ordinateur sur
une prise secteur.
5. Allumez l'ordinateur. Les disques durs sont prêts.
A. Installation d'un premier disque dur 2,5 pouces
Installation en bas du berceau.
C. Vous pouvez monter également un ventilateur
de 80 mm sur le berceau. (non fourni).
Avis de non-responsabilité
Nous nous réservons le droit de modifier toute information rapportée dans ce guide sans
notification préalable. Le constructeur n'assume aucune représentation et aucune garantie
sur le contenu de ce guide. Les informations portées dans ce guide sont destinées
uniquement à une utilisation générale du produit par les clients. Aucune partie de ce
document ne peut être reproduite ou transmise, sous quelque forme que ce soit et par
quelque moyen que ce soit, sans une permission écrite spécifique du constructeur.
Tous les noms de marque et de produit cités dans ce document sont des marques déposées
ou enregistrées de leur propriétaire respectif.
Voorwoord
Gefeliciteerd met uw aanschaf van ons product! Lees
deze handleiding vóór ingebruikname zorgvuldig door
om uzelf bekend te maken met het product.
I.
Plaats de HDD op de bovenzijde van de beugel.
Hardwarevereisten
Eén computer met vrije 3.5" bay
I.
II. Eigenschappen:
• Ondersteunt dubbele HDD 2.5"
• Toepassing voor één 3.5" bay-behuizing
Controleer a.u.b. vóór ingebruikname of de verpakking
inderdaad de hieronder genoemde onderdelen bevat. Neem
a.u.b. bijtijds contact op met uw plaatselijke dealer als dit
niet het geval is.
A. Eén 2.5" HDD Installeren
Plaats de HDD op de onderzijde van de beugel.
Requisiti Hardware
Un computer con una baia 3.5" libera
II. Caratteristiche:
• Supporta doppio HDD 2.5"
• Applicazione per una baia 3.5" da case
B. De Tweede 2.5" HDD Installeren
III. Leveringsomvang
• Eén HDD Montagekit voor dubbele 2.5" HDD
• Eén Schroevenzak
• Eén Gebruikshandleiding
IV. Hardware Installatie
1. Plaats de 2.5" HDD correct op de beugel en bevestig
de HDD vervolgens met de schroeven.
2. Schakel de computer uit, verwijder beide zijpanelen
en zet de beugel op de 3.5" bay.
3. Monteer de beugel met de schroeven.
4. Sluit de HDD correct aan, installeer de zijpanelen
weer en sluit vervolgens de voedingskabel aan.
5. Schakel de computer in en uw HDD zal werken.
Avanti
Congratulazioni per aver acquistato un nostro prodotto!
Prima di utilizzare il prodotto, vi preghiamo di leggere
questo manuale con attenzione per una maggiore
familiarità con il prodotto.
Prima di usare questo prodotto, vi preghiamo di controllare
che quanto contenuto nella confezione sia conforme a
quanto indicato qui sotto. In caso non lo fosse vi preghiamo
di contattare tempestivamente il rivenditore di zona.
III. Contenuto della confezione
• Un Kit di montaggio HDD per doppio HDD da 2.5"
• Un sacchetto viti
• Un Manuale Utente
C. Het is mogelijk één 80mm koelventilator
aan de montagekit toe te voegen.
(niet inbegrepen in de verpakking).
Vrijwaringsontkenning
Alle informatie in dit document is onderhevig aan verandering zonder voorafgaande
kennisgeving. De fabrikant geeft geen verklaringen of garanties met betrekking tot de
inhoud van deze handleiding. De informatie in deze handleiding is bedoeld voor het
algemene gebruik door klanten. Geen enkel deel van dit document mag gereproduceerd
of overgedragen worden, op welke wijze dan ook, zonder de uitdrukkelijke, schriftelijke
toestemming van de fabrikant.
Alle merknamen en productnamen die in dit document worden weergegeven zijn
productmerken of geregistreerde handelsmerken van hun respectievelijke houders.
IV. Installazione dell'Hardware
1. Inserire correttamente l'HDD 2.5" nell'alloggiamento
e quindi montare l'HDD con le viti.
2. Spegnere il PC, rimuovere il pannelli laterali e
fissure l'alloggiamento nella baia da 3.5"
3. Fissare l'alloggiamento con le viti.
4. Collegare l'HDD in modo appropriato, installare
i pannelli laterali del case, e quindi connettere il
cavo di alimentazione.
5. Accendere il PC, e quindi l'HDD sarà funzionante.
A. Installare un HDD 2.5"
Fissare l'HDD alla base dell'alloggiamento.
Fissare l'HDD sulla parte superiore dell'alloggiamento.
Introducción
¡Enhorabuena por la compra de nuestro producto! Antes
de utilizar el producto, lea atentamente este manual para
un mayor conocimiento del mismo.
I.
Ajuste del disco duro en la parte superior del soporte.
Requisitos de hardware
Una computadora con una bahía de 3,5"
II. Características:
• Soporte de doble disco duro 2.5"
• Aplicación de una carcasa de bahía de 3,5"
B. Installare il secondo HDD 2.5"
Antes de usar el producto, por favor verifique los accesorios
que contiene el paquete la lista que aparece a continuación.
Si no es así, póngase en contacto con los distribuidores
locales oportunos.
B. Instale la segunda unidad de disco duro 2.5"
III. Contenido del paquete
• Un kit de montaje para disco duro dual de 2.5" HDD
• Una bolsa de tornillos
• Un manual del usuario
C. Vi è la possibilità di aggiungere una ventola di
raffreddamento da 80 mm nel kit di montaggio.
(Non inclusa nella confezione).
Avviso
Tutte le informazioni in questo documento sono soggette a cambiamento senza previa
notifica. Il produttore non fa rappresentazioni o garanzie riguardo il contenuto di questo
manuale. Le informazioni contenute in questo manuale sono fornite per l'uso generale da
parte del cliente. Nessuna parte di questo documento può essere riprodotto o trasmesso
in qualunque forma con qualunque mezzo senza l'espresso permesso scritto del produttore.
Tutti i nomi commerciali e del prodotto utilizzati in questo documento sono marchi
commerciali o registrati dai rispettivi produttori.
IV. Instalación del hardware
1. Coloque correctamente el disco duro de 2.5" en
el soporte, a continuación fije el soporte al disco
duro usando los tornillos.
2. Apague completamente el ordenador, extraiga los
paneles laterales y fije el soporte a la bahía de 3.5"
3. Atornille el soporte.
4. Conecte el disco duro correctamente, instale
los paneles laterales y luego conecte el cable
de alimentación.
5. Encienda el ordenador, a continuación, el disco
duro estará listo para funcionar.
A. Instale un disco duro 2.5"
Ajuste del disco duro en la parte inferior del soporte.
C. Es posible añadir un ventilador de 80mm en el
kit de montaje. (No se incluyen en el paquete).
Aviso Legal
Toda la información contenida en este documento está sujeta a cambios sin previo aviso.
El fabricante no se hace responsable no ofrece garantías con respecto a cualquiera de los
contenidos de este manual. La información contenida en este manual se proporciona para
uso general de los clientes. Ninguna parte de este documento puede ser reproducida o
transmitida de ninguna forma o por cualquier medio sin el permiso expreso y por escrito
del fabricante.
Todas las marcas y nombres de productos utilizados en este documento son marcas
comerciales o marcas comerciales registradas de sus respectivos propietarios.
Введение
Поздравляем вас с приобретением нашего изделия!
Перед его использованием внимательно прочитайте
данное Руководство.
I.
Установите HDD сверху кронштейна.
Аппаратурные требования
Один компьютер со свободным 3.5" отсеком
Przedmowa
Gratulujemy zakupu naszego produktu! Przed użyciem
produktu prosimy o uważne przeczytanie tego
podręcznika dla lepszego zapoznania się z nim.
I.
Wymagania sprzętowe
Jeden komputer z wolną wnęką 3.5"
II. Характеристики:
• Поддерживает двойной HDD 2.5"
• Примененим для одного 3.5" отсека
II. Właściwości:
• Obsługa dwóch HDD 2.5"
• Zastosowanie jednej wnęki 3.5" w obudowie
Перед использованием изделия проверьте
комплектацию согласно приведенной ниже.
При несоответствии обратитесь к продавцу.
Przed użyciem produktu, proszę sprawdzić zgodność
mocowań z poniższym. Jeśli nie, proszę skontaktować
niezwłocznie ze sprzedawcą.
B. Установите второй 2.5" HDD
III. Комплектация
• Один HDD монтажный комплект
для двойного 2.5" HDD
• Один пакет с винтами
• Одно Руководство пользователя
III. Zawartość pakietu
• Jeden zestaw montażowy HDD dla dwóch
dysków 2.5" HDD
• Jedna torebka z wkrętami
• Jeden podręcznik użytkownika
IV. Аппаратурная установка
1. Правильно установите 2.5" HDD на кронштейн,
затем закрепите HDD винтами.
2. Выключите питание компьютера, снимите
боковые панели и установите кронштейн
в 3.5" отсек.
3. Закрепите кронштейн винтами.
4. Подключите HDD, установите боковые панели,
затем подключите кабель питания.
5. Включите компьютер, HDD начнет работать.
IV. Instalacja sprzętu
1. Umieścić 2.5" HDD we wsporniku, a następnie
je przykręcić śrubami.
2. Wyłączyć zasilanie komputera, wyjąć panele z
dwóch stron, i wstawić wspornik do wnęki 3.5"
3. Zamontować wspornik śrubami.
4. Podłączyć odpowiednio HDD, zainstalować boczne
panele obudowy i podłączyć kabel zasilania.
5. Włączyć komputer napęd HDD będzie działał.
A. Установка одного 2.5" HDD
Установите HDD снизу кронштейна.
C. Имеется возможность установить один 80мм
вентилятор. (в комплект не включен).
Отказ от ответственности
Вся информация в данном документе может быть изменена без предварительного
уведомления. Производитель не несет ответственности и не дает никаких
гарантий в отношении Содержания данного руководства. Информация данного
руководства предоставлена для общего пользования покупателями. Никакая часть
данного документа не может быть воспроизведена или передана в каком-либо виде
и посредством любых средств без четко определенного письменного разрешения
производителя.
Все названия брендов и продуктов, используемые в данном документе являются
торговыми марками или зарегистрированными торговыми марками
соответствующих держателей..
A. Instalacja jednego HDD 2.5"
Wstawić HDD na spód wspornika.
Wstawić HDD na górze wspornika.
Prefácio
Parabéns por ter adquirido este produto! Antes de
utilizá-lo, leia este manual com atenção para que se
familiarize com o produto.
I.
Coloque o HDD na parte superior da armação.
Requerimentos de hardware
Um computador com uma entrada de 3.5" disponível
II. Funções:
• Suporta dois HDDs 2.5"
• Serve como suporte para entradas de 3.5"
B. Instalacja drugiego HDD 2.5"
Antes de utilizar este produto, verifique se o conteúdo da
embalagem confere com o descrito abaixo. Se não, contacte
o seu revendedor imediatamente.
B. Instale o segundo HDD 2.5"
III. Conteúdo da embalagem
• Um kit de montagem para dois HDDs de 2.5"
• Um saco de parafusos
• Um manual de instruções
C. Jeśli możliwe dodać wentylator chłodzący 80mm
na zestawie mocowania. (nie zawarty w pakiecie).
Zastrzeżenia
Informacje zawarte w niniejszym dokumencie podlegają zmianom bez ostrzeżenia. Producent
nie składa żadnych oświadczeń ani gwarancji w odniesieniu treści tego podręcznika
Informacja zawarta w tym podręczniku jest dostarczana dla ogólnego użytku klienta. Żadna
część tego dokumentu nie może być kopiowana zmieniana ani przesyłana, w jakikolwiek
sposób bez wyrażonej pisemnie zgody producenta.
Wszystkie nazwy marek i produktów wymienione w tym dokumencie są znakami firmowymi
lub rejestrowanymi znakami firmowymi należącymi do odpowiednich właścicieli.
IV. Instalação do hardware
1. Insira o HDD de 2.5" na armação e afixe-o com
os parafusos.
2. Desligue o computador, retire os painéis laterais
e encaixe a armação na entrada de 3.5"
3. Afixe a armação com os parafusos.
4. Conecte o HDD corretamente, reinstale os painéis
e conecte o cabo de alimentação.
5. Ligue o computador e o HDD funcionará.
C. É possível incluir um ventilador de 80mm no
kit de montagem. (não fornecido com o produto).
A. Instale um HDD 2.5"
Coloque o HDD na parte inferior da armação.
Aviso Legal
Toda a informação contida neste documento está sujeita a alterações sem aviso prévio.
O fabricante não assume representações ou quaisquer garantias em relação aos Conteúdos
deste manual. A informação contida neste é fornecida para uso geral pelos consumidores.
Nenhuma parte deste documento pode ser reproduzida ou transmitida por qualquer forma,
sem primeiro haver autorização escrita do fabricante.
Todos os nomes de marcas e produtos usados neste documento são marcas registadas pelos
seus respectivos titulares.
Önsöz
Ürünümüzü satın aldığınız için tebrik ederiz! Ürünü
kullanmadan önce, ürünü daha iyi tanımak için lütfen bu
kılavuzu dikkatlice okuyun.
I.
Desteğin üstünde HDD’yi ayarlayın.
Donanım Gereksinimi
Boş 3.5" yuvaya sahip bir bilgisayar
II. Özellikler:
• Çift HDD 2.5" desteği
• Kasanın bir 3.5" yuvası için uygulama
Ürünü kullanmadan önce, lütfen pakette verilenlerin
aşağıdakiler ile uyumlu olduğunu kontrol edin. Eğer değilse,
lütfen yerel bayiniz ile zamanında temasa geçiniz.
B. İkinci 2.5" HDD’yi kurma
III. Paket içindekiler
• Çift 2.5" HDD için bir HDD Montaj Kiti
• Bir vida torbası
• Bir Kullanım Kılavuzu
IV. Donanım Kurulumu
1. 2.5 HDD’yi desteğe doğru yerleştirin ve ardından
HDD’yi vidalar ile monte edin.
2. Bilgisayarın gücünü kapatın, panelleri iki taraftan
çıkarın ve desteği 3.5" yuvasına yerleştirin.
3. Desteği vidaları kullanarak monte edin.
4. HDD’yi doğru bağlayın, kasanın yan panellerini
takın ve ardından güç kablosunu bağlayın.
5. Bilgisayarı açın, ardından HDD çalışacaktır.
C. 80 mm’lik soğutma fanını montaj kitine bağlama.
(Pakette bulunmamaktadır).
A. Bir 2.5" HDD kurmak
Desteğin altındaki HDD’yi ayarlayın.
Feragat beyanı
Bu belgedeki tüm bilgiler önceden haber verilmeden değiştirilebilir. Üretici firma bu
elkitabının içeriği ile ilgili herhangi bir temsilde bulunmamakta ya da garanti vermemektedir.
Bu elkitabında yer alan bilgiler müşterilerin genel kullanımlarına yöneliktir. Bu belgenin hiçbir
kısmı üretici firmadan önceden yazılı izin alınmadan çoğaltılamaz veya herhangi bir formata
dönüştürülemez.
Bu belgede kullanılan tüm marka isimleri ve ürün isimleri ilgili sahiplerinin ticari markaları ya
da tescilli ticari markalarıdır.