1
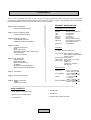
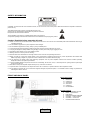
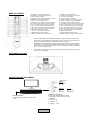
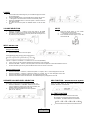
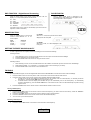
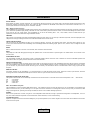
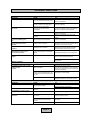
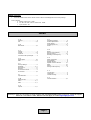
SoundStage 5.1 TX101 CONTENTS Thank you for purchasing the Logic3 TX101. As with all Logic3 products the TX101 has been built to the highest manufacturing standards and testing throughout its development to ensure you get the best possible product. Please read through and familiarise yourself with this manual before you use the product. PRODUCT SPECIFICATION Page 2 ..PACK CONTENTS PRODUCT SPECIFICATION Front Panel Controls & Functions Standby: Input: LED: Volume +: Volume -: Remote: FM Radio: Page 3...SAFETY INSTRUCTIONS FRONT AND BACK PANEL Page 4 ..REMOTE CONTROL POSITIONING THE UNIT CONNECTION SETUP EXAMPLE Side Panel: Page 5...POWER VOLUME SELECTION MUTE INPUT SELECTION SPEAKER VOLUME LEVEL SELECTION SRS FUNCTION 5.1 TEST FUNCTION Standby Power Selection Input Selection LED Display Volume Up Volume Down Remote Control Sensor View frequency scanning and storage locations On/Off Switch Description 5.1 Surround System (All in one) Key Features: Dolby Digital 5.1 Decoder SRS – Sound Retrieval System Remote Control Power Supply: 240V / 50Hz Total Power: 50W + 20W (x 5) = 150W Audio Inputs: Optical x 2 Coaxial x 2 Analogue (L & R RCA) FM Antenna Page 6...DSP FUNCTION DOLBY DIGITAL MODE FUNCTION BEST SOUND QUALITY FM RADIO STORING AN FM FREQUENCY RECALLING AN FM FREQUENCY Speaker Drivers Subwoofer: 5.25” x 2 (50w RMS) 20Hz ~ 200 Hz + 2dB Front (FR&FL): 3” x 2 (20w RMS x 2) 200Hz ~ 20KHz + 2dB Centre: 2” x 2 (20w RMS) 1” Tweeter 200Hz ~ 20KHz + 2dB Surround (SR&SL) 2” x 8 (20w RMS x 2) 200Hz ~ 20KHz + 2dB Page 7…GLOSSARY Page 8…TROUBLE SHOOTING Page 9…RESET FUNCTION INDEX CONTACT DETAILS PACK CONTENTS SoundStage 5.1 Speaker System Optical Cable Remote Control & AA Batteries FM Antenna Coaxial Cable Wall Mounting brackets & Fixings Page 2 SAFETY INFORMATION CAUTION: To reduce the risk of fire and electric shock, do not remove the cover of this product. Refer all maintenance requests to authorized personnel only. This lighting flash arrow symbol in a triangle alerts users to the presence of non-insulated high voltage within the product's enclosure that presents an electrical shock hazard. The exclamation point symbol in a triangle alerts users to the presence of important operating and maintenance instructions in the literature accompanying this product. Caution: Read this before operating this unit. Caution: To reduce the risk of electric shock, do not remove the cover. There are no user-serviceable parts inside. Please refer servicing to a qualified personnel. Do not install the equipment in a place exposed to direct sunlight. Do not install the equipment in a dusty, damp or poorly ventilated place. To prevent damage to the equipment, please unplug from the mains power outlet when not in use. To unplug the equipment, always detach using the plug. Do NOT pull out the plug by tugging the cord. Avoid placing other objects on top of the speaker system. Cleaning care: Use a soft, dry cloth for cleaning. Follow all instructions and adhere to warnings marked on the unit and in the operating instructions. Always use with the correct line voltage. Refer to the manufacturer’s operating instructions for power requirements. Be advised that different operating voltages may require the use of a different line cord and/or attachment plug. Do not install the unit directly above heat producing equipment such as power amplifiers. Observe the maximum ambient operating temperature listed in the product specification. To ensure reliable operation and prevent the unit from overheating, do not block, cover, or insert objects into openings. Never spill a liquid of any kind on the unit. Never attach audio power amplifier outputs directly to any of the unit’s connectors. To prevent shock or fire hazard, do not expose the unit to rain or moisture, or operate it where it will be exposed to water. Do not attempt to operate the unit if it has been dropped, damaged, exposed to liquids, or if it exhibits a distinct change in performance indicating the need for service. FRONT AND BACK PANEL Back Panel Inputs 8. 9. 10. 11. 12. 13. 14. OPTICAL 1 OPTICAL 2 COAXIAL 2 AUX RIGHT AUX LEFT COAXIAL 1 FM ANTENNA Front & Controls 1. 2. 3. 4. 5. 6. 7. Page 3 ON/OFF STANDBY SWITCH INPUT : Input Selection LED Display REMOTE CONTROL SENSOR VOLUME - : Volume DOWN VOLUME + : Volume UP POWER ON/OFF SWITCH REMOTE CONTROL 1. STANDBY: Power Standby Button. 2. COAXIAL1/2: Coaxial Input Selection. 3. FM: FM Selection Button. 4. STEREO: Stereo or Mono FM Radio Selection. 5. MEMORY: Station Memory Button. 6. TU-CH : Preset Channel Down. 7. CENTER-: Center Volume Level Down Button 8. SW-: Subwoofer Volume Level Down Button 9. FR-: Front Right Volume Level Down Button. 10. FL-: Front Left Volume Level Down Button. 11. RR-: Rear Right Volume Level Down Button. 12. RL-: Rear Left Volume Level Down Button. 13. SRS: Sound Retrieval System. 14. TEST: 5.1 Test Sequencer Button. 15. MODE: Mode Selection Button. 16. MAIN VOLUME-: Main Volume Down. 1. 17. RESET: Location Retrieval. 18. OPTICAL1/2: Optical Input Selection. 19. AUX: AUX Input Select. 20. AUTO: Reception Selection. 21. SCAN : Frequency Tuning Down Button. 22. SCAN : Frequency Tuning Up Button. 23. TU-CH : Preset Channel Up Button. 24. CENTER+: Center Volume Level Up Button. 25. SW+: Subwoofer Volume Level Up Button. 26. FR+: Front Right Volume Level Up Button. 27. FL+: Front Left Volume Level Up Button. 28. RR+: Rear Right Volume Level Up Button. 29. RL+: Rear Left Volume Level Up Button. 30. MUTE: Mute Button. 31. DSP: Digital Sound Processing 32. MAIN VOLUME+: Main Volume Up Button. Insert 2 x AAA batteries into the battery compartment at the back of the remote control. Please ensure that the batteries are inserted correctly. If they are inserted incorrectly, it may cause personal injury as well as damage to the remote control. WARNING: Do not mix batteries of different types and capacities in the remote control. Do not drop or cause unnecessary shocks to the batteries. Do not dispose of batteries in fire as they can rupture or leak. Please remove the batteries from the compartment when not in use for long periods. 2. The remote control has a 7 metre operating range at a 30 degree angle left or right away from the SoundStage. POSTIONING THE UNIT CONNECTION SET-UP EXAMPLE Connect to e.g. Optical DVD Player PlayStation3 Sky + HD Auxiliary Television iPod MP3 Player Coaxial Video Player DVD DVD Recorder Audio Input Connections Connect your external devices to either of the following inputs on the back of the SoundStage Optical 1 or 2 Coaxial 1 or 2 Auxiliary – L & R Power Connection Connect the Power Cable to your AC Mains socket Page 4 POWER 1. 2. 3. 4. 5. Connect the Power Cable Plug into your AC Mains Supply and switch it to the ON position. Press the POWER switch on the left side panel to switch the unit ON “-” will appear on the front LCD to indicate it is in Standby mode. Press the STANDBY button on the front panel or remote control to enter Normal mode. To switch the unit OFF press the POWER switch on the left side panel. VOLUME SELECTION 1. 2. MUTE Press the VOLUME + - buttons on the front panel or the MAIN VOLUME+ - buttons on the remote control to adjust the volume level. The volume level will appear on the front panel LCD and ranges from 00 (minimum) to 63 (maximum). 1. 2. 3. Press the MUTE button on the remote control to turn the volume OFF ‘---‘ will appear on the front panel LCD Press the MUTE button again to turn the volume back ON INPUT SELECTION Using the front display 1. Press the INPUT button on the front panel. Press the INPUT button to select which input mode you require according to your setup. The input sequence is as following: Optical 1 Optical 2 Coaxial 1 Coaxial 2 Aux 87.50 (FM Radio) a. b. c. If ‘OP1’ is shown on the LCD this indicates that the Optical 1 input is selected. Press the VOLUME + - buttons on the front panel or remote control to adjust the volume level between 00 63. To select the next input source, press the INPUT button until it is shown on the LCD. Using the remote control a. b. c. d. Press the OPTICAL 1 / 2 buttons, to select the Optical 1 or 2 inputs, ‘OP1’ or ‘OP2’ will appear on the LCD. Press the COAXIAL 1 / 2 buttons, to select the Coaxial 1 or 2 inputs, ‘CO1’ or ‘CO2’ will appear on the LCD. Press the AUX button to select the Aux input. ‘AU’ will appear on the LCD. Press the ‘FM’ button to select the FM Tuner. The selected frequency will appear on the LCD. SPEAKER VOLUME LEVEL SELECTION SRS FUNCTION – Sound Retrieval System The speaker volume levels can be individually controlled. e.g.. 1. Press the ‘CENTER+’ or ‘CENTER-’ buttons on the remote control to adjust the volume level of the center speaker, the speaker volume level will appear on the LCD. 2. The same procedure applies for the other speakers (SW, FR, FL, RR, RL). Press the ‘SRS’ button on the remote control, to switch between ‘SRS-OFF’ and ‘SRS-ON’ 5.1 TEST FUNCTION Page 5 1. Press the ‘TEST’ button on the remote control, this will play a tone through each channel to test the speakers, the testing sequence is as follows: 2. Press the ‘TEST’ button again to stop the test. DSP FUNCTION – Digital Sound Processing DOLBY DIGITAL Press the ‘DSP’ button on the remote control, the front LCD will display ‘H-1’. The preset equalizers are as follows: When a Dolby Digital source is detected by the SoundStage the Dolby Digital logo will appear on the bottom right side of the front panel H-1 : LIVE H-2 : HALL H-3 : THEATER H-4 : CHORUS H-5 : MATRIX (nb: DSP function is only active for the Auxiliary input and not for the Optical or Coaxial connections ) MODE FUNCTION 5.1 mode Press the ‘MODE’ button on the remote control to select between ‘5.1’ or ‘2.1’ sound outputs. When in ‘5.1’ mode, the input and volume will be displayed on the front panel Input Optical – Coaxial – Auxiliary – 2.1 mode Supports 5.1 or 2.1 5.1 or 2.1 2.1 only When in 2.1 mode, ‘2.1’ will be displayed on the front panel GETTING THE BEST SOUND QUALITY In order to get the best sound quality from the SoundStage, we recommend the following: Listening to Music. 1. 2. 3. When listening to music, connect your audio device to the Aux inputs on the back of the SoundStage. Press the AUX button on the remote control. Press the MODE button and choose 2.1 using the remote control Watching a Movie 1. 2. 3. When watching a movie, connect the external device to the COAXIAL or OPTICAL inputs on the back of the SoundStage. Select either COAXIAL 1 / 2 or OPTICAL 1 / 2 using the remote control according to your setup. Press the MODE button on the remote control and choose 5.1 FM RADIO For the best possible FM signal, connect the supplied FM Aerial into the FM ANTENNA connection at the back of the SoundStage. 1. 2. Press the ‘INPUT’ button on the front panel or ‘FM’ on the remote control to select the FM radio function. Press the ‘AUTO’ button on the remote control to select between STEP and SCAN modes. a. If ‘STEP’ shows on the front display this indicates that you can manually scan for an FM frequency. To manually choose an FM frequency, press the SCAN buttons on the remote control. b. If ‘SCAN’ shows on the front display this indicates that you can automatically scan for an FM frequency. To automatically choose an FM frequency, press the SCAN buttons on the remote control. The scan will automatically stop when a strong signal is found. 3. Press the STEREO button on the remote control to switch between stereo and mono sound Storing a FM frequency 1. 2. 3. 4. Press the SCAN buttons on the remote control to select the frequency you wish to store into the memory. Press the ‘MEMORY’ button on the remote control. Press the ‘TU-CH’ buttons on the remote control to select a memory storage location. Press the ‘MEMORY’ button on the remote control to store the selected frequency. You can store up to 20 FM frequencies. Recalling a FM frequency 5. Press the ‘TU-CH ’ buttons on the remote control to recall a stored frequency Page 6 GLOSSARY DOLBY DIGITAL Dolby Digital can deliver surround sound with up to five discrete full-range channels: Left, Center, Right, Left Surround, Right Surround-plus a sixth channel for powerful low-frequency effects. As it needs only about one-tenth the bandwidth of the others, the LFE channel is referred to as a ".1" channel (and sometimes erroneously as the "subwoofer" channel). DSP – Digital Sound Processing The SoundStage also incorporates a Digital Sound processor which manages the crossover technology between the drivers & sub woofer, and allows you to select the equalization (EQ) setting. The DSP can even match human perceived loudness curves, so that the SoundStage can deliver a fuller sound even at very low volume levels. The SoundStage can be set to the following EQ’s - Live, Hall, Theater, Chorus or Matrix this lets you experience movies at home with all the original dramatic sounds. FM RADIO The inclusion of an FM Radio is another integrated feature that this system offers. You can store up to 20 FM Frequencies, which are displayed on the LED panel. Scanning and storage functions can all be administered via the remote control. FRONT AND BACK PANEL The Front panel of the SoundStage will allow you to control the following: unit on/off, input selection and volume. The back panel is where you can connect your external devices to the SoundStage. The SoundStage features the following inputs: Optical 1 & 2, Coaxial 1 & 2, Aux Right & Left, FM Antenna. MONO Mono is where the audio is in the form of one channel, often centered in the sound field. MUTE Temporarily turns all audio being played through the speakers OFF unit the mute button is pressed again. The ‘MUTE’ button can be found on the remote control. POSITIONING THE UNIT The SoundStage provides the same effect as that of individual speakers placed around the room. No Need for numerous individual speakers and cables as this all in one system produces the same surround sound effect. PRODUCT SPECIFICATION This all in one unit truly makes connectivity simple and is ready for use straight out the box. The SoundStage does away with the need for complicated wiring and installation and has been designed for ease of use. The SoundStage features 2 optical, 2 coaxial and an analogue RCA input to connect your TV, DVD or any other external device with this type of connectivity. The FM Antenna which is included allows users to enjoy crystal clear FM reception. REMOTE CONTROL Convenient operation of the SoundStage 5.1 is assured thanks to its multi-functional remote control. Adjust the volume, input selection, FM radio scanning and control all the desired sound options from the comfort of your armchair at the touch of a button. SPEAKER VOLUME LEVEL SELECTION The speaker volume levels can be individually controlled. Use the remote control to control the volume form these speakers : SW FR – Front Right FL – Front Left RR – Rear Right, RL – Rear Left – Sub Woofer, SRS – Sound Retrieval System The SoundStage 5.1 also incorporates SRS 3D technology - this widens the area of sound so that the music is not concentrated in one small area and makes it sound more as if you were listening to it in an open environment. Furthermore it is designed to lift the sound up near your head level, SRS brings out the higher end, providing more clarity and detail, as well as a more realistic listening experience. STEREO Stereo is the reproduction of sound, using two or more independent audio channels, through a symmetrical configuration of loudspeakers, in such a way as to create a effective impression of sound heard from various directions, as in its natural hearing. VOLUME SELECTION Adjust the complete volume level of the SoundStage to your personal preference, the volume ranges from 00 to 63 and can be altered via the remote control or the front panel. Page 7 TROUBLE SHOOTING SOUND / POWER PROBLEM The SoundStage does not turn ON CAUSE The AC power supply cable is not firmly connected to the AC wall outlet. The SoundStage is not switched to the ‘ON’ position on the Side panel No sound. Incorrect input or output cable connections to the back of the SoundStage The sound is set to mute The correct input source has not been selected. The sound suddenly goes Off. No sound from the centre Speaker No sound from the surround speakers Dolby Digital or DTS sources cannot be played back. The sound may be set to MUTE The volume level of the centre speaker is set to minimum. The volume level of the individual speakers is set to minimum. The connected component is not set to output Dolby Digital or DTS digital signals. LCD on front panel does not appear. FIX Connect the AC power supply cable firmly to the AC wall outlet. Press the ON/OFF switch on the side panel of the SoundStage Connect the cables properly. If the problem persists, the cables may be defective. Press MUTE or VOLUME +/– on the remote control or front panel Select an appropriate input source with INPUT button on the front panel or remote control Press MUTE or VOLUME +/– on the remote control or front panel Raise the level of the centre speakers using the button on the remote control. Raise the level of the individual speakers using the button on the remote control. Make an appropriate setting following the operating instructions for your component. Connect the Power Cable properly. Check the unit is switched ON from the side panel switch REMOTE CONTROL PROBLEM The remote control does not work and/or function properly. CAUSE Remote is being used at the wrong distance or angle. FIX Reposition the remote control The remote control has a 7 metre operating range at a 30 degree angle left or right away from the SoundStage Direct sunlight or lighting (from an inverter type of fluorescent lamp, etc.) is striking the remote control sensor of this unit. Reposition the SoundStage The batteries are weak. Replace all batteries in the remote control FM TUNER PROBLEM FM stereo reception is noisy. CAUSE The characteristics of FM broadcasts may cause this problem FIX Check the antenna connection or positioning Use the manual tuning method. There is an interference in the reception Adjust the antenna position The FM station cannot be tuned using the automatic tuning method. The signal is too weak. Use the manual tuning method. Preset stations can no longer be tuned into. This unit has been disconnected for a long period. Preset the stations again. FM Reception is distorted The FM station has not be saved correctly The remote control is not functioning Page 8 Please refer to the frequency save method on page 6 Replace all batteries in remote control RESET FUNCTION 1. Press the ‘RESET’ button on the remote control to set the SoundStage back to the factory settings. Factory Settings a. Master Volume level : ‘10dB’ b. RL / RR / CE / SW / FR / FL volume level : ‘00dB’ c. Input selection ‘ AU’ INDEX B Back Panel…………………...…….3, 7 P Packaging Contents………………..…..2 Product Specification……………..…2, 7 Power Supply………………………..….2 Positioning the unit….............….......4, 7 Power……………………………..…..…5 A Antenna…………………………….....6 Aux…………………………….……3, 5 R Reset………………………………..…...9 Remote Control Battery……….…….…4 Remote Control……………………...4, 7 Recalling a FM Frequency…………….6 C Caution………………………………..3 Coaxial…………………………..…3, 5 Contents……………………..………..2 Connection Set-Up Example….…….4 S Safety Information…………..………….3 Sound Quality……………..……….…...6 Speaker Drivers……………………..….2 Speaker Volume selection……...…. 5, 7 SRS……………………...……………5, 7 Stereo…………………….…......……6, 7 Storing a FM Frequency….……….......6 D Dolby Digital.……………………… 6,7 DSP…………………………….......6, 7 F Factory Settings………………..…....9 FM Radio…………….………..…..6, 7 FM Antenna………………………….6 FM Scan………………….….…........6 Front Panel Controls……………......3 Front Panel…………………………3,7 T Test Function……………………...……5 Total Power…………………..…………2 Trouble Shooting………………..……...8 I Input Selection………………….……5 V Volume Selection………………...….5, 7 M Mode Function…………….…….......6 Mono…………………………........6, 7 Mute………………………..….......5, 7 O Optical……………………………..3, 5 Should you have any connection or setup problems with the Logic3 TX101 please contact our Technical Support Hotline on +44 01923 471 000– National call rates apply or E-mail [email protected] Page 9