1
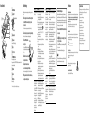
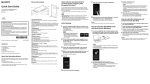
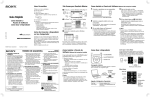
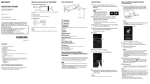
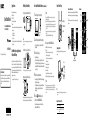
Quick Start Guide How to Install the Bundled Software How to Use the Player NWZ-E363/E364 ©2011 Sony Corporation Printed in China About the manuals In addition to this Quick Start Guide, this model is accompanied by the User Guide (HTML document) which you can view from the WALKMAN Guide. For details, refer to “How to Install the Bundled Software (User Guide included).” Supplied Items Three Ways to Transfer Music How to Install the Bundled Software (User Guide included) Please check the items in the package. Headphones (1) USB cable (1) Quick Start Guide (this manual) Software The software is stored in the built-in flash memory of the player, and includes the following items: Content Transfer WALKMAN Guide User Guide, etc. For details on how to install, refer to “How to Install the Bundled Software (User Guide included)”. From CDs, etc., using Windows Media Player 1 Connect the player to your computer. About Windows Operating System and Windows Media Player From iTunes* , etc., using Content Transfer Make sure that the OS is Windows XP (Service Pack 3 or later), Windows Vista*1 (Service Pack 1 or later) or Windows 7*1, and the installed Windows Media Player version on your computer is 11 (Windows XP/Windows Vista) or 12 (Windows 7). For details about usage or support on Windows Media Player, refer to Windows Media Player information from the following web site: http://support.microsoft.com/ *1 [Compatibility mode] for Windows XP is not supported. USB cable (supplied) Note You cannot transfer contents with copyright protection since the player does not support them. 1 *1 Content Transfer supports data transfer from iTunes 9.0 to the player. By drag-and-drop using Windows Explorer For details on transferring music, videos, photos or podcasts, refer to the User Guide. The User Guide can be readily viewed from the WALKMAN Guide. 2 Select the following order with the computer. Select [start] - [My Computer] or [Computer] - [WALKMAN] [Storage Media]. 3 Double-click [Setup.exe]. The install wizard appears. When you execute [Setup.exe], the [Setup.exe] file stored in the [Storage Media] folder of the player are copied to your computer for backup, and WALKMAN Guide and Content Transfer are installed to your computer. 4 Follow the on-screen instructions. After executing [Setup.exe], the WALKMAN Guide shortcut appears on the desktop of your computer. With the player connected to your computer, when installation of bundled software is completed, Content Transfer starts automatically. 5 Double-click (WALKMAN Guide) on the desktop to start the WALKMAN Guide. For details on transferring music, etc., refer to the User Guide included in the WALKMAN Guide. How to Use the Player How to use the Home menu Hint You can start the WALKMAN Guide and Content Transfer from the [start] menu (displayed by clicking [start]). If you delete the [Setup.exe] file in the player by formatting the built-in flash memory of the player, copy this data from the [Backup] folder on the computer to your player. Then connecting the player to the computer to be installed, follow the above procedure from step 1 to install. The backup data is preserved in the following [C] drive on your computer by the default install setting. C:\Program Files\Sony\WALKMAN Guide\NWZ-E360\Backup BACK/HOME button Home menu The Home menu appears when you press and hold the BACK/HOME button. The Home menu is the starting point to play audio, search for songs, changing settings, etc. From the Home menu, you can select the desired item on the screen by using the 5way button. Photos 5-way button Music Confirm. Charging the Battery The player’s battery is recharged while the player is connected to a running computer. Return to the previous screen. Charging About 2 hours Charging... Fully-charged Hint After executing [Setup.exe] you can use the free space in the [Storage Media] folder more effectively by formatting the built-in flash memory of the player. To format the built-in flash memory of the player, see “To initialize (format) the player” on the backside. Shuffle All OPTION/PWR OFF button What can you do with the WALKMAN Guide ? The WALKMAN Guide includes the following items: User Guide The following contents can be viewed in your web browser. Details on how to use the player How to use software to transfer content to the player Troubleshooting Customer Registration Link Customer Support Link Other useful Links Includes link information, etc., on the download site. The bundled items differ depending on the country/region of purchase. FM Radio Note To prevent battery deterioration, charge the battery at least once every half a year or every year. Turning the Player On and Off To turn on Press any button. To turn off Press and hold the OPTION/PWR OFF button. Settings Clock Display Videos Now Playing Playlists Parts and Controls BACK/HOME button 5-way button*1 (play/pause/confirm) button / buttons / buttons Headphone jack USB connector Connect the USB cable (supplied). Display VOL +*1/– button OPTION/PWR OFF button Press to display the option menu. If you press and hold the OPTION/PWR OFF button, the screen turns off and the player enters standby mode. HOLD switch Strap hole RESET button Use a small pin, etc. *1 There are tactile dots. Use them to help with button operations. Troubleshooting If the player does not function as expected, try the following steps to resolve the issue. 1 Find the symptoms of the issue in “Troubleshooting” in the User Guide (HTML document), and try any corrective actions listed. For details on connecting to a computer, see the tables on the right. 2 Connect the player to your computer to charge the battery. You may be able to resolve some issues by charging the battery. 3 Press the RESET button with a small pin, etc. RESET button If you press the RESET button while operating the player, stored data and player settings may be lost. 4 Check information on the issue in the Help of each software. 5 Look up information on the issue on one of the customer support Web sites. About the customer support Web sites, see “For the latest information”. 6 If the approaches listed above fail to resolve the issue, consult your nearest Sony dealer. Symptom Cause/Remedy The player cannot charge The USB cable is not connected to a USB connector the battery. on your computer properly. Disconnect the USB cable, and then reconnect it. Use the supplied USB cable. The battery is charged in an ambient temperature out of the range of 5 °C (41 ºF) to 35 °C (95 ºF). icon You cannot charge the battery when appears. Charge the battery in an ambient temperature of 5 °C (41 ºF) to 35 °C (95 ºF). The computer is not on. Turn on the computer. Your computer has entered Sleep or Hibernation status. Release the computer from Sleep or Hibernation status. A USB hub is being used. Connecting the player via a USB hub may not work. Connect the player to your computer using the USB cable (supplied). The operating system installed on the computer is not supported by the player. To charge the player, connect the player to a computer with the operating system that is supported by the player. You have not used the player for more than a year. Depending on the conditions under which your player is used, the battery may have been deteriorated. Consult your nearest Sony dealer. [Connected USB. The The remaining battery power is insufficient. Timer and Alarm will Charge the battery by connecting the player to a become invalid.] or running computer for at least 5 minutes. [Connected USB (MTP) The USB cable is not connected to a USB connector The Timer and Alarm on your computer properly. will become invalid.] Disconnect the USB cable, and then reconnect it. does not appear when Use the supplied USB cable. connected to the A USB hub is being used. computer with the USB Connecting the player via a USB hub may not cable (supplied) (The work. Connect the player directly to your computer computer does not using the USB cable (supplied). recognize the player). (Continued) Symptom [Connected USB. The Timer and Alarm will become invalid.] or [Connected USB (MTP) The Timer and Alarm will become invalid.] does not appear when connected to the computer with the USB cable (supplied) (The computer does not recognize the player). The player becomes unstable while it is connected to the computer. When double-clicking [Setup.exe] to install the bundled software, [Setup.exe] does not execute, and the Properties window opens. Cause/Remedy The USB connector on your computer may have a problem. Connect the player to another USB connector on your computer. When you use the player for the first time, or when the battery is low, it may take the player about 30 seconds to display the message after connected to a computer. This is not a malfunction. The software authentication may be performed and it may take rather a long time. Wait for a while. The software installation has been failed. Reinstall the software by using the installer. The imported data will remain untouched. The computer is running another software other than the one used for transferring. Disconnect the USB cable, wait a few minutes, and reconnect it. If the problem persists, disconnect the USB cable, restart the computer, and then reconnect the USB cable. [Connected USB. The Timer and Alarm will become invalid.] or [Connected USB (MTP) The Timer and Alarm will become invalid.] may not appear on the player, depending on the software environment that is running on your computer. Activate Windows Media Player, or Windows Explorer. A USB hub or USB extension cable is being used. Connecting the player via a USB hub or extension cable may not work. Connect the player directly to your computer using the USB cable (supplied). Install the bundled software after installing Windows Media Player 11 or 12. For details on Windows Media Player, refer to the following web site: http://support.microsoft.com/ Precautions To initialize (format) the player You can format the built-in flash memory of the player. If the memory is formatted, all files including the User Guide (HTML document) will be erased and all setting values returned to their defaults. Be sure to verify the files stored in memory prior to formatting, and then export any necessary files to the hard disk of your computer or other device beforehand. 1 Press and hold the BACK/HOME button until the Home menu appears. 2 Select [Settings] – [Common Settings] – [Format] – [Yes] – [Yes] in this order. Press the /// button to select the item, and then press the button to confirm. When initialization finishes, [Memory formatted.] appears. Note Do not format the built-in flash memory using Windows Explorer. If you format the built-in flash memory, format it on the player. About the headphones Avoid playing the unit at so loud a volume that extended play might affect your hearing. At a high volume outside sounds may become inaudible. Avoid listening to the unit in situations where hearing must not be impaired, for example, while driving or cycling. As the supplied headphones are of open-air design, sounds go out through the headphones. Remember not to disturb those close to you. Owner’s Record The model and serial numbers are located on the back of the player. Record them in the space provided below. Refer to these numbers in the spaces whenever you call upon your Sony dealer regarding this product. Model No. __________________________ Serial No. __________________________ For users in France When replacing the headphones/earphones, please refer to the model of the headphones/ earphones adapted to your unit that appears below. MDR-E804 At high volume, prolonged listening to the personal audio player can damage the user’s hearing. License and Trademark Notice Refer to the User Guide (HTML document). For the latest information If you have any questions or issues with this product, or would like information on compatible items with this product, visit the following web sites. For customers in the USA: http://www.sony.com/walkmansupport For customers in Canada: http://www.sony.ca/ElectronicsSupport/ For customers in Europe: http://support.sony-europe.com/DNA For customers in Latin America: http://www.sony-latin.com/index.crp For customers in other countries/regions: http://www.sony-asia.com/support For customers who purchased the overseas models: http://www.sony.co.jp/overseas/support/