1
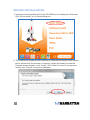
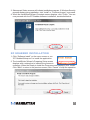
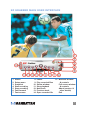
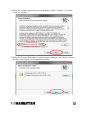
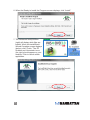
Hi-Speed USB
Audio/Video
Grabber
user
manual
Model 161336
MAN-161336-UM-0111-01
Introduction
Thank you for purchasing the MANHATTAN® Hi-Speed USB Audio/Video Grabber,
Model 161336.
Ideal for sharing favorite video clips or “snapshots” through e-mail or on the Web,
the Hi-Speed USB Audio/Video Grabber records and processes data from your
camcorder, TV or other media device equipped with S-video or RCA outputs: Just
connect the media source to a desktop or notebook computer to capture, convert
and edit content. A single-button control with LED indicators activates a built-in
chip that encodes directly in MPEG 1/2/4 format, and a full version of the
application software is included to help get more professional results with minimal
technical proficiency.
By following the instructions in this user manual — or the simpler setup procedure
in the printed quick install guide included with the product — you’ll soon be enjoying
these popular features:
• Simple, single-button video snapshot and copy-and-pause control
• Plug and Play installation – requires no batteries or external power
• Compact, lightweight design ideal for travel and notebook computers
• Lifetime Warranty (For a complete list of country-specific warranties, go to
www.manhattan-products.com/warranty.)
Package Contents
• Hi-Speed USB Audio/Video Grabber
• RCA extension cable
• Software and driver CD
• Quick install guide
Minimum Recommended System Requirements
• Hi-Speed USB equipped computer with CD-ROM (for software installation)
• 256 MB RAM, 1 GB free HD space, sound card (AC97 compatible), graphics
card (DirectX 9.0c compatible) and Pentium 4 (1 GHz) or above
• Windows XP/Vista/7 operating system
NOTE: Screen images presented in this user manual may have been modified to
fit the format and can vary slightly depending on your operating system, but the
basic installation/operation steps are similar.
2
hardware connections
Using the included RCA extension cable if needed (not depicted in the setup image
below), make the appropriate connection(s) between your computer and the media
source — camcorder, TV or whatever — through the Hi-Speed USB Audio/Video
Grabber.
S-video In
Audio In (L)
Audio In (R)
Video In
1. If the device has been connected properly, the Found New Hardware Wizard
welcome screen displays (below). Click “Cancel.”
3
driver installation
1.Insert the enclosed software CD in the CD-ROM drive to display the initial menu.
Click “Driver Install” or run Driver\Setup.exe.
2.The InstallShield Wizard’s initial Preparing to Install screen displays with a status
bar to indicate that the process is underway. When the Ready to Install the
Program screen displays, click “Install.” Click “Back” to return to the previous
screen; click “Cancel” to stop the installation.
4
3.Subsequent Status screens will indicate installation progress. If Windows Security
prompts display during installation, click “Install” or “Continue Anyway” to proceed.
4.When the InstallShield Wizard Complete screen displays, click “Finish.” You can
now proceed with the EZ Grabber software installation, as detailed below.
ez grabber installation
1.Click “Software Install” on the menu screen or run
“EZ Grabber\Setup.exe” to install the application.
2.The InstallShield Wizard’s Preparing Setup screen
displays with a status bar to indicate the process is
underway. When the Ready to Install the Program screen displays, click “Install.”
Click “Back” to return to the previous screen; click “Cancel” to stop the operation.
5
3.Subsequent Status screens may display to indicate installation progress. When
the InstallShield Wizard Complete screen displays, click “Finish.”
4.Once the EZ Grabber icon appears on your desktop, you can launch the
application to display the EZ Grabber Main User Interface (shown below).
6
EZ Grabber main user interface
1. Status
2. Setup menu
3. Snapshot
4. Start recording
5. Stop recording
6. Fast forward
7. Fast reverse
8. Pause
9. Play recorded files
10. Status window
11. Stop playback
12. Next track
13. Previous track
14. Open recorded file
5. Minimize window
1
& controls
Full screen window
& controls
About (version &
other details)
Exit
7
VHS to DVD software installation
1.Click “Honestech VHS to DVD” on the menu
screen or run “VHS2DVD\Setup.exe” to
install the editing application.
2.When the Choose Setup Language screen
of the InstallShield Wizard displays, select a
language and click “Next.” Click “Back” to
return to the previous screen; click “Cancel” to stop the installation.
3.When the InstallShield Wizard’s Welcome screen displays, click “Next.”
8
4.When the License Agreement screen displays, select “I accept...” and click
“Next” to continue.
5.When the Choose Destination Location screen displays, click “Next” to direct
the file to the default (recommended) location.
9
6.When the Ready to Install the Program screen displays, click “Install.”
7.The Honestech Setup screen
(right) will display while files are
loaded. When the InstallShield
Wizard Complete screen displays
(below), click “Finish.” The EZ
Grabber and Honestech icons
(far right) should appear on your
desktop. Click to launch either
application.
10
8.Click “Users Guide” on the menu screen.
When the directory displays (below), open the
“HTVideoToDVD” file, then click on “Using the
honestech VHS to DVD 2.5” to display the
various Instructions options. (Sample screen
shows launched application.)
11
9.Click “Utility” on the menu screen if you don’t
already have DirectX 9.0 or higher installed
on your computer. Open the “DirectX” file in
the directory to install it, as it is required in
order to operate the Hi-Speed USB Audio/
Video
Grabber.
specifications
Standards and Certifications
• USB 2.0
• NTSC
• PAL
• FCC
• CE
• RoHS
General
• Video system: NTSC, PAL, SECAM (automatic detection)
• Motion capture formats: DVD, SVCD, VCD, MPEG1/2/4, AVI, WMV, WMA, MP3
• Still image formats: JPEG, BMP
• Resolution: NTSC, 720 x 480 @ 30 fps; PAL, 720 x 576 @ 25 fps
• Inputs: S-video, RCA audio and video
• Chipset: CX 23102
• VHS2DVD software included (full version)
• Windows XP/Vista/7 compatible
• Cables: USB, 1.1 m (44 in.); audio/video, 7 cm (2.7 in.); RCA extension, 1.1 m
(44 in.)
• 10.8 x 3.5 x 1.5 cm (4.25 x 1.4 x 0.6 in.); 70.8 g (2.5 oz.)
12
WASTE ELECTRICAL & ELECTRONIC EQUIPMENT
Disposal of Electric and Electronic Equipment
(applicable in the European Union and other European countries with separate collection systems)
This symbol on the product or its packaging indicates that this product shall not be
treated as household waste. Instead, it should be taken to an applicable collection
point for the recycling of electrical and electronic equipment. By ensuring
this product is disposed of correctly, you will help prevent potential negative
consequences to the environment and human health, which could otherwise
be caused by inappropriate waste handling of this product. If your equipment
contains easily removable batteries or accumulators, dispose of these
separately according to your local requirements. The recycling of materials will
help to conserve natural resources. For more detailed information about recycling
of this product, contact your local city office, your household waste disposal service or
the shop where you purchased this product. In countries outside of the EU: If you wish
to discard this product, contact your local authorities and ask for the correct manner
of disposal.
REGULATORY STATEMENTS
FCC Class B
This equipment has been tested and found to comply with the limits for a Class B
digital device, pursuant to Part 15 of Federal Communications Commission (FCC)
Rules. These limits are designed to provide reasonable protection against harmful
interference in a residential installation. This equipment generates, uses and can
radiate radio frequency energy, and if not installed and used in accordance with the
instructions may cause harmful interference to radio communications. However,
there is no guarantee that interference will not occur in a particular installation. If this
equipment does cause harmful interference to radio or television reception, which
can be determined by turning the equipment off and on, the user is encouraged to
try to correct the interference by one or more of the following measures:
• Reorient or relocate the receiving antenna.
• Increase the separation between the equipment and the receiver.
• Connect the equipment to an outlet on a circuit different from the receiver.
• Consult the dealer or an experienced radio/TV technician for help.
CE / R&TTE
This device complies with the requirements of the R&TTE Directive 1999/5/EC.
WARRANTY INFORMATION
For warranty information, go to www.manhattan-products.com/warranty.
13
Copyright © MANHATTAN