1
OPERATION MANUAL
MODE D’EMPLOI
MANUAL DE MANEJO
MANUAL DE OPERAÇÃO
FRANÇAIS
XV-Z17000
PROJECTOR
PROJECTEUR
PROYECTOR
PROJETOR
ENGLISH
XV-Z17000
ESPAÑOL
PORTUGUÊS
SHARP CORPORATION
Printed in China
Imprimé en Chine
Impreso en China
Impresso na China
TINS-E929WJZZ
11P01-CH-NM
XVZ17000_E_US_Hyo1-4.indd 1
2010/12/17 11:49:48
SPECIAL NOTE FOR USERS IN THE U.K.
The mains lead of this product is fitted with a non-rewireable (moulded) plug incorporating a 10A fuse.
Should the fuse need to be replaced, a BSI or ASTA approved BS 1362 fuse marked or
and of the
same rating as above, which is also indicated on the pin face of the plug, must be used.
Always refit the fuse cover after replacing the fuse. Never use the plug without the fuse cover fitted.
In the unlikely event of the socket outlet in your home not being compatible with the plug supplied, cut
off the mains plug and fit an appropriate type.
DANGER:
The fuse from the cut-off plug should be removed and the cut-off plug destroyed immediately and disposed of in a safe manner.
Under no circumstances should the cut-off plug be inserted elsewhere into a 13A socket outlet, as a
serious electric shock may occur.
To fit an appropriate plug to the mains lead, follow the instructions below:
WARNING:
THIS APPARATUS MUST BE EARTHED.
IMPORTANT:
The wires in this mains lead are coloured in accordance with the following code:
Green-and-yellow : Earth
Blue
: Neutral
Brown
: Live
As the colours of the wires in the mains lead of this apparatus may not correspond with the coloured
markings identifying the terminals in your plug proceed as follows:
• The wire which is coloured green-and-yellow must be connected to the terminal in the plug which is
marked by the letter E or by the safety earth symbol or coloured green or green-and-yellow.
• The wire which is coloured blue must be connected to the terminal which is marked with the letter N
or coloured black.
• The wire which is coloured brown must be connected to the terminal which is marked with the letter L
or coloured red.
IF YOU HAVE ANY DOUBT, CONSULT A QUALIFIED ELECTRICIAN.
XVZ17000_E_US_Hyo1-4.indd 2
2010/12/17 11:49:49
Before using the projector, please read this operation manual carefully.
ENGLISH
Introduction
IMPORTANT
• For your assistance in reporting the loss or theft of
your Projector, please record the Serial Number located on the bottom of the projector and retain this
information.
• Before recycling the packaging, please ensure that
you have checked the contents of the carton thoroughly against the list of “Supplied accessories” on
page 9.
WARNING:
Model No.: XV-Z17000
Serial No.:
High brightness light source. Do not stare into the beam of light, or view directly. Be especially
careful that children do not stare directly into the beam of light.
WARNING: To reduce the risk of fire or electric shock, do not expose this product to rain
or moisture.
See bottom of projector.
CAUTION
RISK OF ELECTRIC SHOCK.
DO NOT REMOVE SCREWS
EXCEPT SPECIFIED USER
SERVICE SCREW.
CAUTION: TO REDUCE THE RISK OF ELECTRIC SHOCK,
DO NOT REMOVE COVER.
NO USER-SERVICEABLE PARTS EXCEPT LAMP UNIT.
REFER SERVICING TO QUALIFIED SERVICE PERSONNEL.
The lightning flash with arrowhead symbol,
within an equilateral triangle, is intended to
alert the user to the presence of uninsulated
“dangerous voltage” within the product’s
enclosure that may be of sufficient magnitude
to constitute a risk or electric shock to
persons.
The exclamation point within a triangle is
intended to alert the user to the presence of
important operating and maintenance (servicing)
instructions in the literature accompanying the
product.
WARNING:
This is a Class A product. In a domestic environment this product may cause radio interference in
which case the user may be required to take adequate measures.
WARNING:
FCC Regulations state that any unauthorized changes or modifications to this equipment not expressly approved by the manufacturer could void the user’s authority to operate this equipment.
U.S.A. ONLY
PRODUCT DISPOSAL
This product utilizes tin-lead solder, and lamp containing a small amount of mercury. Disposal
of these materials may be regulated due to environmental considerations. For disposal or
recycling information, please contact your local authorities, the Electronics Industries Alliance: www.eiae.org, the lamp recycling organization www.lamprecycle.org, or Sharp at
1-800-BE-SHARP.
U.S.A. ONLY
This product contains a CR Coin Lithium Battery which contains Perchlorate Material – special handling may apply,
California residents, See www.dtsc.ca.gov/hazardouswaste/perchlorate/
U.S.A. ONLY
-1
XV-Z17000_E_US.indb 1
2010/12/17 11:16:06
INFORMATION
This equipment has been tested and found to comply with the limits for a Class B digital device, pursuant to Part 15
of the FCC Rules. These limits are designed to provide reasonable protection against harmful interference in a residential installation. This equipment generates, uses, and can radiate radio frequency energy and, if not installed and
used in accordance with the operation manual, may cause harmful interference to radio communications. However,
there is no guarantee that interference will not occur in a particular installation. If this equipment does cause harmful
interference to radio or television reception, which can be determined by turning the equipment off and on, the user
is encouraged to try to correct the interference by one or more of the following measures:
• Reorient or relocate the receiving antenna.
• Increase the separation between the equipment and the receiver.
• Connect the equipment into an outlet on a circuit different from that to which the receiver is connected.
• Consult the dealer or an experienced radio/TV technician for help.
U.S.A. ONLY
Declaration of conformity
SHARP PROJECTOR, MODEL XV-Z17000
This device complies with Part 15 of the FCC rules. Operation is subject to the following conditions: (1) This device
may not cause harmful interference, and (2) this device must accept any interference received, including interference
that may cause undesired operation.
Responsible Party:
SHARP ELECTRONICS CORPORATION
Sharp Plaza, Mahwah, New Jersey 07495-1163
TEL: 1-800-BE-SHARP (1-800-237-4277)
Caution Concerning Lamp Replacement
This projector utilizes a pressurized mercury lamp. A loud sound may indicate lamp failure. Lamp failure can be attributed
to numerous sources such as: excessive shock, improper cooling, surface scratches or deterioration of the lamp due to a
lapse of usage time.
The period of time up to failure largely varies depending on the individual lamp and/or the condition and the frequency of
use. It is important to note that failure can often result in the bulb cracking.
When the lamp replacement indicator and on-screen display icon are illuminated, it is recommended that the lamp be
replaced with a new one immediately, even if the lamp appears to be operating normally.
Should the lamp break, there is also a possibility that glass particles may spread inside of the projector. In such a case, it
is recommended you contact your nearest Sharp Authorized Projector Dealer or Service Center to assure safe operation.
Should the lamp break, the glass particles may spread inside the lamp cage or gas contained in the lamp may be vented
into the room from the exhaust vent. Because the gas in this lamp includes mercury, ventilate the room well if the lamp
breaks and avoid all exposure to the released gas. In case of exposure to the gas, consult a doctor as soon as possible.
Caution
• Do not remove the lamp unit from the projector right after use. The lamp will be very hot and may cause burns or
injury.
• Wait at least one hour after the power cord is disconnected to allow the surface of the lamp unit to fully cool before
removing the lamp unit.
• Do not touch the glass surface of the lamp unit or the inside of the projector.
• Do not loosen other screws except for the lamp unit cover and lamp unit.
• Make sure to reset the lamp timer only when replacing the lamp. If you reset the lamp timer and continue to use
the same lamp, this may cause the lamp to become damaged or explode.
Carefully change the lamp by following the instructions described on pages 62 to 64.
* If you wish, you may have the lamp replaced at your nearest Sharp Authorized Projector Dealer or Service
Center.
* If the new lamp does not light after replacement, take your projector to the nearest Sharp Authorized Projector
Dealer or Service Center for repair.
Authorized representative responsible for the European Union Community Market
SHARP ELECTRONICS (Europe) GmbH
Sonninstraße 3, D-20097 Hamburg
E.U. ONLY
-2
XV-Z17000_E_US.indb 2
2010/12/17 11:16:07
Introduction
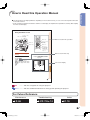
How to Read this Operation Manual
The specifications are slightly different, depending on the model. However, you can connect and operate all models
in the same manner.
• In this operation manual, the illustration and the screen display are simplified for explanation, and may differ slightly
from the actual display.
Using the Menu Screen
MENU utton
Ad ustment uttons
(
//? / _)
Buttons used in this operation
ENTER utton
Ad ustment uttons
(
//? / _)
ENTER utton
RETURN utton
MENU utton
RETURN utton
• Press RETURN
to return to the
previous screen
hen the menu is
displa ed.
Button used in this step
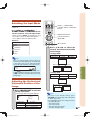
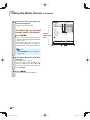
Menu Selections (Adjustments)
• This operation can also e performed
the uttons on the pro ector.
using
1
Press MENU.
2
Press _ or ? to select the menu
screen to adjust on the menu
bar.
• The Picture menu screen for the selected input mode is displa ed.
Example: “Picture” menu screen when
COMPONENT is selected for
input mode
SEL./ADJ.
RETURN
SCR-ADJ
PRJ-ADJ
Standard
0
0
0
0
0
0
0
0
High Brightness
On
Off
Menu bar
On-screen display
Useful Features
Picture
SIG-ADJ
Picture Mode
Contrast
Bright
Color
Tint
Sharp
Red
Blue
CLR Temp
IRIS1 (Manual)
IRIS2 (Auto)
Eco+Quiet
Advanced
Reset
ENTER
END
-35
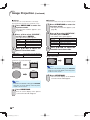
Info
............ Indicates safeguards for using the projector.
Note ............ Indicates additional information for setting up and operating the projector.
For Future Reference
Maintenance
P. 59
Troubleshooting
PP. 72 to 74
Index
P. 78
-3
XV-Z17000_E_US.indb 3
2010/12/17 11:16:07
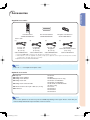
Contents
Preparing
Introduction
How to Read this Operation Manual .............3
Contents ...........................................................4
IMPORTANT SAFEGUARDS............................6
Accessories .....................................................9
Part Names and Functions ...........................10
Using the Remote Control ............................13
Inserting the Batteries.......................................... 13
Usable Range ..................................................... 13
Quick Start
Quick Start .....................................................14
Using
Basic Operation
Turning the Projector On/Off ........................23
Connecting the Power Cord ................................ 23
Turning the Projector On ..................................... 23
Turning the Power Off
(Putting the Projector into Standby Mode) ..... 23
Image Projection ...........................................24
Adjusting the Projected Image ............................. 24
Keystone Correction............................................ 25
Switching the Input Mode.................................... 27
Adjusting the Vertical and Horizontal Position of the Image ... 27
Displaying the Black Screen Temporarily ............. 28
Freezing a Moving Image..................................... 28
Auto Sync (Auto Sync Adjustment) ...................... 28
Selecting the Picture Mode ................................. 28
Displaying an Enlarged Portion of an Image ......... 29
Switching the Iris Setting ..................................... 29
Hiding the Menu Temporarily (Menu Hide) ........... 29
Switching the Eco+Quiet Mode ........................... 29
Resize Mode ....................................................... 30
Useful Features
Menu Bar Items .............................................32
Using the Menu Screen.................................35
Menu Selections (Adjustments) ........................... 35
Picture Adjustment (“Picture” Menu) ..........37
Selecting the Picture Mode ................................. 37
Adjusting the Image ............................................ 37
Switching the Iris Setting ..................................... 38
Eco+Quiet ........................................................... 38
Using the Advanced ............................................ 38
Correcting Gradation of Video (Gamma Correction) ... 38
Adjusting the Colors ............................................ 38
Adjusting the Bright Boost................................... 40
Selecting the Film Mode ...................................... 40
Setting Detail Enhancement ................................ 40
Reducing Image Noise (DNR) .............................. 40
Mosquito Noise Reduction (MNR) ....................... 40
Resetting All Adjustment Items ............................ 40
Computer Image Adjustment (“SIG-ADJ” Menu)...41
Adjusting the Computer Image ............................ 41
Setup
Setting Up the Projector ...............................16
Setting Up the Projector ...................................... 16
Standard Setup (Front Projection) ........................ 16
Projection (PRJ) Mode......................................... 17
Ceiling-mount Setup ........................................... 17
Screen Size and Projection Distance ................... 18
Connections
Samples of Cables for Connection ..............19
Connecting to Video Equipment ..................20
Connecting to a Computer ...........................21
Controlling the Projector by a Computer ....22
Setting the Resolution ......................................... 41
Auto Sync (Auto Sync Adjustment) ...................... 41
Signal Type Setting .............................................. 41
Setting the Video System .................................... 42
Setting the Video Setup....................................... 42
Adjusting the Dynamic Range ............................. 42
Signal Info ........................................................... 42
Adjusting the Projected Image (“SCR-ADJ” Menu) ...43
Setting the Resize Mode ..................................... 43
Adjusting the Image Position ............................... 43
Adjusting the Overscan ....................................... 43
Auto V-Keystone Correction ................................ 44
Keystone Mode Correction .................................. 44
Setting On-screen Display ................................... 45
Setting the Brightness of the Menu Screen.......... 45
Selecting the Background Image ......................... 45
Selecting the Menu Screen Position .................... 45
Reversing/Inverting Projected Images .................. 45
Selecting the On-screen Display Language ......... 45
Adjusting the Projector Function (“PRJ-ADJ” Menu) ...46
Setting Auto Power Off Mode .............................. 46
Setting the Power Save Mode (Economy Mode) ... 46
Setting One Touch Play, System Standby
and Input Name ............................................ 46
Setting the Demo Mode ....................................... 47
Selecting the Transmission Speed (RS-232C) ...... 47
Fan Mode Setting ................................................ 47
Returning to the Default Settings ......................... 47
Lamp Timer (Life) ................................................ 47
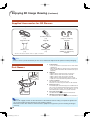
Enjoying 3D Image Viewing……………….… 48
Precautions on using 3D Glasses ........................ 48
Precautions on viewing 3D images ...................... 48
Supplied Accessories for 3D Glasses .................. 50
Part Names ......................................................... 50
Before Using the 3D Glasses ............................... 51
Replacing the Button Cell Battery ........................ 51
Attaching the Nose Pad ...................................... 52
Attaching the 3D Glasses Band ........................... 52
Using the 3D Glasses .......................................... 52
Usage Range of the 3D Glasses .......................... 52
Viewing 3D Images ............................................. 53
3D Settings (“3D MENU”) .................................... 55
Setting the 3D Format Menu ............................... 56
Specifications – 3D Glasses ................................ 58
-4
XV-Z17000_E_US.indb 4
2010/12/17 11:16:07
Maintenance ..................................................59
Maintenance Indicators ................................60
Regarding the Lamp ......................................62
Lamp .................................................................. 62
Caution Concerning the Lamp............................. 62
Replacing the Lamp ............................................ 62
Removing and Installing the Lamp Unit................ 63
Resetting the Lamp Timer ................................... 64
Introduction
Reference
Appendix
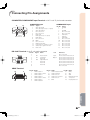
Connecting Pin Assignments .......................65
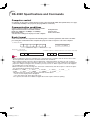
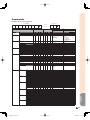
RS-232C Specifications and Commands ....66
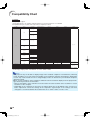
Compatibility Chart .......................................70
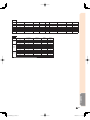
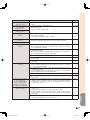
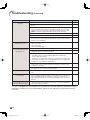
Troubleshooting .............................................72
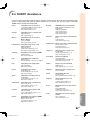
For SHARP Assistance..................................75
Specifications ................................................76
Dimensions ....................................................77
Index ...............................................................78
• DLP® and the DLP logo are registered trademarks of Texas Instruments.
• Microsoft® and Windows® are registered trademarks of Microsoft Corporation in the United States and/or other
countries.
• PC/AT is a registered trademark of International Business Machines Corporation in the United States.
• Macintosh® is a registered trademark of Apple Computer, Inc. in the United States and/or other countries.
• HDMI, the HDMI logo and High-Definition Multimedia Interface are trademarks or registered trademarks of
HDMI Licensing LLC.
• All other company or product names are trademarks or registered trademarks of their respective companies.
• Some IC chips in this product include confidential and/or trade secret property belonging to Texas Instruments. Therefore you may not copy, modify, adapt, translate, distribute, reverse engineer, reverse assemble or
discompile the contents thereof.
-5
XV-Z17000_E_US.indb 5
2010/12/17 11:16:08
IMPORTANT SAFEGUARDS
CAUTION: Please read all of these instructions before you operate this product and save these
instructions for later use.
Electrical energy can perform many useful functions. This product has been engineered and manufactured to assure your personal safety. BUT IMPROPER USE CAN RESULT IN POTENTIAL ELECTRICAL SHOCK OR FIRE
HAZARDS. In order not to defeat the safeguards incorporated in this product, observe the following basic rules for
its installation, use and servicing.
1. Read Instructions
All the safety and operating instructions should be read before
the product is operated.
2. Retain Instructions
The safety and operating instructions should be retained for
future reference.
3. Heed Warnings
All warnings on the product and in the operating instructions
should be adhered to.
4. Follow Instructions
All operating and use instructions should be followed.
5. Cleaning
Unplug this product from the wall outlet before cleaning. Do
not use liquid cleaners or aerosol cleaners. Use a damp cloth
for cleaning.
6. Attachments
Do not use attachments not recommended by the product
manufacturer as they may cause hazards.
7. Water and Moisture
Do not use this product near water–for example, near a bath
tub, wash bowl, kitchen sink, or laundry tub; in a wet basement;
or near a swimming pool; and the like.
8. Accessories
Do not place this product on an unstable cart, stand, tripod,
bracket, or table. The product may fall, causing serious injury
to a child or adult, and serious damage to the product. Use
only with a cart, stand, tripod, bracket, or table recommended
by the manufacturer, or sold with the product. Any mounting
of the product should follow the manufacturer’s instructions,
and should use a mounting accessory recommended by the
manufacturer.
9. Transportation
A product and cart combination should
be moved with care. Quick stops, excessive force, and uneven surfaces may
cause the product and cart combination
to overturn.
10. Ventilation
Slots and openings in the cabinet are provided for ventilation
to ensure reliable operation of the product and to protect it
from overheating, and these openings must not be blocked
or covered. The openings should never be blocked by placing
the product on a bed, sofa, rug, or other similar surface. This
product should not be placed in a built-in installation such as
a bookcase or rack unless proper ventilation is provided or the
manufacturer’s instructions have been adhered to.
11. Power Sources
This product should be operated only from the type of power
source indicated on the marking label. If you are not sure of
the type of power supply to your home, consult your product
dealer or local power company. For products intended to
operate from battery power, or other sources, refer to the
operating instructions.
12. Grounding or Polarization
This product is provided with one of the following types of plugs.
If the plug should fail to fit into the power outlet,
please contact your electrician.
Do not defeat the safety purpose of the plug.
a. Two-wire type (mains) plug.
b. Three-wire grounding type (mains) plug with a
grounding terminal.
This plug will only fit into a grounding type power
outlet.
13. Power-Cord Protection
Power-supply cords should be routed so that they are not likely
to be walked on or pinched by items placed upon or against
them, paying particular attention to cords at plugs, convenience
receptacles, and the point where they exit from the product.
14. Lightning
For added protection for this product during a lightning storm, or
when it is left unattended and unused for long periods of time,
unplug it from the wall outlet and disconnect the cable system.
This will prevent damage to the product due to lightning and
power-line surges.
15. Overloading
Do not overload wall outlets, extension cords, or integral
convenience receptacles as this can result in a risk of fire or
electric shock.
16. Object and Liquid Entry
Never push objects of any kind into this product through
openings as they may touch dangerous voltage points or
short-out parts that could result in a fire or electric shock. Never
spill liquid of any kind on the product.
17. Servicing
Do not attempt to service this product yourself as opening or
removing covers may expose you to dangerous voltage or other
hazards. Refer all servicing to qualified service personnel.
18. Damage Requiring Service
Unplug this product from the wall outlet and refer servicing to
qualified service personnel under the following conditions:
a. When the power-supply cord or plug is damaged.
b. If liquid has been spilled, or objects have fallen into the
product.
c. If the product has been exposed to rain or water.
d. If the product does not operate normally by following the
operating instructions. Adjust only those controls that are
covered by the operating instructions, as an improper
adjustment of other controls may result in damage and
will often require extensive work by a qualified technician
to restore the product to normal operation.
e. If the product has been dropped or damaged in any
way.
f. When the product exhibits a distinct change in
performance, this indicates a need for service.
19. Replacement Parts
When replacement parts are required, be sure the service
technician has used replace ment parts specified by the
manufacturer or have the same characteristics as the original
part. Unauthorized substitutions may result in fire, electric shock,
or other hazards.
20. Safety Check
Upon completion of any service or repairs to this product, ask
the service technician to perform safety checks to determine
that the product is in proper operating condition.
21. Wall or Ceiling Mounting
This product should be mounted to a wall or ceiling only as
recommended by the manufacturer.
22. Heat
This product should be situated away from heat sources such
as radiators, heat registers, stoves, or other products (including
amplifiers) that produce heat.
-6
XV-Z17000_E_US.indb 6
2010/12/17 11:16:08
Caution concerning the lamp unit
Potential hazard of glass particles
if lamp ruptures. In case of lamp
rupture, contact your nearest Sharp
Authorized Projector Dealer or Service
Center for replacement.
See “Regarding the Lamp” on page
62.
Caution concerning the setup of the projector
For minimal servicing and to maintain high image quality,
SHARP recommends that this projector be installed in
an area free from humidity, dust and cigarette smoke.
When the projector is subjected to these environments,
the vents and lens must be cleaned more often. As
long as the projector is regularly cleaned, use in these
environments will not reduce the overall operation life of
the unit. Internal cleaning should only be performed by
a Sharp Authorized Projector Dealer or Service Center.
Do not set up the projector in places exposed to
direct sunlight or bright light.
Position the screen so that it is not in direct sunlight or
room light. Light falling directly on the screen washes out
the colors, making viewing difficult. Close the curtains
and dim the lights when setting up the screen in a sunny
or bright room.
Caution regarding placing of the projector
Place the projector on a level site within the adjustment
range (9 degrees) of the adjustment foot.
After the projector is purchased, a faint smell from the
vent may appear when the power is first turned on. This
is normal and is not a malfunction. It will disappear after
the projector is used for a while.
When using the projector in high-altitude areas
such as mountains (at altitudes of approximately 4,900 feet (1,500 meters) or more)
When you use the projector in high-altitude areas with
thin air, set “Fan Mode” to “High”. Neglecting this can
affect the longevity of the optical system.
Use the projector at altitudes of 7,500 feet (2,300 meters)
or less.
Introduction
Observe the following safeguards when setting up your projector.
Warning about placing the projector in a high
position
When placing the projector in a high position, make certain it is carefully secure to avoid personal injury caused
by the projector falling down.
Do not subject the projector to hard impact
and/or vibration.
Protect the lens so as not to hit or damage the surface
of the lens.
Rest your eyes occasionally.
Continuously watching the screen for long hours will
cause eye strain. Take regular breaks to rest your eyes.
Avoid locations with extremes of temperature.
The operating temperature of the projector is from 41°F
to 95°F (+5°C to +35°C).
The storage temperature of the projector is from –4°F
to 140°F (–20°C to +60°C).
Do not block the exhaust and intake vents.
Allow at least 1113/16 inches (30 cm) of space between
the exhaust vent and the nearest wall or obstruction.
Ensure that the intake vent and the exhaust vent are not
obstructed.
If the cooling fan becomes obstructed, a protection
circuit will automatically put the projector into standby
mode to prevent overheat damage. This does not indicate a malfunction. (See page 60.) Remove the projector
power cord from the wall outlet and wait at least 10 minutes. Place the projector where the intake and exhaust
vents are not blocked, plug the power cord back in and
turn on the projector. This will return the projector to the
normal operating condition.
Caution regarding usage of the projector
If you are not to use the projector for a long time or
before moving the projector, make certain you unplug
the power cord from the wall outlet, and disconnect any
other cables connected to it.
Do not carry the projector by holding the lens.
When storing the projector, ensure that you close the
lens shutter.
Do not expose the projector to direct sunlight or place
next to heat sources. Doing so may affect the cabinet
color or cause deformation of the plastic cover.
-7
XV-Z17000_E_US.indb 7
2010/12/17 11:16:08
Other connected equipment
When connecting a computer or other audio-visual
equipment to the projector, make the connections
AFTER unplugging the power cord of the projector
from the AC outlet and turning off the equipment to be
connected.
Please read the operation manuals of the projector and
the equipment to be connected for instructions on how
to make the connections.
Using the projector in other countries
The power supply voltage and the shape of the plug may
vary depending on the region or country you are using the
projector in. When using the projector overseas, make
sure you use an appropriate power cord for the country
you are in.
Temperature monitor function
If the temperature inside the projector increases, due
to blockage of the air vents, or the setting location,
the temperature warning indicator will blink. And if the
temperature keeps on rising, “
” will illuminate in
the lower left corner of the picture with the temperature
warning indicator blinking. If this state continues, the
lamp will turn off, the cooling fan will run and then the
projector will enter standby mode. Refer to “Maintenance
Indicators” on pages 60 and 61 for details.
Info
• The cooling fan regulates the internal temperature,
and its performance is automatically controlled.
The sound of the fan may change during projector
operation due to changes in the fan speed. This
does not indicate malfunction.
Observe the following safeguards when using the 3D Glasses.
Prevention of accidental ingestion
Using the 3D Glasses
Keep the batteries and band accessory out of the
reach of small children. Small children can accidentally
swallow these parts.
– If a child accidentally swallows any of these parts,
seek immediate medical attention.
Do not disassemble or modify the 3D Glasses.
Parents/guardians should monitor children’s viewing habits to avoid their prolonged use without rest
periods.
Use only the 3D Glasses recommended for this product.
Use the 3D Glasses only for the specified purpose.
Do not move around while wearing the 3D Glasses. The
surrounding area appears dark, which may result in
falling or other accidents that may cause injury.
Caution for lithium battery
Caring for the 3D Glasses
Do not disassemble
Batteries must not be exposed to excessive heat such
as direct sunlight or fire.
Replace only with the same or equivalent type of battery.
The battery may explode if improperly replaced.
Take care not to reverse the battery poles (+ and –)
when loading the battery. Follow the correct procedure
when loading the battery. (See page 51.) Loading the
battery incorrectly may damage the battery or cause it
to leak battery fluid, which could result in a fire, injury or
damage.
Handling the 3D Glasses
Do not drop, exert pressure on, or step on the 3D
Glasses. Doing so may damage the glass section, which
may result in injury.
Be careful not to trap your finger in the hinge section of
the 3D Glasses. Doing so may result in injury.
– Pay special attention when children are using this
product.
Use only the cloth provided with the 3D Glasses to clean
the lenses. Remove dust and soil from the cloth. Any
dust or other soiling on the cloth may result in scratches
on the product. Do not use solvents such as benzene
or thinners as doing so may cause the coating to peel
off.
When cleaning the 3D Glasses, take care not to allow
water or other fluids to come into contact with the
glasses.
Always store the 3D Glasses in the case provided when
not in use.
When storing the 3D Glasses, avoid very humid or hot
locations.
Viewing 3D images
If you experience dizziness, nausea, or other discomfort
while viewing 3D images, discontinue use and rest your
eyes.
Do not use the 3D Glasses if they are cracked or broken.
-8
XV-Z17000_E_US.indb 8
2010/12/17 11:16:08
Introduction
Accessories
Supplied accessories
Remote control
<RRMCGA929WJSA>
Two AA size batteries
<UBATUA020WJZZ>
Two pairs of 3D Glasses*1
<KOPTLA002WJN1>
Power cord*2
(1)
(2)
For U.S. and
Canada, etc.
(6' (1.8 m))
<QACCDA007WJPZ>
For Europe,
except U.K.
(6' (1.8 m))
<QACCVA011WJPZ>
(3)
(4)
For U.K. and
Singapore
(6' (1.8 m))
<QACCBA036WJPZ>
For Australia,
New Zealand and Oceania
(6' (1.8 m))
<QACCLA018WJPZ>
*1 See pages 50 to 52 for details of the 3D Glasses and their accessories.
*2 Which power cords are supplied along with your projector depends on the region. Use the power cord that
corresponds to the wall outlet in your country.
• Operation manual <TINS-E929WJZZ>
Note
• Codes in “< >” are Replacement parts codes.
Optional accessories
Lamp unit
Ceiling-mount adaptor
Ceiling-mount bracket
Ceiling-mount unit
Ceiling-mount extension tube
3 RCA to mini D-sub 15 pin cable (10' (3.0 m))
3D Glasses
AN-K15LP
AN-60KT
AN-XRCM30 (for U.S.A. only)
AN-TK201 <for AN-60KT>
AN-TK202 <for AN-60KT>
AN-EP101B <for AN-XRCM30>
(for U.S.A. only)
AN-C3CP2
AN-3DG10-S
AN-3DG10-R
AN-3DG10-A
Note
• Some of the optional accessories may not be available depending on the region. Please check with your
nearest Sharp Authorized Projector Dealer or Service Center.
-9
XV-Z17000_E_US.indb 9
2010/12/17 11:16:09
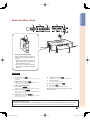
Part Names and Functions
Numbers in
refer to the main pages in this operation manual where the topic is explained.
Projector
10 11
12 13
14 15
16 17
18 19
20
1
2
3
4
5
6
7 8 9
Front View
1 Exhaust vent 59
2 Zoom ring 15, 24
For enlarging/reducing the picture.
3 Focus ring 15, 24
For adjusting the focus.
4 Lens shutter 23, 28, 63
5 IR (infrared) emitter 52
Emits an infrared signal when 3D images are
projected.
6
7
8
9
Adjustment foot 15, 24
Remote control sensor 13
HEIGHT ADJUST lever 24
Intake vent 59
21
Top View
10
11
12
13
Temperature warning indicator 60
14
3D MENU button 53
For displaying the 3D MENU screen.
15
PICTURE MODE button 28
For selecting the appropriate picture.
16
ENTER button 35
For setting items selected or adjusted on the menu.
17
INPUT buttons (P/R) 27
For switching input mode.
18
RESIZE button 30
For switching the picture size (NORMAL, 16:9, etc.).
19
MENU button 35
For displaying adjustment and setting screens.
Lamp indicator 23, 60
Power indicator 23, 60
STANDBY/ON button 14, 23
For turning the power on and putting the projector into
standby mode.
20 RETURN button 35
For returning to the previous menu screen during menu
operations.
21 Adjustment buttons (P/R/O/Q) 35
For selecting menu items.
-10
XV-Z17000_E_US.indb 10
2010/12/17 11:16:10
Introduction
Projector (Rear View)
1
2
3
4
5
6
11
7
89
10
Using the Carrying Handle
When transporting the projector,
carry it by the carrying handle on
the side.
• Always close the lens shutter to
prevent damage to the lens when
transporting the projector.
• Do not lift or carry the projector
by the lens as this may damage
the lens.
Terminals
1 RS-232C terminal 22
Terminal for controlling the projector using a
computer.
2 COMPONENT terminals 19
Terminal for connecting video equipment with
component output terminal.
3 COMPUTER/COMPONENT
input terminal 19, 21
Terminal for computer RGB and YPbPr signals.
4 HDMI1, 2 terminals 19, 20
Terminal for connecting video equipment with
HDMI output terminal.
6 VIDEO input terminal 19
Terminal for connecting video equipment.
7 Carrying handle
For carrying the projector.
8 Remote control sensor 13
9 AC socket 23
Connect the supplied power cord.
10 Kensington Security Standard connector
11 Security bar
5 S-VIDEO input terminal 19, 20
Terminal for connecting video equipment with
an S-video terminal.
Using the Kensington Lock
• This projector has a Kensington Security Standard connector for use with a Kensington MicroSaver Security System.
Refer to the information that came with the system for instructions on how to use it to secure the projector.
-11
XV-Z17000_E_US.indb 11
2010/12/17 11:16:11
Part Names and Functions (Continued)
Numbers in
refer to the main pages in this operation manual where the topic is explained.
1 ON button 14, 23
Remote Control
For turning the power on.
1
2 STANDBY button 15, 23
2
3 HDMI1, 2, COMPONENT, S-VIDEO, VIDEO,
COMPUTER buttons 15, 27
3
4 FREEZE button 28
For putting the projector into the standby mode.
For switching to the respective input modes.
4
11
12
5
13
6
14
7
15
For freezing images.
5 MAGNIFY buttons 29
For enlarging/reducing part of the image.
6 KEYSTONE button 25
For entering the Keystone mode.
7 Adjustment buttons (P/R/O/Q) 35
For selecting and adjusting menu items.
8 RETURN button 35
For returning to the previous menu screen during menu
operations.
8
16
17
9 INPUT button 27
9
18
10 3D ON/OFF button 53, 54
10
19
20
11 AUTO SYNC button 28
For switching input mode.
For switching between 2D and 3D modes.
For automatically adjusting images when connected to
a computer.
12 PICTURE MODE button 28
For selecting the appropriate picture.
13 IRIS 1, 2 buttons 29
For switching “High Brightness” and “High Contrast”.
14 IMAGE SHIFT button 27
For shifting images horizontally and vertically.
15 ENTER button 35
For setting items selected or adjusted on the menu.
16 MENU HIDE button 29
For temporarily hiding menu screen.
17 MENU button 35
For displaying adjustment and setting screens.
18 RESIZE button 30
For switching the picture size (NORMAL, 16:9, etc.).
19 3D MENU button 53
For displaying the 3D MENU screen.
20 ECO+QUIET button 29
For lowering the noise of the cooling fan and extending
the lamp life.
-12
XV-Z17000_E_US.indb 12
2010/12/17 11:16:11
Introduction
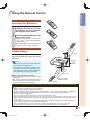
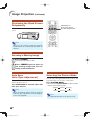
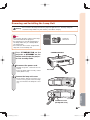
Using the Remote Control
Inserting the Batteries
1
Pull down the tab on the cover
and remove the cover towards
the direction of the arrow.
2
Insert the supplied batteries and
put back the cover.
• Make sure the polarities correctly match
the m and n marks inside the battery
compartment.
• When putting back the cover, be sure that
the cover clicks in place and settles.
30°
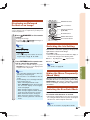
Usable Range
30°
23' (7 m)
The remote control can be used to control
the projector within the ranges shown in the
illustration.
Remote
control
sensors
Note
• Remote control sensor is located on both the
front and rear of the projector.
• The signal from the remote control can be
reflected off a screen for easy operation. However, the effective distance of the signal may
differ depending on the screen material.
When using the remote control:
• Be sure not to drop, expose to moisture or high
temperature.
• The remote control may malfunction under a
fluorescent lamp. In this case, move the projector away from the fluorescent lamp.
30°
30°
23' (7 m)
Remote control
signal transmitter
Remote control
Incorrect use of the batteries may cause them to leak or explode. Please follow the precautions below
Caution
• Danger of explosion if battery is incorrectly replaced.
Replace only with alkaline or manganese batteries.
• Insert the batteries making sure the polarities correctly match the m and n marks inside the battery compartment.
• Batteries of different types have different properties, therefore do not mix batteries of different types.
• Do not mix new and old batteries.
This may shorten the life of new batteries or may cause old batteries to leak.
• Remove the batteries from the remote control once they have run out, as leaving them in can cause them to leak.
Battery fluid from leaked batteries is harmful to skin, therefore ensure you wipe them first and then remove them
using a cloth.
• The batteries included with this projector may run down in a short period, depending on how they are kept. Be
sure to replace them as soon as possible with new batteries.
• Remove the batteries from the remote control if you will not be using the remote control for a long time.
• Comply with the rules (ordinance) of each local government when disposing of worn-out batteries.
-13
XV-Z17000_E_US.indb 13
2010/12/17 11:16:12
Quick Start
This section provides an example showing how to connect the projector to video equipment that has an HDMI
output terminal with a brief explanation of the steps from connection through to image projection.
For details, see the pages suggested in each step.
3, 7 STANDBY/ON
7 STANDBY button
3 ON button
5 Input Mode
button
Select buttons
6 Zoom ring
5 INPUT button
6 Focus ring
6 Adjustment feet
1. Place the projector facing a screen
Page 16
2. Connect the projector to the video equipment and plug
the power cord into the AC socket of the projector
Pages 19-23
3. Open the lens shutter fully and then turn the projector on
On the projector
2
STANDBY/ON button
Page 23
Press STANDBY/ON on the projector or ON on the
remote control pointing the remote control towards
the projector.
On the remote control
2
1
ON button
-14
XV-Z17000_E_US.indb 14
2010/12/17 11:16:14
4. Turn the video equipment on and start playback
5. Select the input mode
Quick Start
Playback
Page 27
Press HDMI1 on the remote control to select “HDMI1” for the Input mode.
HDMI1
YPbPr
1080P
HDMI1 button
• Press HDMI1, HDMI2, COMPONENT, S-VIDEO, VIDEO and COMPUTER on the remote control to
switch the Input mode.
• Press P or R to select your desired input mode when you press INPUT on the remote control or on the
projector.
6. Adjust the projector angle, focus and zoom
1. The focus is adjusted by
rotating the focus ring.
2. Zooming is adjusted by
rotating the zoom ring.
Focus ring
Page 24
3. The projector angle is
adjusted by using the
adjustment feet.
Zoom ring
Adjustment feet
• When the image is distorted
trapezoidally, the keystone
correction is needed.
(See page 25.)
7. Turn the power off
Page 23
Press STANDBY/ON on the projector or STANDBY on the remote control, then press that button again
while the confirmation message is displayed, to put the projector into standby mode.
On the projector
1
On the remote control
On-screen display
STANDBY/ON button
1
STANDBY
button
2
-15
XV-Z17000_E_US.indb 15
2010/12/17 11:16:14
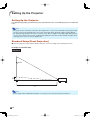
Setting Up the Projector
Setting Up the Projector
For optimal image quality, position the projector perpendicular to the screen with the projector’s feet flat and
level.
Note
• The projector lens should be centered in the middle of the screen. If the horizontal line passing through
the lens center is not perpendicular to the screen, the image will be distorted, making viewing difficult.
• For optimal image, position the screen so that it is not in direct sunlight or room light. Light falling directly
on the screen washes out the colors, making viewing difficult. Close the curtains and dim the lights when
setting up the screen in a sunny or bright room.
Standard Setup (Front Projection)
Place the projector at the required distance from the screen according to the desired picture size.
Example of standard setup
Side View
Screen
H
Lens center
90°
L
Note
• Refer to page 18 for additional information concerning “Screen Size and Projection Distance”.
-16
XV-Z17000_E_US.indb 16
2010/12/17 11:16:15
Projection (PRJ) Mode
The projector can use any of the 4 projection modes, shown in the diagram below. Select the mode most appropriate for the projection setting in use. (You can set the PRJ Mode in “SCR-ADJ” menu. See page 45.)
Ceiling mounted, front projection
Table mounted, front projection
Menu item “Ceiling + Front”
Menu item “Front”
Menu item “Rear”
Setup
Ceiling mounted, rear projection
(with a translucent screen)
Table mounted, rear projection
(with a translucent screen)
Menu item “Ceiling + Rear”
Ceiling-mount Setup
It is recommended that you use the optional Sharp ceiling-mount adaptor and unit for this installation. Before
mounting the projector, contact your nearest Sharp Authorized Projector Dealer or Service Center to obtain
the recommended ceiling-mount adaptor and unit (sold separately).
Indication of the Projection Image Size and Projection Distance
For details, refer to “Screen Size and Projection Distance” on page 18.
Example : When using a wide screen (16:9)
Picture Size
500" (1270 cm)
436
"
(110×245"
7 cm
× 62
200" (508 cm)
100" (254 cm)
80" (203 cm)
40" (102 cm)
3 cm
174
"
(443 ×98"
cm
87"×
× 24
9 cm
(221 49"
)
70"×
cm ×
3
1
9
2
"
5 cm
(1
35"× 77 cm ×
)
100 c
(89 c 20"
m)
m×
5
)
Projection
Distance
(1 1
5. '6
7 "
m
)
(1 4'1
.3 "
m ~
~ 4'9
1 "
8
(2 ' .4
.5 3" m)
m ~
~ 9
10 2. '6"
(3 '4 9
.1 " m
m~ )
~1
20 3 1'1
(6 ' .6 1
.3 7" m "
m ~ )
~ 23
7. '9
2 "
m
)
5
0 cm
)
-17
XV-Z17000_E_US.indb 17
2010/12/17 11:16:16
Setting Up the Projector (Continued)
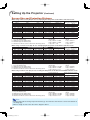
Screen Size and Projection Distance
When using a wide screen (16:9): In case of displaying the 16:9 picture on the whole of the 16:9 screen.
Diag. (x)
500" (1270 cm)
400" (1016 cm)
300" (762 cm)
250" (635 cm)
200" (508 cm)
150" (381 cm)
120" (305 cm)
100" (254 cm)
80" (203 cm)
60" (152 cm)
40" (102 cm)
Picture (Screen) size
Width
436" (1107 cm)
349" (886 cm)
261" (664 cm)
218" (553 cm)
174" (443 cm)
131" (332 cm)
105" (266 cm)
87" (221 cm)
70" (177 cm)
52" (133 cm)
35" (89 cm)
Height
245" (623 cm)
196" (498 cm)
147" (374 cm)
123" (311 cm)
98" (249 cm)
74" (187 cm)
59" (149 cm)
49" (125 cm)
39" (100 cm)
29" (75 cm)
20" (50 cm)
Projection distance [L]
Minimum [L1]
Maximum [L2]
51'6" (15.7 m)
—
41'2" (12.6 m)
47'6" (14.5 m)
30'11" (9.4 m)
35'8" (10.9 m)
25'9" (7.9 m)
29'8" (9.1 m)
20'7" (6.3 m)
23'9" (7.2 m)
15'5" (4.7 m)
17'10" (5.4 m)
12'4" (3.8 m)
14'3" (4.3 m)
10'4" (3.1 m)
11'11" (3.6 m)
8'3" (2.5 m)
9'6" (2.9 m)
6'2" (1.9 m)
7'2" (2.2 m)
4'1" (1.3 m)
4'9" (1.4 m)
x : Picture (Screen) diagonal size: 40" – 500"
L : Projection distance (ft/m)
L1 : Minimum projection distance (ft/m)
L2 : Maximum projection distance (ft/m)
H : Distance from the lens center to the bottom of the image (in/cm)
Distance from the lens center to
the bottom of the image [H]
39 3/8" (100 cm)
31 1/2" (80 cm)
23 5/8" (60 cm)
19 11/16" (50 cm)
15 3/4" (40 cm)
11 13/16" (30 cm)
9 29/64" (24 cm)
7 7/8" (20 cm)
6 19/64" (16 cm)
4 23/32" (12 cm)
3 5/32" (8 cm)
The formula for picture size and projection distance
[Feet/inches]
[m/cm]
L1 (ft) = 0.0314 x / 0.3048
L1 (m) = 0.0314 x
L2 (ft) = 0.0362 x / 0.3048
L2 (m) = 0.0362 x
H (in) = 0.2 x / 2.54
H (cm) = 0.2 x
When using a normal screen (4:3): In case of displaying the 4:3 picture on the whole of the 4:3 screen.
Diag. (x)
400" (1016 cm)
300" (762 cm)
250" (635 cm)
200" (508 cm)
150" (381 cm)
120" (305 cm)
100" (254 cm)
80" (203 cm)
70" (178 cm)
60" (152 cm)
40" (102 cm)
Picture (Screen) size
Width
320" (813 cm)
240" (610 cm)
200" (508 cm)
160" (406 cm)
120" (305 cm)
96" (244 cm)
80" (203 cm)
64" (163 cm)
56" (142 cm)
48" (122 cm)
32" (81 cm)
Height
240" (610 cm)
180" (457 cm)
150" (381 cm)
120" (305 cm)
90" (229 cm)
72" (183 cm)
60" (152 cm)
48" (122 cm)
42" (107 cm)
36" (91 cm)
24" (61 cm)
Projection distance [L]
Minimum [L1]
Maximum [L2]
50'5" (15.4 m)
—
37'10" (11.5 m)
43'7" (13.3 m)
31'6" (9.6 m)
36'4" (11.1 m)
25'3" (7.7 m)
29'1" (8.9 m)
18'11" (5.8 m)
21'10" (6.6 m)
15'2" (4.6 m)
17'5" (5.3 m)
12'7" (3.8 m)
14'6" (4.4 m)
10'1" (3.1 m)
11'8" (3.5 m)
8'10" (2.7 m)
10'2" (3.1 m)
7'7" (2.3 m)
8'9" (2.7 m)
5'1" (1.5 m)
5'10" (1.8 m)
x : Picture (Screen) diagonal size: 40" – 400"
L : Projection distance (ft/m)
L1 : Minimum projection distance (ft/m)
L2 : Maximum projection distance (ft/m)
H : Distance from the lens center to the bottom of the image (in/cm)
Distance from the lens center to
the bottom of the image [H]
38 35/64" (98 cm)
28 29/32" (73 cm)
24 3/32" (61 cm)
19 17/64" (49 cm)
14 29/64" (37 cm)
11 9/16" (29 cm)
9 41/64" (24 cm)
7 45/64" (20 cm)
6 3/4" (17 cm)
5 25/32" (15 cm)
3 55/64" (10 cm)
The formula for picture size and projection distance
[Feet/inches]
[m/cm]
L1 (ft) = 0.03843 x / 0.3048
L1 (m) = 0.03843 x
L2 (ft) = 0.0443 x / 0.3048
L2 (m) = 0.0443 x
H (in) = 0.24477 x / 2.54
H (cm) = 0.24477 x
When using a normal screen (4:3): In case of setting the 16:9 picture to the full horizontal width of the 4:3 screen.
Diag. (x)
500" (1270 cm)
400" (1016 cm)
300" (762 cm)
250" (635 cm)
200" (508 cm)
150" (381 cm)
120" (305 cm)
100" (254 cm)
80" (203 cm)
70" (178 cm)
60" (152 cm)
40" (102 cm)
Screen size
Width
400" (1016 cm)
320" (813 cm)
240" (610 cm)
200" (508 cm)
160" (406 cm)
120" (305 cm)
96" (244 cm)
80" (203 cm)
64" (163 cm)
56" (142 cm)
48" (122 cm)
32" (81 cm)
Height
300" (762 cm)
240" (610 cm)
180" (457 cm)
150" (381 cm)
120" (305 cm)
90" (229 cm)
72" (183 cm)
60" (152 cm)
48" (122 cm)
42" (107 cm)
36" (91 cm)
24" (61 cm)
Projection distance [L]
Minimum [L1]
Maximum [L2]
47'3" (14.4 m)
—
37'10" (11.5 m)
43'7" (13.3 m)
28'4" (8.6 m)
32'8" (10.0 m)
23'8" (7.2 m)
27'3" (8.3 m)
18'11" (5.8 m)
21'10" (6.6 m)
14'2" (4.3 m)
16'4" (5.0 m)
11'4" (3.5 m)
13'1" (4.0 m)
9'5" (2.9 m)
10'11" (3.3 m)
7'7" (2.3 m)
8'9" (2.7 m)
6'7" (2.0 m)
7'8" (2.3 m)
5'8" (1.7 m)
6'6" (2.0 m)
3'9" (1.2 m)
4'4" (1.3 m)
x : Screen diagonal size: 40" – 500"
L : Projection distance (ft/m)
L1 : Minimum projection distance (ft/m)
L2 : Maximum projection distance (ft/m)
H : Distance from the lens center to the bottom of the image (in/cm)
Distance from the lens center to
the bottom of the image [H]
36 9/64" (92 cm)
28 29/32" (73 cm)
21 11/16" (55 cm)
18 1/16" (46 cm)
14 29/64" (37 cm)
10 27/32" (28 cm)
8 43/64" (22 cm)
7 15/64" (18 cm)
5 25/32" (15 cm)
5 1/16" (13 cm)
4 11/32" (11 cm)
2 57/64" (7 cm)
The formula for screen size and projection distance
[Feet/inches]
[m/cm]
L1 (ft) = 0.02882 x / 0.3048
L1 (m) = 0.02882 x
L2 (ft) = 0.03323 x / 0.3048
L2 (m) = 0.03323 x
H (in) = 0.18358 x / 2.54
H (cm) = 0.18358 x
Note
• Refer to page 16 concerning “Projection distance [L]” and “Distance from the lens center to the bottom of
the image [H]”.
• Allow a margin of error in the value in the diagrams above.
-18
XV-Z17000_E_US.indb 18
2010/12/17 11:16:16
Samples of Cables for Connection
• For more details of connection and cables, refer to the operation manual of the connecting equipment.
• You may need other cables or connectors not listed below.
Equipment
Video equipment
Terminal on
connected
equipment
Cable
Terminal on the
projector
HDMI output HDMI cable (commercially available)
terminal
HDMI1, 2
Component Component cable (commercially available)
video output
terminal
COMPONENT
(
3 RCA to mini D-sub 15 pin cable
(optional, AN-C3CP2)
COMPUTER/
COMPONENT
S-VIDEO
(
Video output Video cable (commercially available)
terminal
Camera/Video game
Component
video
output
terminal
Connections
S-video
S-video cable (commercially available)
output terminal
Page 20)
Page 20)
VIDEO
Cables for a camera or a video game/3 RCA to mini COMPUTER/
D-sub 15 pin cable (optional, AN-C3CP2)
COMPONENT
RCA adaptor plug
(commercially available)
Computer
S-video
output
terminal
Cables for a camera or a video game
S-VIDEO
Video
output
terminal
Cables for a camera or a video game
VIDEO
RGB
output
terminal
RGB cable (commercially available)
COMPUTER/
COMPONENT
(
HDMI output HDMI cable (commercially available)
terminal
Page 21)
HDMI1, 2
-19
XV-Z17000_E_US.indb 19
2010/12/17 11:16:17
Connecting to Video Equipment
Before connecting, be sure to unplug the power cord of the projector from the AC outlet and turn off the devices
to be connected. After making all connections, turn on the projector and then the other devices.
Connecting Equipment with HDMI Output Terminal to the HDMI Terminal on the Projector
For video connection, use a cable that conforms to HDMI standards. Using cables that do not conform to HDMI
standards may result in a malfunction.
HDMI-compatible device
To HDMI output terminal
To HDMI1 or 2 terminal
HDMI cable (type A)
(commercially available)
Note
• Depending on specifications of equipment or the DVIÙHDMI digital cable, the signal transmission may
not work property. (The HDMI specification does not support all connections to equipment that has digital
output terminal using a DVIÙHDMI digital cable.)
• HDMI (High-Definition Multimedia Interface) is a digital AV interface that can deliver a high-definition video
signal, multi-channel audio signal, and bi-directional control signal all in just one cable.
• Because it is compatible with the HDCP (High-bandwidth Digital Content Protection) system, the digital
video signal does not degrade when transmitted, and a high-quality image with a simple connection can
be enjoyed.
Connecting to Equipment with S-video Output Terminal
DVD Player, etc.
To S-VIDEO terminal
To S-video output terminal
S-video cable
(commercially available)
Refer to “Samples of Cables for Connection” on page 19 for connecting other equipment.
-20
XV-Z17000_E_US.indb 20
2010/12/17 11:16:19
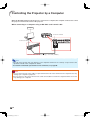
Connecting to a Computer
Ensure that the computer is the last device to be turned on after all the connections are made.
Connecting to a Computer Using the RGB Cable
Computer
To COMPUTER/COMPONENT terminal
To RGB output terminal
RGB cable
(commercially available)
Connections
Note
• Refer to “Compatibility Chart” on page 70 for a list of computer signals compatible with the
projector. Use with computer signals other than those listed may cause some of the functions not to work.
• A Macintosh adaptor may be required for use with some Macintosh computers. Contact your nearest
Macintosh Dealer.
• Depending on the computer you are using, an image may not be projected unless the computer’s
external output port is switched on. (e.g. Press “Fn” and “F5” keys simultaneously when using a
SHARP notebook computer). Refer to the specific instructions in your computer’s operation manual to
enable your computer’s external output port.
-21
XV-Z17000_E_US.indb 21
2010/12/17 11:16:19
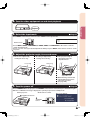
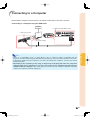
Controlling the Projector by a Computer
When the RS-232C terminal on the projector is connected to a computer, the computer can be used to control
the projector and check the status of the projector.
When connecting to a computer using an RS-232C serial control cable
Computer
To RS-232C terminal
To RS-232C terminal
RS-232C serial control cable (cross type, commercially available)
Note
• The RS-232C function may not operate if your computer terminal is not correctly set up. Refer to the
operation manual of the computer for details.
• For details on RS-232C specifications and commands, see page 66.
Info
• Do not connect the RS-232C cable to a port other than the RS-232C terminal on the computer. This may
damage your computer or projector.
• Do not connect or disconnect an RS-232C serial control cable to or from the computer while it is on. This
may damage your computer.
-22
XV-Z17000_E_US.indb 22
2010/12/17 11:16:20
Turning the Projector On/Off
Connecting the Power Cord
Plug the supplied power cord into the
AC socket on the rear of the projector.
• The power indicator illuminates red, and the
projector enters standby mode.
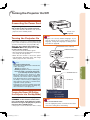
Turning the Projector On
Note that the connections to external equipment and
power outlet should be done before performing the
operations written below. (See pages 20 to 23.)
Power cord
(supplied)
Info
• English is the factory default language. If you
want to change the on-screen display to another
language, change the language according to the
procedure on page 45.
Open the lens shutter fully and press
STANDBY/ON on the projector or ON
on the remote control.
Power indicator
STANDBY/ON button
• The power indicator illuminates green.
• After the lamp indicator illuminates, the projector is ready to start operation.
• When the lens shutter is closed, the power
indicator blinks alternately green and orange
and the projector does not turn on.
Lamp indicator
Note
Basic Operation
• About the Lamp Indicator
The lamp indicator illuminates to indicate the
status of the lamp.
Green: The lamp is on.
Blinking in green: The lamp is warming up.
Red: The lamp is shut down abnormally or the lamp should be replaced.
• When switching on the projector, a slight
flickering of the image may be experienced
within the first minute after the lamp has
been illuminated. This is normal operation as
the lamp's control circuitry is stabilizing the
lamp output characteristics. It should not be
regarded as faulty operation.
• If the projector is put into standby mode and
immediately turned on again, the lamp may
take some time to start projection.
Lens shutter
STANDBY button
ON button
On-screen display
Turning the Power Off (Putting
the Projector into Standby Mode)
Press STANDBY/ON on the projector or
STANDBY on the remote control, then
press that button again while the confirmation message is displayed, to put the
projector into standby mode.
• The projector cannot be turned on while cooling.
Info
• Direct Power Off function:
You can unplug the power cord from the AC outlet
even if the cooling fan is still running.
-23
XV-Z17000_E_US.indb 23
2010/12/17 11:16:20
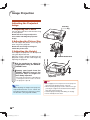
Image Projection
Adjusting the Projected
Image
Zoom ring
Focus ring
1 Adjusting the Focus
You can adjust the focus with the focus ring
on the projector.
Rotate the focus ring to adjust the
focus while watching the projected
image.
2 Adjusting the Picture Size
You can adjust the picture size using the
zoom ring on the projector.
Rotate the zoom ring to enlarge or
shrink the picture size.
3 Adjusting the Height
The height of the projector can be adjusted
using the adjustment feet.
When the screen is above the projector, the
projection image can be made higher by
adjusting the projector.
1
Lift the projector to adjust its
height while lifting the HEIGHT
ADJUST lever.
2
Remove your hands from the
HEIGHT ADJUST lever of the
projector after its height has
been finely adjusted.
• The angle of projection is adjustable up
to 9 degrees from the surface on which
the projector is placed.
Note
• When adjusting the height of the projector,
trapezoidal distortion occurs. Follow the
procedures in Keystone Correction to correct
the distortion. (See pages 25 and 44.)
HEIGHT ADJUST lever
Make small
adjustments.
Info
• Do not apply too much pressure on the projector
when the front adjustment feet come out.
• When lowering the projector, be careful not to get
your fingers caught in the area between the adjustment feet and the projector.
• Hold the projector firmly while lifting or carrying.
• Do not hold by the lens area.
-24
XV-Z17000_E_US.indb 24
2010/12/17 11:16:21
Keystone Correction
This function can correct distortion of an image
projected toward a spherical or cylindrical screen
as well as trapezoidal distortion of an image on a
flat screen and rotate the image at your arbitrary
angle.
KEYSTONE button
Keystone
When the image is projected either from the top or
from the bottom towards the screen at an angle, the
image becomes distorted trapezoidally. The
function for correcting trapezoidal distortion is
called Keystone Correction.
ENTER button
Adjustment buttons
(P/R/O/Q)
RETURN button
Note
• The Keystone Correction can be adjusted up
to an angle of approximately ±40 degrees
with “V-Keystone” and approximately ±30
degrees with “H-Keystone”.
1
O, Q button
For horizontal keystone correction
P, R button
For vertical keystone correction
Press KEYSTONE to enter the
keystone mode.
Keystone Correction
• The keystone mode list appears.
H-Keystone Correction:
KEYSTONE MODE
KEYSTONE
SPHERE
ROTATION
ENTER
Basic Operation
SEL.
END
V-Keystone Correction:
2
Press P/R to select “KEYSTONE”,
and then press ENTER.
• The keystone menu guide appears.
KEYSTONE
H: 0
END
ADJUST
TESTPATTERN
RESET
V: 0
Note
Selectable buttons
Description
ENDKEYSTONE Exits the keystone mode.
ADJUSTP/R/O/Q Adjusts the keystone correction.
TESTPATTERN
ENTER
• To return to the default setting, press RETURN
while the on-screen display of the Keystone
mode is on the screen.
Displays the testpattern.
Info
RESETRETURN Returns to a default setting.
3
Press P/R/O/Q to adjust the
Keystone Correction.
• While adjusting the image using Keystone/
Sphere/Rotation Correction, straight lines
and the edges of the image may appear
jagged.
4
Press KEYSTONE.
• The on-screen display of the Keystone
mode will disappear.
-25
XV-Z17000_E_US.indb 25
2010/12/17 11:16:22
Image Projection (Continued)
Sphere
This function can correct distortion of an image
projected toward a spherical or cylindrical screen.
1
Press KEYSTONE to enter the
keystone mode.
Rotation
This function rotates the image at an arbitrary angle.
1
• The keystone mode list appears. (See
page 25.)
• The keystone mode list appears. (See
page 25.)
2
Press P/R to select “SPHERE”,
and then press ENTER.
2
3
Press P/R to select “ROTATION”,
and then press ENTER.
• The rotation menu guide appears.
• The sphere menu guide appears.
Selectable items
Press KEYSTONE to enter the
keystone mode.
Selectable items
Description
Description
RETURN
Returns to the keystone mode list.
RETURN
Returns to the keystone mode list.
ADJUST
Adjusts the rotation correction.
ADJUST
Adjusts the sphere correction.
TESTPATTERN
Displays the testpattern.
TESTPATTERN
Displays the testpattern.
RESET
Returns to a default setting.
RESET
Returns to a default setting.
Press P/R/O/Q to adjust the
Sphere Correction mode.
P, Q button
R, O button
For correction of concave distortion
For correction of convex distortion
3
Press P/R/O/Q to adjust the
Rotation Correction mode.
P, Q button
R, O button
Rotates the image clockwise.
Rotates the image counterclockwise.
Rotation Correction
Sphere Correction
Correction of Concave Distortion:
Note
Correction of Convex Distortion:
• To return to the default setting, press RETURN
while the on-screen display of the Keystone
mode is on the screen.
4
Press KEYSTONE.
• The on-screen display of the Rotation
Correction mode will disappear.
Note
• To return to the default setting, press RETURN
while the on-screen display of the Keystone
mode is on the screen.
4
Press KEYSTONE.
• The on-screen display of the Sphere
Correction mode will disappear.
-26
XV-Z17000_E_US.indb 26
2010/12/17 11:16:23
Switching the Input Mode
HDMI1, 2, COMPONENT,
S-VIDEO, VIDEO, COMPUTER
buttons
Select the appropriate input mode for the connected
equipment.
Press HDMI1, 2, COMPONENT,
S-VIDEO, VIDEO or COMPUTER on the
remote control to select the input mode.
IMAGE SHIFT button
• When you press INPUT on the projector or on
the remote control, the INPUT list appears.
Press P/R to switch the INPUT mode.
Adjustment buttons
(P/R/O/Q)
INPUT list
INPUT
INPUT button
HDMI1
HDMI2
2
COMPONENT
COMPUTER
S-VIDEO
Press P/R/O/Q to adjust the
vertical and horizontal position
of the image.
H-Image Shift
VIDEO
Selectable items
\ button
| button
H-Image Shift
Leftward
Rightward
Note
• When you switch the INPUT mode, the image as
shown below will be displayed in the upper right
corner of the screen. (You can confirm the selected
input mode and information on the input signal.)
| button
\ button
Basic Operation
HDMI1
YPbPr
1080P
is displayed, “3D” is set to “On”.
• When
is displayed, it means that a 3D image
• If
signal that can be automatically detected is
being input.
Adjusting the Vertical and
Horizontal Position of the
Image
1
V-Image Shift
Selectable items
" button
' button
V-Image Shift
Downward
Upward
" button
' button
Press IMAGE SHIFT to enter the
image shift mode.
• The image shift menu guide appears.
IMAGE SHIFT
END
H: 0
V: 0
ADJUST
RESET
Selectable buttons
Description
ENDIMAGE SHIFT Exits the image shift mode.
ADJUSTP/R/O/Q Adjusts the image shift.
RESETRETURN Returns to a default setting.
XV-Z17000_E_US.indb 27
Note
• To return to the default setting, press
RETURN when the image shift menu guide
is still on the screen.
• The adjustable range of the image shift may
vary depending on:
- the Resize mode
- the Picture mode
- the input signal resolution
- the input 3D signal type
-27
2010/12/17 11:16:24
Image Projection (Continued)
Displaying the Black Screen
Temporarily
FREEZE button
AUTO SYNC button
PICTURE MODE button
Close the lens shutter to temporarily display a black
screen.
Note
• When you close the lens shutter, the projector
will be turned off automatically after about 30
minutes.
Freezing a Moving Image
1
Press FREEZE.
2
Press FREEZE again to return to
the moving image from the currently connected device.
• The projected image is frozen.
Auto Sync
(Auto Sync Adjustment)
Auto Sync function works when detecting input signal
after the projector turns on.
Press AUTO SYNC to manually adjust with
Auto Sync function.
Selecting the Picture Mode
You can select the appropriate picture mode for the
projected image, such as movie or video game.
Press PICTURE MODE.
• When pressing PICTURE MODE, the picture mode
changes in the following order:
Standard
Natural
Dynamic
Game
Movie2
Movie1
Note
• When the optimum image cannot be achieved
with Auto Sync adjustment, use manual adjustments. (See page 41.)
Note
• See page 37 for details on the picture mode.
-28
XV-Z17000_E_US.indb 28
2010/12/17 11:16:25
MAGNIFY buttons
Displaying an Enlarged
Portion of an Image
IRIS 1, 2 buttons
Graphs, tables and other portions of projected images
can be enlarged. This is helpful when providing more
detailed explanations.
1
Adjustment buttons
(P/R/O/Q)
RETURN button
Press
MAGNIFY on the remote
control.
MENU HIDE button
ECO+QUIET button
• Enlarges the image.
• Pressing
or
MAGNIFY enlarges or
reduces the projected image.
Note
×1 ×2
Switching the Iris Setting
.
Press
×3
Press
×4
×9
.
• You can change the location of the enlarged image using P, R, O and Q.
This function controls the quantity of the projected
light and the contrast of the image.
Press IRIS 1 or 2.
• Each time the button is pressed while the display is
on, the mode changes in the following order:
IRIS 1 High Brightness
2
Press RETURN on the remote control to cancel the operation.
Off
Note
• For details, see page 38.
Note
• The selectable magnifications differ depending on the input signal.
• This function is not available for the 3D
mode.
• In the following cases, the image will return
to the normal size (×1).
- When switching the INPUT mode.
- When RETURN has been pressed while
the on-screen display of the magnify
mode is displayed.
- When the input signal is changed.
- When the input signal resolution and refresh rate (vertical frequency) change.
- When the Resize mode is changed.
- When the Picture mode is changed.
- When switching between 2D and 3D
mode.
Hiding the Menu Temporarily
(Menu Hide)
When the menu screen is displayed, you can temporarily hide the menu screen by pressing and holding
MENU HIDE on the remote control. This is useful
when, for example, checking the video adjustment
information.
Basic Operation
• To return to the default setting (×1), press
RETURN when the on-screen display of the
magnify mode is displayed.
IRIS 2 On
High Contrast
Switching the Eco+Quiet Mode
Press ECO+QUIET to switch the
Eco+Quiet mode between on and off.
• When the Eco+Quiet Mode is set to “On”, the sound of
the cooling fan will turn down, the power consumption
will decrease, and the lamp life will extend.
Note
• Refer to “Eco+Quiet” on page 38 for details.
-29
XV-Z17000_E_US.indb 29
2010/12/17 11:16:25
Image Projection (Continued)
RESIZE button
Resize Mode
This function allows you to modify or customize the
resize mode to enhance the input image.
Press RESIZE on the projector or on the
remote control.
Note
• The RESIZE function that can be selected
varies depending on the input signal
(resolution and vertical frequency).
RESIZE button
Resize Mode
RESIZE
Output screen image
NORMAL
The image is displayed with the original aspect ratio.
16:9
An image compressed from a 16:9 aspect ratio to a 4:3 aspect ratio
is restored to a 16:9 aspect ratio and displayed at full-screen.
CINEMA ZOOM
A CinemaScope image or an image with a 16:9 aspect ratio is
displayed at full-screen
-30
XV-Z17000_E_US.indb 30
2010/12/17 11:16:26
RESIZE
Output screen image
ZOOM 14:9
An image with a 14:9 aspect ratio and letterboxing is enlarged while
maintaining the original aspect ratio.
SMART ZOOM
An image with a 4:3 aspect ratio is slightly enlarged.
NATIVE
The image is displayed according to the original input signal.
About Copyrights
• When using the RESIZE function to select an image size with a different aspect ratio to a TV program or
video image, the image will look different from its original appearance. Keep this in mind while choosing an
image size.
• The use of the RESIZE or Overscan function to compress or stretch the image for commercial purposes/public
displays in a café, hotel, etc. may be an infringement of copyright protected by law for copyright holders.
Please use caution.
Basic Operation
-31
XV-Z17000_E_US.indb 31
2010/12/17 11:16:27
Menu Bar Items
The following shows the items that can be set in the projector.
The selectable items vary depending on the selected input, input signals, or adjustment
values. Items that cannot be selected will be grayed out.
“Picture” menu
Main menu
Picture
Page 37
Sub menu
Picture Mode
Page 37
Contrast –30
+30
Bright
–30
+30
Color
–30
+30
Tint
–30
+30
Sharp
–30
+30
Red
–30
+30
Blue
–30
+30
CLR Temp –2
Standard
Natural
Dynamic
Movie1
Movie2
Game
+2
Page 37
IRIS1 (Manual)
Page 38
High Brightness
High Contrast
IRIS2 (Auto)
On
Off
Page 38
Eco+Quiet
Page 38
On
Off
Advanced
Page 38
Gamma
–2
Page 38
Reset
Page 40
C.M.S.1
Page 38
+2
Select Color
Hue
Saturation
Value
Effect
C.M.S.1
Reset
On
Off
Return
C.M.S.2
Page 38
Select Color
Hue
Saturation
Value
Effect
C.M.S.2
On
Off
Reset
Return
Bright Boost
Page 40
On
Off
Film Mode
Page 40
Auto
Off
Detail Enhance
–30
+30
Page 40
DNR
Page 40
MNR
Page 40
Off
Level 1
Level 2
Level 3
-32
XV-Z17000_E_US.indb 32
2010/12/17 11:16:27
“SIG-ADJ” menu
Main menu
SIG-ADJ
Page 41
“SCR-ADJ” menu
Main menu
Sub menu
Clock –150
Page 41
+150
Phase –30
Page 41
+30
H-Pos –150
Page 41
+150
V-Pos –60
Page 41
+60
SCR-ADJ
Page 43
Reset
Resolution
Page 41
Auto Sync
Page 41
On
Off
Signal Type
Page 41
Auto
RGB
YPbPr
Video System
Page 42
Auto
PAL
SECAM
NTSC4.43
NTSC3.58
PAL-M
PAL-N
PAL-60
Video Setup
Page 42
Dynamic Range
Page 42
Signal Info :
Page 42
Sub menu
Resize
Page 43
H-Image Shift –30 +30
Page 43
V-Image Shift –30 +30
Page 43
Overscan
Page 43
Auto V-Keystone
Page 44
Keystone Mode
Page 44
On
Off
Keystone
Sphere
Rotation
0 IRE
7.5 IRE
H-Keystone –60 +60
Page 44
V-Keystone –80 +80
Page 44
Sphere –30 +30
Page 44
Rotation –50 +50
Page 45
OSD Display
Page 45
OSD Brightness
Page 45
Auto
Standard
Enhanced
Background
Page 45
Logo
Blue
None
Menu Position
Page 45
Center
Upper Right
Lower Right
Upper Left
Lower Left
PRJ Mode
Page 45
Front
Ceiling + Front
Rear
Ceiling + Rear
Language
Page 45
English
Deutsch
Español
Nederlands
Français
Italiano
Svenska
Português
On
Off
Standard
Level 1
Level 2
polski
Magyar
Türkçe
Useful Features
-33
XV-Z17000_E_US.indb 33
2010/12/17 11:16:27
Menu Bar Items (Continued)
“PRJ-ADJ” menu
Main menu
PRJ-ADJ
Page 46
“3D MENU”
Main menu
Sub menu
Auto Power Off
Page 46
Economy Mode
Page 46
One Touch Play
Page 46
System Standby
Page 46
On
Off
On
Off
On
Off
On
Off
Input Name
Page 47
Demo Mode
Page 47
On
Off
RS-232C
9600bps
38400bps
115200bps
Page 47
Fan Mode
Page 47
3D MENU
Page 55
Sub menu
3D
Page 55
3D Format
Page 55
On
Off
Auto
Side By Side
Top And Bottom
3D Depth Adjust –15 +15
Page 55
IR Emitter Level
Page 55
Normal
High
3D Auto Change
Yes
No
Page 55
Viewing Time Info
Page 55
Yes
No
Invert
Page 55
Normal
High
All Reset
Page 47
Lamp Timer (Life)
Page 47
-34
XV-Z17000_E_US.indb 34
2010/12/17 11:16:28
Using the Menu Screen
MENU button
Adjustment buttons
('/"/\/|)
ENTER button
Adjustment buttons
('/"/\/|)
ENTER button
RETURN button
MENU button
RETURN button
• Press RETURN
to return to the
previous screen
when the menu is
displayed.
Menu Selections (Adjustments)
• This operation can also be performed by using
the buttons on the projector.
1
Press MENU.
2
Press | or \ to select the menu
screen to adjust on the menu
bar.
• The “Picture” menu screen for the selected input mode is displayed.
Example: “Picture” menu screen when
COMPONENT is selected for
input mode
SEL./ADJ.
RETURN
SCR-ADJ
PRJ-ADJ
Standard
0
0
0
0
0
0
0
0
High Brightness
On
Off
Menu bar
Useful Features
Picture
SIG-ADJ
Picture Mode
Contrast
Bright
Color
Tint
Sharp
Red
Blue
CLR Temp
IRIS1 (Manual)
IRIS2 (Auto)
Eco+Quiet
Advanced
Reset
ENTER
END
-35
XV-Z17000_E_US.indb 35
2010/12/17 11:16:28
Using the Menu Screen (Continued)
3
Press ' or " to select the item
you want to adjust.
(Example: Selecting “Bright”)
To adjust the projected
image while viewing it
Press ENTER.
• The selected adjustment item (e.g.
“Bright”) will be displayed at the bottom
of the screen.
• When ' or " is pressed, the next
item will be displayed. (e.g. “Bright” is
replaced with “Color” by pressing ".)
Singleadjustment
item
Picture
SIG-ADJ
Picture Mode
Contrast
Bright
Color
Tint
Sharp
Red
Blue
CLR Temp
IRIS1 (Manual)
IRIS2 (Auto)
Eco+Quiet
Advanced
Reset
SCR-ADJ
PRJ-ADJ
Standard
0
0
0
0
0
0
0
0
High Brightness
On
Off
SEL./ADJ.
RETURN
Bright
ENTER
END
0
Note
• Press RETURN to return to the previous screen.
4
Press | or \ to adjust the item
selected.
• The adjustment is stored.
• For some menu items, press | to display its submenu and press ' or "
to select an adjustment item, and then
press ENTER.
5
Press MENU.
• The menu screen will disappear.
-36
XV-Z17000_E_US.indb 36
2010/12/17 11:16:29
Picture Adjustment (“Picture” Menu)
Picture
SIG-ADJ
Picture Mode
Contrast
Bright
Color
Tint
Sharp
Red
Blue
CLR Temp
IRIS1 (Manual)
IRIS2 (Auto)
Eco+Quiet
Advanced
Reset
Menu operation ⇒ Page 35
SCR-ADJ
PRJ-ADJ
Standard
0
0
0
0
0
0
0
0
High Brightness
On
Off
IRIS2 (Auto)
Eco+Quiet
Advanced
Gamma
C.M.S.1
C.M.S.2
Bright Boost
Film Mode
Detail Enhance
DNR
MNR
Reset
0
On
Off
Off
Auto
0
Off
Off
SEL./ADJ.
RETURN
SEL./ADJ.
RETURN
ENTER
END
ENTER
END
1 Selecting the Picture Mode
This function allows you to select the picture mode that best suits the room brightness and the type of image being
projected.
Selectable
items
Standard
Natural
Dynamic
Movie1
Description
For standard image
A balanced color image is obtained.
A vivid image is obtained.
For viewing images with the brightness
slightly toned down in a darkened
room
For viewing images with the brightness
slightly boosted in a darkened room
Use this when the audio and image
are not synched or when you want to
create a sharper image.
Movie2
Game
The main default settings of each item when selecting Picture Mode
IRIS1
CLR Temp Bright Boost
IRIS2 (Auto) Eco+Quiet
(Manual)
0
Off
High Brightness
On
Off
0
Off
High Brightness
Off
Off
0
On
High Brightness
Off
Off
-1
Off
High Contrast
Off
On
-1
Off
High Contrast
On
On
0
On
High Brightness
Off
Off
• You can set or adjust each item in the “Picture” menu to your preference. Any changes you make are retained in memory.
Note
• You can also press PICTURE MODE on the remote control to select the picture mode. (See page 28.)
• The default settings are subject to change without notice.
Useful Features
2 Adjusting the Image
Adjustment items
Contrast
Bright
Color
Tint
Sharp
Red
Blue
CLR Temp
\ button
| button
For less contrast.
For more contrast.
For less brightness.
For more brightness.
For less color intensity.
For more color intensity.
For making skin tones purplish.
For making skin tones greenish.
For less sharpness.
For more sharpness.
For making images less reddish.
For making images more reddish.
For making images less bluish.
For making images more bluish.
For making images slightly more reddish For making images slightly more bluish
(slightly warmer colors).
(slightly cooler colors).
-37
XV-Z17000_E_US.indb 37
2010/12/17 11:16:29
Picture Adjustment (“Picture” Menu) (Continued)
Menu operation ⇒ Page 35
3 Switching the Iris Setting
This function controls the quantity of the projected light
and the contrast of the image.
IRIS1 (Manual)
Selectable items
High Brightness
High Contrast
Description
This mode gives priority to brightness
over contrast.
This mode gives priority to contrast
over brightness.
IRIS2 (Auto)
This automatically selects the optimal contrast to match
the image.
Selectable items
On
Off
Description
This mode gives priority to contrast
with the use of auto adjustment.
This mode gives priority to brightness
without the use of auto adjustment.
6 Correcting Gradation of Video (Gamma Correction)
When the darker areas of the image become difficult to
see because of the image or the projection environment,
you can correct the gamma setting to make the image
brighter and easier to see.
Selectable items
+2
+1
0
–1
–2
Provides a brighter gradation.
Standard setting
Provides a darker gradation.
7 Adjusting the Colors
You can select the color of the projected image to correct
and then adjust it to the desired color by setting “Hue”,
“Saturation”, “Value”, and “Effect”.
Note
Note
• You can also use IRIS 1, 2 on the remote control to change the Iris. (See page 29.)
4 Eco+Quiet
Selectable items
On
Off
Description
Brightness and Power consumption
Approx. 75%
100%
Note
• When “Eco+Quiet” is set to “On”, the power
consumption will decrease and the lamp life
will extend. (Projection brightness decreases
approximately 25%.)
• Before performing this adjustment, prepare the
image to be adjusted.
• You can perform this adjustment easier in the
still image than in the moving image.
1
Select “C.M.S.1” or “C.M.S.2”
(C.M.S.: Color Management System) in the “Advanced” menu, and
press ENTER.
• If there is no data for the stored corrected
color, the color selection screen and the
picker is displayed. (Go to step 2.)
Picker
5 Using the Advanced
“Advanced” allows you to make even finer adjustments
to the image so that it appears just the way you want
it to.
To display the Advanced menu, select “Advanced” and
press ENTER.
Note
• When the “Advanced” settings are displayed,
select “Advanced” again and press ENTER to
return to the “Picture” menu.
-38
XV-Z17000_E_US.indb 38
2010/12/17 11:16:30
Menu operation ⇒ Page 35
• If there is data for the stored corrected
color, the C.M.S. color adjustment screen
is displayed. (Go to step 3.)
C.M.S.1
Select Color
Hue
Saturation
Value
Effect
C.M.S.1
Reset
Return
3
Set or adjust each item in the C.M.S.
color adjustment screen.
C.M.S.1
Select Color
Hue
Saturation
Value
Effect
C.M.S.1
Reset
Return
0
0
0
0
On
On
SEL./ADJ.
RETURN
SEL./ADJ.
RETURN
0
0
0
0
ENTER
END
ENTER
END
C.M.S. color adjustment screen:
Selectable items
2
Use the picker and select the color
of the projected image to correct.
The picker can be operated by adjustment buttons (P/R/O/Q) on the
remote control.
• By enlarging the projected image using
or
MAGNIFY, more fine adjustment can
be performed.
Description
Select Color
Starts over the selection of the
color to be corrected.
Hue
Sets the hue of the main colors.
Saturation
Sets the saturation of the main
colors.
Value
Sets the value of the main colors.
Effect*1
Specifies the range of color correction.
C.M.S.1*2
(or C.M.S.2)
Checks the appearance of the
projected image after above
correction.
Reset
Sets “Hue”, “Saturation”, “Value”,
and “Effect” to their default values.
Return
Completes the correction and closes
the C.M.S. color adjustment screen.
Picker
*1 To specify the range of color correction, select
“Effect” and press O or Q button.
O button
Specifies smaller range.
Q button
Specifies larger range.
*2 To check the appearance of the projected image,
select “C.M.S.1” (or “C.M.S.2”) and set to “On”
or “Off”.
After selecting the color of the projected
image to correct, press ENTER. The
C.M.S. color adjustment screen is
displayed. (Go to step 3.)
4
On
The appearance of the projected
image after above color adjustment
reflected can be checked.
Off
The appearance of the projected
image in former color adjustment
can be checked.
Useful Features
• By continuing to press the adjustment
buttons (P/R/O/Q), the picker moves
rapidly.
To complete the C.M.S. color
adjustment, select “Return” and
press ENTER.
Note
• The C.M.S. color adjustment can be made to
one color each in “C.M.S.1” and “C.M.S.2”.
-39
XV-Z17000_E_US.indb 39
2010/12/17 11:16:31
Picture Adjustment (“Picture” Menu) (Continued)
Menu operation ⇒ Page 35
8 Adjusting the Bright Boost
Bright Boost uses Texas Instruments’ Bright Boost
technology. The image becomes brighter while the color
reproduction is kept at a high level.
Selectable items
On
Description
The Bright Boost function is activated.
Off
The Bright Boost function is not activated.
w Mosquito Noise Reduction (MNR)
The so-called Mosquito Noise (flickering) can be
reduced.
Selectable items
Off
Level 1
Level 2
Level 3
Description
MNR does not function.
Sets the MNR level for viewing a clearer picture.
9 Selecting the Film Mode
This function provides high-quality playback of
images originally projected at 24 fps, such as movies
on DVDs.
Selectable items
Auto
Off
Description
Films are detected automatically.
Films are not detected.
0 Setting Detail Enhancement
This function enhances the details in images and,
thereby, creates a greater sense of depth.
\ button
Provides less detail enhancement.
| button
Provides more detail enhancement.
q Reducing Image Noise (DNR)
Note
• Set “MNR” to “Off” in the following cases:
- When the image is blurry.
- When the contours and colors of moving
images drag.
- When TV broadcasts with weak signals are
projected.
• This function is available for the following
signals.
With S-VIDEO or VIDEO input:
- 480I/480P
- 576I/576P
e Resetting All Adjustment Items
To reset all adjustment items to the default settings,
select “Reset” and press ENTER.
Video digital noise reduction (DNR) provides high quality
images with minimal dot crawl and cross color noise.
Selectable items
Off
Level 1
Level 2
Level 3
Description
The DNR function is not activated.
Sets the DNR level for viewing a clearer picture.
Note
• Set “DNR” to “Off” in the following cases:
- When the image is blurry.
- When the contours and colors of moving
images drag.
- When TV broadcasts with weak signals are
projected.
• This function is available for the following
signals.
With S-VIDEO or VIDEO input:
- 480I/480P
- 576I/576P
-40
XV-Z17000_E_US.indb 40
2010/12/17 11:16:32
Computer Image Adjustment (“SIG-ADJ” Menu)
Menu operation ⇒ Page 35
The illustration shown here is for explanation and may
be different from the actual on-screen display.
*1
*2
Picture
SIG-ADJ
Clock
Phase
H-Pos
V-Pos
Reset
Resolution
Auto Sync
Signal Type
Video System
Video Setup
Dynamic Range
SCR-ADJ
0
0
0
0
Signal Info : 1080P
H : XX.X
kHz/
SEL./ADJ.
RETURN
PRJ-ADJ
On
Auto
Auto
0 IRE
Auto
V : XX.X
Note
• Avoid displaying computer patterns which repeat
every other line (horizontal stripes). (Flickering
may occur, making the image hard to see.)
• Information on the currently selected input
signal can be confirmed in item 8 on page 42.
3 Auto Sync (Auto Sync Adjustment)
Hz
Selectable items
On
ENTER
END
*1 If the input mode is S-VIDEO or VIDEO input, the display
changes to the “Video System” screen.
*2 Displayed when the input mode is HDMI input.
Off
1 Adjusting the Computer Image
Use the SIG-ADJ function in case of irregularities such as
vertical stripes or flickering in portions of the screen.
Selectable items
Clock
Phase
H-Pos
V-Pos
Description
Adjusts vertical noise.
Adjusts horizontal noise (similar to
tracking on your VCR).
Centers the on-screen image by
moving it to the left or right.
Centers the on-screen image by
moving it up or down.
Note
2 Setting the Resolution
Note
• Auto Sync adjustment is also performed by
pressing AUTO SYNC on the remote control.
• When setting “Auto Sync” to “Off”, and if
AUTO SYNC is pressed, Auto Sync will be executed in “On” mode. If the button is pressed
again within one minute, Auto Sync will be
executed in “On” mode.
• The Auto Sync adjustment may take some time
to complete, depending on the image of the
computer connected to the projector.
• When the optimum image cannot be achieved with
Auto Sync adjustment, use manual adjustments.
4 Signal Type Setting
When using an input mode of HDMI1, HDMI2, or COMPUTER, set the signal type to the corresponding input
signal type (RGB or YPbPr).
Selectable items
Auto
RGB
YPbPr
Description
Automatically selects the appropriate
input signal between RGB and YPbPr.
Set when RGB signals are received.
Set when YPbPr signals are received.
Useful Features
• You can automatically adjust the computer
image by setting “Auto Sync” in the “SIG-ADJ”
menu to “On”, or pressing AUTO SYNC on the
remote control.
• Depending on the type of input signal, the
adjustment range for each setting may vary or
the adjustment may not be available at all.
• To reset all adjustment items, select “Reset”
and press ENTER.
Description
Auto Sync adjustment will occur when
the projector is turned on or when
the input signals are switched, when
connected to a computer.
Auto Sync adjustment is not
automatically performed.
Ordinarily, the type of input signal is detected and the
correct resolution mode is automatically selected. However, for some signals, the optimal resolution mode in
“Resolution” in the “SIG-ADJ” menu may need to be
selected to match the computer display mode.
-41
XV-Z17000_E_US.indb 41
2010/12/17 11:16:32
Computer Image Adjustment (“SIG-ADJ” Menu) (Continued)
Menu operation ⇒ Page 35
5 Setting the Video System
The video input system mode is factory preset to “Auto”;
however, a clear picture from the connected audio-visual
equipment may not be received, depending on the video
signal difference. In that case, switch the video signal.
Selectable items
Auto
PAL
SECAM
*NTSC4.43
NTSC3.58
PAL-M
PAL-N
PAL-60
* When reproducing NTSC signals in PAL video equipment.
7 Adjusting the Dynamic Range
An optimum picture may not be displayed if an HDMIcapable device’s output signal type and the projector’s
input signal type do not match. If this should occur,
switch “Dynamic Range”.
Selectable items
Auto
Description
In most circumstances, “Auto” should
be selected.
Standard
Enhanced
When the black levels of the image
show banding or appear faded, select
the item that results in the best picture
quality.
8 Signal Info
Input signal information is displayed.
Note
• The video signal can only be set in VIDEO or
S-VIDEO mode.
• When “Video System” is set to “Auto”, you
may not receive a clear picture due to signal
differences. Should this occur, switch to the
video system of the source signal.
6 Setting the Video Setup
Selectable items
0 IRE
7.5 IRE
Description
Sets the black level to 0 IRE.
Sets the black level to 7.5 IRE.
Note
• This function is available for the following
signals.
With COMPONENT or COMPUTER/
COMPONENT input:
- 480I
With S-VIDEO or VIDEO input:
- NTSC3.58
-42
XV-Z17000_E_US.indb 42
2010/12/17 11:16:33
Adjusting the Projected Image (“SCR-ADJ” Menu)
Menu operation ⇒ Page 35
The illustration shown here is for explanation and may
be different from the actual on-screen display.
Picture
SIG-ADJ
Resize
H-Image Shift
V-Image Shift
Overscan
Auto V-Keystone
Keystone Mode
H-Keystone
V-Keystone
Sphere
Rotation
OSD Display
OSD Brightness
Background
Menu Position
PRJ Mode
Language
SCR-ADJ
PRJ-ADJ
Normal
0
0
On
V-Image Shift
Selectable items
V-Image Shift
\ button
ENTER
END
Note
Note
• For details of the Resize mode, see page 30.
• You can also press RESIZE on the remote
control to set the resize mode. (See page 30.)
2 Adjusting the Image Position
• The adjustable range of the image shift may
vary depending on:
- the Resize mode
- the Picture mode
- the input signal resolution
- the input 3D signal type
3 Adjusting the Overscan
This function allows you to adjust the Overscan area
(display area).
Selectable items
You can move the projected image horizontally or vertically.
On
H-Image Shift
Off
\ button
Leftward
| button
On
Standard
Logo
Upper Left
Front
English
1 Setting the Resize Mode
H-Image Shift
| button
Upward
Keystone
0
0
0
0
SEL./ADJ.
RETURN
Selectable items
\ button
Downward
Description
The input area is displayed without screen
edges.
The whole input area is displayed.
| button
Rightward
Note
| button
Useful Features
\ button
• You can adjust the Overscan area for the following input signals and the RESIZE function.
Input signal:
- 480I/480P
- 540P
- 576I/576P
- 720P
- 1035I
- 1080I/1080P
RESIZE function:
- NORMAL
- 16:9
- CINEMA ZOOM
- ZOOM 14:9
• If the display area ratio is set too large, noise
may appear at the screen edges. If this happens, set the display area ratio to a smaller
value.
• Also read “About Copyrights” on page 31.
-43
XV-Z17000_E_US.indb 43
2010/12/17 11:16:33
Adjusting the Projected Image (“SCR-ADJ” Menu) (Continued)
Menu operation ⇒ Page 35
4 Auto V-Keystone Correction
Select “Auto V-Keystone” in the “SCR-ADJ” menu and
press ENTER. Vertical keystone correction is performed
automatically.
Select “Keystone Mode” in the “SCR-ADJ” menu
and press ENTER. Then select a desired item among
“Keystone”, “Sphere”, or “Rotation” and press ENTER.
“Keystone” has been set as a default setting in which
you can adjust “H-Keystone” and “V-Keystone”.
Keystone
Note
• Pressing ENTER when the on-screen display
of the Auto V-Keystone “On” appears changes
the setting of the Auto V-Keystone to “Off”.
• The Keystone Correction can be adjusted up
to an angle of approximately ±12 degrees with
“Auto V-Keystone”.
• For details of Keystone mode, see page 25.
Auto V-Keystone Correction
H-Keystone:
O or Q
Makes the upper and lower
sides parallel.
Horizontal Keystone Correction
V-Keystone:
O or Q
Makes the left and right sides
parallel.
Vertical Keystone Correction
5 Keystone Mode Correction
This function can correct distortion of an image projected
toward a spherical or cylindrical screen as well as trapezoidal distortion of an image on a flat screen and rotate
the image at your arbitrary angle.
Note
• For details of Keystone mode, see page 25.
Sphere
This function corrects screen distortion created during
spherical or cylindrical screen projection.
O button
Narrower at the center
Q button
Wider at the center
Sphere Correction
Info
Correction of Convex Distortion:
• While adjusting the image using Keystone/
Sphere/Rotation Correction, straight lines
and the edges of the image may appear
jagged.
Correction of Concave Distortion:
-44
XV-Z17000_E_US.indb 44
2010/12/17 11:16:33
Menu operation ⇒ Page 35
Rotation
This function can rotate the image at an arbitrary
angle.
O button
Rotates the image
counterclockwise.
Q button
Rotate the image clockwise.
Rotation Correction
0 Reversing/Inverting
Projected Images
This function allows the projector to be used in a wider
range of projection styles by allowing the image to be
inverted to suit the projection environment (location).
Selectable items
Front
Ceiling + Front
Rear
6 Setting On-screen Display
Selectable items
On
Off
Description
All on-screen displays are displayed.
INPUT/FREEZE/AUTO SYNC/RESIZE/
PICTURE MODE/ECO+QUIET/
MAGNIFY/3D ON/OFF (3D/2D mode
change) message are not displayed.
7 Setting the Brightness of the
Menu Screen
Sets the brightness of the menu screen.
Selectable items
Standard
Level 1
Level 2
Description
Standard brightness
Darker than the “Standard”
brightness
Darker than the “Level 1” brightness
8 Selecting the Background Image
Description
SHARP logo screen
Blue screen
— (Black screen)
See page 17 for details of Projection (PRJ) Mode.
q Selecting the On-screen Display
Language
The projector can switch the on-screen display language
among 17 languages.
English
Deutsch
Español
Nederlands
Français
Italiano
Svenska
Português
polski
Magyar
Türkçe
Useful Features
Selectable items
Logo
Blue
None
Ceiling + Rear
Description
Normal image (Projected from the
front of the screen)
Inverted image (Projected from the
front of the screen with an inverted
projector)
Reversed image (Projected from the
rear of the screen or with a mirror)
Reversed and inverted image (Projected with a mirror)
9 Selecting the Menu Screen
Position
Select “Menu Position” in the “SCR-ADJ” menu and the
desired position for the menu screen.
Selectable items
Center
Upper Right
Lower Right
Upper Left
Lower Left
Description
Displayed on the center of the image.
Displayed on the upper right of the image.
Displayed on the lower right of the image.
Displayed on the upper left of the image.
Displayed on the lower left of the image.
-45
XV-Z17000_E_US.indb 45
2010/12/17 11:16:34
Adjusting the Projector Function (“PRJ-ADJ” Menu)
Menu operation ⇒ Page 35
The illustration shown here is for explanation and may
be different from the actual on-screen display.
Picture
SIG-ADJ
Auto Power Off
Economy Mode
One Touch Play
System Standby
Input Name
Demo Mode
RS-232C
Fan Mode
All Reset
SCR-ADJ
On
Off
Off
Off
PRJ-ADJ
Off
9600bps
Normal
3 Setting One Touch Play, System
Standby and Input Name
When a Sharp product equipped with Consumer Electronics Control (HDMI CEC) is connected to the projector
with an HDMI cable, you can use the linked function with
HDMI CEC (“One Touch Play” and “System Standby”).
Note
The CEC function may not work with some CEC
devices. (When the projector is connected to a nonSharp product, the CEC function may not work.)
Lamp Timer (Life)
SEL./ADJ.
RETURN
X h
XX min ( XX% )
ENTER
END
1 Setting Auto Power Off Mode
This function automatically switches the projector to
Standby mode if no signals are received for a set period.
Selectable items
On
Off
Description
When no input signal is detected for
more than 15 minutes, the projector
will automatically enter standby mode.
The Auto Power Off function will be
disabled.
Note
• When the Auto Power Off function is set to
“On”, 5 minutes before the projector enters
standby mode, the message “Enter STANDBY
mode in X min.” will appear on the screen to
indicate the remaining minutes.
2 Setting the Power Save Mode
(Economy Mode)
Economy Mode
Selectable items
On
Off
Description
This enables the Economy mode.
You can use the linked functions. RS232C can be used to control the projector in standby mode.
Note
• Set this function to “Off” when you want to use
RS-232C to control the projector from a computer.
• One Touch Play is set to “Off” when the
Economy mode is set to “On”.
Setting the One-Touch Playback Function
(One Touch Play)
One Touch Play turns on the projector and selects the
input automatically when you turn on or begin playback
on connected HDMI-compliant Sharp Video Products.
Selectable items
On
Off
Description
This enables One Touch Play.
This disables One Touch Play.
Note
• When enabling One Touch Play, be sure to enable
the CEC setting on the HDMI-compliant Sharp
Video Products connected to the projector.
• The Economy mode is set to “Off” when One
Touch Play is set to “On”.
• In the following cases, One Touch Play is not
enabled.
- When playback is paused
- When the screen is turned off (black) after the
lens shutter is closed
- When the cooling fan is running (See page
60.)
- When the lamp is warming up (See page 60.)
Setting the System Standby Function
(System Standby)
When you turn off the projector, the HDMI-compliant
video equipment connected to the projector enters
standby mode.
Selectable items
On
Off
Description
This enables System Standby.
This disables System Standby.
Note
• When enabling System Standby, be sure to
enable the CEC setting on the HDMI-compliant
Sharp Video Products connected to the
projector.
-46
XV-Z17000_E_US.indb 46
2010/12/17 11:16:35
Menu operation ⇒ Page 35
Setting the Input Terminal Names (Input
Name)
Set the name of the input terminal (up to 14 alphanumerical characters).
1
Press P/R to select “Input Name”
and then press ENTER.
Picture
Input name
SIG-ADJ
HDMI1
SCR-ADJ
PRJ-ADJ
HDMI1
5 Selecting the Transmission
Speed (RS-232C)
Make sure that both the projector and computer are set
for the same baud rate.
Selectable items
9600bps
Description
Transmission speed is slow.
38400bps
115200bps
Transmission speed is rapid.
Reset
Return
6 Fan Mode Setting
This function changes the fan rotation speed.
2
\ or | button
Selects a character column.
▼ or 、 button
Selects a character.
ENTER button
Sets the input terminal name.
Press P/R to select “Return” and
then press ENTER to return to the
previous screen.
• To return to the previous setting, select
“Reset” and then press ENTER.
Selectable items
Normal
High
Description
Suitable for normal environments.
Select this when using the projector at
altitudes of approximately 4,900 feet
(1,500 meters) or more.
• When “Fan Mode” is set to “High”, the fan rotation
speeds up, and the fan noise becomes louder.
7 Returning to the Default Settings
Use “All Reset” to initialize all the adjustments you have
made to the default settings.
Note
4 Setting the Demo Mode
Set the Demo Mode to “On” or “Off”.
Selectable items
On
Off
Description
This enables Demo Mode.
This disables Demo Mode.
Note
The following items cannot be initialized.
• “SIG-ADJ” menu — Resolution
• “SCR-ADJ” menu — Language
• “PRJ-ADJ” menu — Lamp Timer (Life)
8 Lamp Timer (Life)
You can confirm the cumulative lamp usage time and the
remaining lamp life (percentage).
Lamp usage condition
“Life”
Remaining lamp life
100%
5%
Operated exclusively with
“Eco+Quiet” set to “On”
Approx. 3,000
hours
Approx. 150
hours
Operated exclusively with
“Eco+Quiet” set to “Off”
Approx. 2,000
hours
Approx. 100
hours
Useful Features
• When connecting the projector to a Sharp Video
Product with an HDMI cable using an input
mode of HDMI1 or HDMI2 and the linked function with HDMI CEC (“One Touch Play” or “System Standby”) works normally, the name of the
connected Sharp Video Product is automatically
captured.
• When the input terminal name has been changed
by a user, the changed name is displayed.
• To return to the default name, select “Reset”
and press ENTER.
Note
• It is recommended that the lamp be changed
when the remaining lamp life becomes 5%.
• The lamp life may vary depending on the usage condition.
-47
XV-Z17000_E_US.indb 47
2010/12/17 11:16:35
Enjoying 3D Image Viewing
CAUTION: Before viewing 3D images, please read this section carefully.
You can use special 3D Glasses to watch
3D-supported images on this projector.
You can enjoy 3D images by viewing the video images
through the 3D Glasses supplied with the projector or
through optional 3D glasses sold separately.
To produce 3D images, liquid crystal shutters in the
3D Glasses alternately open and close imperceptibly
fast to exactly match alternating left and right video
images displayed by the projector.
Not all consumers can experience and enjoy 3D images. Some people suffer from stereo blindness which
prevents them from perceiving the intended depth of
3D entertainment. Also, some people who watch 3D
programming may experience initial feelings of motion
sickness as they adjust to the picture. Others may experience headaches, eye fatigue or continued motion
sickness. Like a roller coaster, the experience is not for
everyone.
Precautions on using 3D Glasses
The 3D Glasses are precision equipment. Handle them
with care.
Improper use of the 3D Glasses or failure to follow
these instructions can result in eye strain.
If you experience dizziness, nausea, or other discomfort while viewing 3D images, immediately discontinue
use of the 3D Glasses. Using the binocular disparity 3D system of this projector with incompatible 3D
broadcasts or software can make images appear with
a cross talk blur or create overlapping images.
If you are nearsighted or farsighted or have astigmatism or a different level of eyesight between the left
and right eyes, you should take the necessary steps,
such as wearing eyeglasses, to correct your eyesight
before viewing 3D images. The 3D Glasses can be
worn over eyeglasses.
3D viewing is possible within the range that the 3D
Glasses are able to receive infrared signals reflected
by the screen. However, most 3D images are manufactured to be viewed from directly in front of the
screen, so 3D viewing is recommended directly in front
of the screen as much as possible.
The 3D Glasses are only recommended for people
ages 5 and older.
When children are viewing 3D images, be sure a parent or guardian is present. Monitor children viewing 3D
images, and if they show signs of discomfort, immediately discontinue use of the 3D Glasses.
People with a known history of photosensitivity and
people with heart problems or poor health should not
use the 3D Glasses. This can worsen existing health
conditions.
Do not use the 3D Glasses for other purposes (such
as general eyeglasses, sunglasses, or protective
goggles).
Do not use the 3D function or 3D Glasses while walking or moving around. This may result in injuries due to
running into objects, tripping, and/or falling.
When using the 3D Glasses, take care not to accidentally strike the screen or other people. Viewing 3D
images may cause you to misjudge the distance to the
screen and accidentally strike the screen, resulting in
possible injury.
Precautions on viewing 3D images
When viewing 3D images continuously, be sure to take
a break periodically to prevent eye strain.
Take regular breaks, at least 5 to 15 minutes after
every 30 to 60 minutes of 3D viewing.
* Based on the guidelines issued by the 3D Consortium revised December 10, 2008.
View 3D images at the appropriate distance from the
screen. The recommended distance is three times the
effective height of the picture.
Examples of recommended distances
100-inch 16:9 picture: Approx. 12.3 ft (3.8 m)
Viewing should not be done closer than the recommended distance.
Refer to page 18 for details on the diagonal size and
height of the picture.
Maintain an appropriate distance from the screen.
Viewing from too close a distance can strain your
eyes. If you experience eye strain, immediately discontinue viewing.
If you experience any of the following symptoms during viewing:
– nausea
– queasiness/dizziness
– headache
– blurry vision or double vision that lasts longer than
few seconds
Do not engage in any potentially hazardous activity
(for example, driving a vehicle) until your symptoms
have completely gone away.
If symptoms persist, discontinue use and do not
resume 3D viewing without discussing your symptoms
with a physician.
-48
XV-Z17000_E_US.indb 48
2010/12/17 11:16:36
Be careful of your surroundings when viewing 3D images. When you view 3D images, objects may appear
at a distance closer or farther than the actual screen.
This may cause you to misjudge the distance to the
screen and possibly result in injury if you accidentally
hit the screen or surrounding objects.
As you get more comfortable viewing 3D images:
Operate the “3D Depth Adjust” function to adjust the
3D effect. (See page 55.)
Adjust the projected image to the most comfortable
viewing size by zooming. (Projecting images on the
smallest or largest screen size possible may eliminate
the 3D effect and strain your eyes.)
Use the Invert function to properly set the video for your
left and right eyes. (For details on using “Invert”, see
page 55.)
A picture simultaneously projected from more than
two projectors may not appear 3D.
Info
• The projected image may become dark when
using the 3D projection function (with “3D” set to
“On”).
• When “3D” is set to “On”, the following functions
may not work fully or may not be available at all.
– Keystone/Sphere/Rotation
– Image Shift
– Magnify
• If the power of your left and right eyes greatly
differs and you primarily use one eye for viewing
the images, the images will not appear in 3D. In
addition, images may be difficult to view in 3D
or images may not be able to be viewed in 3D
depending on the individual or the content being
displayed. The 3D effect varies with the individual.
Warning!
The following people should limit 3D viewing:
– Children under 5 years of age (to protect the eye
growth process)
– People with a history of photosensitivity
– People with heart disease
– People in poor health
– People who are sleep deprived
– People who are physically tired
– People under the influence of drugs or alcohol
Epilepsy
A small percentage of the population may
experience epileptic or strokes seizures or strokes
when viewing certain types of images that contain
flashing patterns of light.
IF YOU OR ANY MEMBER OF YOUR FAMILY
HAS A HISTORY OF EPILEPSY
The following people should consult a physician
before viewing 3D images.
– Anyone with a history of epilepsy, or who has
a family member with a history of epilepsy
– Children under 5 years of age
– Anyone who has ever experienced epileptic
seizures or sensory disturbances triggered by
flashing light effects
SOME LIGHT PATTERNS MAY INDUCE
SEIZURES IN PERSONS WITH NO PRIOR
HISTORY OF EPILEPSY
Discontinue use if you experience any of the
following symptoms while viewing 3D images.
– Involuntary movements, eye or muscle
twitching
– Muscle cramps
– Nausea, dizziness, or queasiness
– Convulsions
– Disorientation, confusion, or loss of
awareness of your surroundings
Useful Features
-49
XV-Z17000_E_US.indb 49
2010/12/17 11:16:36
Enjoying 3D Image Viewing (Continued)
Supplied Accessories for 3D Glasses
Make sure the following accessories are provided with the 3D Glasses. Two sets of 3D Glasses are provided.
3D Glasses
(×2)
Pages 51 to 54
3D Glasses band *
(×2)
Page 52
Nose pad *
(Large ×2, small ×2)
Page 52
Glasses case
(×2)
Cleaning cloth
(×2)
Precision screwdriver
(Phillips ×2, slotted ×2)
Page 51
* Use the 3D Glasses band and nose pad as needed.
Note
• Please contact your local authority for the correct method of disposal of this product and/or packaging.
1 Power button
Part Names
1 2
• Press for at least 2 seconds to turn on and off the
3D Glasses.
• When the 3D Glasses are turned on, pressing this
button switches between 2D and 3D modes. (See
page 52.)
2 LED light
•
•
•
•
•
3
Blinks 3 times when the power is turned on.
Blinks 2 times when 2D mode is selected.
Blinks 3 times when 3D mode is selected.
Blinks 6 times when the battery power is low.
Lights for 2 seconds when the power is turned off.
3 Service terminal
This terminal is for service use only.
Please do not connect any other device to this terminal.
4
6
4 Infrared receiver
An infrared signal sent from the projector is reflected onto
the screen. The reflected infrared signal is then received
by the infrared receiver. The 3D Glasses turn off
automatically after 3 minutes if no signal is received.
5 Nose pad mount 52
The dedicated nose pad can be mounted here.
5
6 3D Glasses band mount 52
The dedicated 3D Glasses band can be mounted here.
Note
• Do not soil or apply stickers or other obstacles to the infrared receiver. Doing so may block signals from
the screen and prevent the 3D Glasses from working correctly.
• Interference from other infrared communications equipment may prevent you from viewing 3D images
correctly.
-50
XV-Z17000_E_US.indb 50
2010/12/17 11:16:36
2
Before Using the 3D Glasses
Before using the 3D Glasses for the first time,
remove the insulating sheet attached to them.
Remove the button cell battery.
1Place the tip of the slotted precision screwdriver into the opening between the button
cell and the socket.
2Lift up the button cell while taking care not
to get the screwdriver caught on the metal
latch.
1
3
When the battery comes loose from
the socket, pick it out with your
fingers.
4
Hook a new button cell to the metal
latch and insert it into the socket.
Replacing the Button Cell
Battery
The battery has an expected service life of approximately 75 hours.
• When the battery power is low, the LED light
blinks six times after the power is turned on.
• When replacing the button cell, use only the
designated battery type (Maxell branded
CR2032 lithium button battery).
1
2
• Take care not to reverse the battery polarity
(+ and -) when inserting the button cell.
Loosen the screw used to secure
the battery cover, and then remove
the battery cover.
Close the battery cover.
6
Insert the screw to secure the battery cover.
Useful Features
5
1
2
Note
• Used batteries should be disposed in accordance with local laws and regulations.
-51
XV-Z17000_E_US.indb 51
2010/12/17 11:16:37
Enjoying 3D Image Viewing (Continued)
Attaching the Nose Pad
Attach either of the supplied nose pads as
needed (such as when the glasses do not fit
properly). The glasses come with a large and
small nose pad.
1
1
2
Attaching
the nose pad
Removing
the nose pad
Note
• When the battery power is low, the LED light
blinks 6 times after the power is turned on.
Switching to 3D and 2D Mode
When viewing 3D images, you can press the
power button to switch between 2D and 3D
modes. This is useful when several people are
viewing the same 3D images with some people
wanting to watch in 3D and some people wanting to watch in 2D.
Viewing 2D images
When you press the power button twice while viewing
3D images, the LED light blinks 2 times and the 3D
images switch to 2D images.
Viewing 3D images
When you press the power button twice while viewing
2D images, the LED light blinks 3 times and the 2D
images switch to 3D images.
Attaching the 3D Glasses
Band
Usage Range of the 3D
Glasses
Attach the supplied 3D Glasses band strap as
needed (such as when the glasses do not fit
properly).
Insert the ends of the 3D Glasses into the 3D
Glasses band until they are secure.
• Pull the cord stopper on the strap to adjust
the strap length.
An infrared signal sent from the projector is reflected onto the screen. The 3D Glasses operate
by receiving the reflected infrared signal.
The 3D Glasses turn off automatically after 3
minutes if no signal is received.
The operating range of the 3D Glasses is shown in the
table below.
“IR Emitter Level” setting
Normal
High
Operating range
(distance from the screen)
Approx. 12.3 ft (3.8 m)
Approx. 18.3 ft (5.6 m)
(For details of the “IR Emitter Level”, see page 55.)
• Be sure to stay within the operating range when
watching 3D images. Otherwise, the 3D Glasses
Using the 3D Glasses
Turning On/Off the Power
Turn on the power of the 3D Glasses.
• Press the power button for at least 2 seconds.
• The LED light blinks 3 times.
Turn off the power on the 3D Glasses.
• Press the power button for at least 2 seconds.
• The LED light lights for 2 seconds.
-52
XV-Z17000_E_US.indb 52
may not work properly and you may not be able to
enjoy the 3D images.
• The operating range in the table above is the average value when using a screen with a screen gain of
1.0 and when viewing in front of the screen.
The operating range may vary depending on your
view position and/or the usage condition (e.g., Gain
level of screen).
(The operating range decreases when you view the
screen at an angle.)
Note
• The IR (infrared) emitter lights in 3D mode.
2010/12/17 11:16:38
3D MENU button
ENTER button
Adjustment buttons
('/"/\/|)
3D MENU button
3D ON/OFF button
Note
• The screen may temporarily become black when
the projector is trying to detect a 3D image
signal and when switching from 3D to 2D mode.
Viewing 3D Images
Receiving a 3D Image Signal That
Can Be Detected Automatically
1
When “3D Auto Change” is set to “Yes”
• The 3D image type is detected automatically
and the appropriate 3D image is displayed.
2
Turn on the 3D Glasses and place
them over your eyes.
• Press the power button for at least 2 seconds.
• The LED light blinks 3 times.
When “3D Auto Change” is set to “No”
• The following message is displayed. Press
3D ON/OFF.
Useful Features
The image signal may contain a 3D identification signal. You can enable the projector to
automatically detect the 3D image type by
selecting “3D MENU” > “3D Auto Change”.
(See page 55.)
3
You can now view 3D images.
3D picture is detected.
Press the 3D ON/OFF button on the remote control.
(Need to wear the 3D glasses to watch 3D picture)
-53
XV-Z17000_E_US.indb 53
2010/12/17 11:16:39
Enjoying 3D Image Viewing (Continued)
Receiving a 3D Image
Signal That Cannot Be
Detected Automatically
1
Press 3D MENU.
2
Press P/R to select “3D”.
3
Press O/Q to select “On” or “Off”.
• The 3D MENU screen is displayed.
• To view in 3D mode: Select “On”, and then
go to step 4.
• Refer to “Setting the 3D Format Menu”
on page 56 for supported 3D signals and
formats.
• If you select “Off”, the video source will be
displayed with no conversion.
4
Press P/R to select “3D Format”,
and then press ENTER.
5
Press P/R to select a supported
format from the list, and then press
ENTER.
Ending 3D Image Viewing
1
Press 3D ON/OFF during the 3D
mode.
2
Take off the 3D Glasses and turn
off the power.
• Press the power button for at least 2 seconds.
• The LED light lights for 2 seconds.
Note
• If the input signal switches to 2D, 2D images
are displayed automatically.
• 3D mode is canceled automatically in the following cases:
- When the signal is no longer received
- When the signal type changes
- When input selection is changed
- When the power is turned off
Auto
Side By Side
Top And Bottom
• If you select the same system as that of the
input signal, 3D images are displayed.
6
Turn on the 3D Glasses and place
them over your eyes.
• Press the power button for at least 2 seconds.
• The LED light blinks 3 times.
7
You can now view 3D images.
-54
XV-Z17000_E_US.indb 54
2010/12/17 11:16:39
3D Settings (“3D MENU”)
The illustration shown here is for explanation and may
be different from the actual on-screen display.
3D MENU
3D
3D Format
3D Depth Adjust
IR Emitter Level
3D Auto Change
Viewing Time Info
Invert
On
Auto
0
Normal
Yes
Yes
Note
• Use this function to get more comfortable 3D
images.
• When you use this function, the 3D image will
look different from its original 3D appearance.
Keep this in mind while using this function.
• The use of this function for commercial purposes/public displays in a café, hotel, etc.,
may be an infringement of copyright protected
by law for copyright holders. Please use caution.
IR Emitter Level
You can change the infrared emitter level.
3D
You can switch between 2D and 3D mode.
Selectable items
On
Off
Selectable items
Normal
High
Description
Projects 3D images.
Projects 2D images instead of 3D
images.
Note
Note
• When “3D Auto Change” is set to “Yes” and a
3D signal is detected, “3D” switches to “On”.
• When a 3D identification signal is not detected:
- If you selected “On”, select the format with
“3D Format”.
- If you select “Off”, the video source will be
displayed with no conversion.
You can set the 3D format manually for when a 3D signal
that cannot be detected automatically is received.
3D Auto Change
Description
When a 3D identification signal is
detected, the format is selected
automatically.
Select the same format type of the
received 3D signal.
Selectable items
Yes
No
Viewing Time Info
This displays the elapsed time of 3D image viewing.
Selectable items
Yes
Note
• Refer to “Setting the 3D Format Menu” on
page 56 for supported signals and 3D formats.
3D Depth Adjust
You can adjust the stereoscopic effect of 3D image.
\ button
Selectable items
Description
For less stereoscopic effect.
| button
For greater stereoscopic effect.
XV-Z17000_E_US.indb 55
Description
When a 3D signal is detected, 3D
mode is selected automatically.
Auto change is not performed.
Useful Features
Side By Side
Top And Bottom
• When “High” is set, other nearby devices that
receive infrared signals, such as remote control
units of audio-video equipment and air conditioners, may not operate properly.
This setting can be used to switch to 3D mode automatically when a 3D identification signal is detected.
3D Format
Selectable items
Auto
Description
Normal infrared emitter level
Select “High” when it is difficult for
3D Glasses to properly receive the
infrared signal reflected off the screen
due to the use of a large screen and
viewers being positioned away from
the screen.
No
Description
Displays the elapsed viewing time on
the screen every hour.
Does not display the elapsed viewing
time.
Invert
Pressing ENTER switches between the image for the
left eye and the image for the right eye, so that you can
make the settings for more natural viewing.
-55
2010/12/17 11:16:40
Enjoying 3D Image Viewing (Continued)
Setting the 3D Format Menu
Select the appropriate 3D format for viewing while referring to the table below.
Input signal
Frame Packing
with 3D
identification
signal
Side By Side
with 3D
identification
signal
without 3D
idetification
signal
Top And Bottom
with 3D
identification
signal
without 3D
idetification
signal
Support
720P
720P
1080I
1080I
1080P
1080P
1080P
720P
720P
1080I
1080I
1080P
1080P
1080P
720P
720P
1080I
1080I
1080P
1080P
1080P
720P
50Hz
60Hz
50Hz
60Hz
24Hz
50Hz
60Hz
50Hz
60Hz
50Hz
60Hz
24Hz
50Hz
60Hz
50Hz
60Hz
50Hz
60Hz
24Hz
50Hz
60Hz
50Hz
720P
60Hz
1080I
50Hz
1080I
60Hz
1080P
24Hz
1080P
1080P
720P
720P
1080I
1080I
1080P
1080P
1080P
50Hz
60Hz
50Hz
60Hz
50Hz
60Hz
24Hz
50Hz
60Hz
When “3D”
is OFF
When “3D” is ON
3D Format
Auto
Side By Side
Top And
Bottom
Displays
image for
left eye
(2D mode)
Displays
correct 3D
image
(3D mode)
–*1
–*1
Displays
image for
left eye
(2D mode)
Displays
correct 3D
image
(3D mode)
–*1
–*1
Displays raw
input signal
Displays raw
input signal
Displays
image for
left eye
(2D mode)
Displays
correct 3D
image
(3D mode)
Displays raw
input signal
Displays raw
input signal
Displays
correct 3D
image
*2 (3D mode)
Garbled
display
(Incorrect
setting)
–*1
Garbled
display
(Incorrect
*2 setting)
–*1
Displays
correct 3D
image
(3D mode)
*1 “3D Format” is set to “Auto” automatically.
*2 The frame rate is changed.
-56
XV-Z17000_E_US.indb 56
2010/12/17 11:16:41
Note
• These 3D Glasses can only be used with Sharp 3D-compatible LCD TVs or projectors that use infrared
control technology.
3D Glasses lenses
• Do not apply pressure to the lenses of the 3D Glasses. Also, do not drop or bend the 3D Glasses.
• Do not scratch the surface of the lenses of the 3D Glasses with a pointed instrument or other object.
Doing so may damage the 3D Glasses and reduce the quality of the 3D image.
• Use only the cloth provided with the 3D Glasses to clean the lenses.
3D Glasses infrared receiver
• Do not allow the infrared receiver to become dirty, and do not attach stickers to or otherwise cover the
infrared receiver. Doing so may prevent the receiver from operating normally.
• If the 3D Glasses are affected by other infrared data communication equipment, the 3D images may not
be displayed correctly.
Useful Features
Caution during viewing
• Do not use devices that emit strong electromagnetic waves (such as cellular phones or wireless transceivers) near the 3D Glasses. Doing so may cause the 3D Glasses to malfunction.
• The 3D Glasses cannot operate fully at extreme high or low temperatures. Please use them within the
specified usage temperature range.
• If the 3D Glasses are used in a room with fluorescent lighting (60 Hz), the light within the room may appear to flicker. In this case, either darken or turn off the fluorescent lights when using the 3D Glasses.
• Wear the 3D Glasses correctly. 3D images will not be correctly visible if the 3D Glasses are worn upside
down or back-to-front.
• Other displays (such as computer screens, digital clocks, and calculators) may appear dark and difficult
to view while wearing the 3D Glasses. Do not wear the 3D Glasses when watching anything other than
3D images.
• If you lie on your side while watching the screen with 3D Glasses, the picture may look dark or may not
be visible.
• Be sure to stay within the viewing angle and optimum viewing distance when watching 3D images. Otherwise, you may not be able to enjoy the full 3D effect.
• The 3D Glasses may not work properly if there is any other 3D product or electronic devices turned on
near the glasses or projector. If this occurs, turn off the other 3D product or electronic devices or keep
the devices as far away as possible from the 3D Glasses.
• Stop using this product in any of the following situations:
– When images consistently appear doubled while you are wearing the 3D Glasses
– When you have difficulty perceiving the 3D effect
• If the 3D Glasses are faulty or damaged, stop using them immediately. Continued use of the 3D Glasses
may cause eye fatigue, headaches and illness.
• If you have any abnormal skin reaction, stop using the 3D Glasses. In very rare instances, such reactions
may be due to an allergic reaction to the coating or materials used.
• If your nose or temples become red or you experience any pain or itchiness, stop using the 3D Glasses.
Pressure caused by long periods of use may lead to such reactions and may result in skin irritation.
-57
XV-Z17000_E_US.indb 57
2010/12/17 11:16:43
Enjoying 3D Image Viewing (Continued)
Specifications – 3D Glasses
Model
AN-3DG10
Lens type
Power supply
Battery
Battery life
Dimension
(W x H x D)
Weight
Liquid crystal shutter
3 V DC
Lithium button battery (CR2032 × 1)
Approx. 75 hours of continuous use
6 13/16 × 1 7/8 × 6 45/64 inch
(172.7 × 47.5 × 170.0 mm)
0.2 lbs./65.0 g (including the lithium button battery)
50°F to 104°F (10°C to 40°C)
(The 3D Glasses cannot operate fully at extreme high or low temperatures. Please use them
within the specified usage temperature range.)
Operating temperature
The product serial number is displayed on the 3D Glasses as indicated in the illustration
on the left. The first four digits represent the product color and the date of manufacture.
Example: Silver colored glasses manufactured on August 11, 2010
Bottom
S/N : S 0 8 B
Manufacture number
Color
S: Silver
R: Red
A: Blue
Year of
manufacture
0: 2010
1: 2011
2: 2012
Month of
manufacture
1: 1
2: 2
3: 3
8 :8
9 :9
A : 10
B : 11
C: 12
Day of
manufacture
1: 1 A : 10
2: 2 B : 11
3: 3
H : 17
J : 18
N : 22
P : 23
W: 30
X : 31
*“I”, “O”, “Y”, and “Z” are not used.
These symbols displayed on the product and the individual carton package of the product are symbols about the
environment in Japan, China and the EU.
For Japan only:
For China only:
For China only:
For the EU only:
-58
XV-Z17000_E_US.indb 58
2010/12/17 11:16:43
Maintenance
Cleaning the projector
Ensure that you have unplugged the power cord
before cleaning the projector.
The cabinet as well as the operation panel is made
of plastic. Avoid using benzene or thinner, as these
can damage the finish on the cabinet.
Do not use volatile agents such as insecticides on
the projector.
Do not attach rubber or plastic items to the projector for long periods.
The effects of some of the agents in the plastic
may cause damage to the quality or finish of the
projector.
Wipe off dirt gently with a soft flannel cloth.
Using a chemical cloth (wet/dry sheet type cloth,
etc.) may deform the components of the cabinet
or cause cracking.
Wiping with a hard cloth or using strong force may
scratch the cabinet surface.
When the dirt is hard to remove, soak a cloth in a
mild detergent diluted with water, wring the cloth
well and then wipe the projector.
Strong cleaning detergents may discolor, warp or
damage the coating on the projector. Make sure to
test on a small, inconspicuous area on the projector before use.
Cleaning the lens
Use a commercially available blower or lens
cleaning paper (for glasses and camera lenses)
for cleaning the lens. Do not use any liquid type
cleaning agents, as they may wear off the coating
film on the surface of the lens.
As the surface of the lens can easily get damaged,
be careful not to scrape or hit the lens.
Cleaning the exhaust and intake vents
Use a vacuum cleaner to clean dust from the
exhaust vent and the intake vent.
ld
Mi
nt
ge
ter
de
Mild detergent diluted
with water
Info
• If you want to clean the air vents during projector
operation, ensure you press STANDBY/ON on
the projector or STANDBY on the remote control
and put the projector into standby mode. After
the cooling fan has stopped, clean the vents.
Wax
Thinner
Appendix
-59
XV-Z17000_E_US.indb 59
2010/12/17 11:16:44
Maintenance Indicators
The warning lights (power indicator, lamp indicator and temperature warning indicator) on the projector
indicate problems inside the projector.
If a problem occurs, either the temperature warning indicator or the lamp indicator will illuminate red, and
the projector will enter standby mode. After the projector has entered standby mode, follow the procedures
given below.
Top View
Power indicator
Lamp indicator
Temperature warning
indicator
About the temperature warning indicator
If the temperature inside the projector increases, due to blockage of the air vents, or the setting
location, the temperature warning indicator will blink. And if the temperature keeps on rising,
“
” will illuminate in the lower left corner of the picture with the temperature warning indicator blinking.
If this state continues, the lamp will turn off, the cooling fan will run and then the projector will enter
standby mode. When you find the temperature warning indicator blinking, be sure to perform the measures
described on page 61.
About the lamp indicator
When the remaining lamp life becomes 5% or less, (yellow) and “Change The Lamp” will be displayed on
the screen. When the percentage becomes 0%, it will change to (red), the lamp will automatically turn off
and then the projector will automatically enter standby mode. At this time, the lamp indicator will illuminate
in red.
If you try to turn on the projector a fourth time without replacing the lamp, the projector will not
turn on.
Indicators on the Projector
Power indicator
Lamp indicator
Temperature warning
indicator
Red on
Green on
Red blinks
Green blinks
Green and orange blink
alternately
Green on
Green blinks
Red on
Off
Red on/Red blinks
Normal (Standby)
Normal (Power on)
Abnormal (See page 61.)
Normal (Cooling)
The lens shutter is closed. (See page 23.)
Normal
The lamp is warming up.
The lamp is shut down abnormally or requires to be changed. (See
page 61.)
Normal
The internal temperature is abnormally high. (See page 61.)
-60
XV-Z17000_E_US.indb 60
2010/12/17 11:16:44
Maintenance indicator
Normal
Abnormal
Temperature
Off
Red blinks
warning
(On)/
indicator
Red on
(Standby)
Lamp
indicator
Green on
(Green
blinks when
the lamp is
warming up.)
Red on
Red on
(Standby)
Power
indicator
Green on/
Red on
Green blinks
(Cooling)
Red blinks
Problem
Cause
The internal
temperature is
abnormally
high.
• Temperatures
around the
projector are
high.
• Blocked air
intake
• Cooling fan
breakdown
• Internal circuit
failure
• Clogged air
intake
The lamp does • The lamp is shut
not illuminate.
down
abnormally.
Time to change • Remaining lamp
the lamp.
life becomes 5%
or less.
The lamp does • Burnt-out lamp
not illuminate.
• Lamp circuit
failure
The power
• The lamp unit
indicator blinks
cover is open.
in red when the
projector is on.
Possible Solution
• Use the projector in an area with a
temperature of lower than 95°F (+35ºC).
• Relocate the projector to an area with
proper ventilation. (See page 7.)
• Take the projector to your nearest Sharp
Authorized Projector Dealer or Service
Center (see page 75) for repair.
• Disconnect the power cord from the AC
outlet, and then connect it again.
• Carefully replace the lamp. (See page
62.)
• Take the projector to your nearest Sharp
Authorized Projector Dealer or Service
Center (see page 75) for repair.
• Please exercise care when replacing the
lamp.
• Securely install the cover.
• If the power indicator blinks in red even
when the lamp unit cover are securely
installed, contact your nearest Sharp
Authorized Projector Dealer or Service
Center (see page 75) for advice.
Info
• If the temperature warning indicator illuminates, and the projector enters standby mode, follow the possible solutions above and then wait until the projector has cooled down completely before plugging in the
power cord and turning the power back on. (At least 10 minutes.)
• If the power is turned off for a brief moment due to power outage or some other cause while using the
projector, and the power supply recovers immediately after that, the lamp indicator will illuminate in red
and the lamp may not be lit. In this case, unplug the power cord from the AC outlet, replace the power
cord in the AC outlet and then turn the power on again.
• The cooling fan keeps the internal temperature of the projector constant and this function is controlled
automatically. The sound of the cooling fan may change during operation because the fan speed may
change and this is not a malfunction.
Appendix
-61
XV-Z17000_E_US.indb 61
2010/12/17 11:16:45
Regarding the Lamp
Lamp
It is recommended that the lamp (sold separately) be replaced when the remaining lamp life becomes
5% or less, or when you notice a significant deterioration in the picture and color quality. The lamp
life (percentage) can be checked with the on-screen display. (See page 47.)
Purchase a replacement lamp of type AN-K15LP from your place of purchase, nearest Sharp Authorized Projector Dealer or Service Center.
IMPORTANT NOTE TO U.S. CUSTOMERS:
The lamp included with this projector is backed by a 90-day parts and labor limited warranty. All service
of this projector under warranty, including lamp replacement, must be obtained through a Sharp Authorized Projector Dealer or Service Center. For the name of the nearest Sharp Authorized Projector Dealer
or Service Center, please call toll-free: 1-888-GO-SHARP (1-888-467-4277).
Hg LAMP CONTAINS MERCURY For State Lamp Disposal Information
www.lamprecycle.org or 1-800-BE-SHARP
U.S.A. ONLY
Caution Concerning the Lamp
This projector utilizes a pressurized mercury lamp. A loud sound may indicate lamp failure. Lamp
failure can be attributed to numerous sources such as: excessive shock, improper cooling, surface
scratches or deterioration of the lamp due to a lapse of usage time.
The period of time up to failure largely varies depending on the individual lamp and/or the condition
and the frequency of use. It is important to note that failure can often result in the bulb cracking.
When the lamp replacement indicator and on-screen display icon are illuminated, it is recommended
that the lamp be replaced with a new one immediately, even if the lamp appears to be operating
normally.
Should the lamp break, there is also a possibility that glass particles may spread inside of the projector. In such a case, it is recommended you contact your nearest Sharp Authorized Projector Dealer
or Service Center to assure safe operation.
Should the lamp break, the glass particles may spread inside the lamp cage or gas contained in the
lamp may be vented into the room from the exhaust vent. Because the gas in this lamp includes mercury, ventilate the room well if the lamp breaks and avoid all exposure to the released gas. In case of
exposure to the gas, consult a doctor as soon as possible.
Replacing the Lamp
Caution
• Do not remove the lamp unit from the projector right after use. The lamp will be very hot and may cause burns
or injury.
• Wait at least one hour after the power cord is disconnected to allow the surface of the lamp unit to fully cool
before removing the lamp unit.
Carefully change the lamp by following the instructions described in this section. * If you wish, you
may have the lamp replaced at your nearest Sharp Authorized Projector Dealer or Service Center.
* If the new lamp does not light after replacement, take your projector to the nearest Sharp Authorized Projector
Dealer or Service Center for repair.
-62
XV-Z17000_E_US.indb 62
2010/12/17 11:16:45
Removing and Installing the Lamp Unit
Warning!
• Do not remove the lamp unit from the projector right after use. The lamp and parts
around the lamp will be very hot and may cause burns or injury.
Info
• Do not touch the glass surface of the lamp
unit or the inside of the projector.
• To avoid injury to yourself and damage to
the lamp, make sure you carefully follow
the steps below.
• Do not loosen other screws except for the
lamp unit cover and lamp unit.
1
Press STANDBY/ON on the
projector or STANDBY on the
remote control to put the projector into standby mode.
2
Disconnect the power cord.
3
• Unplug the power cord from the AC
socket.
• Leave the lamp until it has fully cooled
down (about 1 hour).
Lamp unit
AN-K15LP
Optional
accessory
STANDBY/ON button
AC socket
Remove the lamp unit cover.
• Close the lens shutter. Loosen the user
service screw (1) that secures the lamp
unit cover. Remove the lamp unit cover
(2).
2
Appendix
1
User service screw
(for lamp unit cover)
-63
XV-Z17000_E_US.indb 63
2010/12/17 11:16:45
Regarding the Lamp (Continued)
4
Remove the lamp unit.
5
Insert the new lamp unit.
6
Securing screws
• Loosen the securing screws from the
lamp unit. Hold the lamp unit and pull it
in the direction of the arrow. At this time,
keep the lamp unit horizontal and do not
tilt it.
INTERLOCK
• Press the lamp unit firmly into the lamp
unit compartment. Fasten the securing
screws.
Warning!
DO NOT DEFEAT THIS INTERLOCK
Replace the lamp unit cover.
• Align the tab on the lamp unit cover
(1) and place it while pressing the cover
(2) to close it. Then tighten the user
service screw (3) to secure the lamp
unit cover.
Info
• If the lamp unit and lamp unit cover are
not correctly installed, the power will
not turn on, even if the power cord is
connected to the projector.
1
2
3
Resetting the Lamp Timer
Reset the lamp timer after replacing the lamp.
Info
• Make sure to reset the lamp timer only when
replacing the lamp. If you reset the lamp timer
and continue to use the same lamp, this
may cause the lamp to become damaged
or explode.
1
Connect the power cord and
open the lens shutter fully.
• Plug the power cord into the AC socket
of the projector.
2
Reset the lamp timer.
AC socket
Lamp indicator
STANDBY/
ON button
ENTER
button
R button
MENU button
• While simultaneously holding down
MENU, ENTER and R on the projector,
press STANDBY/ON on the projector and
keep all four buttons pressed down until
the lamp indicator starts blinking green.
• “LAMP 0000 H” is displayed, indicating
that the lamp timer is reset.
-64
XV-Z17000_E_US.indb 64
2010/12/17 11:16:46
Connecting Pin Assignments
COMPUTER/COMPONENT input Terminal : mini D-sub 15 pin female connector
11
1
6
15
5
10
COMPUTER Input
COMPONENT Input
Pin No.
1
2
3
4
5
6
7
8
9
10
11
12
13
14
15
Pin No.
1
2
3
4
5
6
7
8
9
10
11
12
13
14
15
Signal
Video input (red)
Video input (green/sync on green)
Video input (blue)
Not connected
Not connected
Earth (red)
Earth (green/sync on green)
Earth (blue)
Not connected
GND
Not connected
Bi-directional data
Horizontal sync signal: TTL level
Vertical sync signal: TTL level
Data clock
Signal
PR (CR)
Y
PB (CB)
Not connected
Not connected
Earth (PR)
Earth (Y)
Earth (PB)
Not connected
Not connected
Not connected
Not connected
Not connected
Not connected
Not connected
RS-232C Terminal: 9-pin D-sub male connector
Pin No.
1
2
3
4
5
6
7
8
9
9876
54321
Signal
RD
SD
SG
Name
Receive Data
Send Data
Reserved
Signal Ground
Reserved
Reserved
Reserved
I/O
Input
Output
Reference
Not connected
Connected to internal circuit
Connected to internal circuit
Connected to internal circuit
Connected to internal circuit
Connected to internal circuit
Connected to internal circuit
Connected to internal circuit
Not connected
HDMI Terminal
18
19
2
1
Pin No.
1
2
3
4
5
6
7
Name
Pin No.
T.M.D.S data 2+
8
T.M.D.S data 2 shield
9
T.M.D.S data 2–
10
T.M.D.S data 1+
11
T.M.D.S data 1 shield
12
T.M.D.S data 1–
13
T.M.D.S data 0+
Name
Pin No.
T.M.D.S data 0 shield
14
T.M.D.S data 0–
15
T.M.D.S clock+
16
T.M.D.S clock shield
17
T.M.D.S clock–
18
CEC
19
Name
Utility
SCL
SDA
DDC/CEC ground
+5V power
Hot plug detection
Appendix
-65
XV-Z17000_E_US.indb 65
2010/12/17 11:16:47
RS-232C Specifications and Commands
Computer control
A computer can be used to control the projector by connecting an RS-232C cable (null modem, cross type,
commercially available) to the projector. (See page 22 for connection.)
Communication conditions
Set the serial port settings of the computer as follows.
Signal format: Conforms to RS-232C standard.
Baud rate*: 9,600 bps / 38,400bps / 115,200bps
Data length: 8 bits
*Use the same settings for the projector and computer.
Parity bit: None
Stop bit: 1 bit
Flow control: None
Basic format
Send commands from the computer in the following order: command, parameter, and return code. After
processing the command from the computer, the projector sends a response code to the computer.
Command format
C1
C2
C3 C4
P1
P2
P3
Command 4-digit
Response code format
Normal response
O
K
Return code (0DH)
P4
Return code (0DH)
Parameter 4-digit
Problem response (communication error or incorrect command)
E
R
R
Return code (0DH)
Info
• When controlling the projector using RS-232C commands from a computer, wait for at least 30 seconds
after the power has been turned on, and then transmit the commands.
• After sending an input selection or picture adjustment command and then receiving an “OK” response
code, the projector may take some time to process the command. If a second command is sent while the
projector is still processing the first command, you may receive an “ERR” response code. If this happens,
try resending the second command.
• When more than one code is being sent, send each command only after the response code for the previous command from the projector is verified.
• “POWR????”, “TABN _ _ _ 1”, “TLPS _ _ _ 1”, “TPOW _ _ _ 1”, “TLPN _ _ _ 1”, “TLTT _ _ _ 1”,
“TLTM _ _ _ 1”, “TLTL _ _ _ 1”, “TNAM _ _ _ 1”, “MNRD _ _ _ 1”, “PJN0 _ _ _ 1”
−When the projector receives the special commands shown above:
* The on-screen display will not disappear.
* The “Auto Power Off” timer will not be reset.
−The special commands are available for applications that require continuous polling.
-66
XV-Z17000_E_US.indb 66
2010/12/17 11:16:48
Commands
Example: To turn on the projector
Computer
P
O
W
R
_
_
1
_
Projector
→
←
O
K
Return
Control Contents
Power
Command
On
P
O
W
Off
P
O
W
Status
T
L
P
S
?
?
?
T
A
B
N
_
_
_
Projector Condition
Lamp
Name
Input Change
Parameter
Standby mode
(or 30-second startup time)
Power ON
R
_
_
_
1
OK or ERR
OK
R
_
_
_
0
OK
OK or ERR
?
1
0
1
0:Normal
1:Temp High
8:Lamp Life 5% or less
16:Lamp Burnt-out
32:Lamp Ignition Failure
0:Normal
1:Temp High
2:Fan Error
4:Lamp Cover Open
8:Lamp Life 5% or less
16:Lamp Burnt-out
32:Lamp Ignition Failure
64:Temp Abnormally High
Status
T
L
P
S
_
_
_
1
0:Off, 1:On, 2:Retry
3:Waiting, 4:Lamp Error
0:Off, 4:Lamp Error
Power Status
T
P
O
W
_
_
_
1
1:On, 2:Cooling
0:Standby
Quantity
T
L
P
N
_
_
_
1
1
Usage Time (Hour)
T
L
T
T
_
_
_
1
0-9999 (Integer)
Usage Time (Minuite)
T
L
T
M
_
_
_
1
0, 15, 30, 45
Life (Percentage)
T
L
T
L
_
_
_
1
0%-100% (Integer)
Model Name Check
T
N
A
M
_
_
_
1
XVZ17000
Model Name Check
M
N
R
D
_
_
_
1
XV-Z17000
Projector Name Setting1 (First 4 characters) *1
P
J
N
1
*
*
*
*
OK or ERR
Projector Name Setting2 (Middle 4 characters) *1
P
J
N
2
*
*
*
*
OK or ERR
Projector Name Setting3 (Last 4 characters) *1
P
J
N
3
*
*
*
*
OK or ERR
Projector Name Check
P
J
N
0
_
_
_
1
Projector Name
COMPUTER
I
R
G
B
_
_
_
1
OK or ERR
ERR
COMPONENT
I
R
G
B
_
_
_
2
OK or ERR
ERR
HDMI1
I
R
G
B
_
_
_
3
OK or ERR
ERR
HDMI2
I
R
G
B
_
_
_
4
OK or ERR
ERR
S-VIDEO
I
V
E
D
_
_
_
1
OK or ERR
VIDEO
I
V
E
D
_
_
_
2
OK or ERR
ERR
Input RGB Check
I
R
G
B
?
?
?
?
1: COMPUTER, 2: COMPONENT,
ERR
ERR
3: HDMI1, 4: HDMI2, ERR
Resize
Input Video Check
I
V
E
D
?
?
?
?
1: S-VIDEO, 2: VIDEO, ERR
Input Mode Check
I
M
O
D
?
?
?
?
1: RGB, 2: VIDEO
ERR
Input Check
I
C
H
K
?
?
?
?
1: COMPUTER
2: COMPONENT
3: HDMI1
4: HDMI2
5: S-VIDEO
6: VIDEO
ERR
COMPUTER
Normal
R
A
S
R
_
_
_
1
OK or ERR
ERR
16:9
R
A
S
R
_
_
_
2
OK or ERR
ERR
Native
COMPONENT
R
_
_
_
3
OK or ERR
ERR
S
R
_
_
_
5
OK or ERR
ERR
A
S
R
_
_
_
7
OK or ERR
ERR
Smart Zoom
R
A
S
R
_
_
_
6
OK or ERR
ERR
Normal
R
B
S
R
_
_
_
1
OK or ERR
ERR
16:9
R
B
S
R
_
_
_
2
OK or ERR
ERR
R
B
S
R
_
_
_
3
OK or ERR
ERR
Cinema Zoom
R
B
S
R
_
_
_
5
OK or ERR
ERR
Zoom14:9
R
B
S
R
_
_
_
7
OK or ERR
ERR
Smart Zoom
R
B
S
R
_
_
_
6
OK or ERR
ERR
Normal
R
C
S
R
_
_
_
1
OK or ERR
ERR
16:9
R
C
S
R
_
_
_
2
OK or ERR
ERR
R
C
S
R
_
_
_
3
OK or ERR
ERR
Cinema Zoom
R
C
S
R
_
_
_
5
OK or ERR
ERR
Zoom14:9
R
C
S
R
_
_
_
7
OK or ERR
ERR
Smart Zoom
R
C
S
R
_
_
_
6
OK or ERR
ERR
Normal
R
D
S
R
_
_
_
1
OK or ERR
ERR
16:9
R
D
S
R
_
_
_
2
OK or ERR
ERR
R
D
S
R
_
_
_
3
OK or ERR
ERR
Cinema Zoom
R
D
S
R
_
_
_
5
OK or ERR
ERR
Zoom14:9
R
D
S
R
_
_
_
7
OK or ERR
ERR
Smart Zoom
R
D
S
R
_
_
_
6
OK or ERR
ERR
R
A
S
V
_
_
_
1
OK or ERR
ERR
R
A
S
V
_
_
_
2
OK or ERR
ERR
Cinema Zoom
R
A
S
V
_
_
_
5
OK or ERR
ERR
Zoom14:9
R
A
S
V
_
_
_
7
OK or ERR
ERR
A
S
V
_
_
_
6
OK or ERR
ERR
R
Normal
R
B
S
V
_
_
_
1
OK or ERR
ERR
16:9
R
B
S
V
_
_
_
2
OK or ERR
ERR
Cinema Zoom
R
B
S
V
_
_
_
5
OK or ERR
ERR
Zoom14:9
R
B
S
V
_
_
_
7
OK or ERR
ERR
Smart Zoom
R
B
S
V
_
_
_
6
OK or ERR
ERR
Appendix
Normal
16:9
Smart Zoom
VIDEO
S
A
R
Native
S-VIDEO
A
R
Zoom14:9
Native
HDMI2
R
Cinema Zoom
Native
HDMI1
ERR
-67
XV-Z17000_E_US.indb 67
2010/12/17 11:16:48
RS-232C Specifications and Commands (Continued)
Return
Control Contents
Command
ALL Reset
COMPUTER INPUT
A
Picture Mode
_
_
_
1
OK or ERR
Standby mode
(or 30-second startup time)
ERR
R
A
P
S
_
_
_
1
OK or ERR
ERR
R
A
P
S
_
_
_
2
OK or ERR
ERR
Dynamic
R
A
P
S
_
_
_
3
OK or ERR
ERR
Movie1
R
A
P
S
_
_
_
4
OK or ERR
ERR
Movie2
R
A
P
S
_
_
_
5
OK or ERR
ERR
Game
R
A
P
S
_
_
_
6
OK or ERR
ERR
Contrast
-30 - +30
R
A
P
I
_
*
*
*
OK or ERR
ERR
Bright
-30 - +30
R
A
B
R
_
*
*
*
OK or ERR
ERR
Color
-30 - +30
R
A
C
O
_
*
*
*
OK or ERR
ERR
Tint
-30 - +30
R
A
T
I
_
*
*
*
OK or ERR
ERR
Sharp
-30 - +30
R
A
S
H
_
*
*
*
OK or ERR
ERR
Red
-30 - +30
R
A
R
D
_
*
*
*
OK or ERR
ERR
Blue
-30 - +30
R
A
B
E
_
*
*
*
OK or ERR
ERR
CLR Temp
-2 - +2
R
A
C
T
_
_
*
*
OK or ERR
ERR
R
A
R
E
_
_
_
1
OK or ERR
ERR
Picture Mode
Standard
R
B
P
S
_
_
_
1
OK or ERR
ERR
Natural
R
B
P
S
_
_
_
2
OK or ERR
ERR
Dynamic
R
B
P
S
_
_
_
3
OK or ERR
ERR
Movie1
R
B
P
S
_
_
_
4
OK or ERR
ERR
Movie2
R
B
P
S
_
_
_
5
OK or ERR
ERR
Game
R
B
P
S
_
_
_
6
OK or ERR
ERR
Contrast
-30 - +30
R
B
P
I
_
*
*
*
OK or ERR
ERR
Bright
-30 - +30
R
B
B
R
_
*
*
*
OK or ERR
ERR
Color
-30 - +30
R
B
C
O
_
*
*
*
OK or ERR
ERR
Tint
-30 - +30
R
B
T
I
_
*
*
*
OK or ERR
ERR
Sharp
-30 - +30
R
B
S
H
_
*
*
*
OK or ERR
ERR
Red
-30 - +30
R
B
R
D
_
*
*
*
OK or ERR
ERR
Blue
-30 - +30
R
B
B
E
_
*
*
*
OK or ERR
ERR
CLR Temp
-2 - +2
R
B
C
T
_
_
*
*
OK or ERR
ERR
Picture Mode
R
B
R
E
_
_
_
1
OK or ERR
ERR
Standard
R
C
P
S
_
_
_
1
OK or ERR
ERR
Natural
R
C
P
S
_
_
_
2
OK or ERR
ERR
Dynamic
R
C
P
S
_
_
_
3
OK or ERR
ERR
Movie1
R
C
P
S
_
_
_
4
OK or ERR
ERR
Movie2
R
C
P
S
_
_
_
5
OK or ERR
ERR
Game
R
C
P
S
_
_
_
6
OK or ERR
ERR
ERR
Contrast
-30 - +30
R
C
P
I
_
*
*
*
OK or ERR
Bright
-30 - +30
R
C
B
R
_
*
*
*
OK or ERR
ERR
Color
-30 - +30
R
C
C
O
_
*
*
*
OK or ERR
ERR
Tint
-30 - +30
R
C
T
I
_
*
*
*
OK or ERR
ERR
Sharp
-30 - +30
R
C
S
H
_
*
*
*
OK or ERR
ERR
Red
-30 - +30
R
C
R
D
_
*
*
*
OK or ERR
ERR
Blue
-30 - +30
R
C
B
E
_
*
*
*
OK or ERR
ERR
CLR Temp
-2 - +2
R
C
C
T
_
_
*
*
OK or ERR
ERR
R
C
R
E
_
_
_
1
OK or ERR
ERR
Standard
R
D
P
S
_
_
_
1
OK or ERR
ERR
Natural
R
D
P
S
_
_
_
2
OK or ERR
ERR
Dynamic
R
D
P
S
_
_
_
3
OK or ERR
ERR
Movie1
R
D
P
S
_
_
_
4
OK or ERR
ERR
ERR
Picture Reset
HDMI2
E
Standard
Picture Reset
HDMI1
R
Power ON
Natural
Picture Reset
COMPONENT INPUT
L
Parameter
Picture Mode
Movie2
R
D
P
S
_
_
_
5
OK or ERR
Game
R
D
P
S
_
_
_
6
OK or ERR
ERR
Contrast
-30 - +30
R
D
P
I
_
*
*
*
OK or ERR
ERR
Bright
-30 - +30
R
D
B
R
_
*
*
*
OK or ERR
ERR
Color
-30 - +30
R
D
C
O
_
*
*
*
OK or ERR
ERR
Tint
-30 - +30
R
D
I
_
*
*
*
OK or ERR
ERR
Sharp
-30 - +30
R
D
S
H
_
*
*
*
OK or ERR
ERR
Red
-30 - +30
R
D
R
D
_
*
*
*
OK or ERR
ERR
Blue
-30 - +30
R
D
B
E
_
*
*
*
OK or ERR
ERR
CLR Temp
-2 - +2
R
D
C
T
_
_
*
*
OK or ERR
ERR
R
D
R
E
_
_
_
1
OK or ERR
ERR
Picture Reset
T
-68
XV-Z17000_E_US.indb 68
2010/12/17 11:16:49
Return
Control Contents
S-VIDEO INPUT
Picture Mode
Command
V
A
P
S
_
_
_
1
OK or ERR
ERR
Natural
V
A
P
S
_
_
_
2
OK or ERR
ERR
Dynamic
V
A
P
S
_
_
_
3
OK or ERR
ERR
Movie1
V
A
P
S
_
_
_
4
OK or ERR
ERR
Movie2
V
A
P
S
_
_
_
5
OK or ERR
ERR
ERR
Game
V
A
P
S
_
_
_
6
OK or ERR
Contrast
-30 - +30
V
A
P
I
_
*
*
*
OK or ERR
ERR
Bright
-30 - +30
V
A
B
R
_
*
*
*
OK or ERR
ERR
Color
-30 - +30
V
A
C
O
_
*
*
*
OK or ERR
ERR
Tint
-30 - +30
V
A
T
I
_
*
*
*
OK or ERR
ERR
Sharp
-30 - +30
V
A
S
H
_
*
*
*
OK or ERR
ERR
Red
-30 - +30
V
A
R
D
_
*
*
*
OK or ERR
ERR
Blue
-30 - +30
V
A
B
E
_
*
*
*
OK or ERR
ERR
CLR Temp
-2 - +2
V
A
C
T
_
_
*
*
OK or ERR
ERR
V
A
R
E
_
_
_
1
OK or ERR
ERR
Standard
V
B
P
S
_
_
_
1
OK or ERR
ERR
Natural
V
B
P
S
_
_
_
2
OK or ERR
ERR
Dynamic
V
B
P
S
_
_
_
3
OK or ERR
ERR
Movie1
V
B
P
S
_
_
_
4
OK or ERR
ERR
Movie2
V
B
P
S
_
_
_
5
OK or ERR
ERR
Game
V
B
P
S
_
_
_
6
OK or ERR
ERR
Contrast
-30 - +30
V
B
P
I
_
*
*
*
OK or ERR
ERR
Bright
-30 - +30
V
B
B
R
_
*
*
*
OK or ERR
ERR
Color
-30 - +30
V
B
C
O
_
*
*
*
OK or ERR
ERR
ERR
Picture Mode
Tint
-30 - +30
V
B
T
I
_
*
*
*
OK or ERR
Sharp
-30 - +30
V
B
S
H
_
*
*
*
OK or ERR
ERR
Red
-30 - +30
V
B
R
D
_
*
*
*
OK or ERR
ERR
Blue
-30 - +30
V
B
B
E
_
*
*
*
OK or ERR
ERR
CLR Temp
-2 - +2
V
B
C
T
_
_
*
*
OK or ERR
ERR
V
B
R
E
_
_
_
1
OK or ERR
ERR
Picture Reset
RGB Frequency Check
3D
Standby mode
(or 30-second startup time)
Power ON
Standard
Picture Reset
VIDEO INPUT
Parameter
Horizontal
T
F
R
Q
_
_
_
1
kHz (***.* or ERR)
Vertical
T
F
R
Q
_
_
_
2
Hz (***.* or ERR)
ERR
On
3
D
E
N
_
_
_
1
OK or ERR
ERR
Off
3D Format
Invert
Lamp Timer Reset *2
ERR
3
D
E
N
_
_
_
0
OK or ERR
ERR
Auto
3
D
F
M
_
_
_
0
OK or ERR
ERR
Side By Side
3
D
F
M
_
_
_
1
OK or ERR
ERR
Top And Bottom
3
D
F
M
_
_
_
2
OK or ERR
ERR
3
D
I
V
_
_
_
1
OK or ERR
ERR
L
P
R
E
0
0
0
1
ERR
OK, ERR
Note
• If an underbar (_) appears in the parameter column, enter a space. If an asterisk (*) appears, enter a value
in the range indicated in brackets under Control Contents.
*1
*2
For setting the projector name, send the commands in order of PJN1, PJN2 and PJN3.
The Lamp Timer Reset command can only be sent in standby mode.
Appendix
-69
XV-Z17000_E_US.indb 69
2010/12/17 11:16:49
Compatibility Chart
Computer
• Multiple signal support
Horizontal Frequency: 15–110 kHz, Vertical Frequency: 43–85 Hz, Pixel Clock: 12–170 MHz
• Compatible with sync on green and composite sync signals (TTL level)
PC/MAC
Mode
Resolution
1400 × 1050
WSXGA+
1600 × 900
1680 × 1050
1920 × 1080*1
1920 × 1080*2
67.5
60
640 × 480
832 × 624
1024 × 768
1152 × 870
34.9
49.7
60.2
68.7
67
75
75
75
640 × 480
SVGA
XGA
WXGA
WXGA+
800 × 600
1024 × 768
1280 × 720
1280 × 768
1280 × 800
1360 × 768
1366 × 768
1440 × 900
1152 × 864
SXGA
1280 × 960
1280 × 1024
13"
16"
19"
21"
Analog
Support
60
70
85
60
70
85
50
60
70
72
75
85
50
56
60
70
72
75
85
50
60
70
75
85
60
60
60
60
60
60
60
70
75
60
60
60
60
60
60
60
SXGA+
720 × 400
VGA
MAC
MAC
MAC
MAC
Vertical
frequency[Hz]
27.0
31.5
37.9
27.0
31.5
37.9
26.2
31.5
34.7
37.9
37.5
43.3
31.3
35.2
37.9
46.6
48.1
46.9
53.7
40.3
48.4
56.5
60.0
68.7
45.0
47.8
49.7
47.7
47.8
55.9
55.0
66.2
67.5
60.0
64.0
64.0
65.3
55.9
65.3
66.8
640 × 400
PC
Horizontal frequency
[kHz]
VGA
SVGA
XGA
SXGA
Digital
Support
Display
Upscale
Down sampled
Intelligent
Compression
Upscale
*1 When a 1920 × 1080 analog signal is input, the image is compressed before it is displayed on the screen.
*2 Full image display when “Resolution” is set to “1920 × 1080”
Note
• This projector may not be able to display images from notebook computers in simultaneous (CRT/LCD)
mode. Should this occur, turn off the LCD display on the notebook computer and output the display data
in “CRT only” mode. Details on how to change display modes can be found in your notebook computer’s
operation manual.
• When “Screen resolution” of the computer is different from the resolution displayed on the projected image, follow the procedures shown below.
– Refer to “Resolution” on the “SIG-ADJ” menu and select the same resolution as the resolution in “Screen
resolution” of the computer.
– Depending on the computer you are using, the output signal may not be faithful to the “Screen resolution” adjustment. Check the settings of the computer's signal output. If the settings cannot be
changed, it is recommended that the resolution be set to “1920 × 1080” or “1280 × 720”.
-70
XV-Z17000_E_US.indb 70
2010/12/17 11:16:50
DTV
Horizontal
Frequency (kHz)
15.7
Vertical
Frequency (Hz)
60
Analog
Support
Digital
Support
Signal
31.5
60
540P
33.8
60
576I
576P
15.6
720P
720P
Signal
480I
480P
Horizontal
Frequency (kHz)
28.1
Vertical
Frequency (Hz)
50
Analog
Support
Digital
Support
33.8
60
1080I
1080P
27.0
24
50
1080P
28.1
25
31.3
50
1080P
33.8
30
37.5
50
1080P
56.3
50
45.0
60
1080P
67.5
60
Signal
720P
Horizontal
Frequency (kHz)
75.0
Vertical
Frequency (Hz)
50
1080I
3D
Format
Frame
Packing
Side By
Side
Top And
Bottom
Analog
Support
Digital
Support
720P
90.0
60
1080P
54.0
24
720P
37.5
50
720P
45.0
60
1080I
28.1
50
1080I
1080P
33.8
60
56.3
50
1080P
67.5
60
720P
37.5
50
720P
45.0
60
1080P
27.0
24
1080P
56.3
50
1080P
67.5
60
Appendix
-71
XV-Z17000_E_US.indb 71
2010/12/17 11:16:50
Troubleshooting
Problem
Check
• Projector power cord is not plugged into the wall outlet.
• Power to the external connected devices is off.
• The lens shutter is closed.
• The selected input mode is wrong.
• Cables are incorrectly connected to the projector.
• Remote control battery has run out.
• External output has not been set when connecting notebook computer.
No picture or projector does
not start
• The lamp unit cover is not installed correctly.
Page
23
–
23, 28
27, 41, 42
19-23
13
–
63, 64
• The selected “Signal Type” is wrong.
41
• The video signal format of the video equipment is not set correctly.
42
• “Bright” is set to minimum position.
37
• Image adjustments are incorrectly set.
37
(S-VIDEO or VIDEO input)
• Video input system is incorrectly set.
(COMPONENT, COMPUTER/COMPONENT or HDMI1, 2 input)
• Input signal type is incorrectly set.
42
41
Color is faded or poor.
Picture is blurred;
noise appears.
An unusual sound is
occasionally heard
from the cabinet.
Maintenance
indicator on the
projector illuminates.
Picture is green when
receiving YPbPr
signals and the video
equipment is connected
to the COMPONENT or
COMPUTER/COMPONENT
terminal on the projector.
Picture is pink when receiving RGB signals and the video
equipment is connected to the
COMPONENT or COMPUTER/
COMPONENT terminal on the
projector.
The black levels of the
image show banding or
appear faded when HDMI1
or 2 is selected.
Picture is too bright and
whitish.
• Adjust the focus.
24
• The projection distance exceeds the focus range.
18
(Computer input)
• Perform “SIG-ADJ” Adjustments (“Clock” Adjustment)
• Perform “SIG-ADJ” Adjustments (“Phase” Adjustment)
• Noise may appear depending on the computer.
• The “DNR” (Digital Noise Reduction) or “MNR” (Mosquito Noise Reduction) setting is not correct.
• There is fog on the lens. If the projector is carried from a cold room into a
warm room, or if it is suddenly heated, condensation may form on the surface
of the lens and the image will become blurred. Please set up the projector at
least one hour before it is to be used. If condensation should form, remove the
power cord from the wall outlet and wait for it to clear.
• If the picture is normal, the sound is due to cabinet shrinkage caused
by a room temperature changes. This will not affect operation or performance.
• See “Maintenance Indicators”.
41
41
–
40
–
–
60
• Change the input signal type setting.
41
• Make adjustments that result in the best picture quality in the “Dynamic
Range” setting.
42
• Image adjustments are incorrectly set.
37
-72
XV-Z17000_E_US.indb 72
2010/12/17 11:16:50
Problem
The cooling fan
becomes noisy.
The lamp does not light up
even after the
projector turns on.
Check
• When temperature inside the projector increases, the cooling fan runs
faster.
• The lamp indicator is illuminating in red.
Replace the lamp.
• The lens shutter is opened fully.
Page
–
23, 60, 63
The lamp suddenly turns off
during projection.
The image sometimes
flickers.
The lamp needs much time
to turn on.
• Cables are incorrectly connected to the projector or the connected equipment works improperly.
• If this happens frequently, replace the lamp.
19-22
63
• The lamp will eventually need to be changed.
While the remaining lamp life draws to a close, replace the lamp.
63
• Non-Sharp Video Products are connected.
One Touch Play function may not work when the projector is connected
to non-Sharp Video Products.
46
• An HDMI cable is not used for connection between the projector and the
Sharp Video Products.
One Touch Play function is enabled when the projector is connected to
the Sharp Video Products with an HDMI cable.
20
• One Touch Play function of the projector is not set to “On”.
46
Picture is dark.
One Touch Play is not
enabled.
System Standby is not
enabled.
• CEC settings of connected Sharp Video Products or other CEC devices
are incorrect.
–
• One Touch Play is set to “Off” and disabled when the Economy mode is
set to “On”.
46
• Non-Sharp Video Products are connected.
System Standby function may not work when the projector is connected
to non-Sharp Video Products.
46
• An HDMI cable is not used for connection between the projector and the
Sharp Video Products.
System Standby function is enabled when the projector is connected to
the Sharp Video Products with an HDMI cable.
20
• System Standby function of the projector is not set to “On”.
46
• CEC settings of connected Sharp Video Products or other CEC devices
are incorrect.
–
A response code cannot be
received when the
projector was attempted
to be controlled using
RS-232C commands from
a computer during standby.
• In the case of transmitting RS-232C commands from a computer during
standby, it takes a maximum of 30 seconds for the computer to receive
the response code. Set the response code waiting time of the computer
to 30 seconds or more.
66
The remote control
cannot be used.
• Operate the remote control while pointing it at the projector’s remote
control sensor.
• The remote control may be too far away from the projector.
• If direct sunlight or a strong fluorescent light is shining on the projector’s
remote control sensor, place the projector where it will not be affected by
strong light.
13
• The batteries may be depleted or inserted incorrectly. Make sure the batteries are inserted correctly or insert new ones.
13
13
13
Appendix
-73
XV-Z17000_E_US.indb 73
2010/12/17 11:16:50
Troubleshooting (Continued)
Problem
3D images are not
displayed.
Check
• Switch to 3D mode.
• Is “3D Auto Change” set to “No”? Press 3D ON/OFF to switch to 3D
mode.
• If “3D Auto Change” is set to “Yes” but no 3D images are displayed,
check the display format of the content being viewed. Some 3D image
signals may not be recognized as 3D images automatically. Press 3D
MENU to select the appropriate display format for the 3D image.
3D Images flicker when
watching in a room.
Ghosting (a double image)
occurs without the image
appearing in 3D.
Page
53, 54, 55
55
55, 56
• The 3D Glasses are not turned on.
52
• The 3D Glasses are set to 2D mode.
52
• The 3D Glasses operate by receiving the infrared signal reflected onto
the screen. Do not place anything between the screen and the infrared
receiver on the 3D Glasses.
–
• Images may appear to flicker when fluorescent light or ambient light
enters your vision.
-Turn off the lights.
-Block any ambient light.
–
• Use “Invert” to change the setting.
55
• A signal that does not support 3D is being received. Check whether a
signal that supports 3D is being received.
71
• If the projector is connected to a computer for 3D image playback,
check that a stereoscopically-enabled application is being used.
- Use the applicable software
- Configure your 3D application at the correct 3D format, resolution and
refresh rate. To support 3D, your 3D application must be configured to
run at the correct settings for this projector.
–
• If there is strong ambient light, block the light. High intensity lighting can
interfere with communication between the 3D Glasses and the screen,
resulting in some flicker.
–
• A picture simultaneously projected from more than two projectors may
not appear 3D. Use only one projector at a time.
–
• When a 3D image is projected, the screen may appear darker than normal.
–
The 3D Glasses turn off
automatically.
• Is there an obstacle between the 3D Glasses and the screen, or is something covering the infrared receiver on the 3D Glasses? The 3D Glasses
turn off automatically after 3 minutes if no signal is received. Do not
place anything between the screen and the infrared receiver on the 3D
Glasses.
–
Pressing the power button
on the 3D Glasses does not
cause the LED light to light.
• The battery in the 3D Glasses is exhausted. If the LED light does not light
after pressing the power button for more than one second, the battery is
exhausted. Replace the battery.
51
The projected image is dark.
This unit is equipped with a microprocessor. Its performance could be adversely affected by incorrect
operation or interference. If this should happen, unplug the unit and plug it in again after more than
5 minutes.
-74
XV-Z17000_E_US.indb 74
2010/12/17 11:16:51
For SHARP Assistance
If you encounter any problems during setup or operation of this projector, first refer to the “Troubleshooting”
section on pages 72 to 74. If this operation manual does not answer your question, please contact the
SHARP Service departments listed below.
U.S.A.
Sharp Electronics Corporation
1-888-GO-SHARP (1-888-467-4277)
[email protected]
http://www.sharpusa.com
Canada
Sharp Electronics of Canada Ltd.
(905) 568-7140
http://www.sharp.ca
Mexico
Sharp Electronics Corporation
Mexico Branch
(525) 716-9000
http://www.sharp.com.mx
Latin America Sharp Electronics Corp. Latin
American Group
(305) 264-2277
[email protected]
http://www.siempresharp.com
Benelux
SHARP Electronics Benelux BV
0900-SHARPCE (0900-7427723)
Nederland
9900-0159 Belgium
http://www.sharp.nl
http://www.sharp.be
http://www.sharp.lu
Australia
Sharp Corporation of Australia Pty.
Ltd.
1300-135-022
http://www.sharp.net.au
New Zealand Sharp Corporation of New Zealand
Phone: (09) 573-0111
Fax: (09) 573-0112
http://www.sharp.net.nz
Singapore
Sharp-Roxy Sales (S) Pte. Ltd.
65-226-6556
[email protected]
http://www.sharp.com.sg
Hong Kong
Sharp-Roxy (HK) Ltd.
(852) 2410-2623
[email protected]
http://www.sharp.com.hk
Sharp Electronics (Europe) GMBH
01805-234675
http://www.sharp.de
U.K.
Sharp Electronics (U.K.) Ltd.
08705 274277
http://www.sharp.co.uk/customersupport
Italy
Sharp Electronics (Italy) S.P.A.
(39) 02-89595-1
http://www.sharp.it
Taiwan
Sharp Corporation (Taiwan)
0800-025111
http://www.sharp-scot.com.tw
France
Sharp Electronics France
01 49 90 35 40
[email protected]
http://www.sharp.fr
Malaysia
Sharp-Roxy Sales & Service Co.
(60) 3-5125678
U.A.E.
Sharp Middle East Fze
971-4-81-5311
[email protected]
Thailand
Sharp Thebnakorn Co. Ltd.
02-236-0170
[email protected]
http://www.sharp-th.com
Korea
Sharp Electronics Incorporated of
Korea
(82) 2-3660-2002
[email protected]
http://www.sharpkorea.co.kr
India
Sharp Business Systems (India)
Limited
(91) 11- 6431313
[email protected]
Spain
Switzerland
Sweden
Austria
Sharp Electronica Espana, S.A.
93 5819700
[email protected]
http://www.sharp.es
Sharp Electronics (Schweiz) AG
0041 1 846 63 11
[email protected]
http://www.sharp.ch
Sharp Electronics ( Nordic ) AB
(46) 8 6343600
[email protected]
http://www.sharp.se
Sharp Electronics (Europe) GMBH
Branch Office Austria
0043 1 727 19 123
[email protected]
http://www.sharp.at
Appendix
Germany
-75
XV-Z17000_E_US.indb 75
2010/12/17 11:16:51
Specifications
Model
XV-Z17000
Display devices
0.65" DLP® Chip × 1
Resolution
1080P (1920 × 1080)
Lens
Input terminals
Control and
communication
terminals
F number
F 2.5 – 2.7
Zoom
Manual, ×1.15 (f = 21.0 – 24.2 mm)
Focus
Manual
HDMI
×2
Computer/Component
(mini D-sub 15 pin)
×1
Component (3RCA)
×1
S-Video (mini DIN 4 pin)
×1
Video (RCA)
×1
RS-232C (mini D-sub 9 pin)
×1
Projection lamp
250 W
Rated voltage
AC 100 – 240V
Rated frequency
50/60 Hz
Input current
3.7 A
Power consumption (Standby)
353 W (7.6 W) with AC 100 V
339 W (8.3 W) with AC 240 V
Operation temperature
41°F to 95°F (+5°C to +35°C)
Cabinet
Plastic
Dimensions (main body only) [W × H × D]
15 3/4" × 3 15/16" × 13 13/64"
(400 × 100 × 335 mm)
Weight (approx.)
12.8 lbs. (5.8 kg)
As a part of policy of continuous improvement, SHARP reserves the right to make design and specification changes for
product improvement without prior notice. The performance specification figures indicated are nominal values of production units. There may be some deviations from these values in individual units.
This SHARP projector uses a DLP® chip. This very sophisticated panel contains 2,073,600 pixels (micromirrors). As
with any high technology electronic equipment such as large screen TVs, video systems and video cameras, there
are certain acceptable tolerances that the equipment must conform to.
This unit has some inactive pixels within acceptable tolerances which may result in inactive dots on the picture
screen. This will not affect the picture quality or the life expectancy of the unit.
-76
XV-Z17000_E_US.indb 76
2010/12/17 11:16:51
Dimensions
13 45/64 (348)
13 13/64 (335)
1/4
(6)
Units: inches (mm)
4 17/32 (115)
3 15/16 (100)
1 43/64
(42.2)
2 9/16
(65)
4 17/32
(115)
1
3 23/64
(85)
15 3/4 (400)
M4
M4
M4
1 13/16
(45.75)
15/64 (5.75)
2 61/64
(75)
4 5/8
(116.25)
Appendix
7 5/64
(179.75)
6 49/64 (171.5)
M4
3 33/64
(89)
1 1/ 2
(38)
/8 (3)
-77
XV-Z17000_E_US.indb 77
2010/12/17 11:16:51
Index
16:9....................................................................... 30
3D Auto Change ................................................... 55
3D Depth Adjust ................................................... 55
3D Format............................................................. 55
3D Glasses ......................................................50-52
3D MENU ............................................................. 55
3D MENU button ............................................ 54, 55
3D ON/OFF button ......................................... 53, 54
Accessories ............................................................ 9
AC socket ............................................................. 23
Adjustment buttons ............................................. 35
Adjustment feet .................................................... 24
Advanced ............................................................. 38
All Reset ............................................................... 47
Auto Power Off ..................................................... 46
Auto Sync ............................................................. 41
AUTO SYNC button ............................................. 28
Background .......................................................... 45
Batteries ............................................................... 13
Bright .................................................................... 37
Bright Boost ......................................................... 40
Carrying handle .................................................... 11
Ceiling-mount setup ............................................. 17
CINEMA ZOOM .................................................... 30
Clock .................................................................... 41
CLR Temp (Color Temperature) ............................ 37
C.M.S. .................................................................. 38
Color ..................................................................... 37
COMPONENT button ........................................... 27
COMPONENT terminal ......................................... 19
COMPUTER button .............................................. 27
COMPUTER/COMPONENT terminal ............. 19, 21
Contrast ................................................................ 37
Detail Enhance ..................................................... 40
DNR ...................................................................... 40
Dynamic ............................................................... 37
Dynamic Range .................................................... 42
Economy Mode .................................................... 46
ECO+QUIET button .............................................. 29
Effect .................................................................... 39
ENTER button....................................................... 35
Fan Mode ............................................................. 47
Film Mode............................................................. 40
Focus ring............................................................. 24
FREEZE button ..................................................... 28
Game .................................................................... 37
Gamma ................................................................. 38
HDMI1, 2 buttons ................................................. 27
HDMI1, 2 terminals ......................................... 19, 20
HEIGHT ADJUST lever ......................................... 24
H-Image Shift ................................................. 27, 43
H-Pos ................................................................... 41
Hue ....................................................................... 39
IMAGE SHIFT button ............................................ 27
INPUT button........................................................ 27
Input Name ........................................................... 47
Invert..................................................................... 55
IR Emitter Level .................................................... 55
IRIS1, 2 ................................................................. 38
IRIS1, 2 buttons.................................................... 29
Kensington Security Standard connector ............ 11
KEYSTONE button ............................................... 25
Lamp indicator ..................................................... 60
Lamp Timer (Life) .................................................. 47
Language (on-screen display language) .............. 45
Lens shutter.............................................. 23, 28, 63
MAGNIFY buttons ................................................ 29
MENU HIDE button .............................................. 29
MENU button........................................................ 35
MNR ..................................................................... 40
Movie1, 2 .............................................................. 37
NATIVE.................................................................. 31
Natural .................................................................. 37
ON button ............................................................. 23
One Touch Play .................................................... 46
On-screen Display ................................................ 45
Optional accessories .............................................. 9
OSD Brightness .................................................... 45
Overscan .............................................................. 43
Phase.................................................................... 41
Picture .................................................................. 37
Picture Mode ........................................................ 37
PICTURE MODE button ....................................... 28
Power cord ....................................................... 9, 23
Power indicator .............................................. 23, 60
PRJ-ADJ ............................................................... 46
PRJ mode ....................................................... 17, 45
Remote control ..................................................... 12
Remote control sensors ....................................... 13
Replacing the lamp .............................................. 62
RESIZE button ...................................................... 30
RETURN button .................................................... 35
Rotation .......................................................... 26, 45
RS-232C ............................................................... 47
RS-232C terminal ................................................. 22
Saturation ............................................................. 39
SCR-ADJ .............................................................. 43
Screen Size and Projection Distance ................... 18
Security bar .......................................................... 11
Select Color .......................................................... 39
Sharp .................................................................... 37
SIG-ADJ ............................................................... 41
Signal Info............................................................. 42
Signal Type ........................................................... 41
SMART ZOOM ..................................................... 31
Sphere ............................................................ 26, 44
Standard ............................................................... 37
STANDBY button .................................................. 23
STANDBY/ON button ........................................... 23
S-VIDEO button .................................................... 27
S-VIDEO terminal ........................................... 19, 20
System Standby ................................................... 46
Temperature warning indicator ............................. 60
Tint........................................................................ 37
Value ..................................................................... 39
VIDEO button ....................................................... 27
Video Setup .......................................................... 42
Video System ....................................................... 42
VIDEO terminal ..................................................... 19
Viewing Time Info ................................................. 55
V-Image Shift .................................................. 27, 43
V-Pos .................................................................... 41
ZOOM 14:9 ........................................................... 31
Zoom ring ............................................................. 24
-78
XV-Z17000_E_US.indb 78
2010/12/17 11:16:51
SPECIAL NOTE FOR USERS IN THE U.K.
The mains lead of this product is fitted with a non-rewireable (moulded) plug incorporating a 10A fuse.
Should the fuse need to be replaced, a BSI or ASTA approved BS 1362 fuse marked or
and of the
same rating as above, which is also indicated on the pin face of the plug, must be used.
Always refit the fuse cover after replacing the fuse. Never use the plug without the fuse cover fitted.
In the unlikely event of the socket outlet in your home not being compatible with the plug supplied, cut
off the mains plug and fit an appropriate type.
DANGER:
The fuse from the cut-off plug should be removed and the cut-off plug destroyed immediately and disposed of in a safe manner.
Under no circumstances should the cut-off plug be inserted elsewhere into a 13A socket outlet, as a
serious electric shock may occur.
To fit an appropriate plug to the mains lead, follow the instructions below:
WARNING:
THIS APPARATUS MUST BE EARTHED.
IMPORTANT:
The wires in this mains lead are coloured in accordance with the following code:
Green-and-yellow : Earth
Blue
: Neutral
Brown
: Live
As the colours of the wires in the mains lead of this apparatus may not correspond with the coloured
markings identifying the terminals in your plug proceed as follows:
• The wire which is coloured green-and-yellow must be connected to the terminal in the plug which is
marked by the letter E or by the safety earth symbol or coloured green or green-and-yellow.
• The wire which is coloured blue must be connected to the terminal which is marked with the letter N
or coloured black.
• The wire which is coloured brown must be connected to the terminal which is marked with the letter L
or coloured red.
IF YOU HAVE ANY DOUBT, CONSULT A QUALIFIED ELECTRICIAN.
XVZ17000_E_US_Hyo1-4.indd 2
2010/12/17 11:49:49
OPERATION MANUAL
MODE D’EMPLOI
MANUAL DE MANEJO
MANUAL DE OPERAÇÃO
FRANÇAIS
XV-Z17000
PROJECTOR
PROJECTEUR
PROYECTOR
PROJETOR
ENGLISH
XV-Z17000
ESPAÑOL
PORTUGUÊS
SHARP CORPORATION
Printed in China
Imprimé en Chine
Impreso en China
Impresso na China
TINS-E929WJZZ
11P01-CH-NM
XVZ17000_E_US_Hyo1-4.indd 1
2010/12/17 11:49:48