Transcript
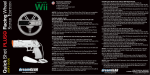
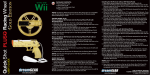
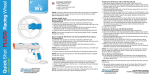
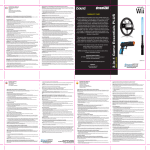
For service on any defective product under the 120-day warranty
policy, please contact Consumer Support
to obtain a Return Authorization Number.
NOTE: dreamGEAR will not process any defective claims without
a Return Authorization Number.
Consumer Support Hotline:
877-999-DREAM (3732) (U.S. and Canada only) or
310-222-1045 (International)
Consumer Support Email: [email protected]
Websites:
www.dreamgear.net
www.isound.net
PACKAGE CONTENTS:
• QUICK SHOT PRO
• User’s Guide/Warranty Card
• Registration Card
BATTERY INSTALLATION:
1. Unscrew the battery compartment door (located on the bottom of the
QUICK SHOT PRO handle) using a mini-screwdriver (not included).
2. Insert 2 “AAA” batteries (not included) in the correct +/- direction and
close the battery compartment door.
3. Screw the battery compartment door shut tightly before using.
NOTE: The power switch located next to the battery compartment
turns the blue LED & rumble functions of the QUICK SHOT PRO ON
and OFF.
USER’S GUIDE
This warranty does not cover normal wear and tear, abusive use or
misuse, modification, tampering or by any other cause not related to
either materials or workmanship. This warranty does not apply to
products used for any industrial, professional or commercial purposes.
Quick Shot Pro
All dreamGEAR/i.Sound products come with a limited warranty and
have been subjected to a thorough series of tests to ensure the highest
level of dependability and compatibility. It is unlikely that you will
experience any problem, but if a defect should become apparent
during the use of this product, dreamGEAR warrants to the original
consumer purchaser that this product will be free from defects in
material and workmanship for a period of 120 days from the date of
your original purchase. If a defect covered by this warranty occurs,
dreamGEAR, at its option, will repair or replace the product purchased
at no charge. If a replacement is necessary and your product is no
longer available, a comparable product may be substituted at the sole
discretion of dreamGEAR.
DGWII-3137
Without Wii MotionPLUS
1. Open both latches located at the top of the QUICK SHOT PRO.
2. Insert the Wii Remote (with the Wii Remote Jacket attached) by
sliding it into the Wii Remote cradle of the QUICK SHOT PRO
(directional pad end first with the buttons facing upward) until it stops.
3. Close the latch that is closest to the A button on the Wii Remote. If
you are playing a game that does not require the Nunchuk, close the
second latch and you are ready to play. If your game requires the use
of the Nunchuk, continue to step 4.
4. Through the back opening of the QUICK SHOT PRO, slip the
connector plug of the Nunchuk under the back latch on the QUICK
SHOT PRO and connect the Nunchuk to the Wii Remote. Make sure
that the connector cover of the Wii Remote has been removed before
inserting the connector plug of the Nunchuk into the External
Extension Connector of the Wii Remote.
5. Close the back latch.
HOW TO INSERT THE WII REMOTE INTO THE QUICK SHOT PRO:
NOTE: The QUICK SHOT PRO is only compatible with the Wii Remote
when inserted in the Wii Remote Jacket. Please refer to the Wii
Remote’s User’s Guide on how to install and uninstall the Wii Remote
Jacket.
NOTE: There is a pass-through port located on the front of the QUICK
SHOT PRO that can be used to easily navigate through menus without
having to remove the Wii Remote.
With Wii MotionPLUS
1. Open both latches located at the top of the QUICK SHOT PRO.
2. Insert the Wii Remote (with the Wii Remote Jacket attached) by sliding
it into the Wii Remote cradle of the QUICK SHOT PRO (directional
pad end first with the buttons facing upward) until it stops.
3. Close the latches on the QUICK SHOT PRO. If you are playing a game
that does not require the Nunchuk, you are ready to play. If your game
requires the use of the Nunchuk, continue to step 4.
4. Make sure the connector cover of the Wii MotionPLUS has been
removed and insert the connector plug of the Nunchuk into the
External Extension Connector of the Wii MotionPLUS.
CONTENIDO DEL EMBALAJE:
• QUICK SHOT PRO
• Guía de usuario/Tarjeta de garantía
• Tarjeta de registro
INSTALACIÓN DE LAS BATERÍAS:
1. Desenrosque la tapa del compartimiento de las baterías (ubicada en
la parte inferior de la agarradera del QUICK SHOT PRO) usando un
mini destornillador (no incluido).
2. Inserte 2 baterías “AAA” (no incluidas) con la polaridad correcta y
cierre la puerta del compartimiento de las baterías.
3. Atornille firmemente la puerta del compartimiento de las baterías
antes de usarlo.
NOTA: El botón de encendido ubicado cerca del compartimiento de
las baterías ACTIVA y DESACTIVA el LED azul y las funciones de
vibración del QUICK SHOT PRO.
CÓMO INSERTAR EL WII REMOTE EN EL QUICK SHOT PRO:
NOTA: El QUICK SHOT PRO es compatible con el Wii Remote
solamente cuando se inserta en Wii Remote Jacket. Consulte la Guía
de Usuario del Control Wii Remote para ver cómo instalar y
desinstalar Wii Remote Jacket.
NOTA: Hay un puerto de paso ubicado en la parte delantera del
QUICK SHOT PRO que puede utilizarse para navegar con facilidad
por los menús sin tener que quitar el Wii Remote.
Con Wii MotionPLUS
1. Abra los dos cierres que están ubicados en la parte superior del
QUICK SHOT PRO.
2. Inserte el Wii Remote (con el Wii Remote Jacket) deslizándolo en la
Base para Wii Remote del QUICK SHOT PRO (primero el extremo del
control direccional con los botones hacia arriba) hasta que haya
entrado totalmente.
3. Coloque de nuevo los cierres del QUICK SHOT PRO. Si está jugando
un juego que no requiera del Wii Nunchuk, ya puede comenzar a jugar.
Si su juego requiere del uso del Nunchuk, proceda con el paso 4.
CONTENU DE L'EMBALLAGE:
• QUICK SHOT PRO
• Guide d'utilisation/Carte de garantie
• Carte d’enregistrement
INSTALLATION DES PILES:
1. Dévissez le couvercle du compartiment pour piles (situé sous la
manche du QUICK SHOT PRO)
2. Insérer 2 piles "AAA" (non fournies) en respectant les polarités +/- et
refermez le couvercle du compartiment pour piles.
3. Vissez le couvercle du compartiment pour piles avant l'utilisation.
REMARQUE: L'interrupteur d'alimentation situé à côté du compartiment pour piles permet d'allumer et d'éteindre LED et la fonction de
vibration rumble du QUICK SHOT PRO.
COMMENT INSÉRER LA WIIMOTE DANS LE QUICK SHOT PRO:
REMARQUE: Le QUICK SHOT PRO n'est compatible avec la Wii
Remote que lorsqu'il est inséré dans la Wii Remote Jacket. Reportezvous au guide d'utilisation de la Wii Remote pour savoir comment
installer et désinstaller la Wii Remote Jacket.
REMARQUE: Il n'y a pas de port pass-through situé sur la face avant
du QUICK SHOT qui peut être utilisé pour naviguer facilement dans
les menus sans avoir à retirer la Wii Remote.
Avec Wii MotionPLUS
1. Ouvrez les deux loquets situés en haut du QUICK SHOT PRO.
2. Insérez la Wii Remote (avec la Wii Remote Jacket attachée) en la
glissant dans le berceau de la Wii Remote du QUICK SHOT PRO (le
bord du pavé directionnel d'abord avec les boutons vers le haut)
jusqu'à ce qu'elle s'arrête.
3. Fermez les loquets du QUICK SHOT PRO. Si vous jouez à un jeu qui
ne nécessite pas le Nunchuk, vous pouvez commencer tout de suite à
jouer. Si votre jeu nécessite l'utilisation du Nunchuk, continuez à
l'étape 4.
NOTE: The bottom trigger of the QUICK SHOT PRO activates the A
button, the top trigger activates the B button. Please refer to your
game’s User’s Guide for button configuration.
HOW TO REMOVE THE WII REMOTE FROM THE QUICK SHOT PRO:
1. If the Nunchuk is attached to the Wii Remote or the Wii MotionPLUS,
remove the Nunchuk first before trying to remove the Wii Remote
from the QUICK SHOT PRO.
NOTE: Please refer to the Wii Remote’s User’s Guide for Nunchuk
removal instructions.
2. Open both latches located on the top of the QUICK SHOT PRO and
lift the Wii Remote up from the back and slide the Wii Remote until it
is completely out of the QUICK SHOT PRO.
FOR TECHNICAL SUPPORT
PLEASE CONTACT: 1-877-999-DREAM
or [email protected]
4. Asegúrese de quitar la tapa del conector del Wii MotionPLUS antes
de insertar el enchufe del conector del Nunchuk en el External
Extension Connector del Wii MotionPLUS.
Sin Wii MotionPLUS
1. Abra los dos cierres que están ubicados en la parte superior del
QUICK SHOT PRO.
2. Inserte el Wii Remote (con el Wii Remote Jacket) deslizándolo en la
Base para Wii Remote del QUICK SHOT PRO (primero el extremo del
control direccional con los botones hacia arriba) hasta que haya
entrado totalmente.
3. Coloque el cierre que está más cerca del botón A del Wii Remote. Si
está jugando un juego que no requiera del Nunchuk, instale de nuevo
el segundo cierre y ya puede comenzar a jugar. Si su juego requiere
del uso del Nunchuk, proceda con el paso 4.
4. A través de la abertura trasera del QUICK SHOT PRO, deslice el
conector del Nunchuk bajo el cierre trasero del QUICK SHOT PRO y
conecte el Nunchuk al Wii Remote. Asegúrese de que se haya
retirado la tapa del conector del Wii Remote antes de insertar el
enchufe del conector del Nunchuk en el External Extension
Connector del Wii Remote.
5. Reponga el cierre trasero.
NOTA: El gatillo inferior del QUICK SHOT PRO activa el botón A, el
gatillo superior activa el botón B. Consulte la Guía de Usuario de su
juego para ver la configuración de los botones.
CÓMO EXTRAER EL WII REMOTE DEL QUICK SHOT PRO:
1. Si el Nunchuk está acoplado al Wii Remote o al Wii MotionPLUS,
retire primero el Nunchuk antes de intentar retirar el Wii Remote del
QUICK SHOT PRO.
NOTA: Consulte la Guía de Usuario del Wii Remote para ver las
instrucciones de remoción del Nunchuk.
2. Abra ambos cierres ubicados en la parte superior del QUICK SHOT
PRO y mueva el Wii Remote deslizándolo hacia arriba desde la parte
trasera y deslice el Wii Remote hasta que salga completamente del
QUICK SHOT PRO.
PARA SOPORTE TÉCNICO
CONTACTE AL: 1-877-999-DREAM
o [email protected]
4. Assurez-vous que le capuchon du connecteur de la Wii MotionPLUS
a été retiré et insérez le connecteur du Nunchuk dans l'External
Extension Connector (connecteur de la rallonge externe) de Wii
MotionPLUS.
Sans Wii MotionPLUS
1. Ouvrez les deux loquets situés en haut du QUICK SHOT PRO.
2. Insérez la Wii Remote (avec la Wii Remote Jacket attachée) en la
glissant dans le berceau de la Wii Remote du QUICK SHOT PRO (le
bord du pavé directionnel d'abord avec les boutons vers le haut)
jusqu'à ce qu'elle s'arrête.
3. Fermez le loquet qui est le plus proche du bouton A de la Wii Remote.
Si vous jouez à un jeu qui ne nécessite pas le Nunchuk, fermez le
second loquet et vous pouvez commencer tout de suite à jouer. Si
votre jeu nécessite l'utilisation du Nunchuk, continuez à l'étape 4.
4. Par l'ouverture arrière du QUICK SHOT PRO, glissez le connecteur du
Nunchuk en dessous du loquet arrière du QUICK SHOT PRO et
connectez le Nunchuk à la Wii Remote. Assurez-vous que le
capuchon du connecteur de la Wii Remote a été retiré avant d'insérer
le connecteur du Nunchuk dans l'External Extension Connector
(connecteur de la rallonge externe) de la Wii Remote.
5. Fermez le loquet arrière.
REMARQUE: La gâchette inférieure de QUICK SHOT PRO active le
bouton A et la gâchette supérieure active le bouton B. Reportez-vous
au guide d'utilisation de votre jeu pour la configuration des boutons.
COMMENT RETIRER LA WII REMOTE DE LA QUICK SHOT PRO:
1. Si le Nunchuk est attaché à la Wii Remote ou au Wii MotionPLUS,
enlevez d'abord le Nunchuk avant d'essayer d'enlever la Wii Remote
du QUICK SHOT PRO.
REMARQUE: Reportez-vous au guide d'utilisation de la Wii Remote
pour le retrait du Nunchuk.
2. Ouvrez les deux loquets situés au dessus de QUICK SHOT PRO et
soulevez la Wii Remote par l'arrière en la tirant jusqu'à ce qu'elle
sorte complètement du QUICK SHOT PRO.
POUR ASSISTANCE TECHNIQUE
VEUILLEZ CONTACTER : 1-877-999-DREAM
Ou [email protected]