1
916i cr
8 9 10 11 12
1
2
3
4
5
6
7
13
14
15
16
17
18
19
20
English
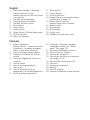
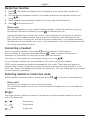
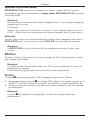
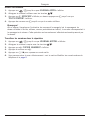
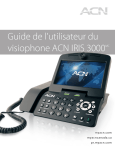
1 . New voice message - (flashing),
answer machine on (on),
answer machine off (off) and visual
ring indicator
. Two-way recording/Memo
3 . Hanging Hook for Handset
4 . Handset Volume Control
5 . Mute Button
6 . Store button
. Redial button
8 . Select Caller ID/Phone Book mode
9 . OK/Call Number
10 . New CID message
11 .
1 .
13 .
14 .
15 .
16 .
1 .
18 .
19 .
0 .
Menu button
Cancel Button
Scrolling Buttons
Answer machine functions buttons
(please refer to page 12)
Hands free button and
headset button with indicator
Recall button
Ring volume
Ring melody
Ringer tone
Headset or hands free mode
Français
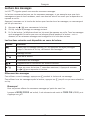
1 . Voyant répondeur :
Allumé continu = répondeur activé.
Clignotant = nouveaux messages.
Eteint = répondeur désactivé.
. Touche d’enregistrement/Mémo
3 . Support du combiné en position
murale
4 . Touche de réglage du volume du
combiné
5 . Touche Secret
6 . Touche de programmation
. Touche Bis
8 . Touche de sélection de la
présentation du numéro/Répertoire
9 . OK/Touche de numérotation
10 . Indicateur “Nouveau message”
(messagerie réseau) et “Nouvel
appel” (voir page 10)
11 . Touche de défilement du menu
1 . Touche Annuler/ Effacer
13 . Touches de navigation
14 . Touches de fonctions du répondeur
(voir page 12-14)
15 . Touche mains libres avec LED
16 . Touche R
1 . Volume de la sonnerie
18 . Mélodie
19 . Tonalité d’appel
0 . Casque ou combiné et haut-parleur
English
Contents
Installation
3
Connection. . . . . . . . . . . . . . . . . . . . . . . . . . . . . . . . . . . . . . . . . . . . . . . . . . . . 3
Settings. . . . . . . . . . . . . . . . . . . . . . . . . . . . . . . . . . . . . . . . . . . . . . . . . . . . . . 3
Number of Rings (Answer delay). . . . . . . . . . . . . . . . . . . . . . . . . . . . . . . . . . . . 4
Pin Code. . . . . . . . . . . . . . . . . . . . . . . . . . . . . . . . . . . . . . . . . . . . . . . . . . . . . 4
Voice . . . . . . . . . . . . . . . . . . . . . . . . . . . . . . . . . . . . . . . . . . . . . . . . . . . . . . . 4
Answer Only . . . . . . . . . . . . . . . . . . . . . . . . . . . . . . . . . . . . . . . . . . . . . . . . . . 5
Privacy Mode. . . . . . . . . . . . . . . . . . . . . . . . . . . . . . . . . . . . . . . . . . . . . . . . . . 5
The display. . . . . . . . . . . . . . . . . . . . . . . . . . . . . . . . . . . . . . . . . . . . . . . . . . . . 5
Service Access . . . . . . . . . . . . . . . . . . . . . . . . . . . . . . . . . . . . . . . . . . . . . . . . . 5
Operation
6
Making a call . . . . . . . . . . . . . . . . . . . . . . . . . . . . . . . . . . . . . . . . . . . . . . . . . . 6
Normal Dialling. . . . . . . . . . . . . . . . . . . . . . . . . . . . . . . . . . . . . . . . . . . . . . . . 6
Pre-Dialling. . . . . . . . . . . . . . . . . . . . . . . . . . . . . . . . . . . . . . . . . . . . . . . . . . . 6
Mute Button. . . . . . . . . . . . . . . . . . . . . . . . . . . . . . . . . . . . . . . . . . . . . . . . . . . 6
Redial function. . . . . . . . . . . . . . . . . . . . . . . . . . . . . . . . . . . . . . . . . . . . . . . . . 6
Timer. . . . . . . . . . . . . . . . . . . . . . . . . . . . . . . . . . . . . . . . . . . . . . . . . . . . . . . . 6
Volume control . . . . . . . . . . . . . . . . . . . . . . . . . . . . . . . . . . . . . . . . . . . . . . . . . 6
Recall . . . . . . . . . . . . . . . . . . . . . . . . . . . . . . . . . . . . . . . . . . . . . . . . . . . . . . . 6
Hands free function. . . . . . . . . . . . . . . . . . . . . . . . . . . . . . . . . . . . . . . . . . . . . . 7
Connecting a headset. . . . . . . . . . . . . . . . . . . . . . . . . . . . . . . . . . . . . . . . . . . . . 7
Selecting headset or hands free mode. . . . . . . . . . . . . . . . . . . . . . . . . . . . . . . . . 7
Ringer . . . . . . . . . . . . . . . . . . . . . . . . . . . . . . . . . . . . . . . . . . . . . . . . . . . . . . . 7
Phone Book
8
Using the Phone Book. . . . . . . . . . . . . . . . . . . . . . . . . . . . . . . . . . . . . . . . . . . . 8
Letters . . . . . . . . . . . . . . . . . . . . . . . . . . . . . . . . . . . . . . . . . . . . . . . . . . . . . . 8
Storing names/numbers. . . . . . . . . . . . . . . . . . . . . . . . . . . . . . . . . . . . . . . . . . 8
Dialling from the Phone Book. . . . . . . . . . . . . . . . . . . . . . . . . . . . . . . . . . . . . . 9
Changing phone numbers/names. . . . . . . . . . . . . . . . . . . . . . . . . . . . . . . . . . . . 9
Deleting a Phone Book entry. . . . . . . . . . . . . . . . . . . . . . . . . . . . . . . . . . . . . . . 9
Deleting all entries in the Phone Book. . . . . . . . . . . . . . . . . . . . . . . . . . . . . . . . 9
Caller Identification
10
Explanation of Caller ID. . . . . . . . . . . . . . . . . . . . . . . . . . . . . . . . . . . . . . . . . . 10
Retrieving and dialling CID numbers. . . . . . . . . . . . . . . . . . . . . . . . . . . . . . . . 10
Messages . . . . . . . . . . . . . . . . . . . . . . . . . . . . . . . . . . . . . . . . . . . . . . . . . . . 10
Deleting Numbers. . . . . . . . . . . . . . . . . . . . . . . . . . . . . . . . . . . . . . . . . . . . . 11
Transfer Numbers to the Phone Book. . . . . . . . . . . . . . . . . . . . . . . . . . . . . . . . 11
English
The Answer Machine
12
About the Answer Machine. . . . . . . . . . . . . . . . . . . . . . . . . . . . . . . . . . . . . . . . 12
Outgoing Message (OGM). . . . . . . . . . . . . . . . . . . . . . . . . . . . . . . . . . . . . . . . . 12
Recording an Outgoing Message. . . . . . . . . . . . . . . . . . . . . . . . . . . . . . . . . . . 12
Checking the Outgoing Message. . . . . . . . . . . . . . . . . . . . . . . . . . . . . . . . . . . 12
Restore the pre-recorded message (OGM) . . . . . . . . . . . . . . . . . . . . . . . . . . . . 12
Incoming messages (ICM) . . . . . . . . . . . . . . . . . . . . . . . . . . . . . . . . . . . . . . . . 13
The following functions are available during playback. . . . . . . . . . . . . . . . . . . . 13
Delete Incoming Messages. . . . . . . . . . . . . . . . . . . . . . . . . . . . . . . . . . . . . . . 13
Switching the Answer Machine On/Off. . . . . . . . . . . . . . . . . . . . . . . . . . . . . . . . 14
Personal Message - MEMO. . . . . . . . . . . . . . . . . . . . . . . . . . . . . . . . . . . . . . . . 14
Two-way Recording . . . . . . . . . . . . . . . . . . . . . . . . . . . . . . . . . . . . . . . . . . . . . 14
Remote Control. . . . . . . . . . . . . . . . . . . . . . . . . . . . . . . . . . . . . . . . . . . . . . . . 15
Room Monitoring. . . . . . . . . . . . . . . . . . . . . . . . . . . . . . . . . . . . . . . . . . . . . . . 16
Remote Activation. . . . . . . . . . . . . . . . . . . . . . . . . . . . . . . . . . . . . . . . . . . . . . 16
Out of Memory . . . . . . . . . . . . . . . . . . . . . . . . . . . . . . . . . . . . . . . . . . . . . . . . 16
Other
Hearing Aid compatible. . .
Troubleshooting. . . . . . . . .
Declaration of conformity. .
Guarantee. . . . . . . . . . . . .
17
.
.
.
.
.
.
.
.
.
.
.
.
.
.
.
.
.
.
.
.
.
.
.
.
.
.
.
.
.
.
.
.
.
.
.
.
.
.
.
.
.
.
.
.
.
.
.
.
.
.
.
.
.
.
.
.
.
.
.
.
.
.
.
.
.
.
.
.
.
.
.
.
.
.
.
.
.
.
.
.
.
.
.
.
.
.
.
.
.
.
.
.
.
.
.
.
.
.
.
.
.
.
.
.
.
.
.
.
.
.
.
.
.
.
.
.
.
.
.
.
.
.
.
.
.
.
.
.
.
.
.
.
.
.
.
.
.
.
.
.
.
.
.
.
.
.
.
.
.
.
.
.
. 17
. 17
. 18
. 18
English
Installation
Connection
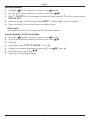
1. Connect the curly cord to the handset and to the socket marked q on the underside of
the telephone.
2 . Connect the mains adapter to the socket marked DC 9V/300mA on the bottom of the
telephone and then to an electrical wall socket.
3 . Connect the telephone line cord to the socket marked T on the underside of the
telephone, and then to a network wall socket.
4 . Position the cables in the grooves underneath the telephone.
5 . Lift the handset and listen for the dial tone.
6 . Mount the included desk stand for better angle of display and phone (see picture).
Settings
1. Press w. The display shows LCD CONTRAST. Press Q to change or press } to continue
without changes.
2 . To change the contrast select the desired setting (01 = faint to 04 - dark) using {/}.
Press Q.
3 . If you chose to continue the display shows TIME/DATE. Press Q to change or press } to
continue without changes.
4 . To set the hour (00-23) use {/}. Press Q to save and continue to next function.
5 . To set the minute press {/}. Press Q to save and continue to next function.
6 . To set the month press {/}. Press Q to save and continue to next function.
7 . To set the date press {/}. Press Q to save and continue to next function.
8 . To set the weekday press {/}. Press Q to save and continue to next function.
9 . The display shows LANGUAGE. Press Q to change, press } to continue without
changes.
10. Select the desired language ENGLISH or FRANCAIS using {/}. Press Q.
11. The display shows VOICE. Press Q to change, press } to continue without changes.
12. Select VOICE ��
ON or VOICE ���
OFF using {/}. Press Q.
English
13. The display shows FLASH. Press Q to change or press } to continue without changes.
14. Select the desired setting using {/}. 100 for AU/UK/EU, 270 for FR and 600 for NZ.
Press Q.
15. The display shows TONE/PULSE. Press Q to change or�
���������
press
������ } to continue without
changes.
16. Select TONE or PULSE using {/}. If unsure about which mode to use, select Tone as
this works in most locations. Press Q.
17. The display shows ANSWER DELAY. Press Q to change or�
���������
press } to continue without
������
changes.
18. Select 2, 4 or TS using {/}. Press Q.
19. The display shows ANSWER MODE. Press Q to change or�
���������
press
������ } to continue without
changes.
20 . Select ANSWER&RECORD or ANSWER ONLY using {/}. Press Q.
21. The display shows PIN CODE. Press Q to change or�
���������
press
������ } to continue without
changes.
22 . Use the numeric keypad to enter
�������������������������������������
the default code (0000). Press
������ Q. Enter the new code.
Press Q.
If the code is not accepted/correct you will hear a short beep, repeat step 21 and 22.
23 . The display shows PRIVACY MODE. Press Q to change or�
���������
press
������ } to continue without
changes.
24 . Select ON or OFF using {/}. Press Q.
The LCD shows “TOTAL:00 NEW:00”, which means both the total call and new call counter
are zero.
Press w anytime to change the settings. Press 1 / to return to standby.
Number of Rings (Answer delay)
The number of rings before the answer machine answers can be selected between 2, 4
or TS.
With TS (Time Saver) selected, calls will be answered after four rings until a new ICM
(incoming message) has been recorded, any subsequent calls will be answered after two rings.
Once these ICM’s (incoming messages) have been erased this cycle will be repeated. This
is useful when remotely accessing your unit, if there is no answer after three rings no ICM’s
(incoming messages) have been recorded, you can therefore terminate the call before you are
charged.
Pin Code
This code is needed in order to gain access to the remote control functions of the answer
machine (factory setting is 0000). The same code is used for Privacy mode. You can alter the
code according to the description above.
Voice
With VOICE set to ON you will be announced the time for when the incoming message (ICM)
was recorded. With VOICE set to OFF the time and date will not be announced but you can
still see when the incoming message was recorded in the display.
English
Answer Only
ANSWER ONLY is your announcement message to a caller in which contact information
can be supplied but no incoming message (ICM) will be recorded. When ANSWER ONLY is
selected the display shows A2.
Please note!
You need to record your own greeting message, there is no pre-recorded message. See page
12 for instructions on how to record an (OGM) outgoing message.
An example:
“Sorry I cannot take your call at this time, if urgent try contacting me on 0746 …….
Please do not leave a message as this will not be recorded. Thanks for calling.”
Privacy Mode
Use the Privacy mode if you want to prevent unauthorized people from accessing your
incoming messages. With PRIVACY MODE set to ON you will be asked to enter the
PIN CODE before listening to your incoming messages (ICM).
Please note!
Privacy mode and remote access uses the same PIN code.
The display
When the telephone is not in use, the time and date, TOTAL number of calls stored in the
Caller ID memory and number
�������������������������������������������������
of NEW calls will
�����������������������������
be shown in the display.
Please note!
There are separate logs for answer machine and Caller ID and separate red LED’s.
In order to stop the flashing LED the corresponding log must be reviewed.
Service Access
Key 1 and 2 can be programmed with a service number.
1. Press and hold 1. Enter number is displayed.
Use the keypad and C to edit the access number. Press p.
2 . Enter name is displayed. Use the keypad to edit the access name. Press p to confirm
the changes.
To dial, press and hold 1 or 2 and�������
����������
press Q.
Please note!
Key 2 can also be programmed in the same way, please follow description above.
English
Operation
Making a call
Normal Dialling
1. Lift the handset.
2 . Dial the desired telephone number.
Pre-Dialling
This allows you to enter and change a telephone number before it is dialled.
Please note!
Only available in Caller ID mode. Press b /
to select Caller ID mode. Ensure
shows. If in phone book mode (b) pressing the number buttons will quick-search the
phone book entries.
1. Enter the required telephone number. Mistakes can be erased by pressing C.
2 . You can now either lift the handset, press
OR , the displayed telephone number will
now be dialled.
Mute Button
The handset microphone can be disabled during a call by pressing and holding z.
Redial function
1. If the number dialled is engaged or you wish to redial the last number called.
Press r one or more times to scroll between the 10 most recently dialled numbers, which
will be shown on the LCD display.
2 . Lift the handset (or press
) to dial.
Please note!
During a conversation, you can switch from the handset to hands free mode at any time by
pressing
. Press
again to terminate the call.
Timer
Immediately after dialling a telephone number a call timer will be shown on the display. The
timer is a simple way to help you keep track of how long the call lasts.
Volume control
The handset earpiece volume may be adjusted during a call using
.
To adjust the speaker volume (hands free), use {/} during a call.
Recall
Press the recall button R followed by the extension number to transfer calls when connected to
a PBX (TBR only).
Access to additional network services can be gained by using the recall button R, *
and # buttons. Contact your network operator for more information.
English
Hands free function
1. Press . The Hands free speaker will be activated and the Hands free indicator will
illuminate.
2 . Dial the required telephone number. The speaker volume can be adjusted during a call
using {/}.
3 . Speak towards the microphone located on the front edge of the telephone.
4 . Press
to terminate the call.
Please note!
During a conversation, you can switch between headset / hands free mode by picking up
the handset. Replace the handset (or press ) to terminate the call.
Please remember that in Hands free mode it is only possible for one person at a time to
talk. The switch between speaker and microphone is automatic and dependent on the
sound level of the incoming call and the microphone respectively. It is therefore essential
that there are no loud noises, e.g. music, in the immediate vicinity of the telephone, as this
will disrupt the speaker function.
Connecting a headset
You can connect a headset to the socket = on the underside of the telephone.
When a headset is connected the speaker button
is used to connect /disconnect a
telephone call (equivalent to lifting and putting down the handset).
The volume in the headset can be adjusted during a call using {/}.
A neck loop/extra handset can be connected to this socket instead of a headset.
DORO original headsets are tested and adapted for this model. Other types and makes of
headsets may be used, though the function and sound quality cannot be guaranteed. In the
worst case, these could damage the headset and telephone. This type of damage is not covered
by the telephone’s guarantee.
Selecting headset or hands free mode
Select headset-/handsfree mode by setting the switch
=/
on the back of the telephone.
Please note!
On delivery, the telephone is set to Hands free mode.
The Hands free speaker function will not work when the headset function is activated and
vice versa.
Ringer
The ringer volume, melody and tone can be selected using the switches located on the rear
side of the telephone:
e
Ring volume
n
Ring melody
Ringer tone
English
Phone Book
Using the Phone Book
The phone book will store 99 telephone numbers (22 digits max) and their associated names
(14 characters max) with entries arranged alphabetically. A stored phone number can be
dialled using fewer keystrokes than if dialled manually.
If you subscribe to a Caller ID service, the name/number of the caller will be shown when you
receive an incoming call.
Letters
Each number button has been allocated certain characters.
Button
Letters/symbols
1......................................... [Space character] + & - / X 1
2......................................... A B C Å Ä Æ æ å ä ß 2
3......................................... D E F ë 3
4......................................... G H I ï 4
5......................................... J K L 5
6......................................... M N O Ñ ñ Ö ö 6
7......................................... P Q R S 7
8......................................... T U V Ü ü 8
9......................................... W X Y Z 9
*......................................... ` @ ( ) * < >
0......................................... , . : ? = 0
#......................................... $ _ % ! ; #
Storing names/numbers
1. Press b /
to
����������������������������������
select phone book mode. Ensure b shows.
Press p. Display will show NEW PBOOK?.
Press p again.
Enter the telephone number to be stored (up to 22 digits). Press p.
Enter the name (up to 14 characters). Press the corresponding number button one or more
times for the first letter (see the table above).
6 . Press p.
7 . Press p if you want to add more contacts, or press 1 / to return to standby.
2 .
3 .
4 .
5 .
Please note!
Press r if you need to insert a pause in the telephone number.
If you wish to change a number, store the new number in the same location as the old one.
English
Dialling from the Phone Book
1. Press b /
to select phone book mode. Ensure b shows.
2 . Scroll to the required memory location using {/}. To quick-search in the phone book
press the corresponding number button one or more times for the first letter (refer to table
on previous page).
3 . Lift the handset (or either press
or
) to dial the displayed number. If you do nothing
the phone will return to standby mode.
Please note!
During a conversation, you can switch from the handset to hands free mode at any time by
pressing . Press
again to terminate the call.
Changing phone numbers/names
1. Press b /
to select phone book mode. Ensure b shows.
2 . Scroll to the required memory location using {/}.
3 .
4 .
5 .
6 .
Press and hold p until EDIT PBOOK? is displayed. Press p.
Change the displayed telephone number with C and {/}. Press p.
Changes to the displayed name can be made using C and {/}.
Press p to confirm the changes.
Deleting a Phone Book entry
1. Press b /
to select phone book mode. Ensure b shows.
2 . Scroll to the required memory location using {/}.
3 . Press C. DELETE? will be displayed.
4 . Press and hold C until the displayed telephone number disappears.
Deleting all entries in the Phone Book
1. Press b /
to select phone book mode. Ensure b shows.
2 . Scroll to the required memory location using {/}.
3 . Press and hold C until the display shows DELETE ALL?.
4 . Press and hold C until the display shows EMPTY.
English
Caller Identification
Explanation of Caller ID
Caller ID allows you to see who is calling before you answer a call and to see who has called
in your absence. If the number is stored in the phone book, the caller’s name will be shown
instead. Received calls are stored chronologically with the sequential number shown in the top
right hand side of the display.
When the Caller ID log is full, the oldest number will be deleted automatically as the new
call is logged. New calls are indicated by T in the display and flashing of the upper red ring
indicator light.
Please note!
In order for numbers to be shown, the Caller ID service must be provided by your network
operator and a current subscription in place. Contact you operator for more information.
There are separate logs for answer machine and Caller ID and separate red LED’s.
In order to stop the flashing LED the corresponding log must be reviewed.
Retrieving and dialling CID numbers
1. Press b /
to select Caller ID mode. Ensure
shows.
{
}
2 . Press either
or
to review the numbers stored in the Caller ID memory.
3 . Lift the handset (or either press
or
) to dial the displayed number. If you do nothing
the phone will return to standby mode.
Please note!
During a conversation, you can switch from the handset to hands free mode at any time by
pressing . Press
again to terminate the call.
Messages
Besides showing telephone numbers, the display can show a number of text messages or
symbols:
OUT OF AREA It is an International call or a call from a PBX (no information received).
PRIVATE
Information on the number is blocked. The call could also be from a PBX.
q
The call was received while using the Call Waiting function.
T
New call.
5
Message Waiting indication.
10
English
Deleting Numbers
1. Press b /
to select Caller ID mode. Ensure
shows.
2 . Scroll to the telephone number you wish to erase using {/}.
3 . Press C. DELETE? will be displayed, alternatively press and hold c until the display shows
DELETE ALL?.
4 . Press and hold C until the display shows EMPTY. Press 1 / to return to standby.
5 . If you do nothing the phone will return to standby mode.
Please note!
This deletes the Caller ID memory, not the Phonebook memory.
Transfer Numbers to the Phone Book
1. Press b /
to select Caller ID mode. Ensure
shows.
2 . Scroll to the telephone number you wish to copy using {/}.
3 . Press p.
4 .
5 .
6 .
7 .
The display shows COPY TO PBOOK?. Press p.
Change the displayed telephone number with C and {/}. Press p.
Enter the name using C and {/}.
Press p to confirm the changes.
11
English
The Answer Machine
About the Answer Machine
The answer machine has to be turned on in order to receive messages. When a call is received
it will be answered after the selected number of rings (please refer to page 4).
When the answer machine answers an incoming call, the caller will hear your outgoing
message. After a short beep they can then leave a message (up to 120 seconds). Should the
caller exceed this limit the call will be disconnected.
The memory will store approximately 40 minutes of incoming messages (including the outgoing
message).
Outgoing Message (OGM)
The outgoing message is your message to an incoming caller and may be up to 60 seconds in
length.
You may want the message to tell the caller that they may start speaking once the beep is
heard after your outgoing message.
An example of an outgoing message:
-“Hello we are unable to take your call right now, please leave a message at the sound of the
beep and we’ll return your call as soon as possible. Thanks for calling.”
Recording an Outgoing Message
1. Press and hold 88. You will hear a short beep, the LED will flash and the display will show
OGM RECORDING, do not release the 88 - button until you are done recording.
2 . Record your outgoing message. Speak clearly towards the machine from a distance of 1520 cm.
3 . Release 88 to stop recording.
4 . The outgoing message will be repeated after a few seconds. Repeat this procedure if you
want to change the message, any old outgoing message will automatically be erased when a
new one is recorded.
Checking the Outgoing Message
Press 88. The current outgoing message will now be played.
Restore the pre-recorded message (OGM)
1. Press and hold 88. You will hear a short beep, the LED will flash and the display shows
OGM RECORDING, release the 88 - button.
2 . The pre-recorded OGM is played after a few seconds.
Please note!
You can record 2 different outgoing messages, one for ANSWER&RECORD (normal) and
one for ANSWER ONLY. See Installation on how to select ANSWER MODE.
12
English
Incoming messages (ICM)
The red indicator 5 flashes to show that new messages have been received.
Playback will always begin with any new messages, for example if there are three old messages
and two new ones, only the two new ones will be played back, then the answer machine will
return to standby mode.
Press the play button once again to listen to all messages, starting with the oldest messages.
1. Press 9 / || to start playback.
With Privacy Mode activated you need to enter the PIN CODE (0000) and then press
Q. The TAM will then play the incoming message(s).
2 . After each message a short beep will be heard.
3 . When playback is finished you will hear a short beep, and the machine will return to
standby mode. All incoming messages are saved (unless you have erased any during
playback, see below), new messages will then be recorded after the old ones.
The following functions are available during playback
Button
Function
88
Repeat the current message, or press 88 twice to step back through the
messages.
99
Skip to next message.
1/
Stop playback.
C
Erase messages.
{/}
Increase or decrease the speaker volume.
9 / ||
Pause during playback (max. 7 seconds). Press 9 / || again to resume
playback.
Delete Incoming Messages
If you want to delete a single incoming message press C while the message is playing.
To erase all messages after playback, press and hold C until unit beeps.
Please note!
New messages cannot be deleted until they have been played.
With Privacy Mode activated you need to enter the PIN CODE (0000) and then press
Q.
13
English
Switching the Answer Machine On/Off
The answer machine can be switched ON or OFF using the 1 / button.
In ANSWER ON position, incoming calls will be answered by the answer machine and the red
indicator 5 will be on.
In ANSWER ���
OFF position no calls will be answered and the red indicator 5 will be off.
Please note!
Although turned Off, the Answer Machine will answer a call after 10 Rings. This is to allow
the remote ON and other features to be accessed.
Personal Message - MEMO
A personal message – MEMO – is a message recorded directly onto the answer machine
(120 seconds maximum) without dialling. This means that the answer machine may be used
as an electronic notebook, where messages, reminders or other notes to family members or
colleagues can be recorded.
1. Press and hold the a button. You will hear a beep.
2 . Start speaking clearly towards the machine to record your Memo message. This function
only works when the handset is on the telephone base (on-hook).
3 . Release the a button to stop recording.
4 . Memos are played back in the same way as regular incoming messages.
Please note!
With Privacy Mode activated you need to enter the PIN CODE (0000) and then press
Q. The TAM will then play the recorded MEMO(s).
Two-way Recording
You can record telephone conversations as they occur. There is approximately 40 minutes
available recording time in memory, with the answer machine handling two-way recordings as a
regular incoming call.
1. A call is connected.
2 . Press a. The display will show 2WAY RECORDING and a, indicating that
two-way recording is in progress.
3 . Press 1 / to terminate recording.
14
English
Remote Control
This machine can be remotely controlled using the buttons of an ordinary tone dialling
telephone. Call up the answer machine and enter the PIN CODE (please refer to
page 4) while the outgoing message is playing. Once the code is accepted, several remote
control commands are available.
1. Call up the answer machine (the number that your device is connected to, usually your
home number).
2 . While the outgoing message is playing, enter the PIN CODE. If the code is accepted, you
will hear two beeps.
3 . Select a remote control command (within 10 seconds) from below.
4 . When you have finished accessing the machine, replace the handset.
Command
Function
1#
Play new messages
Play all messages
2#
During playback:
3#
4#
5#
6#
Erase single message during playback
Skip to previous message
Stop playback
Skip to next message
After playback:
7#
8#
9#
0#
Turn the answer machine either On or Off.
Record a new outgoing message, to Stop recording press 5#.
Record a MEMO, to Stop recording press 5#.
Room monitoring (active for 2 minutes and 30 seconds,
press 0# to continue).
Please note!
If the machine doesn’t respond correctly to the remote control commands, try pressing the
telephone buttons for a longer or shorter time. In normal cases, the answer machine should
react to tones approximately 0.5 – 1 seconds in length, but longer tones may be necessary
in certain telephone networks.
If you do not enter any remote control command, the answer machine will disconnect after
a few seconds.
If you listen to any incoming messages for more than 2 minutes and 40 seconds, you will
hear two beeps. Press any button to continue.
15
English
Room Monitoring
This remote access feature enables you to call your home and turn ON the answer machine’s
microphone function, allowing you to monitor sounds in the room where the answer machine is
situated.
Remote Activation
The answer machine can be activated using the remote control functions.
1. Call up the answer machine. After approximately 10 rings, the machine will answer and
emit a long tone.
2 . Enter the PIN CODE during your outgoing message (OGM). If the code is accepted, you
will hear two short beeps.
3 . Press 7#. One beep confirms that the answer machine is now on. Replace the handset.
Out of Memory
The total capacity of the answer machine’s memory is approximately 40 minutes. The memory
space is shared between the outgoing message, personal memos, and regular incoming
messages.
When the memory is full the display will show MEMORY FULL, the answer machine will
answer after 10 rings to allow remote playback and deletion of messages, no new messages
will be accepted until the existing messages have been played and erased.
16
English
Other
Hearing Aid compatible
This telephone is hearing aid compatible. Select the T mode on your hearing aid to enable this feature.
Troubleshooting
Check that the telephone cord is undamaged and properly plugged in. Disconnect any additional equipment, extension cords and other telephones. If the problem is resolved, the fault is with the other equipment.
Test the equipment on a known working line. If the product works, then the fault is probably with the line.
Please inform your local line provider.
No number shown in display when ringing
•
In order for this feature to function, you must subscribe to the Caller Identification service from your
network provider.
•
If a text message is shown on the display, the call may be an international call (no data received), or
from a private or withheld number.
•
It may not be possible to receive Caller ID information if the phone operates in a PBX system.
The Answer Machine Is Not Answering
•
Check that the unit is switched on.
•
Check that the telephone cable and the mains adapter are correctly connected.
The Answer Machine Does Not Respond to Remote Control
•
Check that the telephone you are using to remotely access the answer machine is tone dialling.
•
Telephones that generate only a short tone signal when pressing a button may not allow you to remotely
access your machine. In this situation please use a separate tone transmitter.
•
Try holding the buttons down longer, approximately 1 second per digit.
I can’t hear the outgoing message very well
•
Record a new outgoing message.
•
Speak closer to the unit/microphone when recording.
The line is disconnected when someone leaves a message:
•
The incoming message may be over the maximum recording time (120 seconds). After this time, the
call will be disconnected.
•
If an incoming caller pauses for approximately 7 seconds while leaving a message the call will be
disconnected, as the voice control function will believe that they have hung up.
I hear a tone sequence, but nothing happens when I press the playback button:
•
There are no incoming messages.
If the telephone still does not work, contact the place of purchase. Please note that the receipt or a copy
invoice will be required for guarantee purposes.
17
English
Declaration of conformity
Doro hereby declares that the product Doro 916i cr conforms to the essential requirements and other
regulations contained in the directives 1999/5/EC (R&TTE), 2002/95/EC (ROHS). A copy of the manufacturer’s declaration is available at www.doro.com/dofc
Guarantee
This product is guaranteed for a period of 12 months from the date of purchase. Proof of purchase is
required for any service or support required during the guarantee period.
This guarantee shall not apply to a fault caused by an accident or a similar incident or damage, liquid
ingress, negligence, abnormal usage, not reasonably maintained or any other circumstances on the purchaser’s part. Furthermore, this guarantee shall not apply to a fault caused by a thunderstorm or any other
voltage fluctuations.
This guarantee does not in any way affect your statutory rights. (As a matter of precaution, we recommend
disconnecting the telephone during a thunderstorm.)
18
Français
Sommaire
Installation
3
Raccordement. . . . . . . . . . . . . . . . . . . . . . . . . . . . . . . . . . . . . . . . . . . . . . . . . . 3
Réglages. . . . . . . . . . . . . . . . . . . . . . . . . . . . . . . . . . . . . . . . . . . . . . . . . . . . . . 3
Nombre de sonneries (Temps reponse) . . . . . . . . . . . . . . . . . . . . . . . . . . . . . . . 4
Code pin. . . . . . . . . . . . . . . . . . . . . . . . . . . . . . . . . . . . . . . . . . . . . . . . . . . . . 4
Voix . . . . . . . . . . . . . . . . . . . . . . . . . . . . . . . . . . . . . . . . . . . . . . . . . . . . . . . . 4
Répondeur simple (Mode réponse) . . . . . . . . . . . . . . . . . . . . . . . . . . . . . . . . . . 5
Mode privé . . . . . . . . . . . . . . . . . . . . . . . . . . . . . . . . . . . . . . . . . . . . . . . . . . . 5
Afficheur . . . . . . . . . . . . . . . . . . . . . . . . . . . . . . . . . . . . . . . . . . . . . . . . . . . . . 5
Service. . . . . . . . . . . . . . . . . . . . . . . . . . . . . . . . . . . . . . . . . . . . . . . . . . . . . . . 5
Utilisation
6
Appeler . . . . . . . . . . . . . . . . . . . . . . . . . . . . . . . . . . . . . . . . . . . . . . . . . . . . . . 6
Appeler un correspondant. . . . . . . . . . . . . . . . . . . . . . . . . . . . . . . . . . . . . . . . . 6
Composer le numéro avant de décrocher. . . . . . . . . . . . . . . . . . . . . . . . . . . . . . 6
Touche Secret. . . . . . . . . . . . . . . . . . . . . . . . . . . . . . . . . . . . . . . . . . . . . . . . . . 6
Touche Bis. . . . . . . . . . . . . . . . . . . . . . . . . . . . . . . . . . . . . . . . . . . . . . . . . . . . 6
Chronométrage des appels. . . . . . . . . . . . . . . . . . . . . . . . . . . . . . . . . . . . . . . . . 6
Réglage du volume . . . . . . . . . . . . . . . . . . . . . . . . . . . . . . . . . . . . . . . . . . . . . . 6
Mode mains-libres. . . . . . . . . . . . . . . . . . . . . . . . . . . . . . . . . . . . . . . . . . . . . . . 7
Connexion d’un casque . . . . . . . . . . . . . . . . . . . . . . . . . . . . . . . . . . . . . . . . . . . 7
Sélectionner casque ou combiné et haut-parleur. . . . . . . . . . . . . . . . . . . . . . . . . . 7
Sonnerie. . . . . . . . . . . . . . . . . . . . . . . . . . . . . . . . . . . . . . . . . . . . . . . . . . . . . . 7
Répertoire
8
Utilisation du répertoire. . . . . . . . . . . . . . . . . . . . . . . . . . . . . . . . . . . . . . . . . . . 8
Lettres . . . . . . . . . . . . . . . . . . . . . . . . . . . . . . . . . . . . . . . . . . . . . . . . . . . . . . 8
Enregistrer un nom/numéro . . . . . . . . . . . . . . . . . . . . . . . . . . . . . . . . . . . . . . . 8
Appeler un numéro du répertoire. . . . . . . . . . . . . . . . . . . . . . . . . . . . . . . . . . . . 9
Modifier les noms/numéros de téléphone. . . . . . . . . . . . . . . . . . . . . . . . . . . . . . 9
Effacer un correspondant du répertoire. . . . . . . . . . . . . . . . . . . . . . . . . . . . . . . 9
Effacer le contenu du répertoire. . . . . . . . . . . . . . . . . . . . . . . . . . . . . . . . . . . . 9
Présentation du numéro
10
Que signifie ‘Présentation du numéro’? . . . . . . . . . . . . . . . . . . . . . . . . . . . . . . . 10
Consulter et appeler à partir du journal des appelants (JAP) . . . . . . . . . . . . . . . 10
Messages . . . . . . . . . . . . . . . . . . . . . . . . . . . . . . . . . . . . . . . . . . . . . . . . . . . 10
Effacer les numéros. . . . . . . . . . . . . . . . . . . . . . . . . . . . . . . . . . . . . . . . . . . . 11
Transférer les numéros dans le répertoire . . . . . . . . . . . . . . . . . . . . . . . . . . . . 11
Français
Répondeur
12
Le répondeur - Généralités. . . . . . . . . . . . . . . . . . . . . . . . . . . . . . . . . . . . . . . . 12
Annonce. . . . . . . . . . . . . . . . . . . . . . . . . . . . . . . . . . . . . . . . . . . . . . . . . . . . . 12
Enregistrement de l’annonce . . . . . . . . . . . . . . . . . . . . . . . . . . . . . . . . . . . . . 12
Vérification de l’annonce . . . . . . . . . . . . . . . . . . . . . . . . . . . . . . . . . . . . . . . . 12
Activation de l’annonce pré-définie. . . . . . . . . . . . . . . . . . . . . . . . . . . . . . . . . 12
Lecture des messages . . . . . . . . . . . . . . . . . . . . . . . . . . . . . . . . . . . . . . . . . . . 13
Les fonctions suivantes sont disponibles en cours de lecture: . . . . . . . . . . . . . . 13
Effacement des messages . . . . . . . . . . . . . . . . . . . . . . . . . . . . . . . . . . . . . . . 13
Mise en/hors service du répondeur . . . . . . . . . . . . . . . . . . . . . . . . . . . . . . . . . . 14
Mémo (message personnel) . . . . . . . . . . . . . . . . . . . . . . . . . . . . . . . . . . . . . . . 14
Enregistrement des communications. . . . . . . . . . . . . . . . . . . . . . . . . . . . . . . . . 14
Interrogation à distance. . . . . . . . . . . . . . . . . . . . . . . . . . . . . . . . . . . . . . . . . . 15
Ecoute à distance . . . . . . . . . . . . . . . . . . . . . . . . . . . . . . . . . . . . . . . . . . . . . . 16
Activation à distance. . . . . . . . . . . . . . . . . . . . . . . . . . . . . . . . . . . . . . . . . . . . 16
Mémoire pleine. . . . . . . . . . . . . . . . . . . . . . . . . . . . . . . . . . . . . . . . . . . . . . . . 16
Autres
Compatibilité appareil auditif. .
Dépannage. . . . . . . . . . . . . . .
Déclaration de conformité . . . .
Garantie. . . . . . . . . . . . . . . . .
17
.
.
.
.
.
.
.
.
.
.
.
.
.
.
.
.
.
.
.
.
.
.
.
.
.
.
.
.
.
.
.
.
.
.
.
.
.
.
.
.
.
.
.
.
.
.
.
.
.
.
.
.
.
.
.
.
.
.
.
.
.
.
.
.
.
.
.
.
.
.
.
.
.
.
.
.
.
.
.
.
.
.
.
.
.
.
.
.
.
.
.
.
.
.
.
.
.
.
.
.
.
.
.
.
.
.
.
.
.
.
.
.
.
.
.
.
.
.
.
.
.
.
.
.
.
.
.
.
.
.
.
.
.
.
.
.
.
.
.
.
. 17
. 17
. 18
. 18
Français
Installation
IMPORTANT!
A lire avant la mise en service du téléphone. Avant de raccorder votre Doro 916i cr à la
prise secteur, veuillez poser le combiné sur la base du poste et le maintenir en position
raccrochée.
Raccordement
1. Reliez le cordon spiralé au combiné et à la fiche située au dos du téléphone marquée q.
2 . Reliez le bloc d’alimentation à la prise sous le téléphone marquée DC 9V/300mA et à la
prise de courant.
3 . Reliez le câble téléphonique fourni à la prise sous le téléphone marquée T et à la prise
téléphonique murale.
4 . Placez les câbles dans les rainures situées en dessous du téléphone.
5 . Prenez le combiné: vous devez entendre la tonalité.
Réglages
1. Atteignez CONTRASTE avec la touche w. Appuyez sur Q.
2 . Atteignez le réglage désiré (1 le plus clair, 4 le plus foncé) à l ’aide des touches {/}.
Appuyez sur Q.
3 .
4 .
5 .
6 .
7 .
8 .
Atteignez HEURE/DATE avec les touches {/}. Appuyez sur Q.
Réglez l’heure (00-23) avec les touches {/}. Appuyez sur Q.
Réglez les minutes avec les touches {/}. Appuyez sur Q.
Réglez le mois avec les touches {/}. Appuyez sur Q.
Réglez la date avec les touches {/}. Appuyez sur Q.
Réglez le jour de la semaine avec les touches {/}. Appuyez sur Q.
9 . L’afficheur indique LANGUE. Appuyez sur Q.
10. Sélectionnez la langue désirée ENGLISH ou FRANCAIS avec les touches {/}. Appuyez
sur Q.
11. L’afficheur indique VOIX. Appuyez sur Q.
12. Sélectionnez VOIX ON ou VOIX ���
OFF avec les touches {/}. Appuyez sur Q.
Français
13. L’afficheur indique FLASH. Appuyez sur Q.
14. Sélectionnez 270 pour la France (100 AU/UK/EU, 600 NZ) avec les touches {/}.
Appuyez sur Q.
15. L’écran affiche FV/DC. Appuyez sur Q.
16. Sélectionnez FV ou DC avec les touches {/}. Si vous n’êtes pas certain du mode à
utiliser, sélectionnez l’option FV qui fonctionnera dans la plupart des cas.
Appuyez sur Q.
17. L’afficheur indique TEMPS REPONSE. Appuyez sur Q.
18. Sélectionnez 2, 4 ou TS avec les touches {/}. Appuyez sur Q.
19. L’afficheur indique MODE REPONSE. Appuyez sur Q.
20 . Sélectionnez REPONDEUR ENR. ou REPONDEUR SEUL avec les touches {/}.
Appuyez sur Q.
21. L’afficheur indique CODE PIN. Appuyez sur Q. NOUV. CODE s’affiche.
22 . Entrez le nouveau numéro à 4 chiffres. Appuyez sur Q.
23 . L’afficheur indique MODE PRIVE. Appuyez sur Q.
24 . Sélectionnez ON ou Off avec les touches {/}. Appuyez sur Q.
L’afficheur indique “TOTAL:00 NVX:00”, ce qui signifie que vous n’avez aucuns appels reçus
ni aucuns appels en absence.
En appuyant sur w vous pouvez à chaque moment modifier ces réglages. Appuyez sur 1 /
pour revenir à l’accueil.
Appuyez sur 1 / pour repasser en veille.
Nombre de sonneries (Temps reponse)
Vous pouvez régler le nombre nécessaire de sonneries avant que le répondeur ne se déclenche
: 2 ou 4 sonneries ou TS (économiseur d’appel).
La fonction Economiseur (TS) répond aux appels au bout de quatre sonneries, jusqu’à ce
qu’un message soit enregistré. Après, le répondeur se déclenche au bout d’environ deux
sonneries. Une fois ces messages lus et effacés, le cycle se répète. Le mode économiseur
d’appel est utile si vous interrogez votre répondeur à distance. Si le répondeur ne se déclenche
pas après la 4ème sonnerie, vous pouvez raccrocher et ainsi économiser le coût d’un appel
inutile puisque vous n’avez pas reçu de nouveaux messages.
Code pin
Le code pin vous permet d’effectuer les interrogations à distance du répondeur
(le réglage d’usine est 0000). Pour changer ce code, procédez comme suit.
Voix
Avec l’option voix activée, le téléphone vous annonce vocalement l’heure du dépôt du
message vocal. Lorsque l’option voix est désactivée, l’heure et la date ne sont pas annoncées
vocalement mais affichées sur l’écran.
Français
Répondeur simple (Mode réponse)
Répondeur seul signifie qu’à la réception d’un appel, l’appareil diffuse l’annonce
enregistrée et raccroche automatiquement. Lorsque
�����������������
l’option REPONDEUR SEUL est activée,
l’écran affiche A2.
Remarque !
Vous avez besoin d’enregistrer votre propre message d’accueil, il n’y a pas de message préenregistré pour ce mode.
Par exemple:
«Bonjour, je ne suis pas à la maison en ce moment. En cas d’urgence, appelez-moi sur le
0746 …. Désolé, mais vous ne pouvez pas me laisser de message. Merci de votre appel.»
Mode privé
Utilisez le mode privé si vous souhaitez restreindre l’accès à votre messagerie vocale. Avec le
MODE PRIVE activé, vous devrez entrer votre CODE PIN avant d’écouter vos messages.
Remarque !
Le MODE PRIVE et l’accès à distance de votre messagerie requièrent le même code
d’accès.
Afficheur
En veille, la date et l’heure ainsi que le nombre d’appels du JAP (nouveaux appels et nombre
total d’appels) sont affichés.
Remarque !
Il y a deux journaux distincts ayant chacun leur LED: un pour le répondeur et un pour la
présentation des numéros.
La LED arrête de clignoter quand vous consultez le journal correspondant.
Service
La touche 1 est pré-programmée sur 3103 (messagerie vocale France Télécom).
1. Appuyez et maintenez la touche 1. Le numéro 3103 s’affiche. Pour appeler, appuyez sur la
touche Q ou utilisez le clavier et la touche C pour modifier le numéro. Appuyez sur p.
2 . Utilisez le clavier pour modifier le nom associé au numéro. Appuyer sur p pour confirmer
les modifications.
Remarque !
La touche 2 peut également se programmer. Procédez de la même manière que
précédemment.
Français
Utilisation
Appeler
Appeler un correspondant
1. Prenez le combiné.
2 . Composez le numéro de téléphone.
Composer le numéro avant de décrocher
Cette méthode vous permet de composer un numéro de téléphone et, au besoin, de le modifier
avant d’appeler.
1. Composez le numéro de votre correspondant. En cas d’erreur, effacez avec
la touche C.
2 . Vous pouvez soit :
- Décrocher le combiné
- Appuyer sur la touche
- Appuyer sur la touche
pour numéroter.
Touche Secret
En cours d’appel, vous pouvez couper le micro du combiné en maintenant la touche z
enfoncée.
Touche Bis
La touche r permet de rappeler les dix derniers numéros composés :
1. Appuyez plusieurs fois sur r pour faire défiler ces numéros.
2 . Vous pouvez soit:
- Décrocher le combiné
- Appuyer sur la touche
- Appuyez sur la touche
pour appeler le numéro choisi.
Remarque !
En cours d’appel, vous pouvez passer à tout moment en mode mains-libres en appuyant sur
. Appuyez à nouveau sur
pour mettre fin à l’appel.
Chronométrage des appels
Lorsque la communication est établie, un chronomètre s’affiche. Ce chronomètre vous permet
de vérifier la durée des appels.
Réglage du volume
Utilisez la touche
pour ajuster le volume d’écoute du combiné en cours de conversation
(2 réglages possibles: normal et maximum).
En mains-libres, utilisez les boutons {/} pour régler le volume du haut-parleur.
Français
Mode mains-libres
1. Raccrochez le combiné et appuyer sur . Le haut-parleur est activé et le témoin lumineux
sur la touche s’allume.
2 . Composez le numéro de téléphone. Utilisez les touches {/} pour ajuster le volume du
haut-parleur en cours de conversation.
3 . Parlez face au téléphone.
4 . Appuyez sur
pour mettre fin à la communication.
Remarque !
Attention, en mode mains-libres vous devez obligatoirement raccrocher le combiné et parler
face au téléphone. Si vous gardez le combiné à la main en mode mains-libres, le micro et
le haut parleur du combiné ne fonctionneront pas.
Vous devez donc dans ce cas parler face à la base du téléphone et écouter la conversation
par l’intermédiaire du haut-parleur de la base. (témoin lumineux sur la touche allumé).
Vous pouvez poursuivre la conversation en privé en cours d’appel en prenant le combiné.
Raccrochez le combiné pour mettre fin à la communication.
Notez qu’en position mains-libres les deux correspondants ne peuvent pas parler
simultanément, mais uniquement un à la fois. L’alternance entre celui qui parle et celui
qui écoute se fait automatiquement; et elle est gérée par le niveau du son de la ligne
téléphonique (votre correspondant) et celui du micro (votre discours). C’est pourquoi il est
important qu’il n’y ait pas trop de bruit dans l’entourage du téléphone exemple : musique à
haut volume.
Connexion d’un casque
Vous pouvez raccorder un casque à la fiche = situés au dos du téléphone. Lorsqu’un casque
est connecté, le touche
du haut-parleur permettent de prendre/libérer la ligne téléphonique
(ce qui équivaut à décrocher/raccrocher le combiné).
Vous pouvez régler le volume du casque avec les touches {/}.
A la place d’un casque, vous pouvez raccorder à ce connecteur une bobine à induction
« tour de cou » ou un combiné supplémentaire.
Les casques de la marque DORO sont testés et adaptés à ce téléphone. Vous pouvez utiliser
d’autres types ou marques de casques mais dans ce cas nous ne pourrons pas garantir leur
qualité sonore et leur bon fonctionnement. Il est possible que le casque et le téléphone soient
alors endommagés. La garantie du téléphone ne couvre pas ce type de dommage.
Sélectionner casque ou combiné et haut-parleur
Sélectionnez la fonction en réglant le curseur
=/
/ derrière.
Remarque !
À la livraison, le téléphone est réglé sur la fonction haut-parleur.
La fonction haut-parleur est désactivée quand celle du casque est activée et vice versa.
Sonnerie
Vous pouvez régler la sonnerie grâce aux boutons situés en façade arrière du téléphone:
e
Volume de la sonnerie
n
Mélodie
Tonalité d’appel
Français
Répertoire
Utilisation du répertoire
Le répertoire enregistre 99 jeux de noms de 14 caractères maximum et numéros de téléphone
de 22 chiffres maximum ; ils sont présentés en ordre alphabétique. Il est plus rapide d’appeler
un numéro en mémoire que de le composer manuellement.
Si vous êtes abonné à la présentation du numéro, le nom/numéro du correspondant s ’affiche à
la réception d’un appel.
Lettres
Vous pouvez saisir les noms dans votre répertoire grâce aux touches numériques du téléphone
y compris certains caractères spéciaux.
Touche
Lettres/symboles
1......................................... [Espace] + & - / X 1
2......................................... A B C Å Ä Æ æ å ä ß 2
3......................................... D E F ë 3
4......................................... G H I ï 4
5......................................... J K L 5
6......................................... M N O Ñ ñ Ö ö 6
7......................................... P Q R S 7
8......................................... T U V Ü ü 8
9......................................... W X Y Z 9
*......................................... ` @ ( ) * < >
0......................................... , . : ? = 0
#......................................... $ _ % ! ; #
Enregistrer un nom/numéro
1. Appuyez sur b jusqu’à ce que REPERTOIRE s’affiche.
2 . Appuyez sur p. NVX CONTACT ? s’affiche.
3 . Appuyez à nouveau sur p.
4 . Composez le numéro de téléphone à enregistrer (22 chiffres maximum).
Appuyez sur p.
5 . Entrez le nom à enregistrer (14 caractères maximum). Appuyez une ou plusieurs fois sur la
touche numérotée correspondant à la première lettre (voir le tableau ci-dessus).
6 . Appuyez sur p.
Remarque !
Insérez une pause en appuyant sur r.
En cas de changement de numéro, remplacez l’ancien par le nouveau.
Français
Appeler un numéro du répertoire
1. Appuyez sur b jusqu’à ce que REPERTOIRE s’affiche.
2 . Atteignez l’entrée désirée à l ’aide des touches {/}. Pour effectuer une recherche rapide,
appuyez une ou plusieurs fois sur la touche numérotée correspondant à la première lettre
(voir le tableau de la page précédente).
3 . Décrochez ou appuyez sur
pour appeler le numéro affiché. Si vous n’appuyez pas de
touche, le téléphone repasse en mode veille.
Remarque !
En cours de conversation, vous pouvez passer à tout moment en mode mains-libres en
appuyant sur . Appuyez à nouveau sur
pour mettre fin à l’appel.
Modifier les noms/numéros de téléphone
1. Appuyez sur b pour sélectionner le répertoire. REPERTOIRE doit s’afficher.
2 . Atteignez l’entrée désirée à l’aide des touches {/}.
3 . Maintenez appuyé sur p jusqu’à ce que MOD. CONTACT? s’affiche. Appuyez sur p.
4 . Vous pouvez modifier le numéro affiché en appuyant sur les touches C et {/}. Appuyez
sur p.
5 . Vous pouvez modifier le nom affiché en appuyant sur les touches C et {/}.
6 . Appuyez sur p pour enregistrer le changement.
7 . Appuyez sur 1 / pour repasser en veille.
Effacer un correspondant du répertoire
1. Appuyez sur b pour sélectionner le répertoire. REPERTOIRE doit s’afficher.
2 . Atteignez l’entrée désirée à l ’aide des touches {/}.
3 . Appuyez sur c. EFFACER? s’affiche.
4 . Appuyez sur c jusqu’à ce que le nom/numéro de téléphone s’efface.
Effacer le contenu du répertoire
1. Appuyez sur b pour sélectionner le répertoire. REPERTOIRE doit s’afficher.
2 . Atteignez une entrée à l’aide des touches {/}.
3 . Appuyez sur c jusqu’à ce que TOUT EFFACER? s’affiche.
4 . Appuyez de nouveau sur c jusqu’à ce que VIDE s’affiche.
Français
Présentation du numéro
Que signifie ‘Présentation du numéro’?
Présentation du numéro/nom vous permet de voir qui vous appelle avant de répondre ou qui
a appelé en votre absence. Si le nom/numéro du correspondant est déjà dans votre répertoire,
son nom est affiché. Les appels reçus sont enregistrés par ordre chronologique (indiqué dans le
coin supérieur droit).
Quand le journal atteint sa capacité maximum, les numéros les plus anciens sont effacés
automatiquement au fur et à mesure des nouveaux appels. Les nouveaux appels sont signalés
sur l’afficheur ainsi que par le clignotement de la LED rouge en haut du téléphone.
Remarque !
Pour que la présentation du numéro puisse fonctionner vous devez vous abonner à ce
service auprès de votre opérateur. Pour toute information, adressez-vous directement à
votre opérateur.
Il y a deux journaux distincts ayant chacun leur LED: un pour le répondeur et un pour la
présentation des numéros.
La LED arrête de clignoter quand vous consultez le journal correspondant.
Consulter et appeler à partir du journal des appelants (JAP)
1. Appuyez sur b /�
jusqu’à ce que JOURNAL APPEL s’affiche.
2 . Appuyez sur { ou } pour faire défiler les numéros du JAP.
3 . Pour appeler le correspondant dont le numéro est affiché, appuyez sur
OU
sur . Si vous n’appuyez pas de touche, le téléphone repasse en mode veille.
Remarque !
En cours de conversation, vous pouvez passer à tout moment en mode mains-libres en
appuyant sur . Appuyez à nouveau sur
pour mettre fin à l’appel.
Messages
En plus des noms/numéros de téléphone, l’écran peut afficher d’autres messages ou symboles
:
HORS ZONE
S’affiche lorsque vous recevez un appel international ou un appel provenant
d’un PABX (aucune information reçue).
PRIVE
Lorsque l’appel provient d ’un numéro masqué le texte PRIVE s’affiche.
L’appel peut aussi provenir d’un PABX.
T
Nouvel appel reçu d’un numéro précédemment enregistré.
q
Avertissement par une icône d’un appel manqué durant une communication.
5
Indicateur de message en attente.
10
Français
Effacer les numéros
1. Appuyez sur
/ b jusqu’à ce que JOURNAL APPel s’affiche.
2 . Atteignez le numéro à effacer avec les touches {/}.
3 . Appuyez sur c. EFFACER? s’affiche; au besoin appuyez sur c jusqu’à ce que
TOUT EFFACER? s’affiche.
4 . Appuyez de nouveau sur c jusqu’à ce que le numéro s’efface.
Remarque !
Afin d’effacer l’enveloppe d’indication de nouveau(x) message(s) de la messagerie du
réseau affichée à l’écran, effacez, comme précédemment décrit, le numéro correspondant à
la messagerie du réseau. Cette opération est normalement effectuée automatiquement par
le réseau.
Transférer les numéros dans le répertoire
1. Appuyez sur
/ b jusqu’à ce que JOURNAL APPPEL s’affiche.
2 . Atteignez le numéro à copier avec les touches {/}.
3 .
4 .
5 .
6 .
Appuyez sur p COPIER NUMERO? s’affiche.
Appuyez à nouveau sur p.
Appuyez sur 1 / pour repasser en mode veille.
Vous pourrez entrer le nom ultérieurement : voir la section Modifier les noms/numéros de
téléphone à la page 9.
11
Français
Répondeur
Le répondeur - Généralités
Le répondeur doit être en service pour pouvoir enregistrer les messages. Vous pouvez
sélectionner le nombre de sonneries nécessaires avant que le répondeur ne prenne les appels
(voir page 4).
Quand le répondeur prend l’appel, votre correspondant entend l’annonce suivie d’un bip et
peut ainsi laisser un message de 3 minutes maximum. L’appel est coupé au bout de cette
durée.
La mémoire a une capacité d’enregistrement de 40 minutes environ (messages et annonce).
Annonce
L’annonce est le message diffusé par votre répondeur lorsque vos correspondants tombent sur
celui-ci. La durée maximale d’enregistrement de cette annonce est de 60 secondes.
Si vous préférez ne pas enregistrer votre propre annonce, votre correspondant entendra
l’annonce pré-enregistrée par défaut.
Exemple d’annonce:
«Bonjour, vous êtes bien chez les Dupont. Nous ne sommes pas à la maison en ce moment,
mais veuillez nous laisser un message après le bip sonore et nous vous rappellerons dès que
possible. Merci de votre appel.»
Enregistrement de l’annonce
1. Maintenez appuyée la touche 88 jusqu’à ce que vous entendiez un bip sonore et que la led
se mette à clignoter, ne pas relâcher la touche avant la fin de l’enregistrement.
2 . Enregistrez l’annonce. Parlez clairement, à environ 15-20 cm du poste.
3 . Relâchez la touche 88 en fin d’enregistrement.
4 . Votre annonce est répétée au bout de quelques secondes. Modifiez-la au besoin ; la
précédente est automatiquement effacée à l’enregistrement de la nouvelle annonce.
Vérification de l’annonce
Appuyez sur 88. L’annonce est diffusée.
Activation de l’annonce pré-définie
1. Appuyez et maintenez la touche 88. Vous entendrez un bip, la LED clignote et
ENREG. ANNONCE s’affiche, lâchez la touche 88.
2 . Le message d’annonce pré-défini est alors activé.
Remarque !
Vous pouvez enregistrer 2 différentes annonces: une pour le REPONDEUR ENREG.
et une autre pour le REPONDEUR SEUL. (Voir en page 4 pour le choix du mode du
répondeur)
12
Français
Lecture des messages
La LED 5 clignote quand vous avez de nouveaux messages.
La lecture commence toujours par les nouveaux messages; si par exemple vous avez trois
messages anciens et deux nouveaux, seuls ces derniers seront lus avant que le répondeur ne
repasse en veille.
Appuyez à nouveau sur la touche de lecture pour écouter tous les messages, en commençant
par les plus anciens.
1. Appuyez sur 9 / || pour commencer la lecture.
2 . Un bip indique le passage au message suivant.
3 . En fin de lecture, le téléphone émet un bip avant de repasser en veille. Tous les messages
sont sauvegardés (à moins que vous ne les ayez effacés pendant la lecture – voir cidessous) et les nouveaux messages sont enregistrés à la suite des anciens.
Les fonctions suivantes sont disponibles en cours de lecture:
Touche
Fonction
88
Répétition du message courant, ou, en appuyant de façon prolongée
jusqu’à l’émission d’un bip, défilement des messages.
99
Message suivant.
1
/
Arrêt de la lecture.
C
Effacement des messages.
{/}
Augmentation ou diminution du volume d’écoute.
9 / ||
Pause en cours de lecture (7 secondes maximum). Appuyez à nouveau
sur 9 / || pour reprendre la lecture.
Effacement des messages
Pour effacer un seul message, appuyez sur C pendant la lecture de ce message.
Pour effacer tous les messages après la lecture, appuyez sur C jusqu’à ce que vous entendiez
un bip.
Remarque !
Vous ne pouvez effacer les nouveaux messages qu’après les avoir lus.
Lorsque le MODE PRIVE est activé, il est nécessaire de saisir le CODE PIN (0000) puis
d’appuyer sur Q.
13
Français
Mise en/hors service du répondeur
Pour mettre le répondeur en ou hors service, appuyez sur la touche 1 / . Quand il est en
service (ON), le répondeur prend les appels; hors-service (OFF) il ne prend pas d’appel et la
LED 5 est éteinte.
Remarque !
Bien que coupé, le répondeur reçoit les appels (émet un bip) au bout de 10 sonneries.
Après ce bip vous avez la possibilité d’interroger votre répondeur (voir page 15:
Interrogation à distance).
Mémo (message personnel)
La fonction MEMO vous permet de laisser un message personnel de trois minutes maximum
directement sur votre répondeur. Ceci vous permet d’utiliser le répondeur comme un carnet
électronique où vous enregistrez des messages pour les membres de la famille ou vos
collègues.
1. Maintenez appuyée la touche a jusqu’à ce que vous entendiez un bip.
2 . Parlez clairement face à l’appareil pour enregistrer votre Mémo (message personnel).
Ce paramètre fonctionne uniquement lorsque le combiné est raccroché.
3 . Relâchez la touche a en fin d’enregistrement.
4 . Vous lisez les mémos de la même façon que les messages.
Remarque !
Lorsque le MODE PRIVE est activé, il est nécessaire de saisir le CODE PIN (0000) puis
d’appuyer sur Q. Le répondeur pourra alors lire le(s) MEMO(S).
Enregistrement des communications
Vous pouvez enregistrer les conversations téléphoniques en cours d’appel. La mémoire a une
capacité d’enregistrement d’environ 40 minutes; le répondeur enregistre les conversations
téléphoniques de la même façon que les messages.
Remarque !
Ce paramètre fonctionne uniquement avec le combiné. Ne fonctionne pas avec le casque
ou le mode mains-libre.
1. Vous êtes en communication avec un correspondant.
2 . Appuyez sur a. ENR. CONVERS. s’affiche, indiquant que vous enregistrez la
communication.
3 . Appuyez sur 1 / pour mettre fin à l’enregistrement.
14
Français
Interrogation à distance
Vous pouvez interroger le répondeur à distance au moyen des touches d’un téléphone avec
numérotation à fréquence vocale. Composez votre numéro de téléphone pour appeler le
répondeur et entrez votre code de sécurité (voir page 4) pendant la diffusion de l’annonce. Une
fois le code accepté, vous disposez de plusieurs options d’interrogation à distance.
1. Appelez le répondeur.
2 . Quand vous entendez l’annonce, entrez le code de sécurité. Le répondeur émet deux bips si
le code est correct.
3 . Composez dans les 10 secondes le code de commande correspondant à la fonction
souhaitée (voir ci-dessous).
4 . Quand vous avez fini d’interroger le répondeur, raccrochez.
Code
Fonction
1#
Permet de lire les nouveaux messages
Permet de lire tous les messages
2#
En cours de lecture:
3#
4#
5#
6#
Permet
Permet
Permet
Permet
d’effacer un seul message en cours de lecture
de passer au précédent.
d’arrêter la lecture.
de passer au message suivant.
Après la lecture:
7#
8#
9#
0#
Permet de mettre le répondeur en/hors service. Deux bips
indiquent qu’il est éteint – un bip qu’il est en marche.
Permet d’enregistrer une nouvelle annonce ; pour arrêter,
appuyez sur 5#
Permet d’enregistrer un MEMO; pour arrêter, appuyez sur 5#
Permet d’écouter à distance (active pendant 2 minutes 30
secondes; appuyez sur 0# pour continuer).
Remarque !
Si l’interrogation à distance du répondeur ne fonctionne pas, essayez d’appuyer plus ou
moins longuement sur les touches du téléphone. Normalement, le répondeur réagit aux
fréquences vocales de 0,5 à 1 seconde, mais des fréquences vocales plus longues pourront
être nécessaires pour certains réseaux téléphoniques.
Si vous ne composez pas le code d’accès à distance pendant l’annonce, votre appel se
déconnecte au bout de quelques secondes.
Si vous écoutez un message de plus de 2 minutes 40 secondes, vous entendez un bip.
Appuyez sur n’importe quelle touche pour continuer.
15
Français
Ecoute à distance
Cette fonction vous permet d’appeler votre téléphone à distance afin de mettre votre répondeur
en marche pour écouter ce qui est audible dans l’environnement proche du téléphone.
Reportez-vous sur le tableau précédent afin d’activer cette fonction.
Activation à distance
Le répondeur peut être mis en marche à distance.
1. Lorsque votre répondeur est désactivé (OFF), appelez le répondeur et au bout d’environ 10
sonneries, l’appareil répond et émet un bip prolongé.
2 . Entrez le CODE PIN, voir page 4. Le répondeur émet deux bips si le code est correct.
3 . Appuyez sur 7#. Un bip confirme que le répondeur est en service. Raccrochez.
Mémoire pleine
La mémoire du répondeur a une capacité d’enregistrement totale d’environ 40 minutes. Elle
est commune aux annonces, aux mémos et aux messages.
Quand la mémoire est pleine, MEMOIRE PLEINE s’affiche. Vous devez donc effacer des
messages pour pouvoir en recevoir des nouveaux. Si vous accédez à distance au répondeur,
il se déclenchera à la 10ème sonnerie pour vous permettre de lire et d’effacer les messages.
Pour cela vous devez faire une lecture complète des messages puis les effacer.
16
Français
Autres
Compatibilité appareil auditif
Ce téléphone est compatible appareil auditif. Pour activer cette fonction, mettez votre appareil auditif
sur T.
Dépannage
Vérifiez que le câble téléphonique soit en bon état et qu’il soit branché correctement. Débranchez tout
autre matériel, rallonges et téléphones. Si l’appareil fonctionne alors normalement, la panne est causée
par le matériel additionnel.
Testez le matériel sur une ligne en état de marche. S’il fonctionne, cela signifie que votre propre raccordement téléphonique est défectueux. Signalez la panne à votre opérateur.
Pas de présentation du numéro à la réception d’un appel
•
Pour que la présentation du numéro fonctionne, vous devez vous abonner à ce service auprès de votre
opérateur.
•
Si un message s’affiche, il peut s’agir d’un appel international (pas d’informations disponibles), ou
provenant d’un numéro masqué ou hors annuaire.
•
Il est possible que la présentation du numéro ne fonctionne pas si le téléphone est derrière un PABX.
Le répondeur ne répond pas
•
Vérifiez que le répondeur soit en service
•
Vérifiez que le câble téléphonique et le bloc d’alimentation soient correctement branchés.
Le répondeur ne répond pas à l’interrogation à distance
•
Vérifiez que vous appelez le répondeur d’un téléphone d’une ligne directe à fréquence vocale.
•
A la pression des touches, certains téléphones émettent une tonalité trop brève pour activer
l’interrogation à distance. Utilisez alors un bipper.
•
Essayez aussi d’appuyer plus longuement sur les touches (environ 1 seconde par touche).
L’annonce n’est pas clairement diffusée
•
Enregistrez une nouvelle annonce.
•
Rapprochez-vous du micro de l’appareil pour enregistrer l’annonce.
L’appel est coupé lorsqu’un correspondant laisse un message:
•
Le message dépasse peut-être la durée maximum (3 minutes). Au bout de ce délai, l’appel est coupé.
•
Si la personne qui laisse le message reste silencieuse pendant environ 7 secondes, l’appel est coupé
car l’activation vocale en déduit qu’elle a raccroché.
J’entends la tonalité, mais il ne se passe rien quand j’appuie sur la touche de lecture :
•
Vous n’avez pas de message.
Si le téléphone ne fonctionne toujours pas, contactez Doro ou votre revendeur. N’oubliez pas de vous
munir de la facture de votre appareil.
17
Français
Déclaration de conformité
Nous, Doro, déclarons la conformité du produit Doro 916i cr aux dispositions de la directive européenne
1999/5/CE, 2002/95/CE. La déclaration de conformité peut être consultée à l’adresse suivante:
www.doro.com/dofc
Garantie
Cet appareil est garanti 2 ans à partir de sa date d’achat, la facture faisant foi. Le service de garantie n’est
valide que sur présentation d’un justificatif d’achat.
Les dommages dûs à des manipulations ou à un emploi non conformes, à un montage ou entreposage dans
de mauvaises conditions, à un branchement ou une installation non conformes ne sont pas pris en charge
par la garantie. Par ailleurs, la garantie ne s’appliquera pas si l’appareil a été endommagé à la suite d ’un
choc ou d’une chute, d’une fausse manœuvre, d’un branchement non conforme aux instructions mentionnées dans la notice ou aux prescriptions de l’ART (Autorité de Régulation des Télécommunications), de
l’effet de la foudre,
de surtensions électriques ou électrostatiques, d’une protection insuffisante contre l’humidité, la chaleur
ou le gel.
En cas de panne, adressez-vous au S.A.V. de votre revendeur ou installateur. (Il est recommandé de
débrancher le téléphone en cas d’orage.)
18
English
French
Version 1.0