1
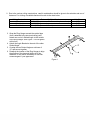
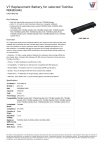
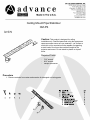
Ceiling Mount Pipe Stabilizer
CM-PS
Form E-362
Rev. 08 / 10
Caution: This product is designed for ceiling
installation only. Qualified personnel using the appropriate
fasteners should mount the Pipe Stabilizer. The surface to
which this unit is mounted must be capable of supporting
a static load of four times the combined weight of the
projector and mount. Do not attach to plaster or drywall
alone.
Required Tools:
-
-
7/16” wrench
9/16” wrench
Phillips screwdriver
Procedure
1. Remove contents from carton and examine for damaged or missing parts.
2. Due to the various ceiling constructions, careful consideration should be given to the selection and use of
fasteners. For a listing of available fastener kits refer to the chart below.
Ceiling Construction
Concrete
Wood Joist
Metal Joist
Fastener Kit Model Number
A101 (3/8” cap screws & hollow set drop-in anchors)
A105 (3/8” lag screws)
A111 (3/8” cap screws & nuts)
3. Wrap the Ring Hanger around the vertical pipe
(that is attached to the structural ceiling) and
attach one end of a Slotted Angle to the outside
of the Ring Hanger. See Figure 1. Do not tighten
at this time.
4. Attach the Angle Bracket to the end of the other
Slotted Angle.
5. Overlap the two Slotted Angles a minimum of
12” and secure together.
6. Readjust the location of the Ring Hanger to align
the position of the pipe and tighten all of the
fasteners. It may not be necessary to use both
Slotted Angles in your application.
Figure 1
Hole Size
5/8”
3/16”
7/16”