1
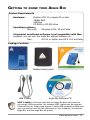
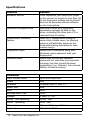
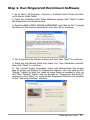
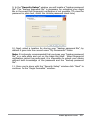
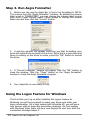
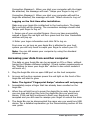
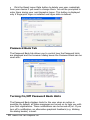
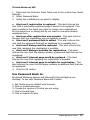
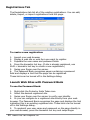
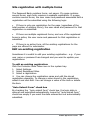
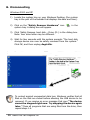
Aegis Bio 2.5” external hard drive User Guide the leader in mobile data storage Copyright © Apricorn, Inc. 2007. All rights reserved. Windows is a registered trademark of Microsoft Corporation. Macintosh and OS X are registered trademarks of Apple Computer, Inc. All other trademarks and copyrights referred to are the property of their respective owners. Distribution of substantively modified versions of this document is prohibited without the explicit permission of the copyright holder. Distribution of the work or derivative work in any standard (paper) book form for commercial purposes is prohibited unless prior permission is obtained from the copyright holder. DOCUMENTATION IS PROVIDED AS IS AND ALL EXPRESS OR IMPLIED CONDITIONS, REPRESENTATIONS AND WARRANTIES, INCLUDING ANY IMPLIED WARRANTY OF MERCHANTABILITY, FITNESS FOR A PARTICULAR PURPOSE OR NON-INFRINGEMENT, ARE DISCLAIMED, EXCEPT TO THE EXTENT THAT SUCH DISCLAIMERS ARE HELD TO BE LEGALLY INVALID. Table of Contents Page# Introduction .......................................................................... 4 Getting to know your Aegis Bio ............................................... 5 w System Requirements ......................................................... 5 w Package Contents ............................................................... 5 w Specifications ..................................................................... 6 Aegis Bio Set-Up .................................................................... 7 w Step 1. Install program on host system ............................... 7 Typical Installation Option .................................................. 9 Custom Setup Option ......................................................... 9 w Step 2. Run Fingerprint Enrollment Software.......................... 11 w Step 3. Run Aegis Formatter.................................................. 14 w Using the Logon Feature ................................................... 14 w Accessing your data from another computer ....................... 15 w Tray Icon Overview ........................................................... 16 Editing Fingerprints ........................................................... 16 Fingerprint Tutorial ............................................................ 17 w Settings ........................................................................... 17 General Options Tab .......................................................... 17 Password Bank Tab ............................................................ 19 Registration Tab ................................................................. 20 w Password Unlock Utility ..................................................... 23 w PST Administration Tool ........................................................ 23 w PST Reset Tool .................................................................... 25 w Making CDs without PST Administration Tools ....................... 25 w Disconnecting .................................................................... 26 wT echnical Support ............................................................... 27 Contact Information ........................................................... 27 RMA Policy .......................................................................... 27 wW arranty ............................................................................ 28 wF AQ ................................................................................... 29 Introduction Thank you for purchasing the Aegis Bio. Please take the time to read this manual first to familiarize yourself with the Aegis Bio and the included software. Why you can trust your data to the Aegis Bio. Designed for those that demand the highest level of protection for their data, the Aegis Bio fuses leading edge technology in biometric authentication and encryption with a rugged, portable design to produce a truly remarkable drive. Biometrically secure, the Aegis Bio utilizes UPEK’s Digital ID Hardware Engine. Comprised of UPEK’s unique TouchStrip Sensor with Oxford Controller chip, the Aegis Bio is able to store up to ten fingerprint profiles. Once your fingerprint is enrolled, just swipe your finger to access your files. No software is required on the host computer to access your data, and the Aegis Bio is cross platform compatible, enabling you to take your data securely from work, home or on the road regardless of your operating system. With its Administrator Password feature in addition to its fingerprint activation, the Aegis Bio is the perfect option for IT departments with mobile users that need to take sensitive information on the road, including government agencies or financial institutions. The Aegis Bio secures your data with real-time 128-bit AES hardware encryption, rendering the drive impenetrable even if it is removed from its enclosure. In addition, the Aegis Bio’s 16-point omni-directional shock mounting system protects the drive from accidental drops and bumps, creating the most secure mobile drive available on the market today. 4 Value You Can Depend On Getting to know your Aegis Bio System Requirements Hardware: Pentium CPU II or Apple G3 or later 32MBs RAM USB Port CD ROM or CD-RW drive Operating systems: Microsoft: Windows 2000, XP and Vista Fingerprint enrollment software is not compatible with Mac, However, you can use the Aegis Bio without software on: Mac: OS 9.2 or higher and OS X 10.2 and later Package Contents Aegis Bio USB Y-cable Padded travel pouch Quick Start Guide Aegis Bio Software CD USB Y-cable: In the rare case that the Aegis Bio does not power up on a single USB connection, the included USB Y-cable may be required (Pictured above). Simply plug the two Y-cable USB connectors (black and grey connectors) into the two USB ports on your notebook, connect the Aegis Bio, and the Aegis Bio will power. www.apricorn.com 5 Specifications Features Benefits Biometric Access Once registered, just swipe your finger on the sensor for access to your files. Up to ten fingerprint profiles can be stored and can be accessed without software on the host system. Hardware Encrypted Drive Real-time 128-bit AES encryption seamlessly encrypts all data on the drive, protecting the drive even if it is removed from it’s casing Administrator Password feature Ideal for IT departments looking to secure their mobile users, by allowing setup of administrator access to the drive before being distributed to their mobile user(s). Fingerprint Logon Allows you to substitute using your Windows Logon password with your fingerprints. Password Bank Stores user names and standard passwords for web sites and corporate intranets, but also normal Windows applications (e.g. Outlook), into secured section of device memory. Parameter Data Transfer Rates Up to 480 Mbps USB Power USB Interface Hi-Speed USB 2.0 and 1.1 Buffer Size 8MB RPM 5400 Average Seek Time 12ms Voltage 5 Volts +/- 5% Shock - non operating 1000G 1ms Shock - operating 300G 2ms Dimensions 19mm x 84.5mm x 120mm Approvals FCC, CE & USB IF 6 Value You Can Depend On Aegis Bio Set-Up The Aegis Bio Setup involves three steps. Step 1. Run “Install the program on the host system” Step 2. Run the fingerprint enrollment software. Step 3. Run Aegis Formatter. Step 1. Install program on host system (PC Only) 1. Insert the “Aegis Bio Software CD” into your CD-ROM and click on the “Install Aegis Bio Software” button. Note: If the installation menu does not pop up automatically when you load the CD-ROM, go to My Computer and double-click CD-ROM drive with the Apricorn Icon next to Aegis Bio & (Drive Letter). 2. Choose “Install program on host system” to continue. 3. On the “Welcome to Protector Suite Token Installation Wizard” window click “Next” to continue. www.apricorn.com 7 4. Enter the User information and click “Next” to continue 5. Choose the destination folder and click “Next” to continue. 6. Choose Typical or Custom Install and click “Next” to continue. Note: Use the custom installation option to substitute your Windows Logon passwords with your fingerprints. 8 Value You Can Depend On Typical Installation Option 1. Click “Next” to continue. 2. Click Finish to Complete the installation. Custom Setup Option 1. Select Custom Option and click “Next” to continue. www.apricorn.com 9 2. Click on the red X, choose “Will be installed on local hard drive” and click “Next” to continue. 3. Click “Next” to continue and Finish to complete the installation. 4. Once the installation has completed you will need to restart the system for the changes to take effect. Click Yes to restart now or No to restart later. 10 Value You Can Depend On Step 2. Run Fingerprint Enrollment Software 1. Go to Start / All Programs / Apricorn / Protector Suite Token and Click on Protector Suite Token 2. From the Protector Suite Token Welcome screen click “Next” to start the fingerprint enrollment wizard. 3. Read the END-USER LICENSE AGREEMENT and Click on the “I accept the terms of the license agreement” and click OK to continue. 4. The Fingerprint Enrollment wizard will start click “Next” to continue. 5. Read the Enrollment Hints and check the “Run interactive tutorial” then click “Next” to continue. 6. The Correct Swipe Procedure video will demonstrate the proper way to swipe you fingers for fingerprint capture. You can click on the “Replay” button to view the video as many times as needed or click on the “Skip Tutorial” button and go directly to “Fingerprint Enrollment” window or click “Next” to continue the fingerprint tutorial and proceed to the “Scanning Practice” window. www.apricorn.com 11 7. On the “Scanning Practice” window you can practice scanning your fingers. You can do this as many times as you need to by clicking on the “Try again” button. If you have any question about the proper technique, use the “Replay Animation” button to watch the Fingerprint Tutorial Video. When you are comfortable scanning your fingers click “Next” to continue to the “Fingerprint Enrollment” window. 8. In the “Fingerprint Enrollment” window, click on the box above the finger you wish to enroll. Wait for the “Fingerprint Swipe” window to appear. Once you have swiped your finger successfully three times the “Fingerprint Swipe” window will say succeeded and disappear. Enroll more than one finger (as recommended) and then click “Next” to continue to the “Security Setup” window. Note: If the “Fingerprint swipe” window appears and you are not prompted for a password at this time, your IT administrator has already completed the “Security Setup” for you. Please swipe your finger and continue to the “Aegis Formatter” section of this guide on page #14 12 Value You Can Depend On 9. In the “Security Setup” window you will create a “backup password file”. The “backup password file” is necessary for unlocking your Aegis Bio in the event that fingerprint verification is not possible. (To view the password in plain text, select the Unhide password check box.) 10. Next, select a location for storing your “backup password file”, by default it goes into the current users “My Documents” folder. Note: It is strongly recommended that you keep your “backup password file” in a safe place and not on the Aegis Bio itself. When fingerprint verification cannot be performed, it is impossible to unlock your device without both knowledge of the password and the “backup password file”. 11.Once you’re done with the “Security Setup” window click “Next” to continue to the “Aegis Formatter” window. www.apricorn.com 13 Step 3. Run Aegis Formatter 1. Before you can use the Aegis Bio, it has to be formatted in FAT32. This is done from the “Aegis Formatter” window. By default the volume label is set to “ENCRYPTED”, you can change the volume label to give your drive a user friendly name. Either accept or change the volume label now and then click the “format” button. 2. A warning window will appear informing you that formatting your drive will erase all the contents of the drive. Since this is a new drive and there is nothing on the drive to erase, press the “OK” button to format the drive. 3. A “Format Complete” window will popup, click the “OK” button to close the window. Click the “Close” button on the “Aegis Formatter” window to close the Aegis Formatter program. 4. Your Aegis Bio is now ready to use. Using the Logon Feature for Windows The first time you Log on after installing the Logon feature for Windows you will be prompted to swipe your finger and enter your logon information. On a host system with Windows XP, you will see a new banner with an Aegis Bio connection message. On host system with Windows Vista, there will be a new fingerprint user icon with the connection message below it. 14 Value You Can Depend On Connection Message 1. When you start your computer with the Aegis Bio attached, the message will read: “Swipe your finger to log on”. Connection Message 2. When you start your computer without the Aegis Bio attached, the message will read: “Attach device to Log on”. Logging on the first time after installation. Make sure your Aegis Bio is attached to the host system. The Aegis Bio’s red light will be glowing. The connection message should read “Swipe your finger to log on”. 1. Swipe one of your enrolled fingers. Once you have successfully swiped a finger the red light will turn green and the User Credentials window will pop up. 4. Enter your logon information and click OK to log on. From now on, as long as your Aegis Bio is attached to your host system you will only need to swipe your finger to unlock your PC. Note: You can still access your computer by using the standard Windows logon. Accessing your data from another computer The data on your Aegis Bio can be accessed on PCs or Macs without having the PStoken software installed. (Check system requirements on the “Getting to know your Aegis Bio” section to see which models it will work on.) 1. Plug the Aegis Bio into an open USB port on the host computer. 2. As soon as the drive receives power the red light on the front of the Aegis Bio will start to glow. Note: The typical “Fingerprint Swipe” window will not pop up. 3. Immediately swipe a finger that has already been enrolled on the Aegis Bio. 4. When the red light turns to green the Aegis Bio is ready to use and you can drag and drop files onto the Aegis Bio like you would any device. If the red light continues to flash your fingerprint was not accepted and you will need to reswipe your finger to unlock the drive. 5. The Aegis Bio can be disconnected the same way you would any USB device. For a detailed explanation go the Disconnecting section of this user guide. www.apricorn.com 15 Tray Icon Overview The Protector Suite Token icon will populate the system tray in the lower right corner of your task bar. This icon provides access to the following features: • Edit Fingerprints: Opens the fingerprint enrollment wizard to register additional fingers or delete existing ones. • Lock/Unlock: Locks or unlocks the device. For unlocking, fingerprint verification is required. Locking your device while a write operation to the device is in progress can corrupt the data being written. It is strongly recommended that you finish any ongoing read/ write operation with the device before you lock it. • Registered Sites: The Password Bank will allow you to access your registered sites without having to re-enter your login and passwords, just swipe and the browser will launch and you will be logged in to your site. • Settings: Opens the Settings dialog. • Fingerprint Tutorial: Runs the fingerprint tutorial. • Help: Opens this help. • About: Displays information about the program and its version. • Exit: Exits the Protector Suite Token application. Editing Fingerprints To edit, delete or add fingerprints, please use the following steps: 1. 2. 3. 4. 5. 6. 7. 8. Right-click the Protector Suite Token icon in the system tray in the lower right corner of your task bar. Select Edit Fingerprints. Verify yourself by swiping your finger over the sensor. Click Next. You will now see a page with two hands on it Click on the icon above the finger you would like to add, delete, or edit. Follow the enrollment messages until you have completed the process. Click the Finish button to close the wizard. Warning: Always keep one finger enrolled. After the last fingerprint is deleted, the device is RESET deleting all data, formatting, registrations and logon information. 16 Value You Can Depend On Fingerprint Tutorial Strip sensors represent a new type of fingerprint scanner. To help you with your enrollment, we created a tutorial where you can practice swiping your finger to create fingerprint samples. To run the fingerprint tutorial: The tutorial is included in the Protector Suite Token Enrollment Wizard, but in the event that you would like to run it again after enrollment please follow the steps below. 1. Right-click on the Protector Suite Token icon in the system tray on the lower right corner of your desktop. 2. Select Fingerprint Tutorial. The animation in the tutorial shows the correct movement of the finger across the sensor: • Position the last knuckle joint (closest to the tip of your finger) over the sensor. • Maintain finger contact with the sensor while sliding the finger towards you in a straight line. • Make sure to keep the finger in a flat position as you move it over the sensor. • On the next page of the tutorial, we have created a practice session for you to perfect the swipe method. Settings To display the Settings dialog: 1. Click the Protector Suite Token tray icon and select Settings from the menu. 2. Swipe your finger over the sensor to verify your identity. 3. Select one of the appropriate tabs. General Options Tab To set general application options: • Set the desired status of check boxes in the General section. • Set the biometric hot key for the Password Bank and (optional) fingerprint logon. This combination of keys invokes fingerprint logon, web page registration, or replaying of a registered page. (To register an already registered page, use it together with Shift.) www.apricorn.com 17 • Click the Reset Logon Data button to delete your user credentials from your device if you need to change them. You will be prompted to enter them during your next biometric logon. This button is displayed only if fingerprint logon is installed and logon data is defined. Password Bank Tab The Password Bank tab allows you to control how the Password hints are displayed and the browsers dialog boxes the Password Bank can be used with. Turning On/Off Password Bank Hints The Password Bank displays hints for the user when an action is possible. By default, all these messages are turned on to help you with your first registrations. These notifications can be turned off/on. If you turn off a notification, an alternative graphical feedback (e.g. blinking the dialog border) is used. 18 Value You Can Depend On To turn hints on/off: 1. Right-click the Protector Suite Token icon in the system tray. Select Settings. 2. Select Password Bank. 3. Select the notifications you want to display. • Alert me if registration is replayed - This alert informs the user that a previously registered page is about to be replayed. This alert is useful in the event you want to create more registrations for the same form or dialog and do not want to overwrite already registered form. • Alert me after registration was created - This alert informs the user that the registration was successfully created. • Alert me if password field is edited - This alert informs the user that the password field will be displayed in a readable form. • Alert me if dialog could be replayed - This alert informs the user that replaying the registration is possible. • Alert me if dialog is suitable for registration - This alert informs the user that the dialog contains a password field that can be registered. • Alert me if internet page could be replayed - This alert informs the user that replaying the registration is possible. • Alert me if internet page is suitable for registration - This alert informs the user that the page contains a password field that can be registered. 4. Click the OK button. Use Password Bank to: By default Windows dialogs and Microsoft Internet Explorer are checked. To use with Password Bank with Firefox: 1. 2. 3. 4. 5. Set Firefox as your default web browser. Click on Install extension. Choose the version of Firefox you are using. Click on Install now. Click on Restart Firefox. www.apricorn.com 19 Registrations Tab The Registrations tab list all of the existing registrations. You can edit, delete, export, or import registrations from this page. To create a new registration: 1. Launch your web browser 2. Display a web site or web form you want to register. 3. Populate the user name and password fields. 4. Press the biometric hot key. (if site is already registered, use Shift + biometric hot key to create a new registration.) 5. Swipe your finger over the sensor. 6. The Password Bank recognizes pages containing a password field and displays a hint that the page can be registered. These hints can be turned off in the Settings dialog. Launch Web Sites with Password Bank To use the Password Bank: 1. Right-click the Protector Suite Token icon. 2. Select the desired registered site. 3. Swipe your finger over the sensor to verify your identity. 4. Or you can navigate to a registered site directly from your web browser. The Password Bank recognizes the page and displays the hint indicating this is an existing registered site. These hints can be turned off in the Settings dialog. 5. To resubmit your user name and password on the page directly in your web browser, press the biometric hot key and swipe finger. 20 Value You Can Depend On Site registration with multiple forms The Password Bank registers forms, not pages. If a page contains several forms, each form requires a separate registration. If a page contains several forms, the user name and password associated with a registration will be submitted using the following logic: • If there is only one registration for the page (regardless of the total number of existing forms), the user name and password for that registration is submitted. • If there are multiple registered forms, and one of the registered forms is active, the user name and password for that registration is submitted. • If there is no active form, all the existing registrations for the page are offered for submission. Edit an existing registration Sometimes it is useful to edit your existing registration - e.g. if your user name or password has changed and you want to update your registrations. To edit an existing registration: Click the Protector Suite Token icon in the system tray. 1. Select Settings. 2. Select Registered Sites. 3. Select a registration. 4. You can change the registration name and edit the stored registration elements. To change a value stored in the registration, select it and click Edit. You can change a value of the item or delete the item. “Auto Submit Form” check box By checking the “auto submit form” check box, the login data is entered and submitted automatically. Leave the “auto submit form” check box empty if you want the data entered but not automatically submitted. www.apricorn.com 21 Renaming a registration Registrations are stored with a default name. You can later rename a registration. To rename a registration: 1. 2. 3. 4. 5. 6. Click the Protector Suite Token icon in the system tray. Select Settings. Select Registered sites. Select a registration. Click the Rename button. Type a new registration name. Deleting an existing registration To delete an existing registration: You are logged on to the computer and want to delete an existing registration. 1. 2. 3. 4. 5. Click the Protector Suite Token icon in the system tray. Select Settings. Select Registered sites. Select a registration. Click the Delete button. Exporting/Importing a Registration You can export your registration (e.g. for use on another computer). An exported registration is a file with .pb extension and can be imported later. To export a registration: 1. Click the Protector Suite Token icon in the system tray. 2. Select Settings. 3. Select Registered sites. 4. Select registrations to be exported. 5. Click the Export button. 6. Enter the target file name. 7. Enter and retype a password which protects your registration. This password will be later used when importing these registrations. 22 Value You Can Depend On To import a registration: 1. Click the Protector Suite Token icon in the system tray. 2. Select Settings. 3. Select Registered sites. 4. Click the Import button. 5. Browse for the .pb file to be imported. 6. If registrations already exist on your computer, you will be asked whether you want to preserve your existing registrations, or to replace them. If you select the option to preserve your registrations, the new instances of registrations from the .pb file will be identified using a number after the registration name. 7. Enter the password. 8. Registrations will be imported. Password Unlock Utility The Password Unlock Utility gives you access to your Aegis Bio in the event that fingerprint verification is not possible. To unlock the Aegis Bio: 1. Run the Password Unlock Utility from the shortcut in the Start menu (installed version), or run pstunlock.exe manually. (1.Insert the Aegis Bio Software CD in the CD drive of your computer and click on the “Browse CD” button. 2. Open the pstoken3.0 folder. 3. Open the ‘cdrom” folder.) 2. You must provide your backup password and the key backup file (if used). Note: In corporate environments, tokens may be distributed with a security password already created by your administrator. In these cases, the enrollment wizard ended after you enrolled your finger(s). If you later need to unlock your device, contact your administrator. PST Administration Tool For corporate implementations, the PST Admin Tool allows the administrator to install a backup password and save it in an encrypted “Backup Password File” that ties it to each Aegis Bio’s unique serial number. With knowledge of the password and the “Backup Password File”, the administrator will always be able to unlock the Aegis Bio. When an end-user receives an Aegis Bio with the backup password installed by the administrator, the end-user will not be able to remove or change the backup password. www.apricorn.com 23 Warning! the PST Administration tools are included with the standard Aegis Bio application CD, but it is not recommended for distribution in a corporate environment. These tools can be destructive if used incorrectly. Go to page #25 “Making CD’s without PST Administration Tools” for instructions on how to create a CD for distribution. To access the PST Administration Tool 1. Insert the Aegis Bio Software CD in the CD drive of your computer. Click on the “Browse CD” button to open a window with the entire contents of the Aegis Bio Software CD 2. Open the pstoken3.0 folder. 3. To start the PST Administration Tool program, open the “pstadmin” folder and double-click the pstadmin.exe. The Administration Tool dialog will appear with the following functions: Show serial number Shows the Aegis Bio’s unique serial number. Warning! Do not save the file directly on the device. When the device is locked the file would remain on the locked drive and it would not be possible to retrieve the password! Unlock Fill in the password and click “Unlock”. Select the relevant xml file (if used) for the device. The code at the end of the file name corresponds to the serial number of the device. Unenroll ******WARNING****** Enroll Set up a password for the device. Fill in a password (use “Unhide password” button to see the password in plain text), click “Enroll” to save an xml file (if used) to a chosen location. The code at the end of the proposed file name corresponds to the serial number of the device for easier identification. This file is required for unlocking the device later. Unenroll will delete all the information on the hard drive. There are NO WARNINGS associated with this action. Only use Unenroll if you do not intend to retrieve any information off the drive later. 24 Value You Can Depend On PSTReset Tool ******WARNING****** Run pstreset.exe file to delete all files and formatting from your device. No password is necessary. This will leave your hard drive in a preformatted state and it will be necessary to format the hard drive and go through the initial enrollment process. This tool should be used only as an emergency solution, not for routine maintenance of the device. All data on the device will be lost and cannot be retrieved. To access the PST Reset Tool: 1. Insert the Aegis Bio Software CD in the CD drive of your computer. Click on the “Browse CD” button to open a window with the entire contents of the Aegis Bio Software CD 2. Open the pstoken3.0 folder. 3. Open the “pstreset” folder and double-click the pstreset.exe. Making CD’s without PST Administration Tools To create a PS Token CD for distribution to end users without the PST Administration Tools: 1. Insert the Aegis Bio Software CD in the CD drive of your computer. Click on the “Browse CD” button to open a window with the entire contents of the Aegis Bio Software CD 2. Open the pstoken3.0 folder. 3. Burn the entire contents of the “cdrom” folder to a CD. www.apricorn.com 25 B. Disconnecting Windows 2000 and XP 1) Locate the system tray on your Windows Desktop (the system tray is the part of the taskbar that displays the date and time). 2) Click on the “Safely Remove Hardware” icon system tray. A dialog box will appear. in the 3) Click ‘Safely Remove hard disk – Drive (D:) in the dialog box. Note: Your drive letter may be different. 4) Wait for few seconds until the system prompts ‘The hard disk storage device can now be safely removed from the system.” Click OK, and then unplug Aegis Bio. To protect against unexpected data loss, Windows verifies that all files on the disk are closed before allowing the USB device to be removed. If you receive an error message that says “The device cannot be stopped right now. Try stopping the device again later.” Close all programs that are using files from the drive, then repeat steps 1-4. 26 Value You Can Depend On Technical Support A. Contact Information Apricorn provides the following helpful resources for you: 1. Setup, Software and FAQs sections of the User’s Guide. 2. Apricorn’s Website (http://www.apricorn.com) This gives you the ability to check for up-to-date information. 3. E-mail us at [email protected]. 4. Or call the Technical Support Department at 1-800-458-5448 option 3. Apricorn’s Technical Support Specialists are available from 8:00 a.m. to 5:00 p.m., Pacific Standard Time Monday through Friday. B. RMA Policy An RMA (Return Merchandise Authorization) tracking number must be issued by Apricorn. If you need to return or replace your Aegis Bio, Apricorn requires that you perform the following steps: 1. Simply call Apricorn’s technical support department with your Aegis Bio part number and a description of the problem(s) you are experiencing. 2. If the Apricorn representative finds cause for a return, they will issue an RMA number. Please write this number down. 3. Fill out an RMA authorization form with your package. The RMA form is available on-line at http://www.apricorn.com/support/rma.php. 4. Please send the prepaid package to the following address, make sure the RMA# is written on the exterior of the package: Apricorn RMA#: __________ 12191 Kirkham Road Poway, CA 92064 The purchaser shall be responsible for any loss or damage to the returned product until it is received by Apricorn. Purchaser should consider obtaining insurance with respect to shipping the product. www.apricorn.com 27 Warranty Conditions Three-Year Warranty: Apricorn offers a 3-year warranty on the Aegis Bio against defects in materials and workmanship under normal use. The warranty period is effective from the date of purchase either directly from Apricorn or an authorized reseller. Disclaimer and terms of the warranties: The warranty becomes effective on the date of purchase and must be verified with your sales receipt or invoice displaying the date of product purchase. Apricorn will, at no additional charge, repair or replace defective parts with new parts or serviceable used parts that are equivalent to new in performance. All exchanged parts and products replaced under this warranty will become the property of Apricorn. This warranty does not extend to any product not purchased directly from Apricorn or to any product that has been damaged or rendered defective: 1. As a result of accident, misuse, Neglect, abuse or failure and/or inability to follow the written instructions provided in this user guide: 2. By the use of parts not manufactured or sold by Apricorn; 3. By modification of the product; or 4. As a result of service, alteration or repair by anyone other than Apricorn and shall be void. This warranty does not cover normal wear and tear. No other warranty, either express or implied, including any warranty or merchantability and fitness for a particular purpose, has been or will be made by or on behalf of Apricorn or by operation of law with respect to the product or its installation, use, operation, replacement or repair. Apricorn shall not be liable by virtue of this warranty, or otherwise, for any incidental, special or consequential damage including any loss of data resulting from the use or operation of the product, whether or not Apricorn was apprised of the possibility of such damages. 28 Value You Can Depend On FAQ’s I enrolled my fingerprints but the Aegis Formatter says “Aegis USB Device Not Found”. This can happen on a computer with network drives. The PS token software sees the drive and allows you to enroll your fingerprints. But your Operating System assigns the Aegis Bio a drive letter that conflicts with one of the network drives. In this case the Aegis Formatter can not find the drive and you will need to change the drive letter assigned to the Aegis Bio to resolve the conflict. 1. To reassign the drive letter on the Aegis Bio right-click on ‘My Computer’ and click on ‘Manage’ then under ‘Storage’ you will click on ‘Disk Management’ 2. On the lower half of the window scroll down to see the Disk listed in numerical order. You are looking for a Disc listed as “Removable” with no drive status information and a drive letter that matches one of the network drives on your system. 3. Right-click inside the box with the removable disk information and open ‘Change Drive Letters and Paths’ dialog box. www.apricorn.com 29 4. Now click the down arrow next to the ‘Drive Letter’ to open the drop down menu and choose a new ‘Drive Letter’. Make sure to choose a ‘Drive Letter’ that does not conflict with any of the network drives. Click on the OK button to assign the new ‘Drive Letter’ and close all the windows. The “Aegis Formatter” will now recognize and format the entire drive in FAT 32. 5. To start the “Aegis Formatter” manually, click on the “Browse CD” button from the Aegis Bio Software CD. This will open a window showing the entire contents of the CD. Locate and double-click the psformat.exe file it to start the “Aegis Formatter”. Go to step 14 in the Installation section of this manual for more information about the “Aegis Formatter” options. Why can’t I format my Aegis Bio by right-clicking on the drive in My Computer? The Aegis Bio’s encryption system requires that the drive be formatted with the “Aegis Formatter”. To start the “Aegis Formatter” manually, click on the “Browse CD” button from the Aegis Bio Software CD. This will open a window showing the entire contents of the CD. Locate and double-click the psformat.exe file it to start the “Aegis Formatter”. Go to step 14 in the Installation section of this manual for more information about the “Aegis Formatter” options. I have created registrations for web pages and they are not working when I try to run them? Some applications have implemented the login screen in a way other than using a standard password field. Any nonstandard password field that does not allow you to copy & paste your password into the form will not work with the “Password Bank” either. 30 Value You Can Depend On Why am I having so much trouble with one of the fingerprints I have enrolled? There can be many reasons you might be having trouble with an enrolled fingerprint, normally it will be difference in the angle or pressure you are swiping your finger. But, if you do have a fingerprint that doesn’t seem to work very well just go to the fingerprint enrollment and delete the fingerprint in question and re-enroll it. What is SyncToy 1.4? Microsoft’s® SyncToy 1.4 for Windows is available as a free download from the Microsoft Download Center. The easy to use, customizable application helps you copy, move, rename, and delete files between folders and computers. To make it easy for you to find and download, we have created a link that is accessible from the Aegis Bio Software CD. I run pstoken.exe and get an error. Why? The most likely reason to receive an error when you run the pstoken software, is because your Aegis Bio drive is not connected to a USB port on your computer. I want to remove/change my logon information. How do I do that? 1. Click on the Protector Suite Token icon in the tray and swipe your finger to verify yourself. 2. Click on setting. On the Options tab, the “Reset Logon Data” button is displayed only if fingerprint logon is installed and logon data is defined. 3. On the Options tab, click the “Reset Logon Data” button to clear your user credentials from the device. There is no warning associated with this feature and your Log on credentials will be removed immediately. This only clears the information entered into the user credentials window during your initial biometric logon. It does not change any of the Windows Log on information. You will be able to continue logging on to Windows with the same user name and password as you always have. www.apricorn.com 31 4. After you click the “Reset Logon Data” button you will receive a the following verification window. You will be prompted to enter your user name and password in the user credentials window during your next biometric logon. How do I get the password bank to work with Firefox? (Firefox must be set as the default browser.) 1. Click the Protector Suite Token tray icon in the system tray (usually in the lower right corner of your desktop). 2. Select Settings from the menu. 3. Swipe your finger over the sensor to verify yourself. 4. Select Password Bank tab. 5. Click on Install extension... 6. Choose the version of Firefox you are using. 7. Click on Install now. 8. Click on Restart Firefox. I plug in my Aegis Bio but the LED doesn’t light up. The Aegis Bio will need to be initialized with the PSToken software. Run the PSToken software, and enroll your fingerprint and use the Aegis Formatter to prepare the drive. If the Aegis Bio is lost, can someone remove the hard drive and access the data? No, due to Apricorn’s unique method of encrypting the drive on a hardware level, the data will be stored in an encrypted state on the drive. How do I change my secret password? The only way to change your secret password requires resetting the drive which deletes all the information off the drive. If your device had the password installed by the administrator you must have the administrator reset the device to clear the password. If you set the password, you can clear it by removing all of the fingerprints. 32 Value You Can Depend On What happens if I loose my backup password file or it becomes corrupted? Take care to store the backup password file in a safe place you will always have access to. Because, you must have both the password file and knowledge of the backup password to unlock the device without fingerprints. Is my password stored on the “backup password file”? No, only the information needed to generate encryption from the password you entered is stored in the “backup password file”. Why can’t I find my Aegis Bio listed with my other USB devices in the “Safely Remove Hardware” window? The mass storage device does not appear in the icon for the Hot Plug Manager in Windows 2000 and safe-removal is not possible through this GUI. This is a known Windows 2000 problem. A supported hotfix is available from Microsoft. Please search site http://support.microsoft.com for string “KB841880” or try to access http://support.microsoft.com/ kb/841880 directly. www.apricorn.com 33 What are the advantages of installing program on host system? Running the “Install program on host system” offers the following convenient features and custom options. • Fingerprint logon (Only available through custom setup) Fingerprint Logon allows you to substitute your Windows Logon passwords with your fingerprints. You will not need to enter your user name and password during logon any more, just swipe your finger when prompted to unlock your computer. • Running verification automatically after attaching your device When you attach your Aegis Bio to the host system, it automatically recognized the Aegis Bio and launches the “Fingerprint Swipe” window to unlock your device. See “Using the Logon feature” on page #14 • Adding shortcuts to Protector Suite Token applications to the Start menu What features are available when the Aegis Bio software is installed on host system compared to running PStoken only or taking your Aegis Bio to another system and swiping your finger? Install on Host System PStoken only Finger Swipe a Windows Logon with fingerprint a a Auto recognize on plug-in a site registration a a a a a a a a setup new device app registration edit fingerprints Start menu Cross-Platform 34 Value You Can Depend On Notes: www.apricorn.com 35 12191 Kirkham Road Poway, CA, U.S.A. 92064 1-858-513-2000