1
C
PY
O
. Thank you for purchasing a Canon product.
This Instructions booklet assume t h a t a Type A camera is used with the ST-E2.
'
With Type H cameras (EOS cameras except 'I'ype
A models), the ST-E2 can be used only for manual
flash and multi-flash photography. See pages 23
to 27 in t h i s booklet a n d t h e Speedlite 550EX
Instructions.
PY
Speedlite Transmitter ST-E2 is a wireless transmitt e r which can control up to two Speedlite 550EX
groups set as slaves.
The transmitting range is about 12 to 1 5 meters /
39.4 to 49.2 ft indoors and 8 to 10 meters / 26.2 to
32.8 ft outdoors. With Type A cameras (EOS-3, EOS
Elan IIIIIE, EOS 50/50E, EOS 500NlRebel G, EOS
IX. EOS IX7AX Lite), the ST-E2 can execute the following operations through wireless control:
O
E-?"rL autoflash
High-speed sync (FP flash)
FE lock
Flash exposure compensation
Manual flash (Flash output set with Speedlite)
Multi-flash firing (Set with the Speedlites)
C
With the EOS-3, the following operations a r e also
possible: Flash ratio control between two Speedlite
slave P ~ O U D S .modeline flash firing.
-, and linkage of
A F - a s k t dea'm to a r e a k .
-
C€
The C E Mark is a Directive cunformity mark of the European
Community (ECl
I
Symbols used in this Instructions booklet:
0: Warning for preventing c a m e r a or ST-E2
malfunction.
Supplementary notes for using t h e ST-E2
with the camera.
:'&: Helpful tip for using t h e ST-E2 and taking
pictures.
Keep this Instructions booklet handy for future
reference.
a:
1.
I
This digital apparatus does not exceed t h e Class B
limits for radio noise emissions frnrn digital apparatus a s set out in the interference-causing equipment
standard entitled "Digital Apparatus", ICES-003 of
the Industry Canada.
Contents
PY
1. Nomenclature ................................................................................................................
22
23
2. Readying the ST-E2 .......................................................................................................
3. Readying the 550EX (Slave Setting) ............................................................................ 25
4. Basic Wireless E-TTL Autoflash Operation ................................................................. 26
5. Wireless Multi-Flash E-TTL Autoflash Operation ...................................................... 29
6. Applications ...................................................................................................................
33
7. Troubleshooting .............................................................................................................34
Specifications ........................................................................................................................35
I
O
Note
All t h e operation instructions in this booklet assume t h a t the ST-E2 and other relevant equipment a r e
already turned on. Before proceeding, make sure the ST-E2 and other equipment are on.
I
C
This device complies with Part 15 of the FCC Rules. Operation is subject to the following two conditions: (1) This device may not
cause harmful interference, and (2) this device must accept any interference receivcd, including interlilrence that may cause
undesired operation.
Do not make any changes or modifications to the equipment unless otherwise specified in the instructions. If such changt.s or
modifications should be made, you could be required to stop operation of the equipment.
This equipment has been tested and found to conlply with the limits for a class B digital device, pursuant to part 15 16the FCC
Rules. These limits arc designed to provide reasonable protection against harmful interference in a residential installation. This
equipment generates, uses and can radiate radio frequency energy and, if not installed and used in accordance with the
instructions, may cause harmful interference to radio communications.
However, there is no guarantec that interference will not occur in a particular installation. If this equipment does cause harmful
interference to radio or television reception, which can be determined by turning the equipment off and on, the user is encour;~g-ed
to try to correct the interference by one or more of the following measures:
Reorient or relocate the receiving antenna.
Increase the separation between the equipment and receiver.
Consult the dealer or a n experienced radiolIli technician for help.
21
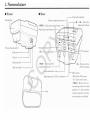
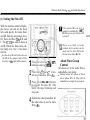
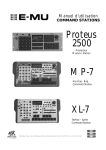
1. Nomenclature
Front
Rear
Battery compartment cover
,+I"-assist beam emlttor
PY
Flash ratio cuntrol lamp
Channel intl~cat,~r
O
< PILOT > I'ilot. I:im
Shoc l t ~ slider
k
trnnsmission button
C
High-speed synr (FI' fl:~:
< 0 ,:Turns off thr 11rnr.er.
< I >:Turns on thr po\rer.
< HOLD >: Retains t h e c u r rent settings u,hilo thr switch
position is I . All lr:,nsmiLter
controls except the tPet transmission button ;ire ~lis:$blcd.
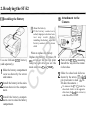
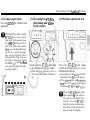
2. Readying the ST-E2
(2) Attachment to the
(I) Installing the Battery
Camera
1 Slide
the battery compartment
cover as shown by the arrow
C
and remove.
When to replace the battery
Replace the battery if it takes 30
sec. o r longer for t h e red pilot
l a m p to light a f t e r you s e t t h e
main switch to < I > or < HOLD >.
O
Use one l i t h i u m 2CR5 b a t t e r y
(sold separately).
PY
About the battery
If t h e b a t t e r y c o n t a c t s a r e
soiled, improper electrical cont a c t m a y r e s u l t . Before
installing the battery, wipe the
battery contacts with a clean
cloth.
Install the battery in the orientation shown in the compartment.
Install the battery compartment cover to close the battery
compartment.
Push in the ST-E2's mounting
1 foot all the way into the camera's hot shoe.
Slide t h e shoe lock slider a s
shown by the arrow. (The lock
pin protrudes to lock t h e STE2 onto the camera.)
To remove the ST-152, slide t h e
shoe lock slider in the opposite
direction ( t h e lock pin retracts)
and slide off the ST-EP.
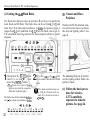
Readvine the ST-E2
(3) Turning On the Power
transmission is possible,
2 When
the pilot lamp lights in red and
the 5 icon lights in the camera
viewfinder.
PY
The hot shoe on t h e EOS 650,
EOS 620, EOS 750, a n d EOS
850 will not couple w i t h t h e
lock pin. The ST-E2 can still be
attached to these cameras, but
it cannot be locked onto the hot
shoe.
When the 5 icon lights in the
0 camera
viewfinder, it indicates
that the ST-E2 is able to transmit. When Speedlite 550EX is
rechareed and readv to fire. its
AE-assist beam emiiter blinks.
1 Turn
the main switch to < I >.
The main switch has the follow-
C
O
ing three positions:
< 0 > : Turns of'f'the powcr.
< I > : Turns on the powrr.
< HOLD > : T h e s e t t i n g s which
were set a t the I switch position
arc frozen. All transmitter controls exccpt t h e t e s t trtinsmission button a r e disabled. This
prevents inadvertant alteration
of transmitter settings.
Q
If t h e ST-E2 is on and not
u s e d for 90 sec., t h e S E
(Save Energy) feature takes
effect a n d t u r n s off t h e
power automatically to save
b a t t e r y power. The ST-E2
t u r n s back on when t h e
shutter button or test transmission button is pressed.
With a Type A camera (EOS3, EOS Elan IIIIIE, EOS
50/50E, EOS 500NIRebel G,
EOS IX. EOS IX7IIX Lite)
equipped with E-ITL, the STE2's E-ITL indicator lights.
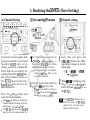
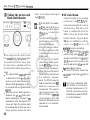
3. Readying the 550EX (Slave Setting)
(4) Channel Setting
(2) Channel setting
RATIO
S e t t h e w i r e l e s s selector t o
SLAVE >. H e r e i n a R e r , a
S p e e d l i t e 5 5 0 E X s e t to t h i s
mode will be called a "slave."
1<
O
To prevent wireless signals from
being transmitted to unrelated
S p e e d l i t e 55OEX u n i t s i n t h e
vicinity, you can set a channel different from the one used by the
unrelated Speedlite 550EX units.
One of four channels can be set.
T h e ST-E2 ( m a s t e r ) and s l a v e
Speedlite(s) must be set to t h e
same channel No.
PY
E*:
(1) Slave settingIPower on
C
The zoom setting is set automatically to (a c7'lmm. T h i s can be
overridden manually.
P r e s s t h e < CH. > button a n d
select the desired channel.
Each time the button is pressed the
channel indicator changes in the following loop: 1 2 -.3 -.4 1
T h e ST-E2 a n d Speedlite 550EX
must be set to the same channel No
+
-
E a c h t i m e you p r e s s t h e
< SEL/SET > button, the blinking display changes in the following loop:
+m+------
lights
-
,
While
is blinking, press
the slave's main switch to 2 t h e < + z or < - > butlon to
2 Set
< I > or <
> to turn it on.
select the same channel No. as
SE
When t h e Speedlite is ready t o
fire, the AF-assist beam emitter
blinks conli~>uously
a t 1 Hz.
the ST-E2's.
channel No. is
0 dIfi ftfheer e550EX's
nt from t h e ST-E2's
c h a n n e l No., w i r e l e s s t r a n s mission will not work.
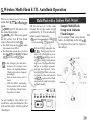
4. Basic Wireless E-TTL Autoflash Operation .
the <
b u t t o n After t h e ST-E2 a n d s l a v e a r e ready, they can work w i t h i n t h e a r e a
3 todpress
regster the channel N ~(the
,
shown below for easy wireless E-TTI.autoflash.
isplay stops blinking and
SEL/SET,
For explanatory purposes, t h e EOS-3 will be used a s t h e sample camera here.
( I ) Positioning of ST-E2 and slave
O
PY
Attach t h e slave to t h e mini s t a n d (equipped with tripod socket) which comes
with t h e 550EX.
Turn t h e Speedlite's body (bounce feature) so t h a t t h e slave sensor fhccs toward
t h c ST-EZ.
Indoors, the slave position need not be so precise since the light will also bounce
off the walls.
After positioning t h e c a m e r a a n d slaves, be s u r e to t e s t t h e wirclrss control
before taking a picture.
Do not place any obstructions between t h e ST-EP and slaves. Otherwise, remote
transmission may not bc achieved.
C
stays on).
8m I 2 6 21t
12m I 3 9 4R
Basic Wireless E-TTL Autoflash Operation
(2) Camera operation
Set the camera for normal flash
operation.
(3) Checking the ST-E2's
pilot lamp and slaveready status
(4) Wireless operation test
Check that the ST-E2's pilot lamp
is on and that the slave is ready.
O
lamp is off. (If necessary, press
the <RATIO > button to turn it
off.) If the flash ratio control
lamp is on, t h e Speedlite may
not fire or a correct exposure
m a y not be a t t a i n e d . After
turning off the flash ratio control lamp, set the main switch
to <IioLD> prevent the 'lash
ratio control lamp from lighting inadvertantly.
PY
the EOS-3, make sure the
0 With
ST-E2's f l a s h r a t i o control
C
When the slave is ready to fire, its
AF-assist beam emitter flashes a t 1
1111111
P r e s s t h e S T - E 2 ' s pilot l a m p
(which also functions a s a t e s t
transmission button).
If everything is OK, slavc A will fire
followed by slave R ( a t 1/64 output).
If the slave(s) docs not fire, reposition t h e slave's angle or distance
toward the ST-EZ and Lcst it :rg;lin.
When t h e ST-E2's pilot lamp
0 lights
and the 5 icon lights in
t h e c a m e r a viewfinder, they
i n d i c a t e t h a t t h e S T - E 2 is
ready for remote transmission.
They do not indicate t h a t the
slave is ready (recharged).
Basic Wireless E-TTI. Autoflash O ~ e r a t i o n
(5) Taking the picture and
flash confirmation
closer to t h e s u b j e c t a n d r e p e a t
steps (2) to ( 5 ) .
C
O
W h e n you press t h e s h u t t e r butt o n c o n ~ p l e t e l y a, w i r r l c s s s i g n a l
i s t r a n s m i t t e d to t h e s l a v e , t h e n
t h e slave fires a preflash a n d t h e n
t h e m a i n f l a s h w h e n t h e p i c t u r e is
taken.
The subject's flash cxposurc reading
is obtained with t h e preflash a n d
used to s e t t h e main flash output.
Wireless flash photography is thereby executed with a n optimum flash
ou1put.
When t h e correct flash exposure is
obtained, t h e ST-E2's flash confirmation lamp lights for about 3 sec.
immediately after the flash fires. If
i t does not light, the picture might
be underexposed. In this case, use a
larger a p e r t u r e or place the slave
PY
B
With the EOS-3, the modelIng
, ' flash can be fired to see
t h e lighting effects before
t h e piclure i s t a k e n . See
page 32.
The slave must be properly
positioned to receive t h e
wireless transmission.
After t h e picture is t a k e n .
the slave's operation result
is displayed on t h e slave's
display panel.
I f t h e s l a v e i s in t h e S E
(Save Energy) mode, pressing t h e ST-E2's t e s t t r a n s mission button will cancel it.
When you press t h e shutter
button halfway and activate
t h e camera's exposure
meter, the ST-E2 cannot be
used to cancel the slave's SF:
mode o r to e x e c u t e a t e s t
transmission. The camera's
exposure m e t e r m u s t t u r n
off (viewfinder's exposure
s e t t i n g d i s p l a y t u r n s off)
before t h e S E mode can be
canceled or a test transmission executed.
28
AF-assist beam
U n d e r low-light o r low-contrast
c o n d i t i o n s , t h e ST-E2's A F a s s i s t b e a m is e m i t t e d t o a s s i s t
a u t o f o c u s i n g . The A F - a s s i s t
beam is compatible with t h e
EOS-3's A r e a AF. T h e AF-assist
b e a m ' s effective r a n g e is a b o u t
0.6 m e t e r t o 10 m e t e r s a t t h e
c e n t e r a n d 0.6 m e t e r t o 5
meters along t h e periphery.
The ST-E2's AF-assist bran> c a n he
e m i t t e d only while t h e ST-E:! is
attached to the EOS-3. In the case of
EOS c a m e r a s with a built-in AFassist beam emitter, the beam will
be emitted by the camera.
The slave's AF-assist beam is not
emitted (except when t h e flash is
ready).
overheating, limit
44 Tot h eprevent
n u m b e r of consecutive
wireless transmissions to 50.
After 50 consecutive wireless
transmissions, allow the ST-EP
to rest for 10 minutes.
45. Wireless Multi-Flash E-TTL Autoflash Operation
a
The flash ratio can be set only when
the camera is an EOS-3.
The flash ratio cannot be set with an
EOS Elan IVIIE, EOS 50/5OE, EOS Rebel
G/500N, EOS IX or EOS K71X Lite.
Sample Multi-Flash
Setup with Uniform
Flash Output
In t h e sample flash s e t u p shown
below, t h e lighting on t h e left will
be b r i g h t e r t h a n on t h e r i g h t of
t h e subject.
the EOS-3, make sure the
0 With
S T - E 2 ' s f l a s h r a t i o control
lamp is off. (If necessary, press
the <RATIO > button to t u r n i t
off.) If t h e flash ratio control
lamp is on, the Speedlite may
not fire or a correct exposure
m a y n o t be a t t a i n e d . A f t e r
turning off the flash ratio control lamp, set the main switch
to <HOLD > to prevent the flash
ratio control lamp from lighting inadvertantly.
O
By c h a n g i n g t h e d i s t a n c e
between t h e subject a n d
slaves, the lighting balance
(flash ratio) can be changed
accordingly.
Two or more slaves can be
used.
With the EOS-3, a modeling
flash can be fired to check
t h e lighting effects before
the picture is taken.
Thc operation ~rooedureis thc same
a s with wireless I.>-'ITI, autoflash.
C
a
All t h e s l a v e s s e t a t t h e s a m e
c h a n n e l fire a t t h e s a m e o u t p u t
controlled by E-TTL autoflash t o
obtain a correct exposure.
PY
T h e r e a r e t w o t y p e s of wireless
multi-flash E-TTL autoflash opcrations:
< RATIO > O F F : All slaves fire
the same flash output.
Q)< RATIO > ON: Slaves are given
a n ID, e i t h e r A o r B. T h e f l a s h
ratio is then set for each ID.
As a n e x a m p l e , t w o s l a v e s a r e
used here, one positioned on t h e
left a n d t h e other on t h e right of
the subject.
Outdoors
+%-
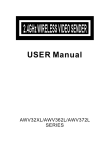
Wireless Multi-Flash E-TTL Autuflash Operation
Sample Multi-Flash Setup with Slave ID and Flash
ti^ settings
PY
15ni / 49.2ft
Indoors
C
O
In t h e example shown for "MultiF l a s h with a Uniform Flash
Output," the lighting balance
(flash ratio) was adjusted by placi n g t h e slaves a t different dist a n c e s t o t h e s u b j e c t . However,
with "Multi-Flash with Slave ID
and Flash Ratio Settings," the
flash ratio can be adjusted without moving the slaves.
T h e f l a s h r a t i o c a n bc a d j u s t e d
from 8:l to 1 a n d from 1 to 118 in
half-stop increments.
12m ~ : % . . i s t
Wireless Multi-Flash E-'lTL Autoflash Operation
(1) Setting the Slave ID
by
E2. Be sure to set the slave ID
to A or B.
Press t h e slave's < SEL/SET >
button to select <
>.
O
Set the slave ID to A for the slave on
the left of the camera. and to B for
the slave on the right of the camera.
If the slave's ID is set to C, it
0 cannot
thc SThe controlled
PY
With the wireless control of multiple slaves, you can set the flash
ratio and specify the main flash
and fill flash by assigning a slave
ID. There are three IDS: A, B, and
C. The ST-E2 can control slaves A
and B. When the flash ratio control lamp is lit, the C slave does
not fire.
+
Press the < > or < - > button to set the slave ID to <A>.
C
2
the <
> button
3 Press
to register the slave ID. (The
SELISET
slave I D stops blinking a n d
stays on.)
the same procedure for
4 Follow
the other slave to set the slave
ID to <B>.
T h e r e is n o l i m i t a s t o t h e
number of slaves t h a t can be
used. S e t t h e slave ID for all
the slaves to either A or B.
About Slave Group
Control
All slaves s e t to the same ID a r e
controlled a s one group.
Shown below is a g r o u p of t h r e e
slaves whose ID is A. They will be
controlled as a single slave group A.
7rn5s
Wireless Multi-Flash E-TTL Autoflash Operation
(2) Setting the A:B Flash Ratio
Position the ST-E2-attached camera and the two slaves to obtain
t h e desired lighting effect. See
page 26.
O
PY
The flash ratio between slave A and slave B can be set to specify the
main flash and fill flash. The flash ratio can be set from 8:l to 1 and
from 1 to 1:8 in half-stop increments. In terms of exposure stops, it
ranges from 3:l to 1 and from 1 to 1:3. When the flash ratio is set, ETTL autoflash metering controls the flash output to obtain a correct
exposure.
(3) Camera and Slave
Positions
Press the < 4 > or < b > button to select the desired flash
ratio.
C
Check t h a t t h e ST-E2's main
switch is s e t to c I > , then
press the <RATIO > button.
T h c f l a s h r a t i o control l a m p
lights in red, and the respective
flash ratio indicator lights.
The flash ratios for the unmarked indicators (
are shown in parentheses below.
If the main switch has been set
0 twork.
o < >, t h e b u t t o n s will not
S e t t h e main switch to
I
< HOLD >.
The modeling flash can be fired to
see the lighting effects before the
picture is taken.
(4) Follow the basic procedure for wireless
E-TTL autoflash
exposure to take the
picture. See page 26.
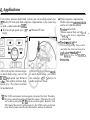
6. Applications
Even with a wireless multi-flash system, you can use high-speed sync
(FP flash), FE lock, and flash exposure compensation in the same way
a s with a camera-attached 650EX.
Wireless high-speed sync (FP
Wireless F E lock
flash)
Wlrelchs manual flash
Wireless manual flash can be fired
by settlng the slave to single-slave
or manual flash
Wlreless repeating flash
Wireless r e p e a t i n g flash c a n be
used when the slave has been set to
slngle-slave or repeat~ngflash
For d e t a l l s , s e e t h e 5.50EXts
Instruct~ons
O
PY
-
Flash exposure compensation
Flash exposure compensation
can be set with the camera.
After setting t h e wireless singleo r multi-flash s e t u p , j u s t p r e s s
t h e c a m e r a ' s < FEL > b u t t o n t o
enable wireless FE lock.
C
After setting t h e wireless singleor multi-flash setup, just s e t t h e
ST-E2's high-speed sync button to
< 5~ >. This enables wireless highspeed sync. T h e slaves need not
be touched at all.
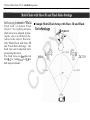
ST-E2 can transmit wireless signals only toward the front. Therefore,
39: The
the slaves cannot be positioned behind the camera. Otherwise, they will
\ I /
not be able to pick up the ST-E2's wireless control signals. However, with
Off-Camera Shoe Cord 2 (sold separately), the ST-E2 can be positioned
away from the camera and face any direction for wireless transmission.
-
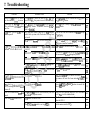
7. Troubleshooting
Problem
Soon after thc power is turned
on, the indicator lamp turns on'
Although t h e 5 icon i s lit in
t h e viewfinder, t h e slave does
not fire.
Solution
Page
Either press the shutter button halfway or press
24
the < PILOT > button.
When the slave is ready to fire, ~ t s
A12-assist beam
27
emltter blinks
Turn off the flash ratio control lamp bcforc takinp
the picturr~.
PY
Probable Cause
If t h e power is turned on and the ST-E2 i s not
used for 9 0 scc., the power turns off automatically.
The 5 ]con in t h e v ~ e w f i n d e does
r
not indicate
flash ready. Rather. it indicates that the ST-E2 is
able to transm~t.
T h e flash p i c t u r e c n m c o u t The flash ratio control lamp was lit even thouph a
undrrexposed
multi-flash system with flash ratio settings was
not used.
'The subject is beyond the effective flash range.
C
O
Place the slave nearer to the suhect or use 3 largc r aperture (smaller f-number).
T h e s l a v e d ~ ~ nclt
c s fire evcn 'I'hc s l ~ i v r ' schannel does not lnatcli the ST-E2's Set thr slavc to thesamechannel as thr ST-E2.
when the sl~utt<.~.
i, ~rrlra.;ed.
oh;~nnrl.
T l ~ sl;~ve
r
is tor^ far away from thc ST-E2.
Position t h e slavc nearer to the ST-E2 :ind tcst
the transmission befirrc taking the picture.
'Thu sl;~vcis r ~ r ,t l ~ side
r
or hack of thr c:lmr,r;l.
Use On'-(:amera Shoe Cord 2 (solrl separatrlyl and
point the ST-E2's trtlnsmitter toward the slave.
'l'hc Speedlite's slave sr,nsar I S not pmperly point- Use thc RSOEX's bounce feature trl point its sI;~vc
c.d 3t L ~ ST-E2.
C
sensor townrd the ST-EZ.
'l'hc Ilr~shratio h:lu Ihcrr~srt, hut thc slave ID has Set thc slave 11) to A or B.
hrrn set to C.
If thc EOS camcra has a built-in AF-assist beam.
T h e ST-EP does not enlit th<. 1'Iic, r;~rner;lis not ; I I ~KOS-3.
the camera will rmit the beam instead ofthe STXF-assist beam.
E2.
Press the ST-E2's < PILOT > button to cancel the
The slave's flash-rcady indica. The, sla\.e is in the SE mode.
S E mode.
slave's
tor (blinking AF -assist beam I
turns off.
The test transmission does not You prcssrd the shutter button halfway and this Make sure the metering display in the viewfinder
is off Then test the transmission.
activ;~tedthe exposure meter
work.
The flash ratio cannot he set with cameras other
T h r camera is not an EOS-3.
The flash ratlo cannot be set.
than the EOS-3.
The ST-E2's main switch is set to <HOLD>.
Set the main switch to < I 1.
29
28
25
33
26
:3 1
28
28
28
-
24
I
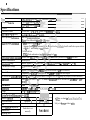
Specifications
55OEX-dedicated, clip-on Speedlite transmitter with direct 4
Type A EOS cameras (E-TTL at
Typo B EOS canicras IMariual
f
.Channels
1
Flash Ratio Control
For A R ratio I 8 to 1:l lo 8 : l . in half-step incremrnts or 18 strps
High-Specd Sync tFP flash)
Enablcd w ~ t hh~gh-speedsync modr 5 " .
Slave Operation Cunfirmation
With trst transmtssion hutton.
"Slave A fires followed by slavr I3 at llfi4 output.
lilasli Exposure Cunfirn~ation
1 Rrforc flash fires durlng VE lock
Adequate flash rxposurc indicatrd by the 5 icon lit in the vie\vfinder. Insufficient flash exposure indicated by the 5 icon blinking in the viewfinder.
2 After flash fires
ST-EZ's flash confirmatiun lamp ltghts in green for 9 sec.
WirrlrsslaveSF. mcdecancellatlon Cancels when thc test transmission buttun or FE lock button is pressed to turn on t h slave
~
unit
Wireless Transmission
Infrared pulse
Transm~ssionRange
Indoors: Approx. 12 - 15 meters 139.4 - 49.2 ft Ontdrmrs: Approx. 8 - 10 meters / 26.2 - 32.8 ft
Transmission Coveragr
r10' horizontal and +30' vertical
Battery Life
Approx. 1,500 transmissions (At room temperature and with a new set of batteries)
AF-assist Beam
Compatible with EOS-3's 45-point Area AF and 28mm and longer lens focal lengths
AF-assist Beam Effective Kanpe Approx. 0.6 tn 10 m 12.010 33 A a t center. 0.6 to 5 m 12.0 to 16 5 ft along the periphery (in total darkness).
SE Featurc
While thc power switch is set to I or HOLD, the transmitter turns off automatically aftcr about 90 scc. of
non-use.
Powrr Sourcr
2CR2 lithium ( 6 V) b a t k w x 1
D~mensions
fi2 ( W ) x 51 (HI x 80 (Dlmni 12.
) x 3.1 (Dltn
Weight
100 g 13.5 oz (rxcluding battery
C
O
PY
Type
Compatible Camcrns
W ~ r r l m sOperat~onIl~fferenceswrth the 550EX
Wireless Operation
ST-E2
2 groups A, I3
Flash ratio control
FER
Flash rxposurr compensation
Each slave is set
Manual flash
manually.
Repeating flash
I
I
I
-
B a u r , ~<masterl
:3 groups: A, R , C
0
Set \villi maslcr.
-All data are based un (';~non'?;Stt~nil;~t-cl
'I'v.it
Method.
S u b j e c t to change without noticc,.
C
PY
O
Canon
CANON INC. 30-2. Shimornaruko 3-chome, Ohta-ku. Tokyo 146-8501, Japan
USA
CANON U.S.A., INC.
-
For all lnqutriesconcerning lhls camera. call toll free in the U.S. 1800.828.4040
or wrlle lo: Customer Relallons, Canon U S A.. Inc
One Canon Plaza. Lake Success. N.Y. 11042-1198
CANADA
-CANON CANADA INC. HEADQUARTERS
5390 Dlxle Roao. Miss~ssauaa.Ontarlo L5T 1P7. Canada
CANON C A N ADA INC~MONTREALBRANCH
5990. CMe~deL~esse.Montreal Ou8bec H4T lV7. Canada
PY
CANON CANADA INC. CALGARY OFFICE
2828. 16th Street N E Calgary. Aberia TZE 7K7. Canada
Far all Nnauirles cancernlna this camera. w l l toll free In Canada I 800 828~4040
EUROPE. AFRICA
-
8 MIDDLE EAST
CANON EUROPA N.V.
Bovenkeikerweq 59 61. P 0 Box 2262 1180 EG Amstelveen. The Netherlands
CANON PHOTO VIDEO FRANCE S.A.
102, averwe Charles de Gaulle 92250 La GarenneColombes. France
CANON UK LTD.
Brerll Trnd8ng Cenlre. Nonh Circular Road, London NWlO OJF. Uniled Kingdom
CANON EURO-PHOTO G.m.b.H
S181"~"5rl"4 90 92. D-478i7 Wllich. Germany
~TALIAS.
A
O
CANON
Palazzo L. Slrada fi. 288dRozzano. Mrlanolrorr. Mlano. Italy
CANON Benelux N.V.1S.A.
Bessenveldslraal 7. I831 Diegen (Macheen). Belgium
CANON Schweiz AG
GeSchallSbere<chWiedewerkaut. Induslrisslrasse 12. CH-8305 Dielllkoo. Sw8lzerland
CANON G.m.b.H.
ASIA-
C
Obeilaaerstras~e233. 4th l l w r . 1I 0 0 Wleo, Austrba
CENTRAL & -- CANON LATIN AMERICA, INC. DEPTO DE VENTAS
SOUTH AMERICA
6505 Blue Laawn Drrve. Sulle 325. M~arnl.FL33126 U S.A
CANON LATIN AMERICA, INC. CENTRO DE SERVlClO Y REPARACION
A n I? 201 I s n ow oe ,c c r H ~ L
o r- or " 3 n ~ r n
CANON SINGAPORE PTE LTD.
79 Anson Road no9 01.05 Singapore 079906
OCEANIA - - CANON AUSTRALIA PTY. LTD.
1 Thomas Holl Drve. N ~ n Ryde.
h
N.S W. 21 13. Australla
CANON NEW ZEALAND LTD.
Fred Thomas Dnve. P O Box 33-336. Takapuna. Auckland. New Zealand
JAPAN
-
CANON SALES CO., INC.
1215. Mita. 3 Chome. Mlnato ku. Takyo 108-8011. Japan
CT1 - 7724 - 00 1
0299Ni1.2
(C! CANON INC. 1998
PRINTED IN JAPAN