1
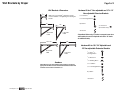
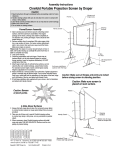
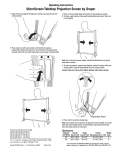
Installation Instructions
Wall Brackets by Draper
10" or 14"
non-adjustable
Extension Brackets
18¼"-24" adjustable or
20" non-adjustable
Extension Brackets
➀ Attach eye bolts to brackets. First, fully seat the flanged nut onto the
eye bolt. Then, place a nut in the countersunk hole in the bracket, and
screw in the eye bolt.
Please Note: Make sure flanged nut is fully tightened against the
wall bracket, but be careful not to overtighten.
➁ Measure distance between mounting holes on the screen, and mark
the bracket locations on the wall.
➂ Mount brackets to wall. For 10" extension from wall, install with the
long end against the wall. For 14" extension from wall, install with
short end against the wall.
Please Note: It is the responsibility of the installer to ensure that
appropriate hardware is used. The maximum diameter fastener that
should be used to attach to the wall is 5/16".
➃ Suspend the screen from the eye bolts with “S” hooks.
➄ Crimp both ends of the “S” hooks so the screen cannot come off.
➀ Attach Extension arms to wall brackets. For 20" extension from wall,
attach extension arms to short ends of brackets. For 18¼"-24"
extension from wall, attach extension arms to short ends of brackets.
➁ Attach eye bolts to brackets. First, fully seat the flanged nut onto the
eye bolt. Then, place a nut in the countersunk hole in the bracket, and
screw in the eye bolt.
Please Note: Make sure flanged nut is fully tightened against the
wall bracket, but be careful not to overtighten.
➂ Measure distance between mounting holes on the screen, and mark
the bracket locations on the wall.
➃ Mount brackets to wall.
Please Note: It is the responsibility of the installer to ensure that
appropriate hardware is used. The maximum diameter fastener that
should be used to attach to the wall is 5/16".
➄ Suspend the screen from the eye bolts with “S” hooks.
➅ Crimp both ends of the “S” hooks so the screen cannot come off.
Please note: When installing wall brackets, flexible driver bit extensions may
make it easier to accurately drive the fasteners into the mounting surface.
Please note: When installing wall brackets, flexible driver bit extensions may
make it easier to accurately drive the fasteners into the mounting surface.
For dimensional drawings and hardware/parts lists, please see
reverse side.
For dimensional drawings and hardware/parts lists, please see
reverse side.
Caution
➀ Do not overtighten bolts/screws: Overtightening could damage
brackets.
➁ For added safety, crimp “S” hooks so the screen cannot come off.
➂ Assembly hardware is included; fasteners for attaching to wall are
not included.
➃ Maximum load for wall brackets is 75 lbs; installer is responsible
for ensuring the mounting surface is adequate.
➄ Installer is responsible for providing hardware appropriate to
mounting surface and size and weight of screen.
6" non-adjustable Extension Brackets
➀ Attach eye bolts to brackets. First, fully seat the flanged nut onto the
eye bolt. Then, place a nut in the countersunk hole in the bracket, and
screw in the eye bolt.
Please Note: Make sure flanged nut is fully tightened against the
wall bracket, but be careful not to overtighten.
➁ Measure distance between mounting holes on the screen, and mark
the bracket locations on the wall.
➂ Mount brackets to wall. Make sure to use provided 3/8" washers as
shown above to prevent incorrect hardware or overtightening from
cracking the bracket.
Please Note: It is the responsibility of the installer to ensure that
appropriate hardware is used. The maximum diameter fastener
that should be used to attach to the wall is 5/16". 3/8" washers are
provided.
➃ Suspend the screen from the eye bolts with “S” hooks.
➄ Crimp both ends of the “S” hooks so the screen cannot come off.
For dimensional drawings and hardware/parts lists, please see
reverse side.
If you encounter any difficulty installing or servicing your Wall Brackets by
Draper, all your dealer or Draper, Inc., Spiceland, Indiana, (765) 987-7999, or fax
(765) 987-7142.
®
Copyright ©2008 Draper Inc. Form WallBrackets_Inst08-R2Printed in U.S.A.
Page 2 of 2
Wall Brackets by Draper
Wall Brackets—Dimensions
61/2"
Make sure to use provided 3/8" washers to prevent
incorrect hardware or overtightening from cracking the
bracket.
Max. Load 75 lbs (35 kgs)
14"
Hardware Kit for 6" Non-adjustable and 10" & 14"
Non-adjustable Extension Brackets
5/16"-18
Nut-2
5/16"-18
Flanged Nut-2
Eye bolt-2
10"
3/8"
washer-4
(6" brackets only)
“S” Hook-2
Longest Arm
to Wall
Shortest Arm
to Wall
Please Note: When using "S" hooks to suspend screen from
wall brackets, be sure to crimp both ends of the "S" hooks
for additional safety.
20"
18¼"-24"
Hardware Kit for 18¼"-24" Adjustable and
20" Non-adjustable Extension Brackets
Shortest Arm
to Wall
Longest Arm
to Wall
1/4"-20
x 11/4"
Carriage Bolt-4
1/4"
Washer-4
1/4"-20
Hardware
Please Note: It is the responsibility of the installer to ensure that
appropriate hardware is used. The maximum diameter fastener that
should be used to attach to the wall is 5/16".
Wing Nut-4
5/16"-18
Nut-2
5/16"-18
Flanged Nut-2
Eye bolt-2
“S” Hook-2
www.draperinc.com
(765) 987-7999