1
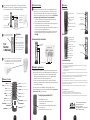
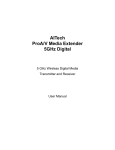
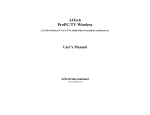
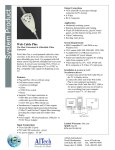
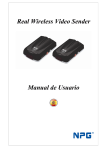
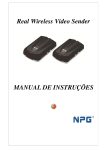
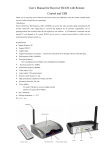
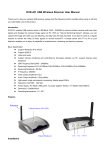
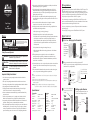
Wireless Cable TV CATV2400PLUS SMARTtv Easy Set-up and User Manual Congratulations 14.Unplug this product from the wall outlet and refer servicing to qualified services personnel under the following conditions: For an easy and quick set-up of your new AITech product, follow the instructions on the following pages. a. When the power supply cord or plug is damaged. We sincerely hope you enjoy your new AITech Wireless Cable TVs System. b. If liquid has been spilled, or objects have fallen into the products. Safety To reduce the possibility of Electrical Shock, do not remove the cover to any component in this package. There are no user-serviceable parts inside the components. Please refer all service to qualified personnel only. WARNING: 10.Power supply cord should be routed so that they are not likely to be walked on or pinched by items placed upon or against them. 11.For added protection for this product during a lightning storm, or if it is left unattended and unused for long periods of time, unplug it from the wall outlet and disconnect the cable system. This will prevent damage to the product due to lightning and power line surges. 12.Never push objects of any kind into this product through the openings as they may touch dangerous voltage points or short-out parts that could result in a fire or electric shock. 13.Do not overload wall outlets with extension cords or integral convenience receptacles as this can result in a risk of fire or electric shock. To prevent fire or electrical shock hazard, do not expose the units to rain or moisture. Safety Terms and Symbols: WARNING: Warning statements identify conditions or practices that could result in injury or loss of life. CAUTION: Caution statements identify conditions or practices that could result in damage to this product or other property. DANGER: To reduce the possibility of electrical shock, do not remove the cover to this product. Important Safety Instructions: 1. All of the safety, set-up and operating instructions should be read before the product is operated. 2. The safety and operating instructions should be retained for future reference. 3. All warnings on the product and in the operating instructions should be adhered to. 4. All operating and use instructions should be followed. 5. Unplug this product from the wall outlet before cleaning. Do not use liquid cleaners or aerosol cleaners. Use a damp cloth for cleaning. 6. Do not use attachments not recommended by the products manufacturer if they may cause hazards. 7. Do not use this product near water - for example, near a bath tub, wash bowl, kitchen sink, or laundry tub. Never spill liquid of any kind on this product. 8. Any mounting of the product should follow the manufacturer’s instructions and should use a mounting accessory recommended by the manufacturer. 9. This product should be operated only from the type of power source indicated on the marking label. If you are not sure of the type or power supply to your home, consult your product dealer or local Power Company. For products intended to operate from battery power, or other sources, refer to the operating instructions. 1 c. If the product does not operate normally by following the operation instructions, adjust only those controls that are covered by the operating manual as an improper adjustment of other controls may result in damage and will often require extensive work by a qualified technician to restore this product to its normal operation. d. If the products have been dropped or damaged in any way. e. When the product exhibits a distinct change in performance -- this indicates a need for service. 15.When replacement parts are required, be sure the service technician has used replacement parts specified by the manufacturer or that have the same characteristics as the original part. Unauthorized substitutions may result in fire, electric shock, or other hazards. 16.Upon completion of any service or repair to this product, ask the service technician to perform safety checks to determine that the product is in proper operating condition. 17.The product should be situated from heat sources such as radiators, heat registers, stoves, or other products including amplifiers that produce heat. FCC This device complies with Part 15 of the FCC Rules. Operation is subject to the following two conditions: (1) This device may not cause harmful interference, and (2) This device must accept any interference received, including interference that may cause undesired operation. Warning: Changes or modifications to this unit not expressly approved by the party responsible for compliance could void the user authority to operate the equipment. C ongratulations on your purchase of the AITech Wireless Cable TVs System. This product combines easy set-up, ease of use and convenience for your wireless cable TVs viewing experience. Whether you need a TV in your kitchen, garage, back porch or a room without a cable connection, the AITech Wireless Cable TVs system will provide you with years of Wireless Cable TVs enjoyment. For assistance using or connecting your AITech Wireless Cable TVs System, visit http://www.aitech.com/troubleshooting. If you have an immediate need for assistance, please call and ask for technical support at 408-991-9699. QUICK SET-UP 1 Start Here Setting up the Transmitter Rear view of transmitter Unpack your equipment and locate your Power Adapters, the Transmitter and your RF cables. Power Adapter Front view of transmitter 2 Place your transmitter to the closest cable drop to the remote TV. (NOTE: If you plan to also connect your Digital Cable Box, you must locate the transmitter close to your Digital Box.) 1. Connect your incoming cable to the “F” Type connector on the rear of the transmitter marked “Cable In.” For Digital Box or other video device connection. 2. Connect the 12V power adapter to your transmitter and to your 110V wall outlet. Analog cable TV signal input on the Transmitter by pressing 3 3.theTurn 4 Setting up the Receiver power button at the bottom of the Specifications: Transmitter Receiver transmitter. Frequency: 2400MHz~2483MHz Sender Power: 10dBm Channels: 4 - 2414,2432,2450,2468MHz Frequency Stability: +100KHz Video Input Level: 1 Vp-p Audio Input Level: 1 Vp-p Supply Voltage: 9~12V, 700mA or up Antenna: Flat antenna Dimension: 5”Dx2”Wx7”5H Operating Temperature: -10C~+60C Frequency: 2400MHz~2483MHz Sensitivity: -90dBm Channels: 4 - 2414,2432,2450,2468MHz L.O. Stability: +100KHz Video Input Level: 1 Vp-p Audio Input Level: 1 Vp-p Supply Voltage: 9~12V, 300mA or up Antenna: Flat antenna Dimension: 5”Dx2”Wx7”5H Operating Temperature: -10C~+60C Your Transmitter is Now Ready 2 Unpack your equipment and locate your Receiver, Power Adapter and Cables. Rear view of Receiver Front view of Receiver 3 5 Place your receiver close to the remote TV. We have supplied 2 options for connections to your remote TV; Through the Antenna Connection or through the Composite video Input. Choose one: DO NOT USE BOTH! 1. Connect the RCA cables to the back of the Receiver and the TV. RCA Connection Option 2. Connect the 12V power adapter to your transmitter and to your 110v wall outlet. Features 1 Transmitter Follow the instructions from title 1 to title 4. After completing the set-up on title 7 through 11, you are ready for advanced set-up. Advanced set-up is for those customers that want the added value of being able to watch their digital channels and controlling the digital box from the remote location. Note: When watching the digital channels, they will not be independent. 1. C onnect a set of RCA cables from the output of the digital box (from your cable provider) to the RCA input on the back of the transmitter. 2. C onnect the IR extender cable to the rear of the transmitter. Locate the opposite end of the cable in front of the IR receptor of your digital box. 3. S elect the TV/AV button on your remote control. This will switch the coaxial input to the RCA input. You are now seeing the digital channel. 4. To change the digital channels (all functions of your digital box) use the remote that came with your digital box. Simply point your digital box remote at the receiver. SET-UP 3 Connection to another display or DVR for record Turn on the Receiver by pressing the 6 3.power 7 Operation button at bottom of the receiver. 1. Install the batteries into the remote control. Your Receiver is Now Ready Advanced Setup TV/AV Indicator Light (When Lit, you are in “TV” mode) Connect IR Remote Extender Cable Composite Input (Digital Box) RF Channel Indicator Light Incoming Cable from Cable Previder RF Channel Selector Button Power Button Power Button Receiver Advanced Set-Up Illustration 2. Point the remote at the Receiver and push the RF button on the remote to allow the Transmitter and Receiver to synchronize. (The TX and RX should now be on the same RF channel) IR remote Extender Connector TV/AV Selector Button TV/AV Selector Button TV/AV Indicator Light RF Channel Indicator Lights IR Remote Sensor RF Channel Selector Button Digital Cable TV Box Composite Output to Remote TV TV Channel Up TV Channel Down Power Input TV Volume Up TV Volume Down Power Button fter pressing the RF button on the remote to select the cleanest channel, 8 4. Apress SCAN on the remote. The system will now scan all of the available channels. After scanning is complete, you are ready to watch TV using your AITech Wireless Cable TVs system. RCA Cable Connection Multiple Applications Receiver Remote Control Power (Receiver only) Scan (Scans Available TV Channels) TV/AV (Switch to Digital Box if Connected) Fine Tune (Fine Tune TV Channels) Menu (On Screen Menu) Display (Displays TV Channel and Mode) RF (Select RF Channel) JUMP (Previous TV Channel) The Wireless Cable TVs Systems are designed to be used in applications where more than one system is needed. There are two different applications and a solution for each. 1. I f you have two or more locations where a wireless TV solution is needed and those locations are not used simultaneously, then all you need is one complete system and multiple receivers. All receivers will display the same channel. 2. I f you have two or more locations where a wireless TV solution is needed and those locations are used simultaneously, then you will need complete systems to keep all wireless systems completely independent. Note: Each system comes with 4 RF channels. When using multiple systems for independent applications, the systems must be on different RF channels and you must turn “Synchronization” OFF in the on screen menu. Mute (Mutes TV Volume) CH UP (TV Channel Up) Vol Up (TV Volume Up) Vol Down (TV Volume Down) Menu Selection (Use in MENU Mode) OK (Confirm Menu Selection) Menu Selection (Use in MENU Mode) TV Channel Down Channel Selection Channel Add (Add Channel) Channel Minus (Delete Channel) 4 Turning Synchronization OFF Troubleshooting Why does my remote control not change the channels? 1. The Wireless Cable TVs has built in synchronization. If the TX and the RX have not synchronized, the remote control will not work the Channel function. And pls do above firstly a) Pull up flexible antenna b) Used RF splitter. Don't connected to " RF out " ( Because some cable supplier will carrier electrical power inside. This is another type interfere for us.) To test for synchronization, set the RF channel on the transmitter and receiver to channel 4. If you connections are correct, you should see a TV picture Once you have a picture, point the remote control at the receiver and press the RF button. The RF channel should change to RF 1 and the Picture should follow. If you lose the picture, they are not synchronized and the remote will not work. Put the receiver back on RF channel 4 so that you see your picture. Now, go to the transmitter room and move the transmitter one way or the other. By moving the tranmitter, this allows the receiver try and synchronize. You may have to change the position of the transmitter several times to gain synchronization. Once you find the right position for the transmitter, leave it in that position. If you still have problems getting the remote control to work, try moving the transmitter to a diferent cable drop if available. Why am I not getting a picture? 1. Make sure both units are on the same RF Channel (1,2,3 or 4) 2. Make sure that if you are using the system in TV mode, that the top light on both units are ON 3. If you connected the remote TV using coaxial cable, make sure your TV is ON and is on Channel 3 4. Make sure you follow the instructions on page 8 of the owners manual when connecting your transmitter to your incoming cable.. 1. Select MENU on the remote 2. U se the CH Down button to move down to the Synchronization area. 3. U se the small arrow buttons under the Ch Down button to move the selection. 4. When finished, select OK on the remote. 5 AITech International Headquarters 1288 Kifer Rd., Suite 203 Sunnyvale, CA 97086 Tel: 408.991.9699 Fax: 408.991.9691 Web site: www.AITech.com 6