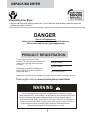
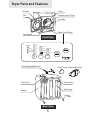
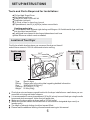
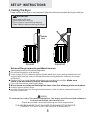
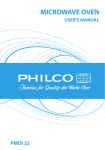
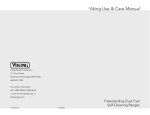
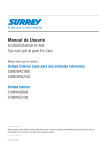
1
Space Saving 120 Volt
Electric Vented Tumble Dryer
Wall-mountable
.
Dryer
User's Manual
HLP140E
Please read this manual
carefully before using.
Retain it for future reference.
Quality Innovation Style
UNPACKING DRYER
Unpacking Your Dryer
1. Inspect and remove all packing materials. This includes the foam and any adhesive tape both
inside and outside of the unit.
2. Inspect and remove any remains of packing, tape or printed materials before powering on the dryer.
DANGER
Risk of child entrapment.
Before you throw away your old dryer, take off the door so
that children may not easily get trapped inside.
PRODUCT REGISTRATION
Than k you for using our Haie r
product. Thi s easy-to-use manual w ill
guide you in getting the best use o f
M odel num ber
your dryer.
Serial number
Remember to record the model and
serial number. They are on a label in
back of the dryer.
Date of purchase
Staple your r eceipt to your m anual. You w ill need it to obtai n warranty service.
Please register online at www.prodregister.com/Haier
WARNING
!
As dr y cleaning solvents, gasolin e, vegetabl e and cookin g oil are highl y
hazar dous material s, items soaked in or spotted with such shoul d not be used i n
the dryer. Items may still contain a substantial amount of the hazardous material
after being washed. W hen such i tems are exposed to heat they could i gnite. As
cl othe s are stacked and piled up the dryer the heat cannot escape. Due to this,
items become hot enough to possibly ignite. Washing in hot water with extra
deter gent would reduce but not eliminate the ri sk of fire.
1
SAFETY INSTRUCTIONS
! WARNING
To reduce the risk of fire, electric shock, or injury to persons when using your
appliance, follow basic precautions, including the following:
1. Read all instructions before using the appliance.
2. Do not dry articles that have been previously cleaned in, washed in, soaked in, or spotted with
gasoline, dry-cleaning solvents, or other flammable or explosive substances, as they give off
vapors that could ignite or explode.
3. Do not allow children to play on or in the appliance. Close supervision of children is necessary
when the appliance is used near children.
4. Before the appliance is removed from service or discarded, remove the door to the drying
compartment.
5. Do not reach into the appliance if the drum is moving.
6. Do not install or store this appliance where it will be exposed to water and/or to the weather.
7. Do not tamper with controls.
8. Do not repair or replace any part of the appliance or attempt any servicing unless specifically
recommended in the user-maintenance instructions or in published user-repair instructions that
you understand and have skills to carry out.
9. Do not use fabric softeners or products to eliminate static unless recommended by the
manufacturer of the fabric softener or product.
10. Do not use heat to dry articles containing foam rubber or similarly textured rubber-like materials.
11. Clean lint screen before or after each load. DO NOT OPERATE THE DRYER WITHOUT
THE LINT FILTER IN PLACE.
12. Keep area around the exhaust opening and adjacent surrounding areas free from the
accumulation of lint, dust and dirt.
13. The interior of the appliance and the exhaust duct should be cleaned periodically, preferably by
qualified service personnel.
14. Do not place items exposed to cooking oils in your dryer. Items contaminated with cooking oils
may contribute to a chemical reaction that could cause a load to catch fire.
15. If material has been used with any flammable liquids or solids it should not be used in the dryer
until all traces of the flammable liquids and its fumes have been removed.
16. This dryer must be properly installed in accordance with the installation instructions before it is
used. See grounding instructions in the installation section.
17. Proper grounding must be ensured to reduce the risk of electric shock and fire. Check with a
qualified electrician or service personnel if you are in doubt as to whether the dryer is properly
grounded.
18. Use the dryer only for its intended purpose, drying clothes.
19. Always disconnect dryer from electrical supply before attempting any service. Disconnect
power cord by grasping the plug, not the cord.
20. Replace worn power cords and/or loose plugs.
.
SAVE THESE INSTRUCTIONS
HOUSEHOLD USE ONLY
2
SAFETY INSTRUCTIONS
Electrical Requirements
Grounding Instructions:
This appliance must be grounded. It is equipped with a 3-wire cord having a grounded plug.
The plug must be plugged into an outlet which is properly installed and grounded.
Warning! Improper use of the grounded wire can result in the risk of electric shock. Consult a
qualified electrician if necessary. Do not attempt to defeat this safety feature by modifying the plug.
Avoid the use of an extension cord because it may overheat and cause a risk of fire. However, if it is
necessary to use an extension cord:
A. Use only 3-wire extension cord with 3-blade grounding plug.
B. The marked rating of the extension cord must be equal to or greater than the rating
of this appliance.
Attempting any maintenance or cleaning:
To minimize the possibility of electric shock, unplug this appliance from the power supply or
disconnect the dryer at the household distribution panel by removing the fuse or switching off the
circuit breaker before attempting any maintenance or cleaning (except the removal and cleaning
of the lint filter).
Note
Pressing the Power ON/OFF button to an off position or pressing Start /PAUSE button,
does NOT disconnect the appliance from the power supply.
3
Table of Contents
Unpacking Your Dryer ………………………………………………… 1
Product Registration .………………………………………………...…1
Safety Instructions………………………………………………...…….2
Electrical Requirements …………………………………………….. 3
Parts and Features………………………………………………....……5
Set Up INSTRUCTIONS ………………………………………….……6-8
-Location of Your Dryer ……………………………………………6
-Assemble Dryer for Installation…………………………..……… 7
-Venting the Dryer……………………………………………………8
INSTALLATION INSTRUCTIONS……………………………............9-11
-Wall Mounting Instructions…………………………………………9 -10
-Completing Instillation …………………………………...............11
OPERATING INSTRUCTIONS…………………………………………12-17
-Control Panel ………………………………………………………12
- Quick Start…………………………………..............................13-14
- Timed Dry………………………...............………….................15
Drying Tips and Precautions …………………………………….……17
Care and Cleaning Guide …………………………………………..…18
Troubleshooting …………………………………………………….....19
Limited Warranty …………………………………………………....…20-21
4
Dryer Parts and Features
Windows
Drum
Door
Exhaust and Lint Filters
Air Intake
Digital Control Panel
Door Gasket
Front View
Status
150
Dry
120
Cooling
90
End Cycle
60
Clean Lint
30
Dry
Time
A
U
T
O
D
R
Y
Normal
Heavy
High
Delicate
Low
Timed Dry
Air-Dry
Cycles
Power
On/Off
Start
Pause
Temp
HLP140E
Dryer Hanging Wall Hook
Hose Clamp Exhaust Housing
Power Cord
Exhaust Vent
Casing
Back Cover
Spacer
Back View
5
SET UP INSTRUCTIONS
Tools and Parts Required for Installation:
Philips Head Screw Driver
Flat Head Screw Driver
Electric Drill and 1/8 inch drill bit
Stud finder (optional)
(6) Wood screws for mounting plywood
Plywood board; size 30 (h) by 24(w) inches or wood slats
Venting materials:
4 inch diameter metal exhaust rigid ducting and fittings or UL flexible metal dryer vent hose,
that should not exceed 6 feet.
2 additional hose clamps for ducting outside exhaust vent hose
Metal Elbows or outdoor vents as needed.
Location of Your Dryer
First find a suitable location where you can mount the dryer on the wall
and still have access to 120 Volt outlets and exterior venting.
Vent to outside
16.73 ”
Nearest 120 Volt
AC outlet
26.97 ”
24.8 ”
.
Type:
Rating:
Size:
Capacity:
Weight:
Electric dryer
Please refer to the rating label regarding detailed information
26.97x24.8x16.73(inch)
IEC2.6cu.ft.( 7.7 lb)
52.9lbs(24kg)
Check dryer size and ensure a good location for the dryer installation on a wall where you can
mount the unit using wall studs or beams.
It is recommended to use a plywood board (30 by 24 inches) to mount the dryer using the walls
beams and studs as support, rather than just wood slats.
Make sure the dryer power cord can reach a 120 Volt outlet.
Make sure you can connect the exhaust vent to the outside or designated dryer vent (in a
laundry room).
The length of exhaust ducting should not exceed 6 feet.
Please read the additional ducting information and warnings in this manual.
6
SET UP INSTRUCTIONS
Assemble Dryer for Installation
Screw mounting hook bracket and wall spacer to dryer with screws provided.
1.Attach Hanging hook bracket using
the 4 screws.
2.Attach the 2 wall spacers to the bottom
of the dryer, using the 2 screws.
3.Attach Exhaust Housing
Connect vent housing to dryer using hose clamp provided to the exhaust pipe.
Exhaust Pipe
Exhaust Vent Housing
Hose Clam
4. You have two choices of the exhaust pipe housing direction
7
SET UP INSTRUCTIONS
5. Venting The Dryer
Proper venting of the dryer is very important. Determine the best and safest ducting for the dryer.
! WARNING!
Use a metal or UL vent.
Do not use plastic ducting.
Do not crimp or use excessive ducting.
Clean old ducts before installing this dryer.
Outside
Vent
Incorrect
Correct
Exhaust Requirements and Maintenance.
Venting must conform to local building codes.
Do not use thin plastic or foil ducting.
Use 4 inches (10.2cm) diameter rigid or flexible metal duct (note: venting materials are not
supplied with the dryer, and you should obtain the venting materials necessary for proper
installation).
Position the Dryer such that the exhaust duct run is as short as possible. Make sure
there is no more than 6 feet of exhaust ducting.
Clean old ducts before installing this dryer
Never bend or collapse ducting flex hose. Use few elbows joints as needed.
Use duct tape on all duct joints.
Insulate ductwork that runs through unheated areas in order to reduce condensation and lint
build-up on pipe walls.
! WARNING
To reduce the risk of fire and combustion, the dryer must be vented outdoors.
Lint accumulation can cause fires.
Check and clean vents and ducting as often as possible.
PLEASE BE AWARE THAT FAILURE TO EXHAUST THE DRYER
CORRECTLY WILL VOID THE DRYER’S WARRANTY.
8
INSTALLATION INSTRUCTIONS
Wall Mounting Instructions
Location for installation and options for various walls
1.There are 2 mounting options- either using wood slats or a whole plywood board. The dryer
installation to the wall should be able to accommodate the weight of the unit of 52 lbs. plus about
10 lbs. for clothing (or approximately 62 lbs). We suggest you use a plywood board for added
support and safety, this is the best way to mount.
2.Determine dryer position on the wall. A minimum of 6”(Inches) is needed between the top
of the dryer and the ceiling for installation.
3.If mounting the dryer above a washing machine, allow sufficient space to open the top lid of
the washer.
4. The Best installation is to add a plywood board to the wall studs.
As a second option- you can use two (2) slats (2 by 4 “) and attach to studs.
9
INSTALLATION INSTRUCTIONS
Mounting Plywood to wall
5. For the best installation:
Locate the wall studs in order to securely mount the unit on the wall. Use 1 plywood board
size 30 (h) by 24(w) inches and mount into the wall studs using (6) wood screws (not provided)
Plywood board
for supporting
the dryer
Use wood screws
30 inches
24 inches
6.Mark the required dryer bracket position and holes using the template provided.
HLP140E Mounting template
Center and level template
Mounting bracket
Drill holes for dryer
mounting bracket
Mounting bracket
6 inches
7. Using the 4 supplied screws attach the 2 wall hanging mounting brackets onto the plywood.
The distance between each bracket should be 6” apart.
6 inches
You are now ready to hang the dryer to the wall.
10
INSTALLATION INSTRUCTIONS
8. Putting Dryer on wall.
Lift the dryer (with the help of an assistant) and insert the hanging hook onto the 2 mounting
brackets on the wall. The wall spacer will distance the dryer from the bottom.
Hang dryer onto
mounting brackets on
the wall
9. Connect ducting to the Dryer
Connect the exhaust ducting (not provided) from the dryer venting housing to external
outside dryer vent using a hose clamp (not provided).
Note Must purchase these parts from local hardware store.
hose clamp
Exhaust
Housing
hose clamp
Exhaust ducting
Outside
Vent
10. Competed final installation, on wall with ducting
Outside
Vent
Note
Vent to the outside only. Improper taping to vent
or unstable installation to vent will cause
undesirable drying performance.
11
OPERATING INSTRUCTIONS
Control Panel Function
LED Indicator lights
Flashing LED- indicates the program is functioning
LED On- indicates function selected or the program, that is going to begin.
Status Indicator lights
'PowerOn/Off ' button
Dry
The dryer is on.
Cooling
The final drying cycle will be completed soon,
and the dryer stoped heating and is cooling down.
End Cycle
The cycle is completed; take out laundry.
Clean Filter
LED reminds you to clean the lint filter each time
you finish drying your clothes.
Status
150
Dry
120
Cooling
90
End Cycle
60
Clean Filter
30
Dry
Time
A
U
T
O
D
R
Y
Press in the 'PowerOn/Off' button
to turn on the power of the dryer
' Start/Pause ' button
With Power ' ON '
Press the ' Start/Pause ' button to
start Drying Cycle , pause
operation,or resume operation.
Normal
Heavy
High
Delicate
Low
Timed Dry
Air-Dry
Cycles
Power
On/Off
Start
Pause
Temp
HLP140E
'Dry Time' button
When in Timed Dry- Use
the Dry Time button to
manually select drying
time in a range of 30, 60,
90,120, or 150 minutes.
Note
'Cycle' button
'Temp' button
Choose Drying Cycle
Normal
Normal drying
Heavy
Huge and heavy garments
Delicat
Low level heat drying
Timed Dry You can manually set
the drying time and
temperature.
If ‘Temp’ function is set
to 'Air-Dry', the 'Dry Time'
is pre-set to select only
30 or 60 minutes.
When in Timed Dry- Use the
Temp button to manually
select the temperature range
to High, Low and Air Dry
temperature settings.
(Air Dry is without any heat)
Note
' Normal ' and ' Heavy ' Cycles
are pre-set to the 'High '
temperature setting.
' Delicate ' is pre-set to ' Low '
temperature setting.
Use the Timed Dry Cycle for manual selecting Dry times and Temperatures
12
OPERATING INSTRUCTIONS
Quick Start
Normal , Heavy and Delicate Cycle Laundry Loads
1.Connect AC plug to 120 Volt outlet.
2.Load your dryer with clothing;
Note
Do not overload the Dryer
It is suggested that 2/3 the capacity of drum be filled to allow for
tumbling and proper drying.
13
OPERATING INSTRUCTIONS
Quick Start
Normal , Heavy and Delicate Cycle Laundry Loads
3. Set Cycle and Start
To start drying a laundry load using Auto Dry with presets for Temperature and Time,
there are 3 easy steps:
Power
On/Off
1. Turn ‘Power ON’
2. Choose drying Cycle –
Normal, Heavy or Delicate
Cycles
Start
Pause
3. Press ‘Start’
Status
150
Dry
120
90
Cooling
End Cycle
60
Clean Filter
30
Dry
Time
A
U
T
O
Normal
D
R
Y
Heavy
High
Delicate
Low
Timed Dry
Air-Dry
Cycles
Start
Pause
Temp
2
Note
Power
On/Off
3
1
Normal , Heavy and Delicate Cycles are auto-set for Temperature and Time to dry a regular load.
Timed Dry Cycle is for manual selecting Dry times and Temperatures. (See next page for instructions)
4. Cooling Status.
When ‘Cooling’ Status LED is ON, the Cooling down time takes 10 minutes for dryer along with the
garments.
If you want to take out clothes in the middle of drying cycle, please use caution and carefully
take out the HOT clothes.
5. End Dry Cycle
A beeper alarm alerts you when the Drying Cycle ends, then the dryer will power down.
Take out the clothes as soon as possible.
6. Clean Filter
‘Clean Filter’ Status LED reminder goes ON. After drying each load of clothing, always clean
the lint filters.
Exhaust vent
Casing
14
OPERATING INSTRUCTIONS
Timed Dry Cycle Manual
Status
150
Dry
120
90
Cooling
End Cycle
60
Clean Filter
30
A
U
T
O
Normal
Heavy
High
Delicate
Low
Timed Dry
Air-Dry
D
R
Y
Dry
Time
Cycles
3
2
Power
On/Off
Start
Pause
Temp
4
5
1
The Timed Dry Cycle is for manual selecting Dry times and Temperatures.
For Timed Dry operation.
1. Turn ‘Power ON’
2. Choose dry Cycle –
Power
On/Off
3. Press Dry Time button
to manually select drying time in a range
of 30, 60,90,120, or 150 minutes.
5. Press ‘Start’
Set Cycle to ‘Timed Dry’ .
Dry
Time
Cycles
4. Press Temp button
to manually select the temperature
range to High, Low and Air Dry
temperature settings.
Temp
Start
Pause
6. Cooling Status.
When ‘Cooling’ Status LED is ON, the Cooling down time takes 10 minutes for dryer along with the
garments.
If you want to take out clothes in the middle of drying cycle, please use caution and carefully
take out the HOT clothes.
7. End Dry Cycle
A beeper alarm alerts youw hen the Drying Cycle ends, then the dryer will power down.
Take out the clothes as soon as possible.
8. Clean Filter
‘Clean Filter’ Status LED reminder goes ON. After drying each load of clothing, always clean
the lint filters.
Exhaust vent
Casing
15
! CAUTION!
The tumble dryer is intended only for drying textile material washed in water.
Disconnect this appliance from the power supply before attempting any
user maintenance other than cleaning the lint trap.
Connect to individual AC power outlet .
Do not allow children to play on or in the dryer.
Only place damp clothes in your dryer .
This dryer is not to be used for clothing or fabrics cleaned by chemicals.
Do not allow lint to collect around the dryer or exhaust vents.
!
WARNING: CLEAN THE LINT TRAP REGULARLY
Cleaning the Exhaust Filters
Clean lint screen after each drying load.
NEVER use your dryer without the filter.
Assembly sequence
Lint
Exhaust Filter
Lint Filter
Exhaust Vent Casing
Refer to User Manual for all instructions.
! Caution, risk of fire
All clothing dryers produce combustible lint. The dryer must be connected to
an external exhaust vent outdoors. Regularly inspect the outdoor exhaust
vent opening and remove any of lint around the exhaust opening and the
surrounding area.
To reduce the risk of fire, do not use heat when drying articles containing
foam rubber or similarly textured rubber-like materials.
! WARNING
Do not locate your dryer in a place with heavy moisture, like the bathroom,
near water taps and places where it could easily be sprayed.
Do not place any wet laundry, liquid detergent or bleach on the control
panel of your dryer.
Only place damp clothing into your dryer. Sufficiently wring out wet
clothes with washer spin cycle to prevent longer drying time.
Do not leave washed wet clothes in your dryer for a long time. This may
result in water leakage or clothing od.
To reduce the risk of electric shock or fire, do not use an extension
cord with this appliance.
16
Drying Tips and Precautions
Delicate clothes especially those with ribbon or lace, should be placed in a nylon mesh bag
before drying to prevent tangling.
Clothes with zippers
Zippers, buckles, buttons and fasteners should be closed or clothing should be turn
inside out to reduce the impact of noise between metal and the drum.
Solvents
- Do not wash or dry articles that have been cleaned in, washed in, soaked in or spotted with
combustible or explosive substances (such as wax, oil, paint, gasoline, degreasers, dry-cleaning
solvents, kerosene, etc.). These substances give off vapors that may ignite or explode. Do not add
these substances to the wash water. Do not use or place these substances around your washer or
dryer during operation.
- Do not place items exposed to cooking oils in your dryer. Items contaminated with cooking oils
may contribute to a chemical reaction that could cause a clothes load to catch fire.
- Any article on which you have used a cleaning solvent or that contains flammable materials (such
as cleaning cloths, mops, towels used in beauty salons, restaurants or barber shops, etc.) must not
be placed in or near the dryer until solvents or flammable materials have been removed. There are
many highly flammable items used in homes such as acetone, denatured alcohol, gasoline,
kerosene, some household cleaners, some spot removers, turpentines, waxes, wax removers and
products containing petroleum distillates.
Elastics
Do not dry articles containing rubber, plastic or similar materials such as padded bras, tennis shoes,
rubber galoshes, bath mats, rugs, bibs, baby pants, plastic bags, pillows, etc. that may melt or burn.
Some rubber materials, when heated, can under certain circumstances produce fire by spontaneous
combustion.
Fabrics
- Make sure to check if there are any special requirements or warning labels on garments before
drying. Carefully follow the garment manufacturer’s care instructions.
- Avoid clothes being caught by the door which will cause clothes to tangle and damage the door
gasket.
- Separate dark and light colored items, like you do for washing.
- Check for stains that may not have been removed in washing.
- Dryer heat may permanently set some stains. Properly dried clothes will need minimum care
when removed from dryer.
- For optimum results,use dryer load with cloths of similar fabric, weight and construction.
Always remove the clothing from the dryer as soon as possible.
17
Care And Cleaning Guide
Clean buildup such as lint on filters after each use, otherwise it will affect
the performance of your dryer.
Cleaning of Lint trap and Filters
The lint filter must be always used for drying.
The filter is in the rear
It must be cleaned each time before or after each use. of the drum
1. Remove the Exhaust venting casing
containing the filters.
Use four finger grabbing holes in middle of the
exhaust vent casing center to pull from the drum.
Remove the filters by pulling straight out.
The exhaust vent casing contains the ‘Lint
filter’ and ‘Exhaust filter’, as shown in figure 1.
Exhaust
vent casing
2. Cleaning the filters from lints
Separate ‘exhaust vent casing’,’lint filter’ and ‘exhaust
filter’ and clean the lint off the filter and exhaust filter
with a soft brush or a small vacuum cleaner. (as shown
in figure 2) or wash it with water if still dirty.
Dry completely before use and do not damage the filters.
Lint
filter
Lint Filter
Exhaust
Filter
brush Lint
Figure 1
Exhaust Filter
small vacuum
Cleaner
Figure 2
3. Install the filters
After cleaning the filters, assemble filters in the
order of ‘exhaust vent casing’,’lint filter’ and
‘exhaust filter’ (as shown in figure 3).
Figure 3
4. Align the recesses center of the ‘exhaust vent
casing’ to the center of drum and make sure that
it is firmly inserted.
!
NEVER USE YOUR DRYER WITHOUT
THE LINT FILTERS INSTALLED.
Exhaust
vent casing
Please unplug the power cord when cleaning the Dryer.
Clean the interior drum or dryer housing with a damp
soft cloth.
! WARNING
.
Do not put water directly on dryer.
Do not use thinner, gasolene or alcohol.
Do not use any type of spray cleaner to clean the interior.
Remove everything from drum before drying the next load.
Clean cabinet with mild soap and water only. Do not use
harsh or abrasive cleaners, as this could damage the dryer.
2LO
7KLQQHU
%HQ]HQH
18
Troubleshooting
Check your problem by using the chart below (If problems occur, please pull out the plug before examining) and try
the solutions for your problem. If the dryer still does not work properly, contact Haier customer service
center or the nearest authorized service center.
Symptom
Possible Cuase
Possible Remedy
Put Power plug in socket.
Dryer won't work.
No power to machine?
Power plug not in the
socket?
Front door not properly shut?
Heating Temperature was not set
for Timed Dry?
Dryer won't heat.
Garments won't dry
enough.
Is Temperature Indicator
LED indicating 'Air Dry'?
Reset the 'Temp' button till the
indicator light indicates 'High'
or 'Low', and the LED is on.
Change Temp. settings to
High or Low: Air Dry works
without heat.
Outside venting ducting is blocked?
Make sure outside vent is not
blocked
The Exhaust Filter is blocked?
Remove and clean Exhaust
vent
Garments were not wringed out
sufficiently by washer spin cycle.
Check that Garments are
wringed out sufficiently by
washer spin cycle.
Overloaded dryer with too many
garments ?
Clothes not sorted to proper cycle
selection?
Drum won't turn.
(The four indicator
lights of Cycle
button are on at the
same time)
Reset circuit breaker or
replace fuses.
Close the front door.
Press in the Power/ ON/OFF,
or Start/Pause button.
Is the front door closed?
! WARNING
Reduce the amount of garments
loaded in dryer.
Select the right drying cycle for
normal, heavy or delicate laundry
loads.
Close front door and
Press the Start/Pause
button.
Never Overload the dryer.
Never put wet clothing that was not wringed out during washer spin cycle.
If you can not find a solution- remove plug from outlet pending resolution.
19
Limited Warranty
If you need service, please first see the ‘Troubleshooting’ section of the User Manual. After checking
‘Troubleshooting’, additional help is available by calling Haier America Customer Service Hot Line 24
hoursa day, 7 days a week. Please call 1-877-337-3639.
Limited Warranty
What is covered and for how long?
This warranty covers all defects in workmanship or materials for a period of:
12 months for labor
12 months for parts (Functional Parts Only)
The warranty commences on the date of item purchase. Customer shall provide Haier with proof of the
date of purchase and the original receipt along with: brand, model and serial number for verification prior to
any warranty service being provided.
In -Home Service is available at the discretion of Haier America.
EXCEPTIONS: Commercial or Rental Use warranty
90 days for labor 90 days for parts
No other warranty applies.
What is covered:
1. The mechanical and electrical parts of the appliance which serve the functional purpose of this appliance
are covered for a period of 12 months or as stated above. This includes all parts except finish, trim and
glass.
2. The limited warranty does not cover any credit or refund for any loss or injury caused by the product or
defects to the product including but not limited to incidental or consequential damages.
What will be done?
1. Any mechanical or electrical part that proves to be defective in normal usage during the specified
warranty period will be repaired or replaced at Haier’s discretion.
ALL WARRANTY SERVICE MUST BE PROVIDED BY ONLY OUR FACTORY SERVICE CENTERS, OR
BY AN AUTHORIZED HAIER CUSTOMER TECHNICIAN.
If it is determined that repair is not appropriate or replacement parts are unavailable for repair, Haier will
exchange the product with a refurbished or new product the same or similar to the original at its discretion.
2. There will be no charge to the purchaser for functional replacement parts and labor on any covered
items during the initial12- month period or as stated above.
3. THIS WARRANTY COVERS APPLIANCES WITHIN THE CONTINENTAL UNITED STATES, PUERTO
RICO AND CANADA. IT DOES NOT COVER THE FOLLOWING:
20
Limited Warranty
Damages from improper installation. Damages incurred during shipping. Defects other than manufacturing. Damage from misuse, abuse, accident, alteration, lack of proper care and maintenance or incorrect
current or voltage or acts of G-D. Damage from other than household use. Damage from service by other
than an authorized dealer or service center. Decorative trims, glass or replaceable light bulbs. Transportation and shipping costs. Labor (after the initial 12 months).Credit or Refund for products over 30 days
past date of purchase This limited warranty doesn’t apply to refurbished product or unit purchased as/like
new or second-hand. THIS LIMITED WARRANTY IS GIVEN IN LIEU OF ALL OTHER WARRANTIES,
EXPRESSED OR INCLUDING THE WARRANTIES OF MERCHANTABILITY AND FITNESS FOR A
PARTICULAR PURPOSE. The remedy provided in this warranty is exclusive and is granted in lieu of all
other remedies. This warranty does not cover incidental or consequential damages, so the above
limitations may not apply to you. Some States do not allow limitations on how long an implied warranty
lasts, so the above limitations may not apply to you. This warranty gives you specific legal rights, and you
may have other rights, which vary from State to State.
Haier America, New York, NY 10018
To have your product serviced, please contact Haier America Customer Service Hot Line
24 hours a day, 7 days a week. In the U.S.A., call 1-877-337-3639.
21
Mount the Haier Dryer over any of Haier's 6 Portable Washers
Both Washer and Dryer Use Standard
120 Volt Outlets:
You Can Install Them Anywhere!
PLUGS INTO ANY HOUSEHOLD OUTLET
• Uses St and ard 120 Volt – 15 amp Out let s
• No Special wiring required
• Easy Installation
Larger Wash Capacity than the HLP140E Dryer
Equal Wash Capacity to the HLP140E Dryer
HLP20E
0.7 Cu.Ft.
HLP21E
0.9 Cu.Ft.
HLP23E
1.6 Cu.Ft.
XQJ50-31
HLP50E
1.62 Cu.Ft.
2.0 Cu.Ft.
XQB60-91BF
2.2 Cu.Ft.
‘Exceeds Dryer capacity
--Partial wash Load Recommended’
The Ultimate Drying Convenience for Portable Washers
used in Apartments, dorms, offices, hotel rooms, or homes.
Qualit y Innovat ion St yle
22
IMPORTANT
Do Not Return This Product To The Store
If you have a problem with this product, please contact the ‘Haier Customer
Satisfaction Center’ at 1-877-337-3639.
DATED PROOF OF PURCHASE REQUIRED FOR WARRANTY SERVICE
IMPORTANT
Ne pas Réexpédier ce Produit au Magasin
Pour tout problème concernant ce produit, veuillez contacter le service des
consommateurs ‘Haier Customer Satisfaction Center’ au 1-877-337-3639.
UNE PREUVE D’ACHAT DATEE EST REQUISE POUR BENEFICIER DE LA
GARANTIE.
IMPORTANTE
No regrese este producto a la tienda
Si tiene algún problema con este producto, por favor contacte el ‘Centro de
Servicio al Consumidor de Haier’ al 1-877-337-3639 (Válido solo en E.U.A).
NECESITA UNA PRUEBA DE COMPRA FECHADA PARA EL SER
VICIO DE LA GARANTIA
Haier America
New York, NY 10018
HLP140E
User Manual
Issued: JUNE 2008
Printed in China
Made in China
Fabriqué en Chine
Hecho en China
Part # 0030806837D-90