1
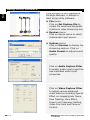
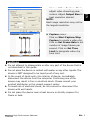
Package Contents
1.
Prestigio Webcam Main Unit
Utility CD
3.
4.
Quick Guide
Warranty Card
EN
2.
Getting Started
1. Turn on PC or notebook.
2. Insert USB connector to any of
the USB slot on PC or notebook.
3. The device driver will be autoinstalled by PC or notebook.
4. The device now is ready for use.
5. Click on My Computer Æ USB
Video Device to start video
streaming session.
6. Click on Take a new picture or
press on Snap button on top of
device to take a snapshot.
7. Click on Delete all pictures on
camera to delete all snapshots.
NOTE:
To utilize all device functions, please follow instructions in next section to
install included utility software.
Installing Utility Software
1. After connecting device to PC or notebook and inserting Utility CD,
the installation window should pop up automatically.
2. Click on Next button to initiate installation process or Cancel button
to exit.
NOTE:
Please click on Ok when prompted to install Unsigned Driver. This is a
Windows system warning that indicates the specific driver program is
not certified by Windows.
3. Utility software will be automatically installed. Click on Finish button
to complete installation.
High Performance Webcam
EN - 1
Using Utility Software
EN
Click on Start Æ All Programs Æ
Prestigio Webcam Æ Amcap to
start using utility software.
z File menu:
Click on Set Capture File to
create file name and designate
maximum video streaming size.
z Devices menu:
Click on device name to select
video/audio input source.
z Options menu:
Click on Preview to display live
streaming capture. Click on
Audio Format to adjust sound
quality.
Click on Audio Capture Filter
to master audio input properties
and individual audio input
properties.
Click on Video Capture Filter
to adjust various advanced
video features including Special
Effect on images/photo frame,
Face Tracking, Face Effect,
Power Line Frequency Setting,
Video Proc Amp and Camera
Control.
EN – 2
High Performance Webcam
z Capture menu:
Click on Start Capture/Stop
Capture to create a video clip.
Click on Set Frame Rate to set
number of image frames per
second. Click on Set Time
Limit to designate video clip
time limit.
Cautions
z Do not attempt to disassemble or alter any part of the device that is
not described in this guide.
z Do not place the device in contact with water or any other liquids. The
device is NOT designed to be liquid proof of any sort.
z In the event of liquid entry into interior of device, immediately
disconnect the device from the computer. Continuing use of the
device may result in fire or electrical shock. Please consult your
product distributor or the closest support center.
z To avoid risk of electrical shock, do not connect or disconnect the
device with wet hands.
z Do not place the device near a heat source or directly expose it to
flame or heat.
High Performance Webcam
EN - 3
EN
Click on Video Capture Pin to
adjust video streaming parameters. Adjust Output Size to
best resolution desired.
NOTE:
Best image resolution may not be
the largest resolution.
Technical Specifications
EN
Model Name
Lens
Interface
Input Voltage
Focus Range
Frame Rate
Color
Image Sensor
Image Resolution
Valid Pixels
USB Cable Length
OS Supported
Weight
Dimensions (mm)
PWC320X
5 Glass Lens
USB 2.0 Interface
5V
3.0cm ~ Infinity
640 X 480: Up to 30 fps
1600 X 1200: Up to 15 fps
RGB24 (True Color 24bit)
1/3” CMOS Sensor
1280 X 1024, 1600 X 1200
100K / 350K / 480K / 1.3M / 2M Pixels
145cm (Including USB Jack)
Windows 2000/ME/XP(32bit)/Vista/7
280g
80.0(L) X 72.0(W) X 300.0(H)
Technical Support and Warranty Information
Please refer to www.prestigio.com for technical support and included
warranty card for warranty information.
Disclaimer
We make every effort to ensure that the information and procedures in
this user manual are accurate and complete. No liability can and will be
accepted for any erros or omissions. Prestigio reserves the right to make
any changes without further notice to any products herein.
EN – 4
High Performance Webcam