1
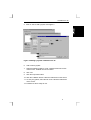
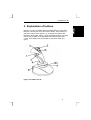
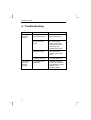
Predator Pro 3D
Predator Pro 3D
User’s Manual
Version 1.0
Predator Pro 3D
Copyright Statement
No part of this manual may be reproduced or transmitted, in any form
or by any means, electronic or mechanical, including photocopying,
recording, or information storage and retrieval systems, for any
purpose other than the purchaser's personal use, without the prior
written permission of the manufacturer.
Disclaimer Statement
The manufacturer specifically disclaims all warranties, either express
or implied, including but not limited to implied warranties of
merchantability and fitness for a particular purpose, with respect to the
software, the product manual(s) and written materials, and any other
accompanying hardware. The manufacturer reserves the right to
revise or make improvements to its product at any time and without
obligation to notify any person of such revisions or improvements.
In no event shall the manufacturer be liable for any consequential or
incidental damages, including any loss of business profits or any other
commercial damages, arising out of the use of its product.
* All company or product names are trademarks or registered
trademarks or service marks of their respective owners.
PREDATOR PRO 3D
Predator Pro 3D
1. Connecting
1.
Turn off your computer.
2.
Connect the plug of the joystick to the 15-pin D-connector of the
game port.
Note:
3.
The game port of your PC is usually located on the sound
card, with the connector at the back of your computer.
Consult the manual of your sound card to activate the game
port on your sound card.
Turn on your computer.
1
Predator Pro 3D
2. Installation
Note:
In order for you to be able to make optimum use of your
joystick and game, DirectX 5.0 (or higher) must be installed
before you install the joystick.
Note:
Calibration of the Predator Pro 3D can be different for each
game. Consult the manual of the software package being
used.
2.1 Windows 95 / 98
1. Set switch A to ‘CH’. Switch B does not have any function in this
mode.
2. Start up Windows.
3. Click on ‘Start’ on your task bar and choose ‘Control Panel’.
4. Double-click the icon ‘Game Controllers’. See Figure 1.
Figure 1: Game-controllers icon
2
Predator Pro 3D
5. Click on ‘Add’ to add a joystick. See Figure 2.
Figure 2: Adding a joystick in Windows 95 / 98
6. Add a custom joystick.
7. Select the following options: 4 axis, 4-buttons and Point-of-View
control. Enter ‘ Predator Pro 3D’ as ‘Name’.
8. Click ‘OK’.
9. Click the ‘Properties’ button.
10. Click the ‘Calibrate’ button. Follow the instructions on the screen.
11. To test your joystick, select the tab ‘Test’. Follow the instructions
on the screen.
12. Predator Pro 3D is ready for use.
3
Predator Pro 3D
2.2 Windows 3.1x / DOS
The joystick does not have to be installed in Windows 3.1x or DOS.
However, make sure that switch A is set to ‘TM’. You can use switch B
to choose between H (HAT switch) or T (Throttle) control.
Adjust your game to a ThrustMaster Joystick. If this option is not
available, then set the game to Standard Joystick. The extra buttons
will not work as a result. Consult the game’s manual to do this, if
necessary. Calibration must then often be carried out in the game.
Note:
4
Some games support only two fire buttons instead of four.
Some games do not support Point of View control (HAT
switch), a Throttle and/or 3D (Rudder).
Predator Pro 3D
3. Explanation of buttons
Buttons 1 to 4 are fire buttons that work independently of each other.
Button 5 is the Point-of-View control (HAT switch). This provides you
with more control in your games; e.g., to change your perspective.
Button 6 is the Throttle. With it, you can adjust the functions of a game
step by step. Rotation of the grip (button 3D, Rudder) gives extra
control. 3D is usually used, for example, to operate a rudder in a
game.
Figure 3: Predator Pro 3D
5
Predator Pro 3D
4. Troubleshooting
Problem
The joystick
does not
respond.
The joystick
does not
function
properly.
6
Cause
The plug is not
connected properly.
Possible solutions
Connect the plug to the
game port properly.
The game port of the
sound card is not
active.
Set the game port of
the sound card to
active. Consult the
manual of the sound
card and of the
software being used.
The sound card is not
installed properly.
Re-install the sound
card. Consult the
manual of the sound
card.
No joystick is defined
in Windows 95 / 98.
Add the joystick.
Consult Chapter 2.1.
The joystick is not
calibrated.
Calibrate the joystick.
Consult the manual of
your software. Consult
Chapter 2.1 for
Windows 95/98.
Predator Pro 3D
5. Maintenance and use
Read the following instructions thoroughly:
1.
Remove the plugs from the outlet before cleaning the joystick.
Do not use any cleaning fluids or spray cans. Wipe off the
joystick with a damp cloth.
2.
Do not use this joystick in damp or wet environments; e.g.,
bathrooms, damp cellars, swimming pools etc.
7


![[User manual (English) - v1.6] 1.7 MB](http://vs1.manualzilla.com/store/data/005855357_1-51a3ddd110ebec5d1eef2b5791ba3868-150x150.png)