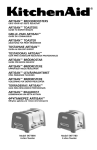
1
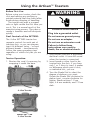
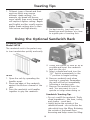
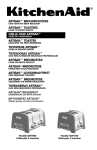
ARTISAN™ BROODROOSTERS
GIDS VOOR HET BESTE RESULTAAT
ARTISAN™ TOASTERS
GUIDE TO EXPERT RESULTS
GRILLE–PAIN ARTISAN™
GUIDE DU CONNAISSEUR
ARTISAN™ TOASTER
ANLEITUNG FÜR PROFI-ERGEBNISSE
TOSTAPANE ARTISAN™
GUIDA AI RISULTATI EXPERT
TOSTADORAS ARTISAN™
GUÍA PARA CONSEGUIR RESULTADOS PROFESIONALES
ARTISAN™ BRÖDROSTAR
GUIDE FÖR BÄSTA RESULTAT
ARTISAN®-BRØDRISTERE
OPPNÅ BEST MULIG RESULTATER
ARTISAN™-LEIVÄNPAAHTIMET
OPAS PARHAISIIN TULOKSIIN
ARTISAN™ BRØDRISTERE
VEJLEDNING FOR EKSPERT-RESULTATER
TORRADEIRAS ARTISAN™
GUIA PARA RESULTADOS PROFISSIONAIS
ARTISAN® BRAUÐRIST
LEIÐBEININGAR UM RÉTTA NOTKUN
ΦΡΥΓΑΝΙΕΡΕΣ ARTISAN™
Οδηγίες χρήσης για τέλεια αποτελέσµατα
Model 5KTT890
4-slice Toaster
Model 5KTT780
2-slice Toaster
Table of Contents
Important Safeguards........................................................................................3
Electrical Requirements ......................................................................................4
Troubleshooting Problems .................................................................................5
Models 5KTT890 & 5KTT780 .............................................................................6
Using the Artisan™ Toasters ..............................................................................7
English
Before First Use ...........................................................................................7
Dual Controls of the 5KTT890.....................................................................7
Toaster Operation .......................................................................................7
Checking the Toaster Progress .....................................................................8
Canceling the Toaster Cycle .........................................................................8
Toasting Tips......................................................................................................9
Using the Optional Sandwich Rack ....................................................................9
Using the Optional Bun Warmer......................................................................10
Care & Cleaning...............................................................................................10
Household KitchenAid® Toaster Warranty.........................................................11
Service Centers ................................................................................................11
Customer Service .............................................................................................12
Your safety and the safety of others are very important.
We have provided many important safety messages in this manual and on your
appliance. Always read and obey all safety messages.
This is the safety alert symbol.
This symbol alerts you to potential hazards that can kill or hurt you
and others.
All safety messages will follow the safety alert symbol and either
the word “DANGER” or “WARNING.” These words mean:
DANGER
You can be killed or seriously injured
if you don’t immediately follow
instructions.
WARNING
You can be killed or seriously injured
if you don’t follow instructions.
All safety messages will tell you what the potential hazard is, tell you how to
reduce the chance of injury, and tell you what can happen if the instructions are
not followed.
2
When using electrical appliances, basic safety precautions should always be
followed, including the following:
1. Read all instructions.
2. Do not touch hot surfaces. Use handles or knobs.
3. To protect against electrical shock, do not immerse cord, plugs, or Toaster
in water or other liquids.
4. The appliance is not intended for use by young children or infirm persons
without supervision.
5. Unplug Toaster from outlet when not in use and before cleaning. Allow to
cool before putting on or taking off parts.
6. Do not operate any appliance with a damaged cord or plug, or after the
appliance malfunctions or has been damaged in any manner. Return
appliance to the nearest authorized service facility for examination, repair,
or adjustment.
7. The use of accessory attachments not recommended by the appliance
manufacturer may cause injuries.
8. Do not use outdoors.
9. Do not let cord hang over edge of table or counter, or touch hot surfaces.
10. Do not place on or near a hot gas or electric burner, or in a heated oven.
11. To disconnect, turn any control to “O”, then remove plug from outlet.
12. Do not use appliance for other than intended use.
13. Oversize foods, metal foil packages, or utensils must not be inserted in
Toaster as they may involve a risk of fire or electric shock.
14. A fire may occur if Toaster is covered or touching flammable material,
including curtains, draperies, walls and the like, when in operation.
15. Do not attempt to dislodge food when Toaster is plugged in.
SAVE THESE INSTRUCTIONS
3
English
IMPORTANT SAFEGUARDS
This appliance is marked according to
the European directive 2002/96/EC on
Waste Electrical and Electronic
Equipment (WEEE).
Disposal must be carried out in
accordance with local environmental
regulations for waste disposal.
For more detailed information about
treatment, recovery and recycling of
this product, please contact your local
city office, your household waste
disposal service or the shop where you
purchased the product.
English
By ensuring this product is disposed
of correctly, you will help prevent
potential negative consequences for
the environment and human health,
which could otherwise be caused by
inappropriate waste handling of this
product.
The symbol
on the product, or
on the documents accompanying the
product, indicates that this appliance
may not be treated as household
waste. Instead it shall be handed over
to the applicable collection point for
the recycling of electrical and
electronic equipment.
Electrical Requirements
Volts: 220–240 Volts A.C.
Hertz: 50/60 Hz
WARNING
NOTE: To reduce the risk of electrical
shock, the plug will fit in an outlet
only one way. If the plug does not fit
in the outlet, contact a qualified
electrician. Do not modify the plug in
any way.
Electrical Shock Hazard
Plug into a grounded outlet.
Do not use an extension cord. If the
power supply cord is too short, have a
qualified electrician or serviceman
install an outlet near the appliance.
Do not remove ground prong.
Do not use an adapter.
Do not use an extension cord.
Failure to follow these
instructions can result in
death, fire or electrical shock.
4
The toaster may emit a pungent odor
or light smoke the first time you use it.
This is a normal result of the
manufacturing process. The odor or
smoke is harmless and will dissipate
quickly.
If the function light remains dark
and the toaster fails to heat when
the “O/I” Switch is turned to “I”:
Check to see if the toaster is plugged
in; if it is, unplug the toaster, then plug
it back in again. A tone will sound
when the toaster is plugged into a live
electrical outlet. If no tone sounds,
check the electrical circuit the toaster is
connected to – is a fuse blown or a
circuit-breaker tripped in your home?
If the problem cannot be corrected, see
the KitchenAid Warranty on page 11
for service information.*
If you have difficulty removing the
crumb tray:
Lifting the crumb tray handle locks the
crumb tray inside the toaster,
preventing removal. Always pull the
crumb tray straight from the toaster
without lifting the handle.
If the function light next to the
“O/I” Switch flashes:
A flashing function light signals a fault
in the toaster electronics. Unplug the
toaster and refer to the KitchenAid
Warranty on page 11 for service
information.*
*Do not return the Toaster to the retailer – they
do not provide service.
5
English
Troubleshooting Problems
Models 5KTT890 & 5KTT780
English
Model 5KTT890
4-slice Toaster
Model 5KTT780
2-slice Toaster
6
Using the Artisan™ Toasters
Before First Use:
Plug into a grounded outlet.
Dual Controls of the 5KTT890:
Do not remove ground prong.
The 4-slice 5KTT890 toaster has
separate controls for each pair of
toasting slots, so you can prepare
toast for different tastes – or toast
different breads – simultaneously.
Follow the same operating steps
regardless of which slot pair you are
using.
Do not use an adapter.
Electrical Shock Hazard
Do not use an extension cord.
Failure to follow these
instructions can result in
death, fire or electrical shock.
2. Plug toaster cord into a grounded
electrical outlet. A tone will sound
when the toaster is connected.
3. Insert bread or other food to be
toasted into the slots. If you have
only 1 or 2 slices to toast, it makes
no difference which pair of slots,
or individual slot, you use.
4. Turn the Shade Dial to select the
degree of darkness you want.
Rotate the Shade Dial clockwise for
darker toast, counter-clockwise for
lighter. Shade settings 1-3 are
light, 4-6 are medium, and 7-9 are
dark.
Toaster Operation:
1. Shorten the cord, if necessary, by
wrapping it under the base.
Model 5KTT890
4-slice Toaster
Model 5KTT780
2-slice Toaster
7
English
WARNING
Before using your toaster, check the
slots and remove any packing or
printed material that may have fallen
inside during shipping or handling.
The toaster may emit a pungent
odor or light smoke the first time you
use it. This is a normal result of the
manufacturing process. The odor or
smoke is harmless and will dissipate
quickly.
Using the Artisan™ Toasters
English
5. Push the lift lever down until the
bread is lowered as far as possible,
then turn the “O/I” Switch
momentarily to the “I” position.
The switch will spring back to the
middle position and the function
light will glow, indicating the
toasting cycle has started.
Checking the Toaster Progress:
To check the progress of your toast
during a toasting cycle, raise the
manual lift lever. Raising the lift lever
will not cancel the toasting cycle,
enabling you to simply lower the
bread if additional browning is
required. If you remove the bread
before a toasting cycle is complete,
don’t forget to cancel the cycle by
turning the “O/I” Switch momentarily
to the “O” position. If you forget to
cancel the cycle, the toaster will
automatically shut off at the end of
the cycle time.
NOTE: Operating the toaster without
bread will not harm the toaster.
NOTE: Toaster will automatically shut
off if the “O/I” Switch is held in the
“I” position more than 15 seconds.
6. When the toasting cycle is
complete, a tone will sound and
the function light will stop
glowing. The toast will remain in
the warm toasting cavity until the
lift lever is raised.
Canceling the Toaster Cycle:
To cancel the toasting cycle at
anytime, turn the “O/I” Switch
momentarily to the “O” position. The
function light will stop glowing and
the toasting cycle will end.
8
1. Different types of bread and their
moisture levels may require
different shade settings. For
example, dry bread will brown
more rapidly than moist bread and
will require a lighter setting. Bagels
and English muffins usually require
higher shade settings due to their
firm texture and high density.
2. For best results, toast only one
bread type and thickness at a time
in a given pair of toasting slots.
Using the Optional Sandwich Rack
Sandwich Rack
Model 5KTSR
The sandwich rack is the perfect way
to toast sandwiches quickly and easily.
4. Lower the toaster lift lever as far as
possible and insert the sandwich
rack into the slot.
5. Select a shade level and turn the
“O/I” Switch momentarily to the
“I” position to begin toasting.
6. Remove sandwich rack when
toasting is complete. Remember:
the rack will be hot immediately
following a toasting cycle.
7. Remove the sandwich from the
rack. You may want to use a
spatula or tongs when doing so.
To use:
1. Open the rack by spreading the
handles apart.
2. Place one edge of the sandwich
against the bottom channel of the
rack.
3. Press the sandwich rack handles
together to grip the sandwich.
Sandwich Toasting Tips
• Do not overfill the sandwich. Thinly
sliced ingredients – like ham, turkey,
and cheese – work best.
• Lightly butter the outside of the
sandwich bread – do not butter the
side which faces the filling. Buttering
the outside of the bread slows
browning and helps warm the filling.
9
English
Toasting Tips
Using the Optional Bun Warmer
Bun Warmer
Model 5KTBW2 – 2-slice
Model 5KTBW4 – 4-slice
Conveniently warm buns on the top of
your toaster with the bun warmer
accessory.
English
2. Place buns on top of the warmer,
select a shade level, and turn the
“O/I” Switch momentarily to the
“I” position to begin warming.
Remember: the bun warmer will be
hot immediately following a
toasting cycle.
To use:
1. Lower the toaster lift lever or levers
as far as possible. Place bun
warmer on top of the toaster,
making sure the formed wire loops
on the bottom of the warmer fit
into the toaster slots.
Care and Cleaning
1. Always unplug the toaster and let it
cool before cleaning.
2. Slide out the crumb tray (the
5KTT890 has two trays, one for
each pair of slots) and shake the
crumbs into a waste container. It is
recommended that the crumb tray
be emptied after each use.
Remember: the tray will be hot
immediately following a toasting
cycle.
NOTE: Lifting the crumb tray handle
locks the crumb tray inside the toaster,
preventing removal. Always pull the
crumb tray straight from the toaster
without lifting the handle.
The crumb tray can be washed in
the top rack of a dishwasher, or by
hand in warm soapy water. If hand
washing, be sure to rinse the tray and
dry it thoroughly with a soft cloth.
Be sure to insert the crumb tray into
the toaster as far as possible. For best
toasting results do not use the toaster
without the crumb tray in its proper
position.
3. The optional sandwich rack and
bun warmer accessories can be
washed in the top rack of a
dishwasher, or by hand in warm
soapy water. If hand washing, be
sure to rinse the accessory and dry
it thoroughly with a soft cloth.
4. Wipe the toaster with a soft, damp
cotton cloth. Do not use abrasive
cleansers, scrubbers, or liquid
cleaning products. Do not immerse
the toaster in water.
5. KitchenAid does not recommend
the use of a toaster cover.
10
Length of
Warranty:
KitchenAid
Will Pay For:
KitchenAid
Will Not Pay For:
Europe, Australia
and New Zealand:
Two Year Full Warranty
from date of purchase.
Replacement parts and
repair labor costs to
correct defects in
materials or
workmanship. Service
must be provided by an
Authorized KitchenAid
Service Center
A. Repairs when
Toaster is used for
operations other
than normal
household food
preparation.
Other:
One Year Full Warranty
from date of purchase.
B. Damage resulting
from accident,
alterations, misuse,
abuse, or
installation/
operation not in
accordance with
local electrical
codes.
KITCHENAID DOES NOT ASSUME ANY RESPONSIBILITY FOR
INDIRECT DAMAGES.
Service Centers
All service should be handled locally by
an authorized KitchenAid Service
Center. Contact the dealer from whom
the unit was purchased to obtain the
name of the nearest authorized
KitchenAid service facility.
In the UK.:
Call 0845 6011 287
In Ireland:
M.X. ELECTRIC
Service Department
25 Alymer Crescent
Kilcock, CO.KILDARE
Call: 1 6792398/87 2581574
Fax: 1 6284368
In Australia:
Call 1800 990 990
In New Zealand:
Call 0800 881 200
11
English
Household KitchenAid® Toaster Warranty
Customer Service
In U.K. & Ireland: Tollfree number 00800 38104026
Address: KitchenAid Europa, Inc.
PO BOX 19
B-2018 ANTWERP 11
BELGIUM
www.KitchenAid.com
English
KitchenAid Europa, Inc.
Nijverheidslaan 3 Box 5
B-1853 Strombeek-Bever
BELGIUM
®
FOR THE WAY IT’S MADE.™
®Registered Trademark of KitchenAid, U.S.A.
™Trademark of KitchenAid, U.S.A.
© 2005. All rights reserved.
Specifications subject to change without notice.
12
4754dZw605