1
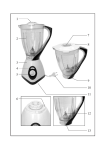
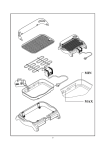
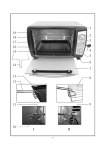
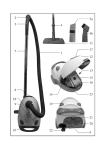
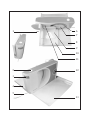
1
6
7
8
9
10
11
2
12
3
4
5
13
Multi-use slicer
●
●
Dear Customer,
Before using the appliance, the user should
read the following instructions carefully.
Familiarisation
1. Rating label (on underside of the unit)
2. Push switch
3. Release button
4. Slide lock for base plate
5. Power cord
6. Stainless steel blade
7. Blade mounting
8. Base plate
9. End-piece holder with finger guard
10. Sliding tray (foldable)
11. Stop plate
12. Thickness selection knob
13. Collection tray
●
●
●
Connection to the mains supply
Make sure that the supply voltage
corresponds with the voltage marked on the
rating label. This product complies with all
binding CE labelling directives.
●
Important safety instructions
● Before the appliance is used, the main
body as well as any attachment fitted
should be checked thoroughly for any
defects. Should the appliance, for
instance, have been dropped onto a hard
surface, it must not be used any longer:
even invisible damage may have adverse
effects on the operational safety of the
appliance.
● This appliance is not intended for use by
any person (including children) with
reduced physical, sensory or mental
capabilities, or lacking experience and
knowledge, unless they have been given
supervision or instruction concerning the
use of the appliance by a person
responsible for their safety.
● Children should be supervised to ensure
●
●
●
4
that they do not play with the appliance.
Do not allow the slicer to come into
contact with open flames or any hot
surface such as hotplates.
Do not operate the slicer if
- the unit or its power cord show any
signs of damage,
- the appliance has been dropped on to a
hard surface, perhaps causing internal
damage,
- the sliding tray, stop plate or base plate
have not been correctly fitted.
For safety reasons, always bring the stop
plate back to its rest (zero) position after
use, so that it is flush with the blade.
We strongly recommend that the
appliance is only used with the sliding
tray and end-piece holder properly
installed and in position. Exceptions may
be made only if required by the size or
shape of the food to be sliced.
Always remove the plug from the wall
socket
- after use,
- in case of any malfunction,
- during cleaning of the appliance.
Do not allow the power cord to come
into contact with the blade. When
removing the plug from the wall socket,
never pull on the power cord.
This appliance is intended for domestic
use only and not for commercial
applications.
No responsibility is accepted if damage
results from improper use, or if these
instructions are not complied with.
In order to comply with safety
regulations and to avoid hazards, repairs
of electrical appliances must be carried
out by qualified personnel, including the
replacement of the power cord. If repairs
are needed, please send the appliance to
one of our customer service departments.
The address can be found in the
appendix to this manual.
Operation
switch is pressed again, the motor will
automatically stop.
Applications
The slicer is designed for use with bread,
cold cuts, ham, cheese, cold roasts and other
foodstuffs suitable for slicing.
Slicing
Following the above safety instructions, the
slicer can now be operated.
- Adjust the desired thickness of the slices.
- Position the collection tray underneath
the unit.
- Use the right hand to place the food to
be sliced on to the sliding tray and to
press it against the stop plate.
- Fit the end piece holder, with the studded
side facing the blade, on to the tray.
- Use the left hand to press the release
button and, almost simultaneously, the
push switch, and then move the sliding
tray against the rotating blade. At the
same time, press the end piece holder
containing the food lightly against the
blade.
- The end piece holder ensures the food
will be held safely while slicing takes
place.
- The cut slices are collected in the tray
underneath the unit.
● For safety reasons, always bring the stop
plate back to its rest (zero) position after
use so that it is flush with the blade.
Short-term operation
The appliance has been designed for shortterm operation only, i.e. the slicer should not
be operated continuously for more than 10
minutes. Switch it off afterwards and allow
the motor to cool down before switching on
again.
Positioning the slicer
The slicer must be positioned on a flat, solid
surface.
Locking the base plate
Fold the base plate into its horizontal
operating position, and then lock it by
pushing the slide lock as far as possible in the
direction of the hinge.
To unlock, slide the lock away from the
hinge.
Fitting the sliding tray
Hold the sliding tray vertically next to the
base plate in such a way that the guide rail
on the tray is located underneath the base
plate. Pull the tray sideways and upwards so
that the rail slips into the guide track
underneath the base plate, and then fold the
tray 90° upwards to lock it into the track.
The tray will now be securely fitted in the
base plate track.
Practical hints
- When cutting a loaf of bread where the
crust is thicker or harder on the top, it
should be placed against the blade in
such a way that the firm part of the crust
faces the cutting edge.
- When cutting cheese, or when cutting
very thin slices of other foods, use a
slightly moist cloth to wipe the blade first.
This will make the slicing process easier.
- When cutting ham, ensure that the fatty
side is facing upwards.
Setting thickness
The thickness of the slices is infinitely
adjustable by means of the selection knob.
Always bring the stop plate back to its rest
(zero) position after use.
General cleaning and care
Safety switch
To activate the motor, first press the release
button, then the push switch, which will lock
in the operating position. As soon as the
General
● Always remove the plug from the wall
socket before detaching any accessories,
5
and before cleaning the appliance.
● After switching off, always wait until the
blade has come to a complete standstill.
Bring the stop plate back to its rest (zero)
position, so that the blade does not
protrude.
● To avoid the risk of electric shock, do not
clean the appliance with water and do
not immerse it in water.
● Do not use abrasives or harsh cleaning
solutions for cleaning. If necessary, the
housing may be wiped with a slightly
damp, lint-free cloth. The end piece
holder can be cleaned using hot water
and a mild detergent (do not put it in a
dish-washer).
Disposal
Do not dispose of old or defective
appliances in domestic garbage;
this should only be done through
public collection points.
Guarantee
This product is guaranteed against defects in
materials and workmanship for a period of
two years from the date of purchase. Under
this guarantee the manufacturer undertakes
to repair or replace any parts found to be
defective, providing the product is returned
to one of our authorised service centres. This
guarantee is only valid if the appliance has
been used in accordance with the
instructions, and provided that it has not
been modified, repaired or interfered with
by any unauthorised person, or damaged
through misuse.
This guarantee naturally does not cover
wear and tear, nor breakables such as glass
and ceramic items, bulbs etc. If the product
fails to operate and needs to be returned,
pack it carefully, enclosing your name and
address and the reason for return. If within
the guarantee period, please also provide the
guarantee card and proof of purchase.
Detaching and cleaning the blade
● The blade is extremely sharp - there is a
risk of serious injury if proper care is not
taken.
The stainless-steel blade can be cleaned with
a slightly damp, lint-free cloth.
The area behind the blade should also be
cleaned occasionally. To remove the blade,
loosen the central fixing screw by turning it
90° in a clockwise direction.
After cleaning, re-attach the blade following
the same steps in reverse order.
Detaching the stop plate
For thorough cleaning, the stop plate can be
removed. Turn the selection knob anticlockwise until the stop plate can be pulled
out sideways. When refitting the stop plate,
follow the same steps in reverse order.
Detaching the base plate
The base plate can be removed for cleaning
To facilitate correct fitting, the base plate has
guide studs on both sides. Once the plate is
brought into a vertical position, the studs can
be pulled out of their guide slots and the
plate can be taken off sideways. The plate
may be cleaned with hot water and a mild
detergent. When refitting the plate, follow
the same steps in reverse order.
6