1
User’s Guide
NPD3298-00 EN
R41A0K180
User’s Guide
Contents
Copyright and Trademarks
Safety Instructions
Safety. . . . . . . . . . . . . . . . . . . . . . . . . . . . . . . . . . . . . . . . . . . . . . . . . . . . . . . . . . . . . . . . . . . . . . . . . . . . . . . . 10
Warnings, Cautions, and Notes. . . . . . . . . . . . . . . . . . . . . . . . . . . . . . . . . . . . . . . . . . . . . . . . . . . . . . . 10
Important Safety Instructions. . . . . . . . . . . . . . . . . . . . . . . . . . . . . . . . . . . . . . . . . . . . . . . . . . . . . . . . 10
Safety requirements. . . . . . . . . . . . . . . . . . . . . . . . . . . . . . . . . . . . . . . . . . . . . . . . . . . . . . . . . . . . . . . . 16
Safety Precautions for Storage Viewer Travel Pack. . . . . . . . . . . . . . . . . . . . . . . . . . . . . . . . . . . . . . . 17
Chapter 1 Introduction
Main Features. . . . . . . . . . . . . . . . . . . . . . . . . . . . . . . . . . . . . . . . . . . . . . . . . . . . . . . . . . . . . . . . . . . . . . . . . 20
Important Notice. . . . . . . . . . . . . . . . . . . . . . . . . . . . . . . . . . . . . . . . . . . . . . . . . . . . . . . . . . . . . . . . . . . . . . . 20
Chapter 2 Getting Started
Parts. . . . . . . . . . . . . . . . . . . . . . . . . . . . . . . . . . . . . . . . . . . . . . . . . . . . . . . . . . . . . . . . . . . . . . . . . . . . . . . . . 21
Front. . . . . . . . . . . . . . . . . . . . . . . . . . . . . . . . . . . . . . . . . . . . . . . . . . . . . . . . . . . . . . . . . . . . . . . . . . . . . 21
Back. . . . . . . . . . . . . . . . . . . . . . . . . . . . . . . . . . . . . . . . . . . . . . . . . . . . . . . . . . . . . . . . . . . . . . . . . . . . . 22
LCD and control panel. . . . . . . . . . . . . . . . . . . . . . . . . . . . . . . . . . . . . . . . . . . . . . . . . . . . . . . . . . . . . . 23
Setting Up the Viewer. . . . . . . . . . . . . . . . . . . . . . . . . . . . . . . . . . . . . . . . . . . . . . . . . . . . . . . . . . . . . . . . . . . 24
Turning the power on. . . . . . . . . . . . . . . . . . . . . . . . . . . . . . . . . . . . . . . . . . . . . . . . . . . . . . . . . . . . . . . 24
Turning the power off. . . . . . . . . . . . . . . . . . . . . . . . . . . . . . . . . . . . . . . . . . . . . . . . . . . . . . . . . . . . . . 25
Holding the key operations. . . . . . . . . . . . . . . . . . . . . . . . . . . . . . . . . . . . . . . . . . . . . . . . . . . . . . . . . . 26
How to use the Home screen. . . . . . . . . . . . . . . . . . . . . . . . . . . . . . . . . . . . . . . . . . . . . . . . . . . . . . . . . 26
About the Software. . . . . . . . . . . . . . . . . . . . . . . . . . . . . . . . . . . . . . . . . . . . . . . . . . . . . . . . . . . . . . . . . . . . . 27
Installing the software. . . . . . . . . . . . . . . . . . . . . . . . . . . . . . . . . . . . . . . . . . . . . . . . . . . . . . . . . . . . . . 28
Uninstalling the Software. . . . . . . . . . . . . . . . . . . . . . . . . . . . . . . . . . . . . . . . . . . . . . . . . . . . . . . . . . . . 29
Chapter 3 Transferring Data to the Viewer
Transferring from CF/SD Memory Cards. . . . . . . . . . . . . . . . . . . . . . . . . . . . . . . . . . . . . . . . . . . . . . . . . . 31
Contents
2
R41A0K180
User’s Guide
Supported types of memory cards. . . . . . . . . . . . . . . . . . . . . . . . . . . . . . . . . . . . . . . . . . . . . . . . . . . . . 31
Inserting CF/SD memory cards. . . . . . . . . . . . . . . . . . . . . . . . . . . . . . . . . . . . . . . . . . . . . . . . . . . . . . . 32
Removing a CF/SD memory cards. . . . . . . . . . . . . . . . . . . . . . . . . . . . . . . . . . . . . . . . . . . . . . . . . . . . 32
Copying all data. . . . . . . . . . . . . . . . . . . . . . . . . . . . . . . . . . . . . . . . . . . . . . . . . . . . . . . . . . . . . . . . . . . 34
Copying particular data. . . . . . . . . . . . . . . . . . . . . . . . . . . . . . . . . . . . . . . . . . . . . . . . . . . . . . . . . . . . . 34
Transferring from USB Devices. . . . . . . . . . . . . . . . . . . . . . . . . . . . . . . . . . . . . . . . . . . . . . . . . . . . . . . . . . . 36
Connecting a USB device. . . . . . . . . . . . . . . . . . . . . . . . . . . . . . . . . . . . . . . . . . . . . . . . . . . . . . . . . . . . 36
Copying all data. . . . . . . . . . . . . . . . . . . . . . . . . . . . . . . . . . . . . . . . . . . . . . . . . . . . . . . . . . . . . . . . . . . 37
Copying particular data. . . . . . . . . . . . . . . . . . . . . . . . . . . . . . . . . . . . . . . . . . . . . . . . . . . . . . . . . . . . . 37
Transferring from the Computer. . . . . . . . . . . . . . . . . . . . . . . . . . . . . . . . . . . . . . . . . . . . . . . . . . . . . . . . . . 38
Chapter 4 Transferring Data from the Viewer
Transferring to USB Storage Devices or CF/SD Memory Cards. . . . . . . . . . . . . . . . . . . . . . . . . . . . . . . . 39
Copying particular data. . . . . . . . . . . . . . . . . . . . . . . . . . . . . . . . . . . . . . . . . . . . . . . . . . . . . . . . . . . . . 39
Copying Data within Backup Files. . . . . . . . . . . . . . . . . . . . . . . . . . . . . . . . . . . . . . . . . . . . . . . . . . . . 40
Transferring to the Computer. . . . . . . . . . . . . . . . . . . . . . . . . . . . . . . . . . . . . . . . . . . . . . . . . . . . . . . . . . . . 41
Connecting the computer. . . . . . . . . . . . . . . . . . . . . . . . . . . . . . . . . . . . . . . . . . . . . . . . . . . . . . . . . . . 41
Copying via the Epson Link2 software. . . . . . . . . . . . . . . . . . . . . . . . . . . . . . . . . . . . . . . . . . . . . . . . . 42
Copying via the Explorer. . . . . . . . . . . . . . . . . . . . . . . . . . . . . . . . . . . . . . . . . . . . . . . . . . . . . . . . . . . . 43
Disconnecting the viewer from the computer. . . . . . . . . . . . . . . . . . . . . . . . . . . . . . . . . . . . . . . . . . . 43
Chapter 5 Viewing Images
Viewing Photos and Videos. . . . . . . . . . . . . . . . . . . . . . . . . . . . . . . . . . . . . . . . . . . . . . . . . . . . . . . . . . . . . . 45
Photo/Video file formats supported by the viewer. . . . . . . . . . . . . . . . . . . . . . . . . . . . . . . . . . . . . . . 45
Displaying photos or videos. . . . . . . . . . . . . . . . . . . . . . . . . . . . . . . . . . . . . . . . . . . . . . . . . . . . . . . . . . 46
How to see the contents screen. . . . . . . . . . . . . . . . . . . . . . . . . . . . . . . . . . . . . . . . . . . . . . . . . . . . . . . 47
Displaying information. . . . . . . . . . . . . . . . . . . . . . . . . . . . . . . . . . . . . . . . . . . . . . . . . . . . . . . . . . . . . 49
Zooming a photo. . . . . . . . . . . . . . . . . . . . . . . . . . . . . . . . . . . . . . . . . . . . . . . . . . . . . . . . . . . . . . . . . . 51
Rotating a photo. . . . . . . . . . . . . . . . . . . . . . . . . . . . . . . . . . . . . . . . . . . . . . . . . . . . . . . . . . . . . . . . . . . 51
Displaying photo enhance. . . . . . . . . . . . . . . . . . . . . . . . . . . . . . . . . . . . . . . . . . . . . . . . . . . . . . . . . . . 52
Playing back sound memo. . . . . . . . . . . . . . . . . . . . . . . . . . . . . . . . . . . . . . . . . . . . . . . . . . . . . . . . . . . 52
Playing videos. . . . . . . . . . . . . . . . . . . . . . . . . . . . . . . . . . . . . . . . . . . . . . . . . . . . . . . . . . . . . . . . . . . . . 52
Editing Photos. . . . . . . . . . . . . . . . . . . . . . . . . . . . . . . . . . . . . . . . . . . . . . . . . . . . . . . . . . . . . . . . . . . . . . . . . 53
Editing a photo. . . . . . . . . . . . . . . . . . . . . . . . . . . . . . . . . . . . . . . . . . . . . . . . . . . . . . . . . . . . . . . . . . . . 53
RAW processing. . . . . . . . . . . . . . . . . . . . . . . . . . . . . . . . . . . . . . . . . . . . . . . . . . . . . . . . . . . . . . . . . . . 54
Managing Files and Folders. . . . . . . . . . . . . . . . . . . . . . . . . . . . . . . . . . . . . . . . . . . . . . . . . . . . . . . . . . . . . . 54
Contents
3
R41A0K180
User’s Guide
Displaying photos as a slide show. . . . . . . . . . . . . . . . . . . . . . . . . . . . . . . . . . . . . . . . . . . . . . . . . . . . . 54
Setting folders as Private. . . . . . . . . . . . . . . . . . . . . . . . . . . . . . . . . . . . . . . . . . . . . . . . . . . . . . . . . . . . 55
Changing a file's or folder's name. . . . . . . . . . . . . . . . . . . . . . . . . . . . . . . . . . . . . . . . . . . . . . . . . . . . . 56
Deleting files or folders. . . . . . . . . . . . . . . . . . . . . . . . . . . . . . . . . . . . . . . . . . . . . . . . . . . . . . . . . . . . . . 57
Copying/Moving files or folders. . . . . . . . . . . . . . . . . . . . . . . . . . . . . . . . . . . . . . . . . . . . . . . . . . . . . . 58
Protecting files or folders. . . . . . . . . . . . . . . . . . . . . . . . . . . . . . . . . . . . . . . . . . . . . . . . . . . . . . . . . . . . 59
Setting Home screen wallpaper or folder icons. . . . . . . . . . . . . . . . . . . . . . . . . . . . . . . . . . . . . . . . . . 60
Using ratings to filter your photos. . . . . . . . . . . . . . . . . . . . . . . . . . . . . . . . . . . . . . . . . . . . . . . . . . . . 61
Setting the screen saver. . . . . . . . . . . . . . . . . . . . . . . . . . . . . . . . . . . . . . . . . . . . . . . . . . . . . . . . . . . . . . 62
Monitoring the Color of Images. . . . . . . . . . . . . . . . . . . . . . . . . . . . . . . . . . . . . . . . . . . . . . . . . . . . . . . . . . 62
About the Pop Up Menu. . . . . . . . . . . . . . . . . . . . . . . . . . . . . . . . . . . . . . . . . . . . . . . . . . . . . . . . . . . . . . . . 63
For photo files. . . . . . . . . . . . . . . . . . . . . . . . . . . . . . . . . . . . . . . . . . . . . . . . . . . . . . . . . . . . . . . . . . . . . 64
For video files. . . . . . . . . . . . . . . . . . . . . . . . . . . . . . . . . . . . . . . . . . . . . . . . . . . . . . . . . . . . . . . . . . . . . 64
Chapter 6 Creating Custom Print
Preparing to Print. . . . . . . . . . . . . . . . . . . . . . . . . . . . . . . . . . . . . . . . . . . . . . . . . . . . . . . . . . . . . . . . . . . . . . 66
Available types of paper. . . . . . . . . . . . . . . . . . . . . . . . . . . . . . . . . . . . . . . . . . . . . . . . . . . . . . . . . . . . . 66
Registering a watermark. . . . . . . . . . . . . . . . . . . . . . . . . . . . . . . . . . . . . . . . . . . . . . . . . . . . . . . . . . . . . 66
Using the Print Wizard Menu. . . . . . . . . . . . . . . . . . . . . . . . . . . . . . . . . . . . . . . . . . . . . . . . . . . . . . . . . . . . 67
Creating Custom Print. . . . . . . . . . . . . . . . . . . . . . . . . . . . . . . . . . . . . . . . . . . . . . . . . . . . . . . . . . . . . . . . . . 68
Selecting a photo. . . . . . . . . . . . . . . . . . . . . . . . . . . . . . . . . . . . . . . . . . . . . . . . . . . . . . . . . . . . . . . . . . . 68
Retouching a photo. . . . . . . . . . . . . . . . . . . . . . . . . . . . . . . . . . . . . . . . . . . . . . . . . . . . . . . . . . . . . . . . . 69
Cropping a photo. . . . . . . . . . . . . . . . . . . . . . . . . . . . . . . . . . . . . . . . . . . . . . . . . . . . . . . . . . . . . . . . . . 71
Setting the layout. . . . . . . . . . . . . . . . . . . . . . . . . . . . . . . . . . . . . . . . . . . . . . . . . . . . . . . . . . . . . . . . . . 72
Printing photos. . . . . . . . . . . . . . . . . . . . . . . . . . . . . . . . . . . . . . . . . . . . . . . . . . . . . . . . . . . . . . . . . . . . 74
Making Copies of Custom Print. . . . . . . . . . . . . . . . . . . . . . . . . . . . . . . . . . . . . . . . . . . . . . . . . . . . . . . . . . 76
Printing Original Photo. . . . . . . . . . . . . . . . . . . . . . . . . . . . . . . . . . . . . . . . . . . . . . . . . . . . . . . . . . . . . . . . . 76
Printing Contact Sheet. . . . . . . . . . . . . . . . . . . . . . . . . . . . . . . . . . . . . . . . . . . . . . . . . . . . . . . . . . . . . . . . . . 77
Chapter 7 Playing Music
Transferring Audio Data from the Computer. . . . . . . . . . . . . . . . . . . . . . . . . . . . . . . . . . . . . . . . . . . . . . . 78
Audio file formats supported by the viewer. . . . . . . . . . . . . . . . . . . . . . . . . . . . . . . . . . . . . . . . . . . . . 78
Starting Playback. . . . . . . . . . . . . . . . . . . . . . . . . . . . . . . . . . . . . . . . . . . . . . . . . . . . . . . . . . . . . . . . . . . . . . . 79
Selecting the category. . . . . . . . . . . . . . . . . . . . . . . . . . . . . . . . . . . . . . . . . . . . . . . . . . . . . . . . . . . . . . . 79
Resume play. . . . . . . . . . . . . . . . . . . . . . . . . . . . . . . . . . . . . . . . . . . . . . . . . . . . . . . . . . . . . . . . . . . . . . . 80
Basic operations while playing music. . . . . . . . . . . . . . . . . . . . . . . . . . . . . . . . . . . . . . . . . . . . . . . . . . 80
Contents
4
R41A0K180
User’s Guide
Repeat and Shuffle Play. . . . . . . . . . . . . . . . . . . . . . . . . . . . . . . . . . . . . . . . . . . . . . . . . . . . . . . . . . . . . 80
Using the Features for Music. . . . . . . . . . . . . . . . . . . . . . . . . . . . . . . . . . . . . . . . . . . . . . . . . . . . . . . . . . . . . 81
Audio equalizer setting. . . . . . . . . . . . . . . . . . . . . . . . . . . . . . . . . . . . . . . . . . . . . . . . . . . . . . . . . . . . . . 81
Deleting album tracks from the viewer. . . . . . . . . . . . . . . . . . . . . . . . . . . . . . . . . . . . . . . . . . . . . . . . . 82
Creating a Playlist on the Viewer. . . . . . . . . . . . . . . . . . . . . . . . . . . . . . . . . . . . . . . . . . . . . . . . . . . . . . . . . . 82
To add tracks to a created Playlist. . . . . . . . . . . . . . . . . . . . . . . . . . . . . . . . . . . . . . . . . . . . . . . . . . . . . 83
To delete a Playlist/remove tracks from a Playlist. . . . . . . . . . . . . . . . . . . . . . . . . . . . . . . . . . . . . . . . 83
To change track order of a created Playlist. . . . . . . . . . . . . . . . . . . . . . . . . . . . . . . . . . . . . . . . . . . . . . 84
About the Audio Pop Up Menu. . . . . . . . . . . . . . . . . . . . . . . . . . . . . . . . . . . . . . . . . . . . . . . . . . . . . . . . . . . 84
Chapter 8 Customizing Settings
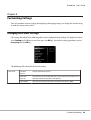
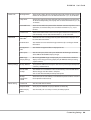
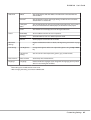
Changing the Viewer Settings. . . . . . . . . . . . . . . . . . . . . . . . . . . . . . . . . . . . . . . . . . . . . . . . . . . . . . . . . . . . 85
Chapter 9 Viewing on a TV
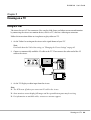
Using A/V Out. . . . . . . . . . . . . . . . . . . . . . . . . . . . . . . . . . . . . . . . . . . . . . . . . . . . . . . . . . . . . . . . . . . . . . . . 88
Chapter 10 Maintenance
Cleaning the Viewer. . . . . . . . . . . . . . . . . . . . . . . . . . . . . . . . . . . . . . . . . . . . . . . . . . . . . . . . . . . . . . . . . . . . 89
Preparing the Battery. . . . . . . . . . . . . . . . . . . . . . . . . . . . . . . . . . . . . . . . . . . . . . . . . . . . . . . . . . . . . . . . . . . 89
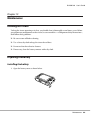
Installing the battery. . . . . . . . . . . . . . . . . . . . . . . . . . . . . . . . . . . . . . . . . . . . . . . . . . . . . . . . . . . . . . . . 89
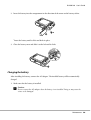
Charging the battery. . . . . . . . . . . . . . . . . . . . . . . . . . . . . . . . . . . . . . . . . . . . . . . . . . . . . . . . . . . . . . . . 90
Removing the battery. . . . . . . . . . . . . . . . . . . . . . . . . . . . . . . . . . . . . . . . . . . . . . . . . . . . . . . . . . . . . . . 91
Chapter 11 Troubleshooting
Error messages / Icons. . . . . . . . . . . . . . . . . . . . . . . . . . . . . . . . . . . . . . . . . . . . . . . . . . . . . . . . . . . . . . . . . . 93
Power supply problems. . . . . . . . . . . . . . . . . . . . . . . . . . . . . . . . . . . . . . . . . . . . . . . . . . . . . . . . . . . . . . . . . . 94
The power does not turn on. . . . . . . . . . . . . . . . . . . . . . . . . . . . . . . . . . . . . . . . . . . . . . . . . . . . . . . . . . 94
The Charge lamp lights orange. . . . . . . . . . . . . . . . . . . . . . . . . . . . . . . . . . . . . . . . . . . . . . . . . . . . . . . 94
Viewing and playback problems. . . . . . . . . . . . . . . . . . . . . . . . . . . . . . . . . . . . . . . . . . . . . . . . . . . . . . . . . . 94
Cannot access data. . . . . . . . . . . . . . . . . . . . . . . . . . . . . . . . . . . . . . . . . . . . . . . . . . . . . . . . . . . . . . . . . 94
The data is not displayed. . . . . . . . . . . . . . . . . . . . . . . . . . . . . . . . . . . . . . . . . . . . . . . . . . . . . . . . . . . . 95
The color space information cannot be recognized. . . . . . . . . . . . . . . . . . . . . . . . . . . . . . . . . . . . . . . 95
The movie is not displayed clearly or stops abruptly. . . . . . . . . . . . . . . . . . . . . . . . . . . . . . . . . . . . . . 95
Contents
5
R41A0K180
User’s Guide
Sound breaks off when the video or audio is played. . . . . . . . . . . . . . . . . . . . . . . . . . . . . . . . . . . . . . 96
No sound comes out when a video is played. . . . . . . . . . . . . . . . . . . . . . . . . . . . . . . . . . . . . . . . . . . . 96
Operation problems. . . . . . . . . . . . . . . . . . . . . . . . . . . . . . . . . . . . . . . . . . . . . . . . . . . . . . . . . . . . . . . . . . . . 96
Cannot use the keys on the viewer. . . . . . . . . . . . . . . . . . . . . . . . . . . . . . . . . . . . . . . . . . . . . . . . . . . . 96
Cannot access the existing folders. . . . . . . . . . . . . . . . . . . . . . . . . . . . . . . . . . . . . . . . . . . . . . . . . . . . . 96
Cannot copy. . . . . . . . . . . . . . . . . . . . . . . . . . . . . . . . . . . . . . . . . . . . . . . . . . . . . . . . . . . . . . . . . . . . . . 97
Cannot delete. . . . . . . . . . . . . . . . . . . . . . . . . . . . . . . . . . . . . . . . . . . . . . . . . . . . . . . . . . . . . . . . . . . . . 97
Cannot increase the hard drive capacity of the viewer even if deleting files. . . . . . . . . . . . . . . . . . . 97
Cannot set/unset as a private folder. . . . . . . . . . . . . . . . . . . . . . . . . . . . . . . . . . . . . . . . . . . . . . . . . . . 97
Printing problems. . . . . . . . . . . . . . . . . . . . . . . . . . . . . . . . . . . . . . . . . . . . . . . . . . . . . . . . . . . . . . . . . . . . . . 98
Cannot print. . . . . . . . . . . . . . . . . . . . . . . . . . . . . . . . . . . . . . . . . . . . . . . . . . . . . . . . . . . . . . . . . . . . . . 98
The image color is different. . . . . . . . . . . . . . . . . . . . . . . . . . . . . . . . . . . . . . . . . . . . . . . . . . . . . . . . . . 98
Resetting the Viewer. . . . . . . . . . . . . . . . . . . . . . . . . . . . . . . . . . . . . . . . . . . . . . . . . . . . . . . . . . . . . . . . . . . . 98
Formatting Data in the Viewer. . . . . . . . . . . . . . . . . . . . . . . . . . . . . . . . . . . . . . . . . . . . . . . . . . . . . . . . . . . 99
Appendix A Customer Support
Contacting Customer Support. . . . . . . . . . . . . . . . . . . . . . . . . . . . . . . . . . . . . . . . . . . . . . . . . . . . . . . . . . . 100
Before Contacting Epson. . . . . . . . . . . . . . . . . . . . . . . . . . . . . . . . . . . . . . . . . . . . . . . . . . . . . . . . . . . 100
Help for Users in North America. . . . . . . . . . . . . . . . . . . . . . . . . . . . . . . . . . . . . . . . . . . . . . . . . . . . 100
Help for Users in Europe. . . . . . . . . . . . . . . . . . . . . . . . . . . . . . . . . . . . . . . . . . . . . . . . . . . . . . . . . . . 101
Help for Users in Australia. . . . . . . . . . . . . . . . . . . . . . . . . . . . . . . . . . . . . . . . . . . . . . . . . . . . . . . . . 101
Help for Users in Singapore. . . . . . . . . . . . . . . . . . . . . . . . . . . . . . . . . . . . . . . . . . . . . . . . . . . . . . . . . 102
Help for Users in Thailand. . . . . . . . . . . . . . . . . . . . . . . . . . . . . . . . . . . . . . . . . . . . . . . . . . . . . . . . . . 103
Help for Users in Vietnam. . . . . . . . . . . . . . . . . . . . . . . . . . . . . . . . . . . . . . . . . . . . . . . . . . . . . . . . . . 103
Help for Users in Indonesia. . . . . . . . . . . . . . . . . . . . . . . . . . . . . . . . . . . . . . . . . . . . . . . . . . . . . . . . . 103
Help for Users in Hong Kong. . . . . . . . . . . . . . . . . . . . . . . . . . . . . . . . . . . . . . . . . . . . . . . . . . . . . . . 105
Help for Users in Malaysia. . . . . . . . . . . . . . . . . . . . . . . . . . . . . . . . . . . . . . . . . . . . . . . . . . . . . . . . . . 105
Help for Users in India. . . . . . . . . . . . . . . . . . . . . . . . . . . . . . . . . . . . . . . . . . . . . . . . . . . . . . . . . . . . . 106
Help for Users in the Philippines. . . . . . . . . . . . . . . . . . . . . . . . . . . . . . . . . . . . . . . . . . . . . . . . . . . . 107
Appendix B Technical Specifications
Standards and Approvals. . . . . . . . . . . . . . . . . . . . . . . . . . . . . . . . . . . . . . . . . . . . . . . . . . . . . . . . . . . . . . . 109
P-7000 (Model: G971B). . . . . . . . . . . . . . . . . . . . . . . . . . . . . . . . . . . . . . . . . . . . . . . . . . . . . . . . . . . . 109
AC adapter (Model: A351H). . . . . . . . . . . . . . . . . . . . . . . . . . . . . . . . . . . . . . . . . . . . . . . . . . . . . . . . 109
Battery (Model: D111A). . . . . . . . . . . . . . . . . . . . . . . . . . . . . . . . . . . . . . . . . . . . . . . . . . . . . . . . . . . . 110
Specifications. . . . . . . . . . . . . . . . . . . . . . . . . . . . . . . . . . . . . . . . . . . . . . . . . . . . . . . . . . . . . . . . . . . . . . . . . 110
Contents
6
R41A0K180
User’s Guide
General. . . . . . . . . . . . . . . . . . . . . . . . . . . . . . . . . . . . . . . . . . . . . . . . . . . . . . . . . . . . . . . . . . . . . . . . . . 110
Electrical. . . . . . . . . . . . . . . . . . . . . . . . . . . . . . . . . . . . . . . . . . . . . . . . . . . . . . . . . . . . . . . . . . . . . . . . 111
Interface. . . . . . . . . . . . . . . . . . . . . . . . . . . . . . . . . . . . . . . . . . . . . . . . . . . . . . . . . . . . . . . . . . . . . . . . . 112
Battery. . . . . . . . . . . . . . . . . . . . . . . . . . . . . . . . . . . . . . . . . . . . . . . . . . . . . . . . . . . . . . . . . . . . . . . . . . 112
AC adapter. . . . . . . . . . . . . . . . . . . . . . . . . . . . . . . . . . . . . . . . . . . . . . . . . . . . . . . . . . . . . . . . . . . . . . . 112
Storage Viewer Travel Pack. . . . . . . . . . . . . . . . . . . . . . . . . . . . . . . . . . . . . . . . . . . . . . . . . . . . . . . . . 113
About Optional Accessories. . . . . . . . . . . . . . . . . . . . . . . . . . . . . . . . . . . . . . . . . . . . . . . . . . . . . . . . . . . . . 114
Index
Contents
7
R41A0K180
User’s Guide
Copyright and Trademarks
No part of this publication may be reproduced, stored in a retrieval system, or transmitted in any form or by any means,
electronic, mechanical, photocopying, recording, or otherwise, without the prior written permission of Seiko Epson
Corporation. The information contained herein is designed only for use with this Epson product. Epson is not responsible for
any use of this information as applied to other products.
Neither Seiko Epson Corporation nor its affiliates shall be liable to the purchaser of this product or third parties for damages,
losses, costs, or expenses incurred by the purchaser or third parties as a result of accident, misuse, or abuse of this product or
unauthorized modifications, repairs, or alterations to this product, or (excluding the U.S.) failure to strictly comply with Seiko
Epson Corporation’s operating and maintenance instructions.
Seiko Epson Corporation shall not be liable for any damages or problems arising from the use of any options or any consumable
products other than those designated as Original Epson Products or Epson Approved Products by Seiko Epson Corporation.
Seiko Epson Corporation shall not be held liable for any damage resulting from electromagnetic interference that occurs from
the use of any interface cables other than those designated as Epson Approved Products by Seiko Epson Corporation.
®
EPSON is a registered trademark of Seiko Epson Corporation.
Photo Fine and its logo are registered trademarks or trademarks of Seiko Epson Corporation in Japan and other countries.
Photo Fine Premia is a proprietary technology of Epson Imaging Devices Corporation.
®
®
®
Microsoft , Windows , and Windows Vista are registered trademarks of Microsoft Corporation in the United States and/
or other countries.
®
®
Apple and Macintosh are registered trademarks of Apple Inc.
SD™ is a trademark.
QuickTime and the QuickTime logo are trademarks or registered trademarks of Apple Inc., used under license.
This product is licensed under the MPEG-4 Visual Patent Portfolio License for the personal and non-commercial use of a
consumer for (i) encoding video in compliance with the MPEG-4 visual standard (MPEG-4 Video) and/or (ii) decoding
MPEG-4 Video that was encoded by a consumer engaged in a personal and non-commercial activity and/or was obtained from
a video provider licensed by MPEG LA to provide MPEG-4 Video. No license is granted or shall be implied for any other use.
Additional information including that relating to promotional, internal and commercial uses and licensing may be obtained
from MPEG LA, L.L.C. - see <www.mpegla.com>
This product is licensed under the AVC Patent Portfolio License for the personal and non-commercial use of a consumer to
(i) encode video in compliance with the AVC standard (AVC Video) and/or (ii) decode AVC Video that was encoded by a
consumer engaged in a personal and non-commercial activity and/or was obtained from a video provider licensed to provide
AVC Video. No license is granted or shall be implied for any other use. Additional information may be obtained from MPEG
LA, L.L.C. - see <www.mpegla.com>
MPEG Layer-3 audio coding technology is licensed from Fraunhofer IIS and Thomson.
Copyright and Trademarks
8
R41A0K180
®
®
®
User’s Guide
®
Adobe , Adobe Photoshop , and Adobe RGB are registered trademarks of Adobe Systems Incorporated in the United
States and/or other countries.
This product is protected by certain intellectual property rights of Microsoft. Use or distribution such technology outside of
this product is prohibited without a license from Microsoft.
General Notice: Other product names used herein are for identification purposes only and may be trademarks of their respective
owners. Epson disclaims any and all rights in those marks.
Copyright © 2008 Seiko Epson Corporation. All rights reserved.
Copyright and Trademarks
9
R41A0K180
User’s Guide
Safety Instructions
Safety
Read all of these instructions before using the viewer, and keep this guide handy for later reference.
Follow all warnings and instructions marked on the viewer and the accessories.
Warnings, Cautions, and Notes
w
Warnings
must be followed carefully to avoid bodily injury.
c
Cautions
must be observed to avoid damage to your equipment.
Notes
contain important information and useful tips on the operation of the viewer.
Important Safety Instructions
When using the viewer
c
Caution:
❏ Do not drop or apply any shock to the viewer. Take care when carrying it, as strong shocks
may damage the internal hard disk drive and cause data to be lost.
❏ Epson is not responsible for backing up or recovering data. We recommend that you make
your own backup files.
❏ Follow all warnings and instructions marked on this product.
❏ Use only AC adapter model A351H and Lithium-ion battery model D111A with this product.
❏ When connecting the viewer to a computer or other device with a cable, ensure the correct
orientation of the connectors. Each connector has only one correct orientation. Inserting a
connector in the wrong orientation may damage both devices connected by the cable.
❏ Do not insert objects into the slots or openings on the viewer.
Safety Instructions
10
R41A0K180
User’s Guide
❏ Do not touch the components inside the viewer unless instructed to do so in the user
documentation. Never force the viewer’s components into place. Although the viewer is designed
to be sturdy, rough handling can damage it.
❏ Never spill liquid onto the viewer.
❏ If the viewer emits unusual noises, odors, or smoke, cancel the current operation and turn it off
immediately. Remove the battery and disconnect the AC adapter from the viewer, then unplug
the AC adapter from the power outlet and contact our customer support.
❏ Do not use your headphones for long periods at high volume as this can cause permanent hearing
loss.
Do not use your headphones while operating a vehicle or performing an activity that requires
attention to external sound. When wearing your headphones, we strongly recommend setting
the volume so that you can hear your normal speaking voice.
❏ Do not stand the viewer upright as it may fall over and be damaged.
❏ To prevent fire or electric shock, do not cover the viewer with a blanket or other covering that
may give off a static electric shock.
❏ To prevent fire or electric shock, do not expose the viewer or its accessories to rain or moisture.
❏ To prevent fire or explosion, do not use the viewer where flammable or volatile gas is stored.
❏ Do not use the viewer outdoors during a thunderstorm.
❏ Do not use the viewer after moving it between extreme temperatures, which may cause
condensation to form on electronic parts.
❏ If you use the viewer in places where the use of electronic devices is limited, such as in airplanes
or hospitals, follow all instructions in those places.
When using the battery
c
Caution:
❏ There is a risk of explosion if the battery is replaced by the incorrect type. Use the specified
new batteries only. Dispose of used batteries according to the instructions.
❏ If charging is not complete after 11 hours or more (when charging with the main unit while
the power is off), stop charging. If you notice any problems during charging such as a high
temperature or bad smell, stop charging immediately.
❏ If battery acid gets into your eyes or on your skin, immediately rinse the affected area thoroughly
with water and seek medical treatment. If a battery is swallowed, seek medical treatment
immediately.
Safety Instructions
11
R41A0K180
User’s Guide
❏ Use only an Epson Lithium-ion battery for the viewer according to the directions in the user
documentation.
❏ You can use the following two methods to charge the battery. Connect the viewer (Model: G971A/
G971B) and the AC adapter (Model: A351H). Place the battery in the battery charger (Model:
EU-217).
❏ Do not use the battery that comes with the viewer for other devices.
❏ To protect against short-circuiting, do not remove the outside case of the battery.
❏ Do not handle the battery with wet hands or use them near water.
❏ Do not expose the battery to water or high humidity.
❏ Do not drop, puncture, disassemble, mutilate, or short-circuit the battery.
❏ Do not place the battery near or into fire or water.
❏ Do not use batteries that are leaking or damaged in any way.
❏ Do not charge the battery using devices except for this product or the specified battery charger
(Model: EU-217).
❏ Do not use, charge, or leave the battery near an open flame or in a very hot location with a
temperature of 35°C or above.
❏ Keep batteries away from heat sources.
❏ Do not leave the battery in a vehicle, to prevent the battery from overheating.
❏ Do not insert objects into any openings as they may touch dangerous voltage points or
short-circuit components.
❏ Prevent the battery from coming into contact with metal objects that could short-circuit it, such
as coins or keys.
❏ Do not insert the battery into power outlets or other power sources such as car cigarette lighter
sockets.
❏ Do not solder wires or terminals directly to the battery.
❏ Do not touch battery terminals.
❏ Keep batteries away from open flame if they leak or smell strange.
❏ If overheating, discoloration, or distortion occurs, remove the battery from the viewer and do
not use it.
Safety Instructions
12
R41A0K180
User’s Guide
❏ Charge the battery before using it if it has not been used for a long period.
When storing the batteries
❏ When not using the viewer for a long period, remove the batteries from the viewer and store them
separately.
❏ Do not store batteries where the temperature or humidity is very high.
❏ Store batteries out of children’s reach.
When disposing of the batteries
Before disposing of batteries, make sure you discharge them completely.
w
Warning:
❏ Be sure to securely cover the each end of the battery with tape to prevent combustion or
explosion when disposing.
❏ Do not dispose of batteries as ordinary refuse. Instead, dispose of them in a collection or recycle
box in accordance with local laws.
❏ Do not incinerate or dispose of the battery in fire.
For European users:
Do not dispose of batteries with ordinary refuse. Instead,
dispose of them in a recycle box in accordance with local laws.
For users in the United States and Canada:
This mark indicates that the battery will be recycled by RBRC.
When you dispose of the battery, contact RBRC.
When using the AC adapter
❏ Use only the type of power source indicated on the AC adapter’s label, and always supply power
directly from a standard, domestic power outlet with a power cord that meets the relevant local
safety standards. If you are not sure of the power supply specifications in your area, contact your
local power company or contact our customer support.
Safety Instructions
13
R41A0K180
User’s Guide
❏ Place the AC adapter near an electrical outlet where the power cord can be easily unplugged.
❏ The AC adapter and power cable provided are designed for use with the viewer. Do not attempt
to use them with other electronic devices unless specified.
❏ Do not remove the AC adapter from the viewer during operations (connecting the AC adapter
during operations is possible).
❏ The AC adapter included is designed for use with the viewer. Use of any other adapter could
result in fire, electrical shock, or injury.
❏ Use only AC adapter model A351H with the viewer.
❏ Make sure the total amperage of all devices plugged into the power outlet does not exceed the
power outlet’s ampere rating.
❏ Do not connect the AC adapter when the battery is not installed. Otherwise, the viewer may be
damaged.
❏ If you plan to use this product in Germany, the building installation must be protected by a 16
amp circuit breaker to provide adequate short-circuit protection and over-current protection for
this product.
❏ Do not use a damaged or frayed AC adapter.
❏ If you use an extension cord with the viewer, make sure the total amperage of all devices plugged
into the extension cord does not exceed the cord’s amperage rating.
❏ Never disassemble, modify, or attempt to repair the AC adapter by yourself except as specifically
explained in this guide.
❏ Do not use power outlets controlled by wall switches or automatic timers.
❏ Do not use power outlets on the same circuit as large motors or other appliances that may cause
voltage fluctuations.
❏ Avoid using outlets on the same circuit as photocopiers or air control systems that regularly
switch on and off.
❏ To prevent fire or electric shock, do not cover the AC adapter with a blanket or similar covering.
❏ Position the viewer’s power cable so that it will not be stepped on or run over.
❏ Do not place any objects on the power cable and the AC adapter.
❏ Keep the power cable straight at the ends and at the points where it enters the transformer.
Safety Instructions
14
R41A0K180
User’s Guide
❏ The power cable should be placed so as to avoid abrasions, cuts, fraying, crimping, kinking, and
other damage.
❏ If the AC plug does not fit your outlet, have a proper outlet installed by a qualified electrician.
❏ Remove the AC plug from the outlet during lightning storms.
For US and Canadian users:
Use the included power cord or a 6 to 10 foot UL-approved type SPT-2 or heavier type, 2 18 AWG
cord with a 125 V 10 A plug and 125 V 7 A connector.
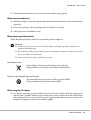
When using a memory card
❏ Only memory cards designed for the viewer’s specifications can be used.
❏ Do not remove a memory card or turn off the viewer while the Access lamp is flashing. See
"Parts" on page 21 to find where the Access lamp is.
When using the LCD
❏ The LCD panel on the viewer may contain a few small bright or dark spots. These are normal
and do not mean that your LCD panel is damaged in any way.
❏ If the LCD panel on the viewer is damaged, consult your dealer.
❏ If the liquid crystal solution contained in the LCD panel on the viewer leaks out and gets onto
your hands, wash them thoroughly with soap and water. If it gets into your eyes, flush them
immediately with water. If discomfort or vision problems remain after a thorough flushing, see
a doctor immediately.
❏ Only use a soft, dry cloth to clean the display. Do not use liquid or chemical cleaners.
When storing, maintaining, or transporting the viewer
❏ Do not store the viewer outdoors.
❏ Do not store the viewer near water.
❏ Do not store the viewer in a location subject to high temperature or humidity.
❏ Do not store the viewer in a location subject to rapid changes in temperature or humidity.
❏ Do not store the viewer in a location subject to direct sunlight or strong light sources.
Safety Instructions
15
R41A0K180
User’s Guide
❏ Unplug the viewer from the power outlet before cleaning it. Use a damp cloth for cleaning and
do not use liquid or aerosol cleaners.
❏ Remove the battery from and unplug the viewer and refer servicing to qualified service personnel
under the following conditions: The power cable or plug is damaged; liquid has entered the viewer
or its accessories; the viewer or its accessories have been dropped or the case is damaged; the
viewer or its accessories do not operate normally or exhibit a distinct change in performance.
Safety information for United Kingdom users
The following safety information applies to the AC adapter.
w
Warning:
Refer to the rating plate for the voltage and check that the appliance voltage corresponds to the
supply voltage.
Important:
The wires in the mains lead fitted to this appliance are colored in accordance with the following code:
Blue — Neutral
Brown — Live
As the colours of the wires in the mains lead of this appliance may not correspond with the coloured
markings identifying the terminals in your plug, proceed as follows;
The blue wire must be connected to the terminal in the plug marked with the letter N.
The brown wire must be connected to the terminal in the plug marked with the letter L.
If damage occurs to the plug, replace the lead set or consult a qualified electrician.
For United Kingdom, Hong Kong, and Singapore users
Replace fuses only with fuses of the correct size and rating.
Safety requirements
Main plug
Use a 3-pin or a 2-pin main plug that is registered with the Safety Authority.
Flexible cord
Use a double insulated flexible cord that is certified* to the relevant IEC or BS
standards.
Safety Instructions
16
R41A0K180
Appliance connector
User’s Guide
Use an appliance connector certified* to the relevant IEC or BS standards.
*Certified by member of IECEE CB Scheme.
Safety Precautions for Storage Viewer Travel Pack
Follow all warnings and instructions below to use the battery charge safety.
When using this kit
w
Warning:
Keep and store the products out of children’s reach.
Safety Instructions
17
R41A0K180
User’s Guide
When using the battery charger
w
Warning:
❏ Do not connect car adapter (Model:CLM10D-050) to the viewer (Model:G971A/G971B).
❏ Do not try to take the battery charger apart or modify it in any way. Doing so may cause fire,
electric shock or physical damage.
❏ This battery charger is intended for use with vehicles that have a 12-volt electrical system with
negative ground. Do not use it with a 24 V DC vehicle. Doing so may cause fire or breakdown.
❏ Do not locate or install the battery charger in the locations where it hinders the forward vision
of the driver or car safety, interferes with driving operations, or endangers passengers. Doing
so may cause automotive accident or personal injury.
❏ Do not use the battery charger while operating a motor vehicle. Doing so may cause
automotive accident.
❏ Do not place the battery charger near a passenger airbag. Doing so may obstruct the airbag
if it is deployed and may cause automotive accident or personal injury.
❏ Do not continue to use the battery charger if it emits smoke or strange odor. Also, do not
continue to use the battery charger if water or foreign matter gets into the battery charger.
Doing so may cause fire or electric shock. Immediately stop using the battery charger and
contact your original dealer or EPSON customer support to request servicing.
❏ Do not locate or install the battery charger in the locations where it may get wet or in locations
subject to high levels of humidity and dust. Doing so may cause fire, electric shock, or
malfunction of the battery charger.
❏ Do not use the battery charger in locations subject to strong direct sunlight or high
temperatures of 40°C (104°F) or above. Also, do not leave the battery charger in a place
subjected to high temperatures of 60°C (140°F) or above. Overheating may cause battery fluid
leakage, smoking, fire, or explosion.
❏ Do not expose the battery charger to the direct sunlight. Doing so may cause fire or breakdown.
❏ Do not use the battery charger in the locations where flammable or explosive gas may be
contained in an atmosphere. Doing so may cause ignition or explosion.
❏ When using the battery charger in an airplane, hospital, or other area where use is prohibited,
follow the instructions (or cabin announcement) given at individual locations.
❏ Do not place the battery charger into a high-pressured container or a microwave. Doing so
may cause fire or electric shock.
Safety Instructions
18
R41A0K180
User’s Guide
❏ Do not allow liquids or metal objects to come into contact with the charger during use, and
do not store the charger with containers of liquid which may spill. If such materials come into
contact the charger, there is a risk of fire or electric shock.
❏ Use the battery charger with the vehicle’s engine turned on. After the charging has finished,
unplug car adapter from the cigarette lighter socket. Using the battery charger for a long time
with your vehicle’s engine turned off can run down your vehicle’s battery.
❏ Using a battery other than the specified battery (Model: D111A/EU-97) battery fluid leakage,
smoking, fire, or explosion.
❏ The car adapter is intended for use with this battery charger only. Do not use it with other
products. Doing so may cause fire or breakdown.
❏ Always make sure to use the car adapter included or the specified AC adapter (Model: A351H)
when using this battery charger.
❏ Use only the type of power source indicated on the AC adapter’s label, and always supply
power directly from a standard, domestic power outlet with a power cord that meets the
relevant local safety standards. If you are not sure of the power supply specifications in your
area, contact your local power company or contact our customer support.
❏ Do not expose the battery to water or high humidity.
❏ Do not drop, puncture, disassemble, mutilate, or short-circuit the battery.
❏ Do not place the battery near or into fire or water.
❏ Do not use batteries that are leaking or damaged in any way.
c
Caution:
❏ When cleaning the battery charger, make sure to first unplug from outlet. Otherwise, it may
cause electrical shock.
❏ Do not leave the battery charger upright.
❏ When cleaning the battery charger, wipe with a dry cloth or a cloth lightly moistened with
water. Do not use benzene, thinner, or any other chemical agents.
Regularly clean the contact parts with the battery or the car adapter, and metal parts of the
car adapter. When cleaning metal parts, use a dry cloth.
For users in Europe
This products comply with Directive 2004/108/EC.
Safety Instructions
19
R41A0K180
User’s Guide
Chapter 1
Introduction
Main Features
With the viewer, you can easily save, view, and print images you have taken with a digital camera.
You can also play videos and music. The main features are described below.
❏ Photo Fine Premia is a high-resolution, wide color gamut (Adobe RGB) liquid crystal display
with a wide viewing angle. You can view images easily in high resolution anywhere, anytime
without a computer or other special device.
❏ You can play videos and music easily anywhere, anytime without a computer or other special
device.
❏ You can print images directly with PictBridge enabled printers.
❏ You can save photo, video, and audio data in the viewer.
Important Notice
The viewer uses the hard disk as its storage medium. Although designed to be resistant against
mechanical and electromagnetic shock, because of the hard disk’s characteristics, there is a danger
that data may be lost or the service life of the viewer may be adversely affected due to malfunction
caused by these factors. Make sure to handle the viewer in which your valuable image data is stored
with care, and store backup copies to your computer whenever possible.
c
Caution:
❏ Do not expose the viewer to any impact, doing so may cause malfunctions.
❏ Do NOT format the viewer’s hard disk drive from your computer, as this will render the viewer
inoperable. If this happens, test the format by following the procedure in "Formatting Data
in the Viewer" on page 99. If this does not fix the problem, you should contact an authorized
Epson service center. Repairs will be chargeable and are not covered by Epson’s warranties.
Introduction
20
R41A0K180
User’s Guide
Chapter 2
Getting Started
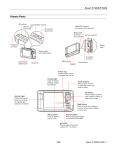
Parts
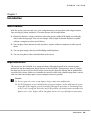
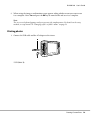
Front
a.
Headphones connector
b.
SD Card slot
c.
Access lamp
d.
CF Card slot
e.
CF Card eject button
f.
Power switch with Hold function
g.
Strap hook
h.
Liquid Crystal Display (LCD)
Getting Started
21
R41A0K180
User’s Guide
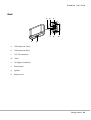
Back
BAT
T.
a.
USB connector (slave)
b.
USB connector (host)
c.
A/V Out connector
d.
Cover
e.
AC adapter connector
f.
Reset button
g.
Speaker
h.
Battery cover
Getting Started
22
R41A0K180
User’s Guide
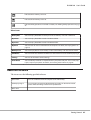
LCD and control panel
a
- /+ key
Press to zoom a photo, and adjust the volume.
b
4-way ring
(Up/ Down/Left/Right key)
Press to move the cursor or highlight. You can select an item by pressing this key to
the up, down, left, or right.
c
OK key
Press to complete the selection and proceed to the next step.
d
Wheel key
Roll to move the cursor or highlight. You can select items quickly by rolling this key.
This operates in a similar way to the Up, Down, Left, and Right keys.
e
Menu key
Press to display the pop up menu.
f
Display key
Press to switch the screen mode.
g
key
h
Charge lamp
Press to rate a particular photo and determine the selection. For details, see "Using
ratings to filter your photos" on page 61.
Lit green during battery charging.
Lit orange when a battery error has occurred.
i
Back key
Press to cancel the selection and return to the previous screen.
j
Illumination lamp (Blue)
Flashes during operations such as turning the power on, printing, LCD power-off
mode, and so on.
Getting Started
23
R41A0K180
User’s Guide
Setting Up the Viewer
This section describes how to turn the power on/off and use the Home screen, and so on.
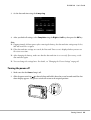
Turning the power on
Slide the power switch to
as shown below. The power switch will return to the original position.
The Illumination lamp turns on.
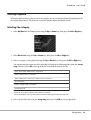
When you turn on the viewer for the first time, the Language screen and Date and Time screen are
displayed. Follow the instructions below.
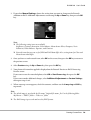
1. The Language screen appears. Select the language to use with the Up or Down key, and press the
OK key.
2. After the message saying “Set current Date and Time.” appears, press the OK key to proceed.
Getting Started
24
R41A0K180
User’s Guide
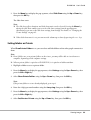
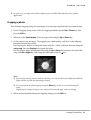
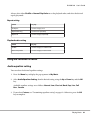
3. Set the date and time using the 4-way ring.
4. After you finish all settings, select Complete using the Right or Left key, then press the OK key.
Note:
❏ If approximately 24 hours passes after removing the battery, the date and time settings may be lost,
and will need to be set again.
❏ If the date and time settings are erased, the Date and Time screen is displayed when you turn on
the viewer next time.
❏ After changing the battery, make sure that the date and time is set correctly. If necessary, set the
date and time again.
❏ You can change the settings later. For details, see "Changing the Viewer Settings" on page 85.
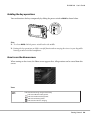
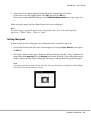
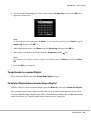
Turning the power off
1. Make sure that the Access lamp is off.
2. Slide the power switch to
as shown below and hold it down for several seconds until the shut
down display appears. The power switch will return to the original position.
Getting Started
25
R41A0K180
User’s Guide
Holding the key operations
You can deactivate the keys temporarily by sliding the power switch to Hold as shown below.
Note:
❏ To release Hold, slide the power switch back to the middle.
❏ Putting the key operations on hold is a useful function when carrying the viewer in your bag while
listening to music with the headphones.
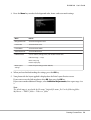
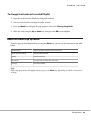
How to use the Home screen
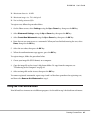
When turning on the viewer, the Home screen appears first. All operations can be started from this
screen.
Icons
Indicates the remaining charge in the battery.
: Indicates sufficient battery power.
: Indicates moderate battery power.
: Indicates low battery power.
: Indicates the viewer is charging.
Getting Started
26
R41A0K180
User’s Guide
Indicates the CF memory card is set.
Indicates the SD memory card is set.
Indicates the key operations are on hold. For details, see "Holding the key operations" on page
26.
Menu items
Backup Files
Select to display files/folders backed up from CF/SD memory cards and a USB device.
My Photos
Select to display files/folders stored in the Photos folder.
My Videos
Select to display files/folders stored in the Videos folder.
My Music
Select to listen to music transferred from the computer. For details, see "Playing Music" on
page 78.
Memory Card
Select to display files on CF/SD memory cards or store memory card data onto the viewer.
USB Device
Select to transfer data between a USB device and the viewer or to use the USB Display Plug-In.
Settings
Select to set the viewer’s various settings.
Print Wizard
Select to follow procedures to complete work on your photos and print. You can edit, crop,
layout, and print your photos. For details, see "Creating Custom Print" on page 66.
About the Software
The viewer uses the following specified software.
Epson Link2
You can transfer data from the computer to the viewer easily.
USB Display Plug-In
You can display images from Adobe Photoshop products on the viewer and edit
photos while confirming a faithful color representation.
Quick Time
Getting Started
27
R41A0K180
User’s Guide
Installing the software
You are required to install the data in the viewer. Connect the viewer to the computer, then install
the necessary software. For details about computer connection, see "Connecting the computer" on
page 41.
Note:
❏ Do not delete the installer (EXE/DMG file) in the viewer’s hard disk.
❏ It is recommended to back up the installer onto the computer.
❏ You need administrative privileges to install the software.
For Windows users
1. Connect the viewer to the computer.
2. Click Start, select My Computer (or Computer), then double-click the viewer’s hard disk drive
icon.
3. Copy the P_XXXX_WIN_SOFTWARE icon to your computer.
Note:
P_XXXX is the model name of your viewer.
4. Double-click the P_XXXX_WIN_SOFTWARE icon.
5. Select Desktop to decompress the files onto, then click Yes.
Note:
For Windows Vista, when the User Account Control window appears, click Continue.
6. On the software installation screen, click Easy Install.
Note:
If you are prompted to select a language, select your preferred language.
7. When the software license agreement screen appears, read the statement and then click Agree.
8. Select your country, then follow the on-screen instructions.
Getting Started
28
R41A0K180
User’s Guide
9. When a message appears indicating that installation is complete, click Exit or Restart Now.
Note:
When Restart Now appears, click the button to restart your computer.
For Macintosh users
1. Connect the viewer to the computer.
2. Double-click the viewer’s hard disk icon on the desktop.
3. Copy P_XXXX_MAC_SOFTWARE.DMG to your computer.
Note:
P_XXXX is your viewer’s model name.
4. Double-click P_XXXX_MAC_SOFTWARE.DMG.
5. Double-click the Mac OS X icon.
6. On the software installation screen, click Easy Install.
Note:
If you are prompted to select a language, select your preferred language.
7. When the software license agreement screen appears, read the statement and then click Agree.
8. Select your country, then follow the on-screen instructions.
9. When a message appears indicating that installation is complete, click Exit or Restart Now.
Note:
When Restart Now appears, click the button to restart your computer.
Uninstalling the Software
To uninstall the software, follow the procedure below. Be sure to back up any viewer installation data
before deleting.
Getting Started
29
R41A0K180
User’s Guide
For Windows users
1. Quit all applications.
2. For Windows Vista, click Start, then click Control Panel.
For Windows XP, click Start, click Control Panel, then click Add or Remove Programs.
For Windows 2000, click Start, point to Settings, then click Control Panel.
3. For Windows Vista, double-click the Programs and Features icon.
For Windows XP, click the Change or Remove Programs icon.
For Windows 2000, double-click the Add/Remove Programs icon.
4. Select the software, and then follow the on-screen instructions.
Note:
After a message saying “Your computer needs to be restarted.” appears, click Restart Now to restart
your computer.
For Macintosh users
1. Select Custom Install in step 4 of "For Macintosh users" on page 29.
2. Select Epson Link2 or USB Display Plug-In.
3. On the software installation screen, select Uninstall.
Note:
After a message saying “Your computer needs to be restarted.” appears, click Restart Now to restart
your computer.
Getting Started
30
R41A0K180
User’s Guide
Chapter 3
Transferring Data to the Viewer
Transferring the data of a full memory card or other USB devices to the viewer makes it possible for
you to continue taking pictures.
Transferring from CF/SD Memory Cards
The viewer has a CF Card slot and an SD Card slot.
You can copy the data from CF/SD memory cards onto Backup Files.
c
Caution:
❏ To use a memory card correctly, read the manuals provided with the memory card.
❏ Never remove a memory card while the Access lamp is flashing. Doing so may cause data in
the card or HDD to be lost or damaged.
❏ Do not put stickers on memory cards. The sticker may peel off, preventing the card from being
ejected and damaging the viewer.
❏ Avoid using or storing the card in direct sunlight, or in places that are extremely hot, humid,
or dusty.
Note:
❏ Before copying data, charge the battery fully. If the battery is low, connect the AC adapter. The
transfer is canceled if the viewer's power supply is disconnected during transfer.
❏ 1 GB of data may take approximately 2 minutes or more to copy, depending on the memory card
you use.
Supported types of memory cards
❏ CF (CompactFlash) memory card (Type2 and 3.3 V, including Micro Drive)
❏ SD memory card, SD High-Capacity card
❏ MultiMedia Card, MultiMedia Card Plus
Transferring Data to the Viewer
31
R41A0K180
User’s Guide
Note:
Commercially available adapters will be required to use other memory cards (miniSD, microSD,
RS-MMC, Memory Stick Duo, Memory Stick PRO Duo, xD-Picture Card, and so on). Contact our
customer support for details.
Inserting CF/SD memory cards
Insert a compatible memory card in the CF card slot or the SD card slot.
Insert the memory card into the memory card slot with the label side facing the display side of the
viewer, then push it fully into the slot.
Note:
Insert memory cards in the correct direction. Otherwise, the memory card and the viewer may be
damaged.
Removing a CF/SD memory cards
1. Make sure that the Access lamp is off.
c
Caution:
Never remove a memory card while the Access lamp flashes. Doing so may cause data in the
card to be lost or damaged.
Transferring Data to the Viewer
32
R41A0K180
User’s Guide
2. For a CF memory card, push the eject button twice. The memory card is pushed out.
For an SD memory card, push the memory card down slightly. The memory card is ejected.
3. Pull out the memory card.
Note:
❏ When using a memory card set in the CF adapter, do not remove only the memory card.
Disconnect the CF adapter from the viewer.
❏ Be sure to use the viewer with the eject button pushed in to avoid possible damage.
Transferring Data to the Viewer
33
R41A0K180
User’s Guide
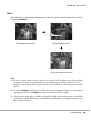
Copying all data
1. Insert a CF/SD memory card.
Note:
According to the screen that appears when inserting the memory card, skip step 2.
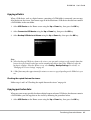
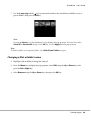
2. Select Memory Card in the Home screen using the Up or Down key, then press the OK key.
3. In the Memory Card screen, select CF Memory Card Backup or SD Memory Card Backup
using the Up or Down key.
4. Press the OK key to start copying.
The massage saying “Backing up memory card files..” appears. After a message appears indicating
that backup is complete, the backup data is displayed automatically.
Note:
When backing up memory card data to the viewer, you can make settings to only transfer data that
has not been previously backed up, and to automatically delete data in the memory card after the
backup is complete. From the Home screen, select Settings - Backup Settings. For details, see
"Changing the Viewer Settings" on page 85. Differential data backup is not available if the SD
memory card is locked.
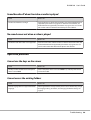
Checking the copied data on the viewer
1. Select Backup Files in the Home screen using the Up or Down key, then press the Right key.
2. Select and check the folder named according to the year and date (when the data is copied), and
the sequential number (e.g.: “19092008D.XXX”).
Note:
You can change the date format. Select Settings in the Home screen, then select Date and Time.
Copying particular data
1. Follow steps 1 and 2 of "Copying all data" on page 34.
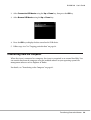
2. In the Memory Card screen, select Browse CF Memory Card or Browse SD Memory Card
using the Up or Down key.
Transferring Data to the Viewer
34
R41A0K180
User’s Guide
3. Press the OK key to show the data on the memory card.
Note:
If you are copying or moving only one file, use the 4-way ring to select the target file.
4. Press the Menu key to display the pop up menu, select Copy/Move using the Up or Down key,
then press the OK key.
5. Select Select and Copy Files using the Up or Down key, then press the OK key.
Note:
When selecting only one file to copy, select Copy this File.
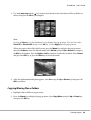
6. Use the 4-way ring and the
key to enter check marks in the check boxes of files or folders to
back up, then press the OK key to complete.
Note:
Pressing the Menu key in the thumbnails screen displays the pop up menu. You can select either
Select All or Deselect All, then press the OK key, or select Apply from the pop up menu.
7. Use the 4-way ring to select the target folder, then press the OK key.
8. Check the copied data following the steps in "Checking the copied data on the viewer" on page
34.
Transferring Data to the Viewer
35
R41A0K180
User’s Guide
Transferring from USB Devices
You can copy data from USB devices directly using the USB Standard-A connector of the viewer.
Only a USB device supporting the USB Mass Storage specification can be used. You can use the
following USB storage devices capable of copying: digital cameras, external HDD drives, USB
memories, and card reader/writers. You can also use the following Epson Multimedia Storage
Viewers: P-2000, P-4000, P-2500, P-4500, P-3000, P-5000, P-6000, and P-7000.
Connecting a USB device
1. Connect the AC adapter to the viewer if possible.
Note:
Some USB devices require the viewer to be powered via the AC adapter.
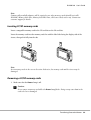
2. Connect the viewer and the USB device. Open the side upper cover and connect a USB cable to
the Host (Standard-A) connector and the other end to the USB device, or connect a USB memory
to the viewer.
3. Turn on the viewer and the USB device.
Note:
❏ If the USB device has a supplied AC power cord, plug it in also, to prevent data loss while transferring.
❏ Using a USB hub is not supported.
❏ A USB device without power may not be activated.
❏ A USB device with the certification or encryption function cannot be used.
❏ When you connect a USB device to this viewer, use the USB cable supplied with the device.
❏ Do not connect USB interfaces (Host-standard A and Slave-Mini B) at the same time. It may cause
a malfunction.
❏ Do not touch the Slave-Mini B connector during the USB data transfer.
❏ Some USB devices may not be compatible.
Transferring Data to the Viewer
36
R41A0K180
User’s Guide
Copying all data
When a USB device, such as a digital camera, containing a DCIM folder is connected, you can copy
all of the data to the viewer. You cannot copy all of the data from a USB device that does not contain
a DCIM folder in the root folder.
1. Select USB Device on the Home screen using the Up or Down key, then press the OK key.
2. Select Connect to USB device using the Up or Down key, then press the OK key.
3. Select Backup USB device to Viewer using the Up or Down key, then press the OK key.
Note:
❏ When backing up USB device data to the viewer, you can make settings to only transfer data that
has not been previously backed up, and to automatically delete data in the USB device after the
backup is complete. From the Home screen, select Setting - Backup Settings. For details, see
"Changing the Viewer Settings" on page 85.
❏ 1 GB of data may take approximately 3 minutes or more to copy, depending on the USB device you
use.
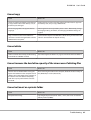
Checking the copied data on the viewer
Follow steps 1 and 2 of "Checking the copied data on the viewer" on page 34.
Copying particular data
When you want to copy specific data from a digital camera or from a USB device that does not contain
a DCIM folder, you can copy data to the viewer by following the procedure below.
1. Select USB Device on the Home screen using the Up or Down key, then press the OK key.
Transferring Data to the Viewer
37
R41A0K180
User’s Guide
2. Select Connect to USB device using the Up or Down key, then press the OK key.
3. Select Browse USB device using the Up or Down key.
4. Press the OK key to display the data stored on the USB device.
5. Follow steps 4 to 7 in "Copying particular data" on page 34.
Transferring from the Computer
When the viewer is connected to a computer, the viewer is recognized as an external hard disk. You
can transfer data from the computer using the included software or your operating system's file
management software such as Explorer or Finder.
For details, see "Transferring to the Computer" on page 41.
Transferring Data to the Viewer
38
R41A0K180
User’s Guide
Chapter 4
Transferring Data from the Viewer
You can transfer data in the viewer to a USB device or computer and save important data.
Transferring to USB Storage Devices or CF/SD Memory Cards
You can transfer the data of this viewer to USB devices or memory cards. This is useful when you
want to back up data in the viewer without using a computer. However, both the viewer and the USB
device will require a power supply, and may take some time to transfer the data depending on the
volume of data in the viewer. You can use the following USB storage devices capable of copying:
external HDD drives, CD/DVD drives, USB memories, and card reader/writers.
Note the following points when burning data to a CD/DVD.
❏ Insert a disc before connecting the CD/DVD drive to the viewer.
❏ Use only blank media.
❏ After copying, you cannot add any more data to the media.
❏ You can only record on single-layer DVD-R discs.
❏ Some CD/DVD drives may not be compatible.
❏ Place data to transfer in a viewer folder with a hierarchy of no more than six levels.
Copying particular data
Note:
This function is not available if the SD memory card is locked.
1. Connect a USB device or insert a memory card. For details, see "Connecting a USB device" on page
36 or "Inserting CF/SD memory cards" on page 32.
2. Highlight a file or folder to copy.
3. Press the Menu key to display the pop up menu, select Copy/Move using the Up or Down key,
then press the OK key.
Transferring Data from the Viewer
39
R41A0K180
User’s Guide
4. Select Select and Copy Files using the Up or Down key, then press the OK key.
Note:
When selecting only one file to copy, select Copy this File. When moving files, select Move this File
or Select and Move Files.
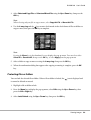
5. Use the 4-way ring and the
key to enter checkmarks in the check boxes of files or folders to
back up, then press the OK key to complete.
6. Select USB Device, CF Memory Card, or SD Memory Card using the Up or Down key, then
press the OK key.
Note:
❏ Pressing the Menu key in the thumbnails screen displays the pop up menu. You can select either
Select All or Deselect All, then press the OK key, or select Apply from the pop up menu.
❏ When the viewer is connected to a USB device, do not connect a computer or printer to the Slave-Mini
B, or touch the connector interface.
Copying Data within Backup Files
Note:
❏ This function is only available for USB devices.
❏ Data in the viewer's Backup Files can be copied to a HDD drive or a CD/DVD drive according to
the date the folders were created. Only folders that were not copied previously are identified and
copied.
When copying folders to a CD/DVD drive according to date, it cannot perform incremental copying.
1. Connect the USB device. For details, see "Connecting a USB device" on page 36.
2. Select USB Device in the Home screen using the Up or Down key, then press the OK key.
Transferring Data from the Viewer
40
R41A0K180
User’s Guide
3. Select Connect to USB Devices using the Up or Down key, then press the OK key.
4. Select Copy all Backup Files using the Up or Down key, then press the OK key.
The data is copied as folders in Backup Files.
Note:
You can copy only additional folders as those which have already been copied are not copied again.
Transferring to the Computer
Connecting the computer
If you connect the viewer to the computer, the viewer is recognized as an external HDD. Before
transferring, install the software. For details, see "Installing the software" on page 28.
1. Connect the AC adapter.
2. Turn on the viewer and the computer.
Transferring Data from the Viewer
41
R41A0K180
User’s Guide
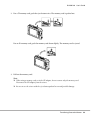
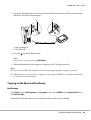
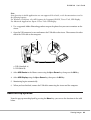
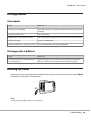
3. Open the USB connector’s cover and connect the USB cable to the viewer. Then connect the other
end of the USB cable to the computer.
a. USB (Standard-A)
b. USB (Mini-B)
4. Press the
key on the Home screen.
Note:
You can also connect by selecting USB Device.
5. When the connection to the computer is complete, the LCD display turns off.
Note:
❏ Disconnect the USB cable from the viewer when not operating with a computer or printer.
❏ When the viewer is connected to a computer, do not connect a USB device to the Host-standard A,
or touch the connector interface.
Copying via the Epson Link2 software
For Windows
Click Start, point to All Programs (or Programs), then select EPSON. Select Epson Link2, then
click Epson Link2.
Alternatively, click the shortcut icon of the Epson Link2 software on the desktop.
Transferring Data from the Viewer
42
R41A0K180
User’s Guide
Only data that has not yet been backed up will be copied to the computer automatically. For details,
see the online Epson Link2 User’s Guide.
For Macintosh
Double-click the Epson Link2 icon in the Epson Link2 folder.
Only data that has not yet been backed up will be copied to the computer automatically. For details,
see the online Epson Link2 User’s Guide.
Copying via the Explorer
You can copy and move files that are compatible with your computer's Explorer. When browsing the
viewer’s HDD on a computer, BACKUP, MUSIC, PHOTOS, and VIDEOS correspond to Backup
Files, My Music, My Photos, and My Videos in the viewer.
Note:
Do not change the folder name. If changed, a new, empty folder will be created in the original name,
and you will need to move data to the new folder.
Disconnecting the viewer from the computer
For Windows
1. Click Unplug or Eject Hardware on the computer screen.
Note:
The message and the icon differ depending on the Windows version.
2. Disconnect the USB cable from the computer.
3. Disconnect the USB cable from the viewer.
Transferring Data from the Viewer
43
R41A0K180
User’s Guide
For Macintosh
1. Drag and drop the viewer icon and memory cards (if inserted) to the trash can on the computer
screen.
2. Disconnect the USB cable from the computer.
3. Disconnect the USB cable from the viewer.
Transferring Data from the Viewer
44
R41A0K180
User’s Guide
Chapter 5
Viewing Images
Viewing Photos and Videos
Photo/Video file formats supported by the viewer
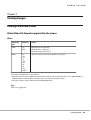
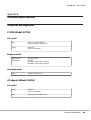
Photo
Supported
Files
Extension
Details
JPEG*
.jpg
.jpeg
Minimum size: 320240 pixels
Maximum size: 31 megapixels
Maximum image aspect ratio: 3:1
RAW**
.erf
.nef
.crw
.cr2
.mrw
.pef
.orf
.raf
.arw
.DNG***
JPEG data stored in the header of RAW files are displayed.
*The progressive JPEG format is not supported.
**The viewer supports images in RAW format taken with most digital cameras produced by Nikon, Canon, KONICAMINOLTA,
PENTAX, Olympus, FUJIFILM, SONY, and Epson. Contact our customer support for details.
***The viewer supports only the JPEG preview embedded DNG format.
Note:
TIFF is not supported.
Viewing Images
45
R41A0K180
User’s Guide
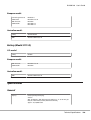
Video
File
Format
Video Codec
Audio Codec
Detail
AVI
MPEG4 (Advanced
Simple Profile)
AAC, G.711 (uLaw, ALaw), PCM, ADPCM (G.726,
MS IMA ADPCM)
30 fps: 720480
25 fps: 720576
4 Mbps (Avg.)
8 Mbps (Peak)
Motion-JPEG
G.711 (uLaw, ALaw), PCM, ADPCM (G.726, MS
IMA ADPCM)
30 fps: 720480
25 fps: 720576
60 fps: 320240
MPEG4 (Advanced
Simple Profile)
AAC, PCM
30 fps: 720480
25 fps: 720576
4 Mbps (Avg.)
8 Mbps (Peak)
Motion-JPEG
G.711 (uLaw, ALaw), PCM, ADPCM (G.726, MS
IMA ADPCM)
30 fps: 720480
25 fps: 720576
60 fps: 320240
MP4
MPEG4 (Advanced
Simple Profile)
AAC, PCM
30 fps: 720480
25 fps: 720576
4 Mbps (Avg.)
8 Mbps (Peak)
MOV
MP4
M4V
H.264/AVC (Baseline
Profile Level 1.3)
AAC, PCM
30 fps: 720480
25 fps: 720576
2.5 Mbps (Avg.)
3 Mbps (Peak)
MOV
Note:
❏ The maximum supportable video file size is 2 GB.
❏ Some data may not be played even if the data is supported by the viewer.
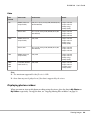
Displaying photos or videos
When you want to view or edit photos or videos using the viewer, place the data in My Photos or
My Videos respectively. To copy the data, see "Copying/Moving files or folders" on page 58.
Viewing Images
46
R41A0K180
User’s Guide
1. Select Backup Files, My Photos, or My Videos, in the Home screen using the Up or Down key,
then press the Right key.
Note:
Press the Right key to display the subfolders in the folder. You can easily navigate the folder structure
when a subfolder is displayed on the right by selecting a folder with the Up or Down key and then
pressing the Right key. Nothing is displayed on the right when the folder does not contain any
subfolders.
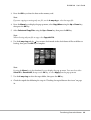
2. Select the folder you want to display using the Up or Down key, then press the OK key.
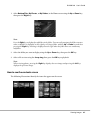
3. Select a file to view using the 4-way ring, then press the OK key to playback.
Note:
When viewing photos, pressing the Right key displays the next image and pressing the Left key
displays the previous image.
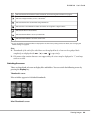
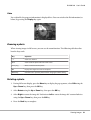
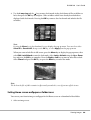
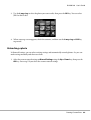
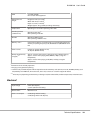
How to see the contents screen
The following illustrations identify the icons that appear on the screen.
Viewing Images
47
R41A0K180
User’s Guide
Indicates that the file or folder is locked. For details, see "Protecting files or folders" on page 59.
Indicates unsupported data, such as a document.*
Indicates that the file is set with the rating information.
Indicates that a Sound Memo has been attached to an image from a digital camera.
Indicates the file is in music format.
Indicates that the folder is set as a private folder.
Indicates that the folder is set as the screen saver.
*You can set whether unsupported files are displayed or not. The factory setting is Hide. For details, see "Changing the
Viewer Settings" on page 85.
Note:
❏ Thumbnails of the video files which have not been played back, or have not been played back
completely are displayed with
( ) or
( ) respectively.
❏ Files names that contain characters not supported by the viewer may be displayed as “?”, and may
not be accessible.
Switching the screen
There are three kinds of screen to display files and folders. You can switch the following screen by
pressing the Display key.
Thumbnails screen
Files or folders appear in 12 divided thumbnails.
Mini-Thumbnails screen
Viewing Images
48
R41A0K180
User’s Guide
Files or folders appear in 64 divided thumbnails.
Details screen
The modify date and file size are displayed.
Switching the view mode
You can switch between two file display methods. As with the folder display method for computer
data and for digital cameras, this method does not display all of the data. Switch the display method
by following the procedure below.
1. Press the Menu key to display the pop up menu, select Settings using the Up or Down key, then
press the OK key.
2. Select Folder View or DSC View using the Up or Down key, then press the OK key.
Displaying information
When viewing a photo or video in full screen, press the Display key to display its information.
Viewing Images
49
R41A0K180
User’s Guide
Photo
For a photo file, no information is displayed first. You can switch to the file information (as below)
by pressing Display key.
File information (general)
File information (detail)
Over-under exposure preview
Note:
❏ In the over-under exposure preview, about 6% on each end of the brightness range (low and high)
throughout the image shows graduated tone reversal allowing you to check exposure level. The
brightest 6% of the image shows 4 grades of black, and the darkest 6% of the image shows 4 grades
of white.
❏ Pressing the Display key while the over-under exposure preview appears displays the image without
any information. Press the Display key again to return to the previous display.
❏ Digital camera images taken in sRGB are displayed in sRGB, and the images taken in Adobe RGB
are displayed in Adobe RGB. Images with unknown Exif information are displayed using the Color
Space setting in Settings.
Viewing Images
50
R41A0K180
User’s Guide
Video
For a video file, the progress information is displayed first. You can switch to the file information (as
below) by pressing the Display key again.
Zooming a photo
When viewing images in full screen, you can use the zoom function. The following table describes
how the keys work.
Key
Operation
- /+
Zoom out / Zoom in
Back
Zoom out of the photo and back to full screen.
4-way ring
Move around the zoomed photo.
OK
Display the navigation screen on the photo.
Wheel key
View the next or previous photo without changing the zoom setting.
Rotating a photo
1. During full screen display, press the Menu key to display the pop up menu, select Edit using the
Up or Down key, then press the OK key.
2. Select Rotate using the Up or Down key, then press the OK key.
3. Select Right to rotate the image 90˚ clockwise or Left to rotate the image 90˚ counterclockwise
using the Up or Down key, then press the OK key.
4. Press the Back key to complete.
Viewing Images
51
R41A0K180
User’s Guide
Note:
❏ Photos can be rotated automatically if they have automatic rotate information and the viewer
setting is set to Auto-Rotation ON. For details, see "Changing the Viewer Settings" on page 85.
❏ You can display the other photos in the folder using the Right or Left key.
Displaying photo enhance
During full screen display, pressing the Menu key to display the pop up menu, then selecting
Enhanced Photo Display Mode enters the photo enhance mode. In this mode, the viewer
discriminates someone’s face or shooting scene automatically, then displays a color-optimized image
on the display. Pressing the Back key returns the normal image display.
Playing back sound memo
You can playback audio memos (WAV format) attached to image files by a digital camera. During
full screen display, press the Menu key to display the pop up menu, and then select Playback Sound
Memo.
Note:
This may not support all digital camera audio memos.
Playing videos
The following table describes how the keys work while playing videos.
Key
Operation
OK
Play/Pause
Back*
Stops the video and returns to the previous screen.
- /+
Adjusts the volume.
Viewing Images
52
R41A0K180
Key
Operation
Left/Right
Rewind/Fast-forward**
User’s Guide
*When you press the Back key to stop playback, the viewer remembers the resume point for the next time you start playback.
The next time you start playback, playback starts from 3 seconds before the resume point. If you want to play back the
video from the beginning, press the Menu key during playback, select Play Settings (if displayed), Play from
Beginning, then press the OK key. This function cannot be used for a video with total playback time of 1 minute or less.
(Resume does not work for some video files.)
**Rewind and fast-forward speed becomes faster if you press the Left/Right key several times while rewinding/
fast-forwarding. (Rewind/Fast-Forward does not work for some video files.)
Note:
You can set the video screen size by selecting Play at Full Screen or Play at Original Size from Play
Settings in the pop up menu. Setting Play at Full Screen displays the image by adjusting the longest
side to the LCD display without changing the aspect ratio.
Editing Photos
While editing your photos, you can check the results on the screen and then save the photos. In
addition to standard correction presets, the Manual setting allows you to apply each correction
manually. For RAW images, you can select one or multiple images to process and then save as a JPEG
file.
Editing a photo
You can edit photos in JPEG format. You can automatically correct photos to suit the scene as well
as manually adjust settings such as brightness and contrast.
1. On the Thumbnail screen, select the JPEG photo that you want to edit. Or, you can display the
photo in full screen.
2. Press the Menu key to display the pop up menu, select Edit using the Up or Down key, then
press the OK or Right key.
3. Select Retouch using the Up or Down key, then press the OK key.
4. You can make various settings on the photo editing screen. For details on the various settings, see
"Creating Custom Print" on page 66.
Viewing Images
53
R41A0K180
User’s Guide
RAW processing
You can process RAW images and then save them in JPEG format. You can make various adjustments
when processing. When selecting multiple images, you can process all of the data using the same
settings.
1. On the Thumbnail screen, select the RAW image that you want to edit. Or, you can display the
RAW image in full screen.
2. Press the Menu key to display the pop up menu, select Edit using the Up or Down key, then
press the OK or Right key.
3. On the thumbnail screen, select Select Photo and Process using the Up or Down key, then
press the OK key.
In full screen, select Process This Photo using the Up or Down key, then press the OK key. Go
to step 5.
key to enter check marks in the check boxes of files you want to
4. Use the 4-way ring and the
process, then press the OK key.
5. When a message screen appears, check the contents, and then use the 4-way ring and OK key
to proceed.
6. You can make various settings on the processing settings screen. For details on the various
settings, see "Creating Custom Print" on page 66.
Managing Files and Folders
Displaying photos as a slide show
You can display JPEG photos as a slide show.
1. Highlight a file or folder to display as a slide show.
Viewing Images
54
R41A0K180
User’s Guide
2. Press the Menu key to display the pop up menu, select Slide Show using the Up or Down key,
then press the OK key.
The slide show starts.
Note:
❏ The slide show effect, duration, and slide show music can be selected. Pressing the Menu key
during the slide show enables you to set the slide show settings from the pop up menu.
Alternatively, you can set the slide show settings from Settings. For details, see "Changing the
Viewer Settings" on page 85.
❏ When slide show music is set, you can turn the volume up or down by pressing the + or - key.
Setting folders as Private
When Show Private Folders is set, you can select and hide folders so that other people cannot view
them.
Note:
❏ Even if folders are set as private folders on the viewer, you may still be able to view them on a
computer, depending on the computer settings.
❏ When a private folder is copied to a CD-R/DVD-R, it is copied as a hidden attribute.
1. Highlight a folder to set as a private folder.
2. Press the Menu key to display the pop up menu, select Settings using the Up or Down key, then
press the OK or Right key.
3. Select Show Private Folders using the Up or Down key, then press the OK key.
Note:
If the private folder to set are already displayed, go to step 6.
4. Enter the 4-digit password number using the 4-way ring, then press the OK key.
5. Press the Menu key to display the pop up menu, select Settings using the Up or Down key, then
press the OK or Right key.
6. Select Set/Unset as Private using the Up or Down key, then press the OK key.
Viewing Images
55
R41A0K180
User’s Guide
7. Use the 4-way ring and the
key to enter check marks in the check boxes of folders to set as
private folders, then press the OK key.
Note:
Pressing the Menu key in the thumbnails screen displays the pop up menu. You can select either
Select All or Deselect All, then press the OK key, or select Apply from the pop up menu.
Note:
To hide the folder set as a private folder, select Hide Private Folders in step 3.
Changing a file's or folder's name
1. Highlight a file or folder to change the name of.
2. Press the Menu key to display the pop up menu, select Edit using the Up or Down key, then
press the OK or Right key.
3. Select Rename using the Up or Down key, then press the OK key.
Viewing Images
56
R41A0K180
User’s Guide
4. The on-screen keyboard appears. Select a letter using the 4-way ring, then press the OK key to
input the selected letter.
Note:
❏ The cursor can be moved forward/backward by pressing the + or - key.
❏ To delete the last letter input, press the Back key.
❏ To cancel the operation, select Cancel using the 4-way ring, then press the OK key.
5. After inputting the name, select Done using the 4-way ring, then press the OK key to complete.
Deleting files or folders
1. Highlight a file or folder to delete.
2. Press the Menu key to display the pop up menu, select Delete using the Up or Down key, then
press the OK key.
Viewing Images
57
R41A0K180
User’s Guide
3. Use the 4-way ring and the
key to enter check marks in the check boxes of files or folders to
delete, then press the OK key to complete.
Note:
Pressing the Menu key in the thumbnails screen displays the pop up menu. You can select either
Select All or Deselect All, then press the OK key, or select Apply from the pop up menu.
When you want to delete files in full screen, press the Menu key to display the pop up menu,
then select Delete to enter the deletion mode. Select Delete using the Up or Down key and press
the OK key to complete. Press the Right or Left key to move to other files to delete. Select Cancel
and press the OK key, or press the Back key to cancel the mode.
4. After the confirmation dialog box appears, select Yes using the Up or Down key, then press the
OK key to delete.
Copying/Moving files or folders
1. Highlight a file or folder to copy or move.
2. Press the Menu key to display the pop up menu, select Copy/Move using the Up or Down key,
then press the OK key.
Viewing Images
58
R41A0K180
User’s Guide
3. Select Select and Copy Files or Select and Move Files using the Up or Down key, then press the
OK key.
Note:
When selecting only one file to copy or move, select Copy this File or Move this File.
4. Use the 4-way ring and the
key to enter check marks in the check boxes of files or folders to
copy or move, then press the OK key to complete.
Note:
Pressing the Menu key in the thumbnails screen displays the pop up menu. You can select either
Select All or Deselect All, then press the OK key, or select Apply from the pop up menu.
5. Select a folder to copy or move to using the 4-way ring, then press the OK key.
6. When the confirmation dialog box appears after copying or moving is complete, press the OK
key.
Protecting files or folders
You can lock the selected file or folder. When a file or folder is locked, the
it cannot be deleted or rotated.
icon is displayed and
1. Highlight a file or folder to lock.
2. Press the Menu key to display the pop up menu, select Edit using the Up or Down key, then
press the OK or Right key.
3. Select Lock/Unlock using the Up or Down key, then press the OK key.
Viewing Images
59
R41A0K180
User’s Guide
4. Use the 4-way ring and the
key to enter check marks in the check boxes of files or folders to
lock, then press the OK key to complete. (Files or folders which have already been locked are
displayed with check marks. Pressing the OK key removes the check mark and unlocks the file
or folder.)
Note:
Pressing the Menu key in the thumbnails screen displays the pop up menu. You can select either
Select All or Deselect All, then press the OK key, or select Apply from the pop up menu.
When you want to lock files in full screen, press the Menu key to display the pop up menu, then
select Edit, Lock/Unlock to enter the lock mode. Select Lock or Unlock using the Up or Down
key and press the OK key to complete. Press the Right or Left key to move to other files to lock.
Select Cancel and press the OK key, or press the Back key to cancel the mode.
Note:
The lock on the file or folder remains in effect until you unlock it, even if you turn off the viewer.
Setting Home screen wallpaper or folder icons
You can set your favorite image as wallpaper for the Home screen or a thumbnail of that folder.
1. Select an image to set.
Viewing Images
60
R41A0K180
User’s Guide
2. Press the Menu key to display the pop up menu, select Wallpaper and Icon Settings using the
Up or Down key, then press the OK or Right key.
3. Select Set as Folder Icon using the Up or Down key, then press the OK key.
Note:
Select Set as Wallpaper of HOME to set the image as wallpaper for the Home screen. On the Home
screen, press the Menu key to display the pop up menu. Then select Reset wallpaper of HOME to
reset the Home screen wallpaper to the initial setting.
Using ratings to filter your photos
When photos have ratings attached, you can filter them for display according to the number of
stars.
After selecting a photo file, press the
key. You can rate photos from
1 to
5.
Note:
❏ You can only rate JPEG and RAW image files.
❏ You cannot rate data stored on a USB device or memory card.
❏ When a photo file is rated
5, pressing the
key deletes its rating.
❏ To edit a file that you rated with the viewer using Adobe Bridge, see the online Epson Link2 User’s
Guide.
When you want to filter photos, follow the procedure below.
1. Display the contents screen that you want to filter.
2. Press the Menu key to display the pop up menu, select Rating Filter Display using the Up or
Down key, then press the OK or Right key.
Viewing Images
61
R41A0K180
User’s Guide
3. Select the filter setting using the Up or Down key. Photos with that star rating or higher are
displayed.
When you want to cancel filtering, follow the procedures in step 2, and then select Show All.
Note:
❏ Folders are always displayed after filtering.
❏ Files other than JPEG and RAW are not displayed after filtering.
Setting the screen saver
1. Highlight a folder to set as the screen saver.
2. Press the Menu key to display the pop up menu, select Set as Screen Saver using the Up or Down
key, then press the OK key.
Note:
❏ For using a screen saver, see "Changing the Viewer Settings" on page 85.
❏ To cancel the screen saver setting, select Don’t Use as Screen Saver in step 2.
❏ The screen saver is activated only when the AC adapter is connected.
Monitoring the Color of Images
You can display images from Adobe Photoshop products on the viewer and edit photos while
confirming a faithful color representation.
To use the monitoring functions, install the software. For details, see "Installing the software" on page
28.
Viewing Images
62
R41A0K180
User’s Guide
Note:
Some functions in Adobe applications are not supported. For details, see the documentation stored in
the following location.
For Windows: Click Start, select All Programs (or Programs), EPSON, Viewer Tools, USB Display.
For Macintosh: Applications: Epson: Viewer Tools: USB Display
1. Use a supported Adobe Photoshop product to open the photo that you want to monitor on the
viewer.
2. Open the USB connector's cover and connect the USB cable to the viewer. Then connect the other
end of the USB cable to the computer.
a. USB (Standard-A)
b. USB (Mini-B)
3. Select USB Device in the Home screen using the Up or Down key, then press the OK key.
4. Select USB Display using the Up or Down key, then press the OK key.
5. Monitoring begins automatically.
6. When you have finished, remove the USB cable connecting the viewer and the computer.
About the Pop Up Menu
From the pop up menu displayed by pressing the Menu key, you can use the functions in the table
below.
Viewing Images
63
R41A0K180
User’s Guide
For photo files
Rating Filter Display
Sets the rating filter.
Enhanced Photo
Display Mode
Displays photo images utilizing the features of the wide color gamut display.
Playback Sound Memo
Plays back sound memos.
Copy/Move
Copies/Moves files or folders.
Edit
Edits such as retouching, RAW processing, rotating photos, locking files, changing the
name, and so on.
Sort
Sets the order of displaying in the list.
Print
Prints photo images.
Wallpaper and Icon
Settings
Sets Wallpaper and icons of folders.
Set as Screen Saver
Sets Screen Saver files.
Slide Show
Starts Slide Show.
Settings
Sets LCD, beeps, showing private folders, setting as private, showing unsupported files,
and so on.
Return to HOME
Returns to the HOME screen.
Delete
Deletes files or folders.
For video files
Copy/Move
Copies/Moves files or folders.
Edit
Edits such as locking files, changing the folder’s name, and so on.
Sort
Sets the order of displaying in the list.
Play from Beginning
Plays back video files from the beginning.
Play Settings
Sets the display size of the video playback.
Set This Frame as Icon
Sets the currently displayed frame as an icon.
Display mode
Sets the most suitable display according to the movie content.
Settings
Sets LCD Brightness and whether or not to play a beep.
Viewing Images
64
R41A0K180
Return to HOME
Returns to the HOME screen.
Delete
Deletes files or folders.
User’s Guide
Note:
Different pop up menus will appear when you press the Menu key, depending on which screen you are
viewing.
Viewing Images
65
R41A0K180
User’s Guide
Chapter 6
Creating Custom Print
You can print photos from this viewer without connecting it to a computer. Simply connect the
viewer to a PictBridge compatible printer.
You can print out your projects by following the Print Wizard menu screen flows from editing photos
to printing them out.
Preparing to Print
Available types of paper
The viewer supports the following types of paper.
Premium Glossy Photo Paper
Premium Semigloss Photo Paper
Ultra Glossy Photo Paper
Glossy Photo Paper
Note:
See the printer’s manuals for details on the available kinds of paper and sizes.
Registering a watermark
If you want to add a watermark to a photo, you need to register it first. You can register three items
of photos or text.
Note:
You can register the following types of images as watermarks.
❏ PNG format images created in Adobe Photoshop.
❏ PNG format images containing partial transmission information.
Creating Custom Print
66
R41A0K180
User’s Guide
❏ Maximum data size: 10 MB
❏ Maximum image size: 720 x 480 pixels
❏ Not including animated files
To register text, follow the procedure below.
1. On the Home screen, select Settings, using the Up or Down key, then press the OK key.
2. Select Watermark Settings, using the Up or Down key, then press the OK key.
3. Select Create New Watermark using the Up or Down key, then press the OK key.
4. Enter the text you want to use as a watermark. When you have finished entering the text, select
Done, then press the OK key.
5. Select the text color, then press the OK key.
6. When the confirmation message appears, press the OK key.
To register images, follow the procedure below.
1. Create your image file (PNG format) on a computer.
2. Copy the image file to the viewer's My photos folder. To copy from the computer, see
"Transferring to the Computer" on page 41.
3. Select an image file on the viewer, then press the OK key.
To remove registered watermarks, repeat steps 1 and 2 of the above procedure for registering text,
and then select Remove this Watermark in step 3.
Using the Print Wizard Menu
Print Wizard has six menus to suit different purposes. See the table in step 2 for details on each menu.
Creating Custom Print
67
R41A0K180
User’s Guide
1. On the Home screen, select Print Wizard using the Up or Down key, then press the OK key.
Note:
If an unprinted job is stored in the viewer, follow the instructions on the screen.
2. Select the menu you want using the Up or Down key, then press the OK key.
Menu
Details
Create Custom Print
You can edit photos and print them out. See "Creating Custom Print" on page 68.
Crop and Print
You can crop photos, lay them out on paper, and then print.
Edit Layout and
Print
You can lay photos out on paper and then print.
Make Copies of
Custom Print
You can make additional prints of your photo projects. See "Making Copies of Custom Print"
on page 76.
Print Original Photo
You can print out the original photo. See "Printing Original Photo" on page 76.
Print Contact Sheet
You can print out a contact sheet displaying thumbnail images of your photos. See "Printing
Contact Sheet" on page 77.
Creating Custom Print
Selecting a photo
1. Select Create Custom Print from the Print Wizard menu. For details, see "Using the Print Wizard
Menu" on page 67
2. Use the 4-way ring and the OK key to display photos in subfolders.
Creating Custom Print
68
R41A0K180
User’s Guide
3. Use the 4-way ring to select the photo you want to edit, then press the OK key. You can select
JPEG or RAW data.
4. When a message screen appears, check the contents, and then use the 4-way ring and OK key
to proceed.
Retouching a photo
In Retouch Settings, you can select existing settings and automatically retouch photos. Or, you can
make settings manually and then save them.
1. Select the current retouch settings or Manual Settings using the Up or Down key, then press the
OK key. Go to step 5 if you select the current retouch settings.
Creating Custom Print
69
R41A0K180
User’s Guide
2. If you select Manual Settings, choose the setting item you want to change on the Retouch
Additions or RAW Additional Adjustments screen using the Up or Down key, then press the OK
key.
Note:
❏ The following setting items are available.
Brightness, Contrast, Saturation, Color Balance, Monochrome Filter, Sharpness, Noise
Reduction, White Balance, Exposure, and Contrast.
❏ Retouch items that you can set for JPEG and RAW data differ. Also, setting items for Color and
Monochrome data differ.
3. Once you have set each retouch item, select OK on the screen, then press the OK key to return to
the previous screen.
4. Select Preview using the Up or Down key, then press the OK key.
5. Your photo with retouches applied is displayed on the Retouch Preview or RAW Processing
Preview screen.
If you want to save the retouched photo, select OK or Start Processing, then press the OK
key.
If you want to make additional changes, select Additional Adjustments or Custom Settings,
then repeat steps 2 to 4.
6. When a message screen appears, check the contents, and then use the 4-way ring and OK key
to proceed.
Note:
❏ The edited image is saved with the file name "Original file name_Exx" in the following folder.
My Photos > "PRINT" folder > "Date.xxx" folder
❏ The RAW image is processed and saved in JPEG format.
Creating Custom Print
70
R41A0K180
User’s Guide
❏ In some cases, you may not be able to display or process RAW data edited by other software
applications.
Cropping a photo
You can make cropping settings for your images. You can crop using fixed ratios or custom settings.
1. On the Cropping setting screen, select the cropping method using the Up or Down key, then
press the OK key.
2. When you select Fixed Aspect, select the aspect ratio using the Up or Down key.
3. Set the range to crop the image. The cropping area is indicated by a red line.Use the following
procedure to move the red line.
For Fixed Aspect: Reduce or enlarge the frame using the -/+ keys, and move the frame using the
4-way ring. Press the Display key to rotate the frame.
For Free Aspect: Move the horizontal line using the Up or Down key and move the vertical line
key.
using the Left or Right key, and change the fixed point using the
Note:
❏ You can fine tune the position with the wheel key. You can switch between Up/Down and Left/
Right with the key that was operated previously.
❏ You can perform the following by pressing the Menu key on this screen and selecting the
menu.
Display a grid, change the aspect ratio, adjust the horizontal angle, and reset settings
4. When you have finished making the cropping settings, press the OK key.
Creating Custom Print
71
R41A0K180
User’s Guide
5. Your photo with cropping applied is displayed on the Cropping Preview screen.
If you want to save the cropped photo, select OK, then press the OK key.
If you want to make additional changes, select Additional Adjustments, then repeat steps 3 to
4.
When saving the image, the Select Print Layout Size screen is displayed.
Note:
The edited image is saved with the file name "Original file name_Exx" in the following folder.
My Photos > "PRINT" folder > "Date.xxx" folder.
Setting the layout
In Print Layout you can set the paper size, background color, water mark, and so on.
1. On the Select Print Layout Size screen, select the paper size using the Up or Down key, then press
the OK key.
2. The image is laid out on the paper. Reduce or enlarge the image using the -/+ keys, and move the
image using the 4-way ring. Press the Display key to rotate the image. If the width of the rotated
image is greater than the length of the paper, the image is reduced to fit the length of the paper.
Note:
You can fine tune the position with the wheel key. You can switch between Up/Down and Left/Right
with the key that was operated previously.
Creating Custom Print
72
R41A0K180
User’s Guide
3. Press the Menu key to make the background color, frame, and water mark settings.
Menu
Details
Background Color
Select the background color.
Frame Color
Select the frame color.
Frame Width
Select the frame width.
Select Watermark
Select the Watermark.
Edit Watermark
You can reduce, enlarge, move, and rotate the water mark.
Reduce/Enlarge: - /+ keys
Move: 4-way ring
Rotate: Display key
Reset Layout
Settings
Reset all layout settings to their defaults.
4. When you have finished making the settings, press the OK key.
5. Your photo with the layout applied is displayed on the Print Layout Preview screen.
If you want to save the laid out photo, select OK, then press the OK key.
If you want to make additional changes, select Additional Adjustments, then repeat steps 2 to
3.
Note:
The edited image is saved with the file name "Original file name_Exx" in the following folder.
My Photos > "PRINT" folder > "Date.xxx" folder
Creating Custom Print
73
R41A0K180
User’s Guide
6. When saving the image, a confirmation screen appears asking whether or not you want to save
it as a template. Select Yes and press the OK key to name the file and save it as a template.
Note:
The on-screen keyboard appears and you can enter the template name. For details on the entry
method, see steps 4 and 5 in "Changing a file's or folder's name" on page 56.
Printing photos
1. Connect the USB cable and the AC adapter to the viewer.
*USB (Mini-B)
Creating Custom Print
74
R41A0K180
User’s Guide
2. Connect the other end of the USB cable to the connector on the printer.
*USB (Standard-A)
Note:
❏ See the printer’s manual for the location of the cable connector on the printer.
❏ Disconnect the USB cable from the viewer when not operating with a computer or printer.
❏ When the viewer is connected to a printer, do not touch the Host-standard A connector interface.
The viewer’s operation may become unstable.
❏ If a printer cannot be detected, the print job is saved.
3. On the confirmation screen, select Yes, then press the OK key.
4. The printer is automatically detected, and the Print Settings screen appears. Make the necessary
settings.
Setting
Detail
Number of Prints
Sets the number of prints.
Paper Size*
Sets the size of paper to use.
Creating Custom Print
75
R41A0K180
Setting
Detail
Paper Kind*
Sets the kind of paper to use.
Print Date**
Sets whether or not to print the date when the photo was taken.
Print Mode
Sets the print mode.
Color enhance***
When printing, the image data is automatically corrected and then printed.
User’s Guide
*Depending on the printer, you cannot select the paper as the setting is set to Auto.
**If the photo does not include date information, the date of the file is printed.
***Depending on the image and the printer, this function may not be available.
5. Press the OK key to start printing.
Making Copies of Custom Print
1. Select Make Copies of Custom Print from the Print Wizard menu. For details, see "Using the
Print Wizard Menu" on page 67.
2. Select the project you want to print using the 4-way ring.
Note:
With this function you can select to print only projects you created using Print Wizard.
3. Press the OK key to start printing. For details on print settings, see "Printing photos" on page
74.
Printing Original Photo
1. Select Print Original Photo from the Print Wizard menu. For details, see "Using the Print Wizard
Menu" on page 67.
2. Open the subfolder using the OK key and the 4-way ring.
Creating Custom Print
76
R41A0K180
User’s Guide
3. Select the file you want to print using the 4-way ring, and select the number of copies using the
-/+ key, then press the OK key.
Note:
By pressing the Menu key, you can select all JPEG, RAW.
4. Select the print layout.
5. Press the OK key to start printing. For details on print settings, see "Printing photos" on page
74.
Printing Contact Sheet
1. Select Print Contact Sheet from the Print Wizard menu. For details, see "Using the Print Wizard
Menu" on page 67.
2. Use the 4-way ring to select the style of contact sheet, then press the OK key.
3. Open the subfolder using the OK key and the 4-way ring.
4. Use the 4-way ring and the
key to enter the check marks in the check boxes of files to print.
Note:
By pressing the Menu key, you can select all JPEG, RAW.
5. Press the OK key to start printing. For details on print settings, see "Printing photos" on page
74.
Creating Custom Print
77
R41A0K180
User’s Guide
Chapter 7
Playing Music
You can listen to music on the viewer.
Transferring Audio Data from the Computer
Using the Epson Link2 software is recommended to transfer audio data from the computer to the
viewer.
1. After installing the Epson Link2 software, connect the viewer to the computer. For details, see
"Connecting the computer" on page 41.
2. Transfer files to the viewer.
Note:
❏ For details about the software, see the online Epson Link2 User’s Guide.
❏ Only audio files transferred from a computer can be displayed in My Music. Within the viewer, you
cannot copy or move audio files from/to My Music. If you want to play an audio file copied from
memory cards, select it in Backup Files, then press the OK key. The file will be played according to
the play mode setting.
Audio file formats supported by the viewer
File Format
Audio Codec
Details
M4A***
AAC (MPEG4)
Maximum bit rate: 320 kbps (48 kHz, 16 bit
Stereo)
MP3*
MP3 (MPEG1/2/2.5 - Layer 3)
Maximum bit rate: 320 kbps (48 kHz, 16 bit
Stereo)
*Without copyright protection.
**Non-Lossless-compliant format.
Note:
❏ The maximum supportable audio file size is 200 MB (up to 10,000 tracks).
❏ Some files may not be played back even if the files are supported by the viewer.
Playing Music
78
R41A0K180
User’s Guide
Starting Playback
When playing back music, you can select the category or start resume play from the beginning of the
previously played track. This function is useful to narrow down your music search.
Selecting the category
1. Select My Music in the Home screen using the Up or Down key, then press the OK or Right key.
2. Select Music List using the Up or Down key, then press the OK or Right key.
3. Select a category to start playback using the Up or Down key, then press the OK or Right key.
You can narrow down your search by selecting the items in the following order using the 4-way
ring, if desired. Select All at the top of the list to include all items in the list.
Artist - Artist name - Album name - Track name
Album - Album name - Track name
Genre - Genre name - Artist name - Album name - Track name
All - Track name
Playlist* - Playlist name - Track name
Update Music List**
*For details, see "Creating a Playlist on the Viewer" on page 82.
**Select Update Music List to update audio data after transferring them from your computer.
4. Select the desired track using the 4-way ring, then press the OK key to start playback.
Playing Music
79
R41A0K180
User’s Guide
Resume play
1. Select My Music in the Home screen using the Up or Down key, then press the OK key.
2. Select Resume using the Up or Down key, then press the OK key.
You can start resume play from the beginning of the previously played track.
Basic operations while playing music
Key
Operation
OK
Play/Pause
Back
Played From from My Photos/My Videos/Backup Files: Stops playback and returns to the
previous screen.
Played From from My Music: Returns to the music browse screen without stopping the music
playback.
- /+
Adjusts the volume.
Left/Right
Skips back/forward.*
Display
Displays Codec, Bit Rate, and Sampling Rate.**
*Pressing and holding the Left/Right key rewinds/fast-forwards the music.
**The information contained in the ID3 tag (the name of file, track, artist, and so on) is displayed. The ID3 tag versions up
to 2.4 are compatible, and up to 127 characters are displayable.
Repeat and Shuffle Play
Press the Menu key to display the pop up menu in My Music, select Play Mode and set the following
items using the 4-way ring and the OK key.
Playing Music
80
R41A0K180
User’s Guide
Always select either Shuffle or Normal Play Order to set the playback order, and select the desired
repeat play mode.
Repeat setting
Select
To play
No Repeat
current category once
Repeat One Song
current track repeatedly
Repeat All
current category repeatedly
Playback order setting
Select
To play
Shuffle
current category in random order
Normal Play Order
current category in normal order
Using the Features for Music
Audio equalizer setting
You can select the desired equalizer settings.
1. Press the Menu key to display the pop up menu in My Music.
2. Select Audio Equalizer Setting, then the desired setting, using the Up or Down key and the OK
key.
Available equalizer settings are as follows: Normal, Jazz, Classical, Rock, Pop, Live, Full
Bass, Custom.
3. If you select Custom, see "Customizing equalizer setting" on page 82. Otherwise, press the OK
key to complete.
Playing Music
81
R41A0K180
User’s Guide
Customizing equalizer setting
Selecting Custom in Audio Equalizer Setting allows you to create your own equalizer settings.
Adjust the level of each frequency using the 4-way ring, then press the OK key to complete.
Deleting album tracks from the viewer
1. Press the Menu key to display the pop up menu in a track name list in a category.
2. Select Delete, audio files to delete using the 4-way ring and the
key, then press the OK key.
3. After the confirmation dialog box appears, select Yes using the Up or Down key, then press the
OK key to complete.
Creating a Playlist on the Viewer
Not only can you create a Playlist on the Epson Link2 software, you can also create them on the
viewer.
1. Press the Menu key to display the pop up menu in a track name list in a category.
2. Select Add to Playlist using the Up or Down key, then press the OK key.
3. Select Create New Playlist using the Up or Down key, then press the OK key.
Playing Music
82
R41A0K180
User’s Guide
4. The on-screen keyboard appears. Select a letter using the 4-way ring, then press the OK key to
input the selected letter.
Note:
To delete the last letter input, press the Back key. To cancel the operation, select Cancel using the
4-way ring, then press the OK key.
5. After inputting the name, select Done using the 4-way ring, then press the OK key.
6. Select tracks to include in the Playlist using the 4-way ring and the
key.
Note:
If you want to select all the tracks to include in the Playlist, press the Menu key and select Select
All.
7. Press the OK key to complete.
To add tracks to a created Playlist
Select the desired Playlist instead of Create New Playlist in step 3.
To delete a Playlist/remove tracks from a Playlist
To delete a Playlist, select the desired Playlist, press the Menu key, then select Delete this Playlist.
You can remove tracks from a Playlist in the same way as you delete them from the viewer. If you
select the audio files from a Playlist, they will be removed from the Playlist but not deleted from the
viewer. For details, see "Deleting album tracks from the viewer" on page 82.
Playing Music
83
R41A0K180
User’s Guide
To change track order of a created Playlist
1. Open the track list of the Playlist to change the order of.
2. Select a track of which to change the order to move.
3. Press the Menu key to display the pop up menu, then select Change Song Order.
4. Move the track using the Up or Down key, then press the OK key to complete.
About the Audio Pop Up Menu
From the pop up menu displayed by pressing the Menu key, you can use the functions in the table
below.
Add to Playlist
Adds audio files to Playlist/Creates new Playlist.
Audio Equalizer Setting
Sets the audio equalizer.
Delete
Deletes audio files.
Play Mode
Changes playback order/Sets repeat play.
Settings
Sets LCD, Key Beep.
Note:
Different pop up menus will appear when you press the Menu key, depending on which screen you are
viewing.
Playing Music
84
R41A0K180
User’s Guide
Chapter 8
Customizing Settings
You can customize various settings for displaying and copying images, or change the sound setting
to make the viewer more useful.
Changing the Viewer Settings
The settings described in the following table can be configured from Settings. To display the menu,
select Settings in the Home screen, then press the OK key. For further setting operations, use the
4-way ring and the OK key.
The following table shows details of each setting.
Device Info.
Firmware
Version
Displays the firmware version.
Hard Drive
Capacity
CF/SD memory cards and the HDD used space is displayed with used disk space
of Backup, My Photos, My Videos, and My Music.
Set Password
Sets the password for private folders. The default password is "0000."
Customizing Settings
85
R41A0K180
Power Save
View Mode
Backup Settings
Movie Setting
User’s Guide
Backlight Timer
Sets the time at which the LCD’s backlight will turn off and the LCD will go blank
if there are no operations. You can select the time from 1, 3, 5, 10, 15 minutes.
Sleep Timer
Sets the time at which the viewer will enter sleep mode if there are no operations.
To deactivate sleep mode, press any key. You can select the time from 1, 3, 5, 10,
15 minutes.
Power Off Timer
Sets the time at which the power will be shut down automatically if there are no
operations, to save the battery. You can select the time from 1, 3, 5, 10, 15
minutes.
Screen Saver
Sets the time at which the screen saver will appear if there are no operations, to
save the battery. You can select the time from 1, 3, 5, 10, 15 minutes.
Video Out**
Select NTSC or PAL according to the TV system of the external display or TV to
be connected to the viewer.
Auto-Rotation
Sets whether or not to rotate the images automatically according to the EXIF
information.
Unsupported
Files
Sets whether unsupported files are displayed or not.
Color Space
Sets the color space, if the color space information of the image is unknown.
Select sRGB or Adobe RGB to display images.
RAW Image
Display Settings
When enlarged RAW images are displayed, you can select from a thumbnail
display and an image processing display only for RAW data from processing
capable cameras.
Backup Method
Set to perform a differential backup for data that was previously backed up from
a memory card/USB device.
Process After
backup
Sets whether or not to delete the data on the memory card or the USB device
after backing up onto the viewer is complete.
You can also select the Verify backed up data option.
Backup
Completion
Sound
Select None (no announcement), or one of the four preset sounds to announce
the completion of data backup.
Screen Size
Sets the screen size of a movie.
Playback Mode
Set to play one video file or to play video files continuously.
Movie Display
Mode
Sets the mode, such as scenery or cinema, for video playback.
Customizing Settings
86
R41A0K180
User’s Guide
Effects*
Sets one of the five slide show effects. The slide show is executed with the
selected effect.
Duration*
Sets the duration to switch the images during a slide show. You can set the
duration from 1 to 30 seconds.
Slide Show
Music*
Sets the slide show music which is played during the slide show. You can select
None, one of three from the default playlist, or one from the user playlist.
Clock*
Sets whether or not to display the clock during the slide show.
Guide Beep
Turns on/off the sound for an error in operation.
Key Beep
Select ON or OFF to turn on or off the operation sound.
Volume
Set the playback volume of audio and video.
Watermark
Settings
-
Register or delete watermarks. For details, see "Registering a watermark" on page
66.
LCD Settings
LCD Brightness
Changes the brightness of the LCD. Adjust the brightness using the Up or Down
key.
LCD Custom
setting
Sets the color for color temperature, gamma, gray, and other items.
Date and Time
Date and Time
Set the date, time and date format.
Language
Language
Choose one of ten languages. If you change the set language, you may not be
able to access existing files or folders.
Slide Show
Sound
*These settings are also effective for Screen Saver.
**After changing the setting, reconnect the VIDEO cable.
Customizing Settings
87
R41A0K180
User’s Guide
Chapter 9
Viewing on a TV
Using A/V Out
The viewer has an A/V Out connector. You can play slide shows and videos on an external monitor
by connecting the viewer to a monitor device, such as a TV, that has a video input connector.
Follow the instructions below to view photos or play videos on TV.
1. Set the Video Out setting on the viewer to the signal format of your TV.
Note:
For details about the Video Out setting, see "Changing the Viewer Settings" on page 85.
2. Connect a commercially available AV cable to the TV. Then connect the other end of the AV
cable to the viewer.
3. Set the TV display to video input from the viewer.
Note:
❏ The LCD turns off when you connect an AV cable to the viewer.
❏ Some monitors cannot display full images and the top and bottom parts may be missing.
❏ For information on available cables, contact our customer support.
Viewing on a TV
88
R41A0K180
User’s Guide
Chapter 10
Maintenance
Cleaning the Viewer
To keep the viewer operating at its best, you should clean it thoroughly several times a year. Before
you perform any maintenance on the viewer, be sure to read the <+ to Important Safety Instructions>,
then follow these guidelines.
❏ Be sure to turn off before cleaning.
❏ Use a clean, dry cloth to keep the viewer free of dust.
❏ Do not use harsh or abrasive cleaners.
❏ If necessary, clean the battery contacts with a dry cloth.
Preparing the Battery
Installing the battery
1. Open the battery cover as shown below.
Maintenance
89
R41A0K180
User’s Guide
2. Insert the battery into the compartment in the direction of the arrow on the battery sticker.
*Insert the battery until it clicks and locks in place.
3. Close the battery cover and slide it to the left until it clicks.
Charging the battery
After installing the battery, connect the AC adapter. The installed battery will be automatically
charged.
1. Make sure that the battery is installed.
c
Caution:
Do not connect the AC adapter when the battery is not installed. Doing so may cause the
viewer to be damaged.
Maintenance
90
R41A0K180
User’s Guide
2. Connect the AC adapter as shown below, then plug the other end into a power outlet.
*Charge lamp
The Charge lamp lights green during charging. When the battery is fully charged, the Charge lamp
turns off. It takes about 3.5 hours to fully charge the battery when the power is off, more time if the
viewer is in use.
Note:
❏ The viewer stops charging if the battery becomes hot when operating it during charging. In that
case, it starts charging again when it cools down.
❏ If the Charge lamp lights orange, see "Troubleshooting" on page 93.
Removing the battery
1. Make sure that the viewer is turned off.
Caution:
Remove the AC adapter if connected.
c❏
❏ Never remove the battery while turned on. Doing so may cause data in the card or HDD
to be lost or damaged.
2. Open the battery cover.
Maintenance
91
R41A0K180
User’s Guide
3. Push the catch down.
The battery is pushed out.
4. Pull out the battery, then close the battery cover.
w
Warning:
Do not carry loose batteries in your pocket.
Maintenance
92
R41A0K180
User’s Guide
Chapter 11
Troubleshooting
Error messages / Icons
When a problem occurs, an error message or icon usually appears in the LCD. Refer to the following
section to solve the problem.
Error message/Icon
Description
Unable to access file.
Wait until the Access lamp turns off, then reinsert the memory card and
try again. Check if there is no data damaged.
An error occurred during verification.
Some files failed to be copied. Check the data.
Cannot access the hard drive. There may be a
problem with the hard drive, or it may not be
formatted as FAT32.
Back up all the data to onto the computer, and test the format by following
the procedure in "Formatting Data in the Viewer" on page 99. If this does
not fix the problem, send the viewer to an authorized Epson service center.
(The data on the viewer will be deleted.) Repairs will be chargeable and
are not covered by Epson’s warranties.
No response from the printer. Please check the
printer.
Make sure of the following.
- Your printer is on.
- The USB cable is connected correctly. (Printer: Standard-A. Viewer:
Mini-B)
- The cable supplied with the viewer is used.
- Your printer is compatible with PictBridge.
Check your printer and printer’s manual.
Wait until the viewer cools down.
The battery power is running out. Charge the battery. For details, see
"Charging the battery" on page 90.
Press the reset button. See "Resetting the Viewer" on page 98 to find
how to use the Reset button.
Troubleshooting
93
R41A0K180
User’s Guide
Power supply problems
The power does not turn on
Cause
What to do
The battery is set incorrectly.
Make sure that the battery is installed correctly. See "Charging the battery"
on page 90.
The battery has run out.
See "Troubleshooting" on page 93 and charge the battery.
The Charge lamp lights orange
Cause
What to do
The battery is not inserted.
Insert the battery into the viewer.
The viewer becomes hot.
Turn off the power, disconnect the AC adapter, stop charging and wait more
than 30 minutes, then connect the AC adapter again to restart charging. The
Charge lamp still lights orange, contact our customer support.
Viewing and playback problems
Cannot access data
Cause
What to do
The name of a file or folder is not supported by
the set language.
Rename the file or folder to access.
Troubleshooting
94
R41A0K180
User’s Guide
The data is not displayed
Cause
What to do
The photo, video, or audio file you selected is
not supported.
See "Photo/Video file formats supported by the viewer" on page 45 or
"Audio file formats supported by the viewer" on page 78 and make sure the
data is supported. Also, check the codec of the data if you are trying to
display a video file. You can convert and transfer video and audio files with
the Epson Link2 software.
The data is broken.
Copy the data again.
The LCD Brightness setting is too dark.
See "Changing the Viewer Settings" on page 85 and make sure the LCD
Brightness setting is set properly.
The video cable is connected to the viewer
Disconnect the video cable to display the LCD.
There is too much data to display on the screen
at one time
Divide the data into multiple folders and switch to computer view. For
details on switching the view mode, see "Switching the view mode" on page
49.
The color space information cannot be recognized
Cause
What to do
The color space information cannot be
recognized with the viewer if you edit the
image with image edit software.
Set the color space from Settings. For details, see "Changing the Viewer
Settings" on page 85.
The movie is not displayed clearly or stops abruptly
Cause
What to do
The bit rate of the data is too high.
Check the bit rate. For details, see "Photo/Video file formats supported by
the viewer" on page 45. You can convert and transfer video files with the
Epson Link2 software.
Troubleshooting
95
R41A0K180
User’s Guide
Sound breaks off when the video or audio is played
Cause
What to do
The bit rate of the file is too high.
Check the bit rate. For details about video files, see "Photo/Video file formats
supported by the viewer" on page 45. For details about audio files, see
"Audio file formats supported by the viewer" on page 78. You can convert
and transfer video and audio files with the Epson Link2 software.
No sound comes out when a video is played
Cause
What to do
The Audio Codec of the data is not supported.
Check the audio codec and the volume. For details about audio codec, see
"Photo/Video file formats supported by the viewer" on page 45. You can
convert and transfer video files with the Epson Link2 software.
Operation problems
Cannot use the keys on the viewer
Cause
What to do
The keys are deactivated because the power
switch is set to Hold.
Check if the power switch is not set to Hold. If so, slide the power switch
back to the middle.
Cannot access the existing folders
Cause
What to do
The set language does not support the folders’
language.
Renaming the folder correctly enables you to access it. Alternatively, change
the language setting. For details, see "Changing the Viewer Settings" on
page 85.
Troubleshooting
96
R41A0K180
User’s Guide
Cannot copy
Cause
What to do
The space available on the HDD is not sufficient
to copy all of the data in the memory card, or
the file may be damaged.
Delete unnecessary data in the HDD, reduce the size of data to copy from
the memory card, or try to copy a different file.
The set language does not support the files’
language.
Renaming the file correctly enables you to access it. Alternatively, change
the language setting. For details, see "Changing the Viewer Settings" on
page 85.
Copy cannot be started as the USB device
connection cannot be recognized because the
USB device has lost power.
Connect the AC adapter to the USB device. Alternatively, make sure that the
viewer is connected the AC adapter correctly.
Cannot delete
Cause
What to do
The file is locked. Alternatively, the file existing
in the folder or subfolder is locked.
See "Protecting files or folders" on page 59 and unlock the file to delete it.
Cannot increase the hard drive capacity of the viewer even if deleting files
Cause
What to do
Check if data was deleted without using the
Epson Link2 software on the computer. Even if
deleting data in the viewer on the computer, if
the data has not been deleted completely,
hard drive capacity of the viewer cannot be
increased.
After connecting the viewer to the computer, delete all the data in "Recycle
Bin" (Windows) or "Trash" (Macintosh).
Cannot set/unset as a private folder
Cause
What to do
The password is wrong.
If you forget the password, enter "5555", "7777", then "3333" to reset the
default password ("0000").
Troubleshooting
97
R41A0K180
User’s Guide
Printing problems
Cannot print
Cause
What to do
The printer is not supported.
See "Preparing to Print" on page 66 and make sure that your printer supports
PictBridge.
The printer’s power is off.
Turn on the printer.
The USB cable is not connected correctly.
See "Printing photos" on page 74 and reconnect the viewer to the printer.
The file is damaged.
Try to print a different file.
The file is a RAW file that cannot be processed.
Check the EPSON Web site for supported RAW files.
The image color is different
Cause
What to do
The color tone of the LCD display differs from
that of the printouts.
Adjust the brightness of the screen or the color temperature of the LCD
display. For details, see "Changing the Viewer Settings" on page 85.
Resetting the Viewer
When an error occurs and operations cannot be done, you can reset the viewer by pressing the Reset
button with a thin object as shown below.
Note:
Avoid using the fragile objects such as pencil.
Troubleshooting
98
R41A0K180
User’s Guide
Formatting Data in the Viewer
You can delete all of the data from the viewer. Settings in the viewer itself are not deleted.
Note:
Before formatting, be sure to backup important data to an external hard disk or memory device.
1. Connect the AC adapter to the viewer.
2. Turn on the power while holding down the OK and Menu keys simultaneously.
3. Select Yes using the Up or Down key, then press the OK key.
4. Input the four digit password using the Up, Down, and OK keys, then press the OK key to finish.
5. When the format confirmation message appears, select Yes using the Up or Down key, then
press the OK key.
6. When a message appears indicating that formatting is complete, turn off the power.
Troubleshooting
99
R41A0K180
User’s Guide
Appendix A
Customer Support
Contacting Customer Support
Before Contacting Epson
If your Epson product is not operating properly and you cannot solve the problem using the
troubleshooting information in your product documentation, contact customer support services for
assistance. If customer support for your area is not listed below, contact the dealer where you
purchased your product.
Customer support will be able to help you much more quickly if you give them the following
information:
❏ Product serial number
(The serial number label is usually on the back of the product.)
❏ Product model
❏ Product software version
(Click About, Version Info, or similar button in the product software.)
❏ Brand and model of your computer
❏ Your computer operating system name and version
❏ Names and versions of the software applications you normally use with your product
Help for Users in North America
Epson provides the technical support services listed below.
Internet Support
Visit Epson’s support website at http://epson.com/support and select your product for solutions to
common problems. You can download drivers and documentation, get FAQs and troubleshooting
advice, or e-mail Epson with your questions.
Customer Support
100
R41A0K180
User’s Guide
Speak to a Support Representative
Dial: (562)276-1300 (U.S.), or (905)709-9475 (Canada), 6am to 6pm, Pacific Time, Monday through
Friday. Days and hours of support are subject to change without notice. Toll or long distance charges
may apply.
Before you call Epson for support, please have the following information ready:
❏ Product name
❏ Product serial number
❏ Proof of purchase (such as a store receipt) and date of purchase
❏ Computer configuration
❏ Description of the problem
Note:
For help using any other software on your system, see the documentation for that software for technical
support information.
Purchase Supplies and Accessories
You can purchase genuine Epson ink cartridges, ribbon cartridges, paper, and accessories from an
Epson authorized reseller. To find the nearest reseller, call 800-GO-EPSON (800-463-7766). Or you
can purchase online at http://www.epsonstore.com (U.S. sales) or http://www.epson.ca (Canadian
sales).
Help for Users in Europe
Check your Pan-European Warranty Document for information on how to contact EPSON
Customer support.
Help for Users in Australia
Epson Australia wishes to provide you with a high level of customer service. In addition to your
product documentation, we provide the following sources for obtaining information:
Customer Support
101
R41A0K180
User’s Guide
Your Dealer
Don’t forget that your dealer can often help identify and resolve problems. The dealer should always
be the first call for advise on problems; they can often solve problems quickly and easily as well as
give advise on the next step to take.
Internet URL http://www.epson.com.au
Access the Epson Australia World Wide Web pages. Worth taking your modem here for the
occasional surf! The site provides a download area for drivers, Epson contact points, new product
information and technical support (e-mail).
Epson Helpdesk
Epson Helpdesk is provided as a final backup to make sure our clients have access to advice. Operators
on the Helpdesk can aid you in installing, configuring and operating your Epson product. Our
Pre-sales Helpdesk staff can provide literature on new Epson products and advise where the nearest
dealer or service agent is located. Many types of queries are answered here.
The Helpdesk numbers are:
Phone:
1300 361 054
Fax:
(02) 8899 3789
We encourage you to have all the relevant information on hand when you ring. The more information
you prepare, the faster we can help solve the problem. This information includes your Epson product
documentation, type of computer, operating system, application programs, and any information you
feel is required.
Help for Users in Singapore
Sources of information, support, and services available from Epson Singapore are:
World Wide Web (http://www.epson.com.sg)
Information on product specifications, drivers for download, Frequently Asked Questions (FAQ),
Sales Enquiries, and Technical Support via e-mail are available.
Customer Support
102
R41A0K180
User’s Guide
Epson HelpDesk (Phone: (65) 6586 3111)
Our HelpDesk team can help you with the following over the phone:
❏ Sales enquiries and product information
❏ Product usage questions or problems
❏ Enquiries on repair service and warranty
Help for Users in Thailand
Contacts for information, support, and services are:
World Wide Web (http://www.epson.co.th)
Information on product specifications, drivers for download, Frequently Asked Questions (FAQ),
and e-mail are available.
Epson Hotline (Phone: (66)2685-9899)
Our Hotline team can help you with the following over the phone:
❏ Sales enquiries and product information
❏ Product usage questions or problems
❏ Enquiries on repair service and warranty
Help for Users in Vietnam
Contacts for information, support, and services are:
Epson Hotline (Phone): 84-8-823-9239
Service Center:
80 Truong Dinh Street, District 1, Hochiminh City Vietnam
Help for Users in Indonesia
Contacts for information, support, and services are:
Customer Support
103
R41A0K180
User’s Guide
World Wide Web (http://www.epson.co.id)
❏ Information on product specifications, drivers for download
❏ Frequently Asked Questions (FAQ), Sales Enquiries, questions through e-mail
Epson Hotline
❏ Sales enquiries and product information
❏ Technical support
Phone
(62) 21-572 4350
Fax
(62) 21-572 4357
Epson Service Center
Jakarta
Mangga Dua Mall 3rd floor No 3A/B
Jl. Arteri Mangga Dua,
Jakarta
Phone/Fax: (62) 21-62301104
Bandung
Lippo Center 8th floor
Jl. Gatot Subroto No.2
Bandung
Phone/Fax: (62) 22-7303766
Surabaya
Hitech Mall lt IIB No. 12
Jl. Kusuma Bangsa 116 – 118
Surabaya
Phone: (62) 31-5355035
Fax: (62)31-5477837
Yogyakarta
Hotel Natour Garuda
Jl. Malioboro No. 60
Yogyakarta
Phone: (62) 274-565478
Medan
Wisma HSBC 4th floor
Jl. Diponegoro No. 11
Medan
Phone/Fax: (62) 61-4516173
Customer Support
104
R41A0K180
Makassar
User’s Guide
MTC Karebosi Lt. Ill Kav. P7-8
JI. Ahmad Yani No.49
Makassar
Phone: (62)411-350147/411-350148
Help for Users in Hong Kong
To obtain technical support as well as other after-sales services, users are welcome to contact Epson
Hong Kong Limited.
Internet Home Page
Epson Hong Kong has established a local home page in both Chinese and English on the Internet to
provide users with the following information:
❏ Product information
❏ Answers to Frequently Asked Questions (FAQs)
❏ Latest versions of Epson product drivers
Users can access our World Wide Web home page at:
http://www.epson.com.hk
Technical Support Hotline
You can also contact our technical staff at the following telephone and fax numbers:
Phone:
(852) 2827-8911
Fax:
(852) 2827-4383
Help for Users in Malaysia
Contacts for information, support, and services are:
World Wide Web (http://www.epson.com.my)
❏ Information on product specifications, drivers for download
Customer Support
105
R41A0K180
User’s Guide
❏ Frequently Asked Questions (FAQ), Sales Enquiries, questions through e-mail
Epson Trading (M) Sdn. Bhd.
Head Office.
Phone:
603-56288288
Fax:
603-56288388/399
Epson Helpdesk
❏ Sales enquiries and product information (Infoline)
Phone:
603-56288222
❏ Enquiries on repair services & warranty, product usage and technical support (Techline)
Phone:
603-56288333
Help for Users in India
Contacts for information, support, and services are:
World Wide Web (http://www.epson.co.in)
Information on product specifications, drivers for download, and products enquiry are available.
Epson India Head Office - Bangalore
Phone:
080-30515000
Fax:
30515005
Epson India Regional Offices:
Location
Telephone number
Fax number
Mumbai
022-28261515 /16/17
022-28257287
Customer Support
106
R41A0K180
Location
Telephone number
Fax number
Delhi
011-30615000
011-30615005
Chennai
044-30277500
044-30277575
Kolkata
033-22831589 / 90
033-22831591
Hyderabad
040-66331738/ 39
040-66328633
Cochin
0484-2357950
0484-2357950
Coimbatore
0422-2380002
NA
Pune
020-30286000 /30286001/30286002
020-30286000
Ahmedabad
079-26407176 / 77
079-26407347
User’s Guide
Helpline
For Service, Product info or to order a cartridge - 18004250011 (9AM - 9PM) - This is a Toll-free
number.
For Service (CDMA & Mobile Users) - 3900 1600 (9AM - 6PM) Prefix local STD code
Help for Users in the Philippines
To obtain technical support as well as other after sales services, users are welcome to contact the
Epson Philippines Corporation at the telephone and fax numbers and e-mail address below:
Phone:
(63) 2-813-6567
Fax:
(63) 2-813-6545
E-mail:
[email protected]
World Wide Web (http://www.epson.com.ph)
Information on product specifications, drivers for download, Frequently Asked Questions (FAQ),
and E-mail Enquiries are available.
Epson Helpdesk (Phone: (63) 2-813-6567)
Our Hotline team can help you with the following over the phone:
Customer Support
107
R41A0K180
User’s Guide
❏ Sales enquiries and product information
❏ Product usage questions or problems
❏ Enquiries on repair service and warranty
Customer Support
108
R41A0K180
User’s Guide
Appendix B
Technical Specifications
Standards and Approvals
P-7000 (Model: G971B)
U.S. model:
EMC
FCC Part 15 Subpart B Class B
CAN/CSA-CEI/IEC CISPR22 Class B
Safety
UL 60950-1
CSA C22.2 No.60950-1
European model:
EMC Directive
2004/108/EC
EN 55022 Class B
EN 55024
EN 61000-3-2 (Use with AC adapter)
EN 61000-3-3 (Use with AC adapter)
Australian model:
EMC
AS/NZS CISPR22 Class B
AC adapter (Model: A351H)
U.S. model:
Safety
UL60950-1
CSA C22.2 No.60950-1
EMC
CAN/CSA-CEI/IEC CISPR22 Class B
Technical Specifications
109
R41A0K180
User’s Guide
European model:
Low Voltage Directive
2006/95/EC
EMC Directive
2004/108/EC
EN 60950-1
EN 55022 Class B
EN 55024
EN 61000-3-2
EN 61000-3-3
Australian model:
Safety
AS/NZS 60950.1
EMC
AS/NZS CISPR22 Class B
Battery (Model: D111A)
U.S. model:
Safety
UL2054
European model:
EMC Directive
2004/108/EC
EN 55022 Class B
EN 55024
Australian model:
EMC
AS/NZS CISPR22 Class B
Specifications
General
Display
LCD (Liquid Crystal Display)
4.0 inch
640 R-YG-B-EG 480 dots (Dot pitch 0.032 mm 4 0.128 mm), (R:
Red, YG: Yellow Green, B: Blue, EG: Emerald Green),
Approx. 16,770,000 colors
Technical Specifications
110
R41A0K180
HDD
2.5" HDD (148 GB)
FAT12/16/32 VFAT supported
Dimensions and
weight
Height: 88.7 mm (3.5 inches)*
Width: 150 mm (5.9 inches)*
Depth: 33.1 mm (1.3 inches)*
Weight: Approx. 433 g (0.95lb) (including the battery)
Temperature
Operating: 5 to 35°C**Non-operating: -20 to 60°C
Humidity (without
condensation)
Operating: 30 to 80%**
Non-operating: 10 to 80%
Altitude
Operating: 3000 m or less
Non-operating: 12000 m or less
Memory card***
CompactFlash memory card (Type2 and 3.3 V, including MicroDrive), SD
memory card, SD High-Capacity card, MultiMedia Card, MultiMedia Card
Plus
Power sources
Lithium-ion battery (Model: D111A)
AC adapter (Model: A351H)
Battery life (when fully
charged) ****
Approx. 3.5 hours when playing a slide show (in the default settings)
Approx. 3 hours when playing video (MPEG4, 2 Mbps, using the
headphones)
Approx. 6 hours when playing audio (MP3, 128 kbps, using the
headphones)
User’s Guide
*Dimensions do not include projections.
**Charging is recognized as operating.
*** Commercially available adapters will be required to use other memory cards (miniSD, microSD, RS-MMC, Memory Stick
Duo, Memory Stick PRO Duo, xD-Picture Card, and so on). Contact our customer support for details.
****Times may vary depending on the memory card being used, the number of files, ambient temperature, and other factors.
Electrical
Input voltage
5 V DC (AC adapter)
3.7 V DC (Lithium-Ion battery)
Rated current
Maximum 2.3 A
Power consumption
6.6 W (Using with the battery)
8.2 W (Using with the AC adapter)
Technical Specifications
111
R41A0K180
User’s Guide
Interface
USB connector
Two USB 2.0 (Mass Storage Class) interface
Host: 2.0 Full Speed and High Speed mode (Standard-A)
Slave: 2.0 Full Speed and High Speed mode (Mini-B)
A/V Out connector
Quadruple mini pin jack (Ø 3.5 mm)
Headphones
connector
3-pole mini pin jack (Ø 3.5 mm)
CF Card slot
One slot (Type2, 3.3 V) for CompactFlash memory card and MicroDrive
SD Card slot
One slot for SD memory card, SD High-Capacity card, MultiMedia Card,
and MultiMedia Card Plus
Battery
Type
Lithium-Ion battery
Model
D111A
Size (H W L)
22.45 mm 20.4 mm71 mm
Ratings
3.7 V, 2600 mAh (Typ.)
Temperature
Storing: -20 to 40°C*
*Keep the battery in a cool place when storing it for a long period.
AC adapter
Model
A351H
Input
AC 100 - 240 V, 50 - 60 Hz, 0.3 A - 0.1 A
Output
DC 5.0 V, 2.3 A
Power consumption
Maximum 18 W
Technical Specifications
112
R41A0K180
User’s Guide
Storage Viewer Travel Pack
Battery charger
Model
EU-217
Dimensions
Approx. 105 × 75 × 26 mm
Weight
Approx. 110 g (Excluding batteries and car adapter)
Input voltage
For indoor use 5 V DC (AC adapter)
For in vehicle use 5.15 V DC (Car adapter)
Output voltage
4.2 V DC
Charging time
Approx. 3.5 hours (for one battery)
Approx. 4.0 hours (for two batteries)
Temperatures
Operating: 5 to 40ºC (41 to 104°F)
Storage: -20 to 60ºC (-4 to 140°F)
Car Adapter
Model
CLM10D-050
Cable length
1500 mm
Input voltage
12 V DC minus ground vehicle only
Output voltage
5.15 V DC
Temperatures
Operating: 5 to 40ºC (41 to 104°F)
Storage: -20 to 60ºC (-4 to 140°F)
Carrying case
Dimensions
115 × 195 × 75 mm
Viewing stand
Dimensions
77 × 82.6 × 10.7 mm (when closed)
77 × 83.8 × 77.8 mm (when opened)
Technical Specifications
113
R41A0K180
User’s Guide
About Optional Accessories
The following options are available for the viewer.
optional product
product code
Lithium-Ion battery
(Model: D111A)
B32B81826✽
*The asterisk (✽
*
) is a substitute for the last digit, which varies by country.
Technical Specifications
114
xreflabel
User’s Guide
Index
A
I
Audio equalizer setting.......................................................81
Important notice..................................................................20
Information..........................................................................49
photo..................................................................................50
video...................................................................................51
B
Backing up data
from the viewer onto the computer........................38, 41
Battery
charging.............................................................................90
installing............................................................................89
removing...........................................................................91
K
Key
while playing music.........................................................80
while playing videos........................................................52
C
M
Changing a file’s name or folder’s name..........................56
Cleaning the viewer.............................................................89
Connecting to the computer..............................................41
Contacting Epson..............................................................100
Copying data to Photos or Videos
from USB devices.......................................................36, 39
Main features.......................................................................20
Memory card
inserting.............................................................................32
removing...........................................................................32
Music playback....................................................................79
O
D
Deleting
audio files..........................................................................82
files or folders.............................................................57, 58
Disconnecting from the computer....................................43
F
File format
audio..................................................................................78
Folder thumbnail.................................................................60
H
Help
Epson...............................................................................100
Holding the key operations................................................26
Home screen........................................................................26
Optional accessories..........................................................114
P
Parts.......................................................................................21
back....................................................................................22
front...................................................................................21
LCD and control panel....................................................23
Playlist
adding tracks....................................................................83
changing track order.......................................................84
creating..............................................................................82
deleting/removing tracks................................................83
Play mode.............................................................................80
Pop up menu
photo files..........................................................................64
video files..........................................................................64
Printer...................................................................................66
available types of paper...................................................66
Index
115
xreflabel
User’s Guide
Private folders......................................................................55
Problems, solving
contacting Epson...........................................................100
Protecting files or folders...................................................59
printing problems............................................................98
viewing and playback problems.....................................94
Turning the power off.........................................................25
Turning the power on.........................................................24
R
V
Rate........................................................................................61
Resetting the viewer............................................................98
Video output........................................................................88
S
Safety instructions...............................................................10
Safety requirements.............................................................16
Screen
icons...................................................................................46
switching...........................................................................48
Screen saver..........................................................................62
Service.................................................................................100
Setting
backlight timer.................................................................86
date and time....................................................................87
language.............................................................................87
power off timer.................................................................86
screen saver.......................................................................86
sleep timer.........................................................................86
slide show clock................................................................87
slide show duration..........................................................87
slide show effects..............................................................87
slide show music..............................................................87
volume...............................................................................87
Slide show.............................................................................54
Software
installing............................................................................28
launching...........................................................................42
Specifications.....................................................................110
Standards and approvals..................................................109
T
Transferring audio data......................................................78
Troubleshooting
error messages/icons.......................................................93
operation problems..........................................................96
power supply problems...................................................94
Index
116