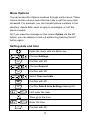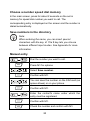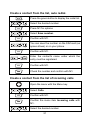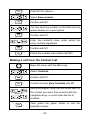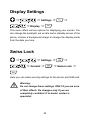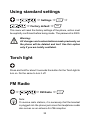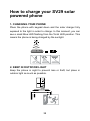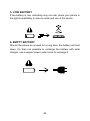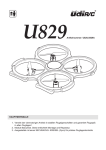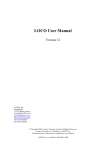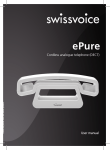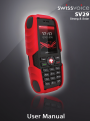
1
SWISSVOICE
SV29
Rugged mobile phone with Solar panel
© 01/2011
Table of Contents
Your new mobile phone ...........................................................5
Contents in the giftbox .........................................................5
Important Notes ........................................................................6
Safety Information................................................................6
Treatment of cells and batteries ...........................................8
Symbols used ......................................................................8
Product Description .................................................................9
Front ....................................................................................9
Rear Panel.........................................................................10
The screen.........................................................................10
The other symbols on the screen.......................................11
Menu Description...............................................................11
Specifications .........................................................................12
Preparation .............................................................................13
Insert the SIM card ............................................................13
Insert the battery................................................................14
Charging ............................................................................15
Start and first steps ................................................................15
Turn on ..............................................................................15
Buttons and controls ..........................................................16
Menu Options ....................................................................17
Setting date and time .........................................................17
Call...........................................................................................18
Making a phone call...........................................................18
Answering a call.................................................................18
Rejecting a call ..................................................................18
Frequently used functions .....................................................19
2
Memory Speed Dial ...........................................................19
Choose a number speed dial memory ...............................20
Save numbers in the directory ...........................................20
Manual entry......................................................................20
Create a contact from the list, auto redial...........................21
Create a contact from the list of incoming calls ..................21
Making a call from the Contact List ....................................22
Lock / unlock the keypad ...................................................23
Turn off the ringer ..............................................................23
Turn on the ringer ..............................................................23
Activate / deactivate the loudspeaker during a conversation
..........................................................................................23
Messages (SMS) .....................................................................23
The Messages Option........................................................24
Read SMS (Inbox) .............................................................25
Write a text message .........................................................25
Alarm .......................................................................................26
Alarm setting......................................................................26
Suspend the alarm for 5 minutes .......................................27
Disable the alarm...............................................................27
Call Log ...................................................................................28
Tools........................................................................................28
Calendar ............................................................................28
Calculator ..........................................................................28
Profiles ....................................................................................29
Profiles ..............................................................................29
Activate Profile...................................................................29
Customize Profile...............................................................29
Display Settings......................................................................30
Swiss Lock..............................................................................30
3
Language ................................................................................31
Keypad Locking......................................................................31
Using standard settings .........................................................32
Torch light ...............................................................................32
FM Radio .................................................................................32
Games .....................................................................................33
Entering text ...........................................................................33
The keys on the keypad.....................................................33
Choice of entry mode.........................................................34
Compliance Statement ...........................................................35
Swissvoice declaration.......................................................35
Warranty disclaimer ...........................................................36
Approval conformity ...........................................................36
How to charge your SV29 solar powered phone ..................38
4
Your new mobile phone
Thank you for buying Swissvoice’s mobile phone product.
Being established in Switzerland with roots in the country since
1893, Swissvoice is the market leader in the development,
marketing and sale of innovative telecommunication solutions and
products. The company has in house R&D and product design
teams for innovative product development. We are joining our
experience together with the latest technologies and design trend
to be at the leading edge of the market.
For more than 100 years, making innovative products with high
quality and excellent design is the commitment to our customers.
Our ultimate goal is enabling users to enjoy the state-of-the-art
Swissvoice-designed product anytime, anywhere.
We are confident in our products and would like to hear from you if
you will have any comment or suggestion to Swissvoice for better
product experience!
Contents in the giftbox
•
Mobile handset
•
Battery
•
AC adapter
•
Headphones
•
2 screws (for battery cover closing)
•
User manual
5
Important Notes
Safety Information
•
•
•
•
•
•
•
•
•
•
•
•
The information in this manual may be amended or
supplemented without prior notice.
Please keep all the accessories in an appropriate place.
The illustrations in this manual are examples only and are not
100% the same as the actual product.
Handle the phone gently. Do not drop. Avoid bumps and
knocks and do not use abrasive cleaners, chemicals or liquids
on the device. Clean the phone only with a dry cloth.
Regarding the warranty, please contact your local dealer.
Use product only as illustrated in the instructions. Improper
use may damage the product or the environment.
The alteration of the product affects their safety.
Never attempt to repair the product by yourself!
Never immerse the product in liquids.
The manufacturer assumes no liability for damages due to
misuse.
Avoid using the device under the following conditions: extreme
temperatures over 60°C or below 0°C, atmospheric
pressureor high electrical radiation. Avoid contact with
cleaning agents or chemicals, as well as with liquids other than
water.
This product is designed to be powered by the battery for the
solar module and power supply unit. Any use other than for
which the product is designed may be dangerous and voids all
warranty related to this product.
6
•
•
•
•
•
•
Persons equipped with pacemakers should observe a safe
distance between the phone and the pacemaker. If in doubt,
contact your doctor.
Do not use your phone near petrol stations, fuel depots,
chemical plants, or any place where such operations are
performed for destruction by explosive, and in any
environment presenting risks of explosion, such as places of
supply, storage of storage, or decks of boats and freighters.
Making a phone call while driving is strictly prohibited without
handsfree function.
Do not use the phone near a strong magnetic field, such as a
microwave, speakers, TV or radio.
Use only original accessories provided by the manufacturer.
This product may potentially interfere with some medical
equipment. That's why you must turn off your phone in clinics
and medical facilities.
NOTE:
During a flight trip, we recommend placing the device
deep in your bag and avoid putting it in a handbag where
it would be exposed to X-ray control. The manufacturer
assumes no liability for damage caused by such
radiation.
7
Treatment of cells and batteries
The batteries should NOT be thrown in the rubbish bin. The
legislation of most of the countries now requires every consumer
to dispose of batteries used in the bins provided specifically for
this purpose.
You can leave your batteries at municipal waste sites and in the
places where they are sold.
•
Always observe the polarity of the batteries. A wrong way to
•
Do not open the batteries, do not throw into fire.
•
Batteries with leakages are dangerous. Do not handle without
•
Keep batteries out of reach from children.
insert the batteries may damage the unit – risk of fire.
gloves.
•
Remove the battery from the device if you do not use it for a
long period of time.
Symbols used
This symbol indicates the possible dangers and
important information about using the product. It is
used whenever the user's attention is particularly
needed.
This symbol identifies helpful tips and information for
optimal use of the product.
8
Product Description
Front
1.
Front Speaker
7.
2.
Flashlight
8.
Microphone
3.
Navigation keys
9.
USB port
4.
Menu key
10. Dial button
5.
Selection key M2
11. Selection key M1
6.
Start / stop button, hang up
12. Screen
9
Keypad
Rear Panel
Battery compartment cover
The screen
1. Display of signal strength
2. Display of battery status
3. Name of the telephone
4. Time
5. Date
6. Display functions for the selector M2
7. Display functions for the menu
8. Display functions for the selector M1
10
The other symbols on the screen
Transferring calls is activated.
The headphones are connected.
The unit is in "roaming".
You received a new SMS.
The device is muted.
The keypad lock is activated.
An alarm is activated.
Menu Description
2
1. Contact
2. Messages
3. Calls
4. Settings
5. FM Radio
6. Tools
7. Games
8. Alarm
MENU
3
1
5
4
6
7
9. SIM tool kit
SIM
OK
11
BACK
9
Specifications
LCD
1.8 inch
Battery
Li-Ion, 1000 mAh
Standby
Autonomy
Around 200 hours
max.
conversation
in
Around 180 minutes
Antenna
Integrated
Frequency
GSM 900/1800
Internal Memory
32 Mb
Vibration
Supported
SIM card
Single SIM
Directory / SMS
100 entries
Tools (integrated)
Alarm, calendar, calculator, flashlight,
games
Dimensions
108 x 48.5 x 18.5 mm
Weight (with battery)
Around 102 g
Indices of absorption
rate (SAR, Specific
Absorption Rate)
0.457 W/kg 10g Head (EGSM900)
0.196 W/kg 10g Body (EGSM900)
0.337 W/kg 10g Head (DCS1800)
0.139 W/kg 10g Body (DCS1800)
12
Preparation
Insert the SIM card
Unpack the handset and accessories carefully.
Open battery compartment located at the rear of phone. To do this,
unscrew solar module with a screwdriver and remove it.
Then insert a SIM card provided by an operator. Please pay
attention to the instructions from the following diagram.
The chip of the SIM card must face down. A small mark inside the
battery compartment shows how the card is properly inserted.
13
Insert the battery
Place the battery so that the white contacts at the top of the
battery are placed exactly opposite the contact pins of the phone.
You'll find that the battery is inserted correctly if it slips easily into
place and sets up easily.
Then replace the solar module and screw it tightly.
14
Charging
Before the first use of the phone, the battery must be fully
charged.
For this it is essential to use the included AC adapter.
With the adapter, the total charge time is about 4 hours. For
charging via the solar module, the total charging time will be
extended by several hours, depending on the sunlight.
The battery is fully charged when it shows a full battery icon on the
screen.
Start and first steps
Turn on
To turn on the phone, press the power button until the welcome
screen appears.
The phone connects automatically to your operator's network.
Note:
If you use a new SIM card, you may need to make some
adjustments on the card first. If necessary, seek advice
from your dealer or mobile phone specialist.
15
Buttons and controls
Control your mobile phone via the buttons above the keypad.
The keys have the following functions:
In menus, press this key to confirm your choice, or
access additional options.
In menus, press this key to delete characters or
interrupt the process. If you need to stop a seizure in
which one or more characters to delete, press this
button for about 3 seconds.
Use these buttons to navigate menus.
Press this button to display the menu of your phone,
or to confirm a choice in a menu. If you press the
button for more than 3 seconds, you turn on or off the
flashlight.
Press this button to call a number you just dialed, or
to view a list of recent calls (redial) if you have not yet
typed a number.
Press to end a call, or to return to the main screen.
16
Menu Options
You can access the Options windows through most menus. These
menus contain various items that can help to set the menu item
accessed. For example, you can transfer phone numbers in the
directory, delete data, send or reply to messages, or call the
phone number.
So if you view the message on the screen Option via the M1
button, you can display a menu of options by pressing the M1
button again.
Setting date and time
Open the menu with the Menu key.
Choose Settings.
Confirm with M1.
Choose General.
Confirm with M1.
Select Time and date.
Confirm with M1.
Confirm Date & time Setting pressing M1.
First enter the date.
Then go to the hour.
Enter the time.
Confirm with M1.
17
Call
Making a phone call
To call a contact, first enter the number on the
keypad.
Then press the green button.
Answering a call
When you receive a call you can answer by
pressing the green button.
Rejecting a call
or
If you do not want to answer a call, you can
either press the M2 button or the red button.
18
Frequently used functions
Memory Speed Dial
Open the menu with the Menu key.
Select Contacts
Confirm with M1.
Then choose Advanced.
Confirm with M1.
Select Speed Dial.
Confirm with M1.
Select the desired button.
Confirm with M1.
Confirm entry Set/Change again with M1.
Select the desired entry in the directory.
Confirm with M1.
19
Choose a number speed dial memory
In the main screen, press for about 2 seconds on the set in
memory for speed dial number you want to call. The
corresponding entry is displayed on the screen and the number is
dialed automatically.
Save numbers in the directory
Note:
When entering the name, you can insert special
characters with the key ¾. The # key lets you choose
between different input modes. See Appendix for more
information.
Manual entry
Dial the number you want to call.
Press M1 for options.
Select Save number.
Confirm with M1.
You can save the number on the SIM card (as
space allows) or on your phone.
Confirm with M1.
Enter the contact's name under which the
entry must be registered.
Confirm with M1.
Check the number and confirm with M1.
20
Create a contact from the list, auto redial.
Press the green button to display the redial list.
Select the desired number.
Press M1 for options.
Select Save number.
Confirm with M1.
You can save the number on the SIM card (as
space allows) or on your phone.
Confirm with M1.
Enter the contact's name under which the
entry must be registered.
Confirm with M1.
Check the number and confirm with M1.
Create a contact from the list of incoming calls
Open the menu with the Menu key.
Select Calls.
Confirm with M1.
Confirm the menu item Incoming calls with
M1.
Select the desired number.
21
Press M1 for options.
Select Save number.
Confirm with M1.
You can save the number on the SIM card (as
space allows) or on your phone.
Confirm with M1.
Enter the contact's name under which the
entry must be registered.
Confirm with M1.
Check the number and confirm with M1.
Making a call from the Contact List
Open the menu with the Menu key.
Select Contacts.
Confirm with M1.
Confirm the item View Contacts with M1.
and / or
Using the keypad, enter the first letters and / or
the contact you want, then select it with the
navigation keys, or scroll down the list of
contacts.
Then press the green button to call the
selected number.
22
Lock / unlock the keypad
Press and hold for 3 seconds the ¾ button to
activate the keypad lock. Press the M1 and
then the ¾ buttons to deactivate the keypad
lock.
Turn off the ringer
Press and hold for about 3 seconds the # key
to turn off the ringer.
Turn on the ringer
If you have disabled the phone ringer, press #
again for about 3 seconds to reactivate.
Activate / deactivate the loudspeaker
during a conversation
During the conversation, press M2 to turn on
or off the speaker phone.
Messages (SMS)
Messaging - or SMS - has become increasingly important with the
evolution and spread of mobile phones. This short form of simple text
messages is used to contact someone quickly, when this contact - or
yourself - is not available or cannot call.
The following items explain how to create and manage text
messages. You will find additional background information attached.
23
The Messages Option
The SMS service center is the service of your mobile operator that
handles the sending of SMS between subscribers.
Usually the phone number for this service is registered in the SIM
card. Occasionally it may happen that you have to save this
number yourself before you can receive or send text messages.
Therefore, quickly check if this number is available or not.
Press the Menu button.
Choose Messages.
Confirm with M1.
Choose Message Settings.
Confirm with M1.
Confirm with M1 the selected menu item
Service Center.
or
If a telephone number is already registered,
leave the menu with the red button.
Otherwise, enter the number of the SMS
service center that can be found in the files
supplied with your SIM card.
24
Read SMS (Inbox)
Press the Menu button.
Choose Messages.
Confirm with M1.
Select Inbox.
Confirm with M1.
Using the phone number or name displayed in
the phonebook, select the text you want to
read.
Confirm with M1.
Use the arrow keys to scroll the text of the
SMS in both directions.
Write a text message
Press the Menu button.
Choose Messages.
Confirm with M1.
Choose Create Message.
Confirm with M1.
Enter your message.
Confirm your entry with M1.
25
Confirm the Send with M1.
or
You can either enter the number of the
recipient directly using the keypad or search
the phonebook by pressing M1.
Note:
You can insert special characters in your message by
pressing ¾. The # key lets you choose between different
input modes. See Appendix for more information.
Alarm
We often need a reliable alarm outside the house for some
important appointments, or to be woken up in time when on a trip
by train, for example. SV29 provides 3 different alarms to serve
this function.
Alarm setting
Press the Menu button.
Choose Alarm.
Confirm with M1.
Select the desired Alarm (1, 2 or 3).
Confirm with M1.
Choose Alarm type or off
26
Choose the line entering the time.
Set the desired time for ringing the alarm.
Select the following line.
Select the alarm you want.
Confirm with M1.
Suspend the alarm for 5 minutes
When the alarm rings, press M1 and the phone
will be ringing again 5 minutes later.
Disable the alarm
Press the Menu button.
Choose Alarm.
Confirm with M1.
Select the desired Alarm (1, 2 or 3).
Confirm with M1.
Choose Off.
Confirm with M1.
27
Call Log
Ö
Ö Calls Ö
The call log is used to check all incoming, outgoing and missed
calls. Each point is the management and overview. For each entry,
you can access additional options for editing, thanks to the M1
button.
Orders are placed with the arrow keys.
Tools
Ö
Ö Tools Ö
This menu offers a preview of the calendar and a simple
calculator.
Calendar
The calendar provides an overview of this month. Of course, you
can see the previous month or next month using the arrow keys.
Calculator
Use the buttons to make your calculations. The calculation
operations (basic operations) are being done by using the
navigation keys and the result is displayed after pressing the
button M1.
28
Profiles
Ö
Ö Settings Ö
Ö
Ö Profiles Ö
Profiles
In this menu you can select and manage multiple profiles. The
profiles are used to quickly adapt the phone settings to different
environments without having to change settings every time.
Activate Profile
With the directional buttons, select a profile from the list and press
M1 twice. The profile is then activated and all settings for that
profile are taken into account immediately.
Customize Profile
Some situations require different behaviors of the phone. For
example, it can be highly embarrassing to hear a phone ringing at
full volume during a play. Therefore, you can either use a
predefined profile or set a profile based on your unique needs.
To do this, choose one of the existing profiles and view the menu
Personalize. You can then choose from the list, which ringtone,
how loud and what other special settings must be used.
29
Display Settings
Ö
Ö Settings Ö
Ö
Ö Display Ö
This menu offers various options for displaying your screen. You
can change the backlight, set an idle test in standby screen of the
phone, choose a background image or change the display mode
from the date you time.
Swiss Lock
Ö
Ö Settings Ö
Ö General Ö
Ö
Ö Swiss Lock Ö
Here you can make security settings for the phone and SIM card.
Warning:
Do not change these settings, ONLY if you are sure
of their effects. Do changes only if you are
completely confident. If in doubt, contact a
specialist.
30
Language
Ö
Ö Settings Ö
Ö General Ö
Ö
Ö Language Ö
This menu allows you to choose the language displayed on your
phone.
Keypad Locking
Ö
Ö Settings Ö
Ö General Ö
Ö
Ö Swiss Lock Ö
Ö Keypad Lock Ö
This option allows you to manage the automatic keypad lock.
The keypad lock prevents accidental key presses when you carry
the phone in a pocket, etc.
You can either set a time that the phone's keypad is automatically
locked, or disable the automatic lock. In the latter case, you can
manually lock the keypad by pressing for 3 seconds on the button ¾.
Note:
See also the section "Lock / unlock the keypad" on page 23.
31
Using standard settings
Ö
Ö Settings Ö
Ö
Ö Factory default Ö
This menu will reset the factory settings of the phone, action must
be explicitly confirmed before being made. The password is 0000.
Warning:
All changes and customizations made previously on
the phone will be deleted and lost! Use this option
only if you are totally confident.
Torch light
Press and hold for about 3 seconds the button for the Torch light to
turn on. Do the same to turn it off.
FM Radio
Ö
Ö FM Radio Ö
Note:
To receive radio stations, it is necessary that the headset
is plugged into the phone jack since the headphone cable
also serves as an antenna for FM reception.
32
In FM radio mode, a menu of options is available and accessible
via the M1 button; you can create a list of radio stations and
perform other advanced settings.
The control buttons in the radio mode are:
and
Adjust the volume of the FM radio.
Adjust directly the desired radio frequency.
Use these buttons to access the next or
previous station in the station list.
Games
Ö
Ö Games Ö
SV29 installed with 2 Games for entertainment. User can use up
and down key to choice the game and select the game by
pressing M1 button.
Entering text
The keys on the keypad
Each key on the keypad corresponds to several letters or other
characters.
You can enter the desired character by briefly and repeatedly
pressing the corresponding button until it appears.
33
Example:
Tap three times on the 2 button, you get the letter “C”. Press twice
the button 7, you get the letter “Q”. Press button 6 once, you get
the letter “M”.
Choice of entry mode
There are several ways to enter text, you can choose between
different input modes. The current input mode is displayed at the
top left of the screen.
Repeatedly press the # key to scroll through the options available.
Help mode to enter text much faster. All characters are given a key
to try to form the word you want to write. You should therefore
support only once on the button to use letters of the key.
Once the desired word is displayed, you can validate and insert
your text by pressing the M1 button.
Example:
In this mode, press 4-2-5-5-6, the next word “hallo”
appears on the screen.
•
Abc:
Use this mode to write only the next letter in upper case.
•
ABC:
Use this mode to write all uppercase letters.
•
abc
Use this mode to write all the letters in lower case.
•
123:
Use this mode to enter numbers instead of letters.
34
Compliance Statement
Swissvoice declaration
SV29 complies with IP56 standard. However, user requires
ensuring that the battery cover and USB jack cover are closed
tightly and properly to withstand dust, shock and water according
to IP56 standard. Swissvoice will not be liable for any warranty
and claim of dust and/or water leakage into the handset due to the
improper use and/or non-proper closing of battery cover and/or
USB jack cover.
SV29 also contains a high efficiency solar charging panel at the
back for emergency battery charging under clear and direct
sunlight. The solar charging panel only works under sunlight but
not with any artificial lighting. When using the solar panel for
battery charging, please make sure the phone is turned OFF and
the sunlight is perpendicular to the surface of the solar panel at the
back of the handset. Swissvoice is not liable for the performance
of the solar charging panel as the charging capability and charging
time greatly depend on the location, clearness of the sky and
objects nearby (e.g. the shadow may come out and may hinder
the efficiency of the solar charging panel). User should understand
that the solar panel mainly acts as a second source for charging
the handset. User should make use of the power supply as the
primary source for battery charging.
The solar charging feature and IP56 standard of SV29 are not
authorized for use in any safety-critical applications (such as life
support and/or mission critical events related to health and/or
safety) where a failure of the product would reasonably be
expected to cause severe personal injury or death. Swissvoice will
not be responsible for any failure, any claim and/or any direct or
indirect loss related to such unauthorized use of SV29 by user.
35
Warranty disclaimer
Your telephone is subject to a guarantee from the date of
purchase in accordance with the legal provisions of the country in
which the unit was purchased. As evidence of the date of
purchase, please keep the receipt or the warranty card completed
by the retailer. All defects attributable to material and
manufacturing faults will be corrected free of charge within the
warranty period, either by repairing or replacing the defective
equipment.
The warranty does not cover expendable materials (battery cells),
defects, which affect the value or use of the equipment only
insignificantly, and damage caused by incorrect use, ordinary
wear and tear, or manipulation by third parties.
This warranty does not cover consequential damage caused by
the use, failure or defectiveness of the product. In particular, no
liability whatsoever is accepted for damage to property and
pecuniary loss.
Approval conformity
This telephone complies with the basic requirements contained in
the R&TTE Directive 1999/5/EC on radio equipment and
telecommunications terminal equipment and is suitable for
connection and operation in the member states indicated on the
device and/or packaging.
The CE symbol confirms the conformity of the telephone
with the above directive.
36
37
How to charge your SV29 solar
powered phone
1. CHARGING YOUR PHONE
Place the phone with keypad down and the solar charger fully
exposed to the light in order to charge. In this moment, you can
see a small Blue LED flashing from the Torch LED position. This
means the phone is being charged by the sunlight.
2. KEEP IN OUTDOOR LIGHT
Keep the phone in sight to prevent loss or theft, but place in
outdoor light as much as possible.
38
3. CHARGE WHENEVER
Charging can happen in multiple instances, whenever you’re not
using the phone. Even 5 minutes in the sun will add some charge
to your battery.
4. CHARGE EVERY DAY
Charge your phone in the sun daily to keep the battery at a good
level instead of charging an empty battery back to full twice a
week.
39
5. LOW BATTERY
If the battery is low, indicating only one bar, place your phone in
the light immediately to ensure continued use of the phone.
6. EMPTY BATTERY
Should the phone be unused for a long time, the battery will shut
down. It’s then not possible to recharge the battery with solar
charger, use a regular power outlet once to recharge it.
40
2