1
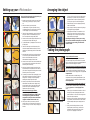
Setting up your ePhotomaker
1
3
5
7
9
2
4
6
Please read these instructions thoroughly before you
assemble and use the ePhotomaker.
1.
Remove the contents from the blue carry case. Please
note that the grey card may flip open as you take it
out.
2.
Check the contents, they should include:
1x ePhotomaker, 1x Support rod (folded in a loop),
1x Ezybalance grey card, 1x Mini tripod, 1x Carry case,
1x Blue 'daylight' film, 2x Double ended clips.
3.
Take hold of the ePhotomaker by one of the black rims
and give it a shake. It will automatically pop-out to
form a tent shape with triangular side panels.
4.
Position the two rounded triangular side panels to form
a tent shape with the open side facing you.
5.
Tip the ePhotomaker up 90 degrees so that it rests on
the back panel.
6.
Take hold of the support rod and locate the yellow
Velcro tabs. Separate the tabs and slowly let the rod
straighten out, whilst keeping hold of the velcro tabs at
each end.
7.
Attach the support rod by fixing the yellow Velcro tabs
on the rod to the yellow Velcro tabs attached to the
black rim of the ePhotomaker, then turn the
ePhotomaker back 90 degrees onto its base.
8.
Position the mini tripod in front of the ePhotomaker and
turn the locking screw anti-clockwise to allow the ball
and socket joint to rotate freely.
9.
Attach your camera by screwing the top plate of the
tripod clockwise into the tripod mount on the base of
your camera. Then tighten the locking screw so the ball
and socket joint can no longer move.
8
10
12
1
2
3
4
What does the blue ‘daylight’ film do?
Most desk lamps incorporate a tungsten/
incandescent bulb which gives a slightly yellow
coloured light. Using the blue film will help
compensate for the yellow colour and simulate
‘daylight’ conditions with less colour cast.
12. Finally turn the flash on your camera to the OFF
position (refer to your camera manual for instructions
on how to do this). You are now ready to arrange your
first shot.
1.
The sewn in fabric can be used as your background or
alternatively for a smoother finish you could insert a
paper/card sheet. This option is particularly useful if
you want your images on a coloured background.
2.
Position the object you want to photograph centrally
inside the ePhotomaker.
3.
Adjust the angle of the lamp to position the lighting to
suit the object being photographed.
4.
Compose/frame the object in the viewfinder or LCD
screen of your camera as you would like to see the
finished image. Your now ready to press the shutter
button and take the photograph.
Depending on which type of camera you are using
there are some additional settings that you may need
to consider before you actually press the shutter.
Please see below
Taking the photograph
1
2
Using a Traditional Film Camera
Check that the film you are using has been balanced to
work with the light source you have chosen. The optional
blue film can be used to adjust your tungsten/incandescent
light source to simulate ‘daylight’ if required.
Using a Digital Camera (with optional manual mode)
Select the manual mode and ‘white balance’ your camera to
your chosen light source following the instructions in your
camera manual (use the blue ‘daylight’ film if required). See
examples below.
3
10. To position your camera to take a photograph, you can
adjust the tilt and rotation of the camera by using the
locking screw. The height can also be adjusted by
extending the telescopic legs of the tripod.
11. Position your desk lamp on the left hand side of the
ePhotomaker. Then attach the blue 'daylight' film (if
required) onto the front of your lamp using the clips
provided. The clips will need assembling first (see
separate instructions with the clips).
11
Arranging the object
Another useful feature to consider altering is EV
compensation. This adjusts the lightness/darkness of your
image. Again, consult your manual for further instructions.
See examples below.
Using a Digital Camera (with automatic mode only)
The effects of using EV compensation.
EV +0
EV +2/3
EV +12/3
If you only have an ‘automatic’ mode you may find it useful
to use the greycard and the blue ‘daylight’ film as
follows:
1.
Place the grey card inside the ePhotomaker in front of
the object you want to photograph. Make sure the
printed 'crosshair' is in the centre of the image and as
close to the subject as possible.
2.
With the grey card in position, half depress the shutter
on your camera. This locks the focus on the 'crosshair'
and automatically takes exposure readings from the
card.
3.
Finally, while still holding the shutter in the half
depress position, remove the grey card from the
ePhotomaker and then press the shutter all the
way down. Your photograph is now taken.
The effects of altering the white balance
Incorrect
Correct
Packing away your ePhotomaker
1
3
5
7
2
1.
Remove the camera from the tripod by first loosening
the locking screw on the tripod and then turning the
top plate anti-clockwise.
2.
Tip the ePhotomaker up 90 degrees so that it rests on
the back panel and remove the support rod. Bend the
rod to form a loop and attach the two yellow Velcro
tabs to each other.
3.
Close the two triangular side panels of the ePhotomaker
together so that they lie flat against each other and
take hold of the left and right corners of the bottom
edge of the ePhotomaker.
4.
Slowly start to bring your hands together while still
holding the ePhotomaker. This will cause the
ePhotomaker to bend into a crisp shape.
5.
As your hands are about to touch, continue pushing but
let your right hand slowly pass underneath the left.
6.
The pointed end of the triangular panels will
automatically fold underneath.
7.
Use the same technique to fold the grey card.
8.
Unclip the blue 'daylight' film from the lamp then
place all the items back into the blue carry case.
4
6
8
Instructions
www.ephotomaker.co.uk