1
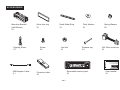
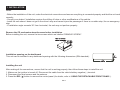
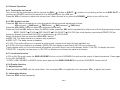
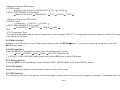
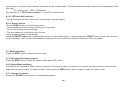
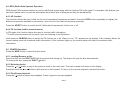
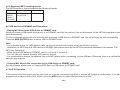
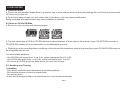
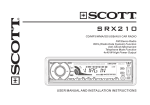
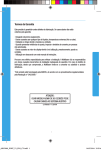
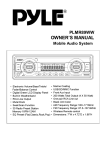
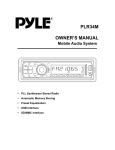
MCX32
CD/MP3 CAR RADIO WITH MANUAL TUNING AND RDS FUNCTION
AM/FM STEREO
RDS FUNCTION (AF/TA/PTY)
PLAYS MP3/ID3 TAG FILES RECORDED ON CD-R/CD-RW
USB PORT & SD/MMC CARD SLOT ON FRONT PANEL
ANTI-THEFT DETACHABLE FRONT PANEL
MUSIC POWER: 28 WATT
USER MANUAL AND INSTALLATION INSTRUCTIONS
Contents
ACCESSORIES....................................................................................................................................................................................GB-1
SAFETY.................................................................................................................................................................................................GB-2
1. INSTALLATION.................................................................................................................................................................................GB-3
2. USING THE DETACHABLE FRONT PANEL...................................................................................................................................GB-6
2.1 Removing the front panel.............................................................................................................................................................GB-6
2.2 Installing the front panel...............................................................................................................................................................GB-6
3. Wiring Diagram................................................................................................................................................................................GB-7
4. OPERATION.....................................................................................................................................................................................GB-8
4.1 Features and Controls..................................................................................................................................................................GB-8
4.2 General Operation........................................................................................................................................................................GB-9
4.3. Radio Operation........................................................................................................................................................................GB-11
4.4. RDS (Radio Data System) Operation.......................................................................................................................................GB-12
4.5. CD/MP3 Operation....................................................................................................................................................................GB-12
4.6 USB device and SD/MMC card Operations...............................................................................................................................GB-15
4.7 AUX IN Operation.......................................................................................................................................................................GB-15
5. DISC NOTES..................................................................................................................................................................................GB-16
5.1 Notes on discs............................................................................................................................................................................GB-16
5.2 Notes on CD-Rs/CD-RWs..........................................................................................................................................................GB-16
5.3. Handling and Cleaning..............................................................................................................................................................GB-16
5.4 Precautions when using new discs............................................................................................................................................GB-17
6. TECHNICAL SPECIFICATIONS.....................................................................................................................................................GB-18
7. TROUBLESHOOTING....................................................................................................................................................................GB-19
7. TROUBLESHOOTING
GB-19
ACCESSORIES
Mounting Bracket
(Half Sleeve)
X1
Tapping Screw
X1
Outer trim ring
X1
Screw
X4
Small Metal Strip
X1
Hex Nut
X1
Plain Washer
X1
Release key
X2
Spring Washer
X2
ISO Wire connector
X1
MCX32
AM/FM STEREO
RDS FUNCTION (AF/TA/PTY)
PLAYS MP3/ID3 TAG FILES RECORDED ON CD-R/CD-RW
FRONT PANEL USB PORT & SD/MMC CARD SLOT
ANTI-THEFT DETACHABLE ON FRONT PANEL
MUSIC POWER: 28 WATT
USB Adaptor Cable
X1
Removable control panel
X1
Protective case
X1
GB-1
User manual
X1
SAFETY
This unit is designed and manufactured with the users safety in mind, however any improper use or operation may result in certain
dangers. It is therefore highly recommended to read this manual thoroughly and adhere to the following precautions.
Safety precautions
* To prevent an electrical shock, do not open the housing of the unit. In any case of malfunctioning, only have the unit serviced by an
approved and qualified service centre.
* Do not expose to any water or to a very humid environment. Do not operate the unit when your hands are wet as this may cause a
short circuit.
* For safe driving, keep the volume low in order to concentrate on traffic conditions.
* Do not clean the unit with alcohol, only clean with a soft dry cloth.
* If the unit has been kept at a high temperature or in a high humidity environment, cool down the car interior before turing on the unit.
* Do not use the unit for a long time without running the vehicle engine, it may drain the battery and the vehicle engine may not be
able to start.
* Before final installation in the dashboard opening, connect the wiring and make sure the unit is working property.
* Only use parts provided with the unit to ensure proper installation.
* Do not route wiring in places that the heat may melt the wiring insulation.
* When replacing the fuse, ensure that the new fuse has the capacity recommended by the manufacturer.
Operation precautions
* Do not operate the player with scratched, bent or broken discs. When a disc is not loaded properly, do not force it into the disc
loader.
* Never insert any other objects into the disc loader like a coin or pin, etc as this may cause damage or a short circuit.
* Do not use different disc formats other than 12cm round discs.
* If the unit is disconnected to the battery, it will lose memorized data.
* If the source disc has poor sound quality due to scratches, dirt or a bad recording, the playback sound quality may be poor.
GB-2
1. INSTALLATION
Notes:
- Before the installation of the unit, make the electrical connections and ensure everything is connected properly and that the unit works
correctly.
- Consult your dealer if installation requires the drilling of holes or other modifications of the vehicle.
- Install the unit where it does not get in the driver’s way and cannot injure the passenger if there is a sudden stop, like an emergency
stop.
- If installation angle exceeds 30° from horizontal, the unit may not perform properly.
Remove the CD mechanism transit screws before installation
Before installing the unit, remove the two screws which are labelled “REMOVE SCREW”.
Installation opening on the dashboard
This unit can be installed in any dashboard opening with the following dimensions (DIN standard):
Installing the unit
After making all the connections, ensure that the unit is working properly, then follow these steps to install the unit.
1. Make sure the ignition is turned off. Disconnect the cable from the vehicle battery negative (-) terminal.
2. Disconnect the wire harness and the antenna.
3. Press the REL ( ) button to remove the control panel (for details, refer to ‘USING THE DETACHABLE FRONT PANEL’).
GB-3
4. If necessary, remove the outer trim ring.
5. The two supplied keys release tabs inside the unit’s sleeve so you can remove it. Insert the left (“L”) and right (“R”) release key as
far as they will go (with the notches facing up) into the appropriate slots at the center of the left and right sides of the unit. Then slide
the sleeve off the back of the unit.
6. Fit the sleeve by inserting it into the opening of the dashboard and bend back the tabs located around the sleeve with a screwdriver.
Not all tabs will be able to make contact, so you will need to select the tabs which will be most effective with your dashboard.
7. Reconnect the wire harness and the antenna, being careful not to pinch any wires or cables.
8. If necessary, use the metal strap and hardware (M5mm hex nut and spring washer) to attach one end of the strap to the mounting
bolt on the back of the unit. If necessary, bend the metal strap to fit it into the dashboard. This metal strap also helps to ensure proper
electrical grounding of the unit.
9. Slide the unit into the sleeve until it fits correctly.
GB-4
10. Reconnect the cable to the vehicle battery’s negative (-) terminal. Then replace the outer trim ring and install the unit’s front panel
(see the steps of ‘Installing the front panel’).
Removing the unit
1. Make sure the ignition is turned off, and then disconnect the cable from the negative (-) terminal of the vehicle’s battery.
2. Press the REL ( ) button to remove the front panel.
3. Remove the top of the outer trim ring by pulling it out.
4. Insert both of the supplied keys into the slots at the middle of the left and right sides of the unit then pull the unit out of the
dashboard.
5. Disconnect the wire harness and the antenna, and disassemble the metal bar attached to the back of the unit (if present).
GB-5
2. USING THE DETACHABLE FRONT PANEL
2.1 Removing the front panel
Press the REL ( ) button
on the front panel.
Pull off the front panel.
Place the front panel into the
protective case provided.
Fig.1
Fig.2
Fig.3
2.2 Installing the front panel
First, fit the left side of the front panel and then fit the right side of the front panel until you hear a click sound. If the panel is not properly
fixed in the unit, some of the keys or the display may not function properly. If this occurs, remove and re-install the front panel.
Precautions when handling
1. Do not drop the front panel.
2. Do not put pressure on the display or control buttons when removing or installing the front panel.
3. Do not touch the back of the front panel or the main unit once the panel has been removed as you may dirty the contacts or damage
them.
4. If any dirt or foreign substances are present on the contacts, they can be removed with a clean and dry cloth.
5. Do not expose the front panel to high temperatures or direct sunlight.
6. Do not allow the unit to come into contact with any liquids (in particular volatile liquids such as benzene, paint thinner or insecticides).
GB-6
3. Wiring Diagram
ISO CONNECTOR
Part A
A1: /
A2: /
A3: /
A4: Battery B+ (10A FUSE) (Yellow)
A5: Electric antenna (Blue)
A6: /
A7: + after ignition (Red)
A8: Ground B- (Black)
Part B
B1: Rear Right + (Violet)
B2: Rear Right - (Violet/Black)
B3: Front Right + (Grey)
B4: Front Right - (Grey/Black)
B5: Front Left + (White)
B6: Front Left - (White/Black)
B7: Rear Left + (Green)
B8: Rear Left - (Green/Black)
RCA cables not supplied (only concerns the use of an external amplifier – not included)
GB-7
1
4. OPERATION
2
4.1 Features and Controls
1) Front panel
GB-8
(Next Track) button
3
DISC SLOT
4
LCD display
5
SEL (select) button
6
EJECT ( ) button
7
VOL +/- button
8
REL
9
USB PORT
10
2) Main unit of the car radio
SD/MMC CARD SLOT
(RELEASE) button
(Previous Track) button
11
AUX Input Jack
12
MOD/ENTER button
13
BND/LOU (loudness)/MP3 button
14
DISP (display) button
15
SCN (Scan), EQ (equalizer) button
16
SHF (shuffle) button
17
MON (Stereo/Mono select),
TA (Traffic Announcement) button
18
RPT (Repeat Mode select),
AF (Alternative Frequency) button
19
PLAY/PAUSE ( )/MUTE button
20
TUNING Knob
21
POWER ( ) button
22
REMOVEABLE CONTROL PANEL
23
LED ANTI-THEFT INDICATOR
24
RESET button
4.2 General Operation
4.2.1 Turning the unit on/off
Turn on the unit by pressing any button (except the REL ( ) button or EJECT ( ) button) or by inserting a disc in the DISC SLOT, or
inserting an SD/MMC card into the card slot or a USB device into the USB port.
Press the VOL+/- buttons to adjust the volume level. When the unit is on, press the POWER button to turn off the unit.
4.2.2 SEL button function
Press the SEL button repeatedly to cycle through the following sound adjustment choices:
VOL(volume)
BAS(bass)
TRE(treble)
BAL(balance)
FAD(fader)
Press the VOL+/VOL- button to adjust the desired sound quality.
Press and hold the SEL button to enter the MENU mode, press the SEL button repeatedly to select one of the following setup choices:
BEEP ON/OFF
P-VOL
ESP ON/OFF
CLK ON/OFF
CLK PRI (the clock display is prioritized)/FREQ PRI (the
frequency display is prioritized) /NO PRI (no preference)
12/24 HOUR
Select the desired item by press the VOL+/VOL- button.
♦ BEEP ON: The beep sound is on when a key is pressed.
♦ BEEP OFF: The beep sound is disabled.
♦ P-VOL: This option allows you to preset a volume level (volume level when the unit switches on).
♦ CLK PRI (the clock display is prioritized) /FREQ PRI (the display is prioritized) /NO PRI (no preference):
These options allow you to choose which information you would like to see on the display. Select “CLK PRI” to display the clock,
“FREQ PRI” to display the frequency or “NO PRI” to display one of these two options at random.
4.2.3 Loudness function
In CD or AUX IN mode, press the BND/LOUD/MP3 to turn on the LOUDNESS to reinforce the output of bass frequencies. Press again
to turn off LOUDNESS.
*In MP3, USB, SD/MMC or RADIO mode, press and hold the BND/LOUD/MP3 to turn the LOUDNESS function on/off.
4.2.4 Display function
1) Adjusting time:
Press and hold the DISP until the clock blinks. You can press VOL+ to adjust the hour and press VOL- to adjust the minute.
2) Information display
Press the DISP button repeatedly:
GB-9
- When receiving an RDS station
In RADIO mode:
Name of the station
FREQUENCY
In DISC, USB, SD/MMC or AUX mode:
Name of the station
FREQUENCY
PTY
CLOCK
PTY
CLOCK
FUNC
- When receiving a non-RDS station
In RADIO mode:
Frequency
(NO PTY)
CLOCK
In DISC,USB, SD/MMC or AUX mode:
FREQUENCY
(NO PTY)
CLOCK
FUNC
Note:
- PTY: Programme Type
- The name of the station and the type of programme or the message “NO PTY” (no programme type) only appears on the LCD screen
if you select the FM band.
4.2.5 Mute function
In Radio or AUX IN mode, to turn off the sound instantly, press the MUTE/
MUTE button again.
button, To resume the previous sound level, press the
4.2.6 EQ (equalizer)
Press the EQ button repeatedly to select one of the following EQ modes:
FLAT CLASSIC POP ROCK DSP OFF (equaliser off)
* In CD/MP3, USB or SD/MMC mode, press and hold the EQ button to select EQ mode.
4.2.7 Mode selection
Press the MOD button repeatedly to switch between DISC, USB,SD/MMC, AUX IN and RADIO modes.
4.2.8 LCD display
Display the current frequency and activated functions on the LCD screen.
4.2.9 ESP function
The unit features an anti-shock feature, which memorises a certain amount of the recorded program in advance. This means that if the
GB-10
unit skips due to rough road conditions, the music will be uninterrupted. The time of the memorised content varies depending on the
disc type:
CD: 40 seconds; MP3: 120 seconds
See section 4.2.2 “SEL button function” to the ESP function on/off.
4.2.10 LED anti-theft indicator
The LED indicator will flash if the unit is connected to a power supply.
4.2.11 Reset function
Use the RESET button in the following cases:
- Initial installation of the unit when all wiring is completed.
- The function buttons do not operate.
- The disc cannot be inserted into the disc slot.
- Error symbol appears on the display.
Press the RESET button with either a ballpoint pen or a thin metal object. If after pressing the RESET button the unit still does not
function properly, use a cotton swab soaked in isopropyl alcohol to clean the socket on the back of the front panel.
4.3. Radio Operation
Press the MOD button to select the radio mode.
4.3.1 Selecting the frequency band
Press the BND button to select the desired radio band: FM or AM.
4.3.2 Stereo/Mono selection
FM stations are received in Stereo mode. However, if the signal is weak or reception is not good, switching to Mono mode usually
improves the sound quality. To switch to Mono mode, press the MON button. press it again to return to Stereo mode.
4.3.3 Tuning to a station
Rotate the TUNING knob to tune in a broadcasting station.
GB-11
4.4. RDS (Radio Data System) Operation
RDS allows FM broadcast stations to emit an additional signal along with the ordinary FM radio signal. For example, the stations can
emit their station name, as well as information about what type of programme they are broadcasting.
4.4.1 AF function
This function allows the user to find out the list of alternative frequencies available. Press the DISP button repeatedly to display the
different frequencies available in succession, then tune into the desired frequency manually.
Press the AF/RPT button to switch the AF (Alternative frequencies) function on or off.
4.4.2 TA function (traffic announcement)
In FM mode, this function allows the user to receive traffic information.
* TA traffic announcement will not work if you are listening to an AM station.
Hold down the TA/MON button to switch the TA function on or off. When it is on, “TA” appears on the display. If this indicator blinks, the
current station does not broadcast traffic information. If this indicator lights up, the current station will start to broadcast traffic
information.
4.5. CD/MP3 Operation
Press the MOD button to select the disc mode.
4.5.1 Loading/Remove a disc
Insert the disc into the DISC SLOT with the printed side facing up. The player will play the disc automatically.
To remove the disc, press the EJECT button.
4.5.2 Selecting tracks
Press the or button to skip to the previous track or the next track. The track number will show on the display.
Press and hold the or button to fast reverse or fast forward. To return to the normal playback, release the button.
4.5.3 Play/Pause playback
Press the button to pause disc playback. Press it again to resume playback.
GB-12
4.5.4 Introduction scan
Press the SCN button to play the first several seconds of each track on the current disc. Press it again to stop the introduction scan and
listen to the music.
4.5.5 Repeating the same track
Press the RPT button to set the unit to repeat the same track. Press it again to stop the repeat function.
4.5.6 Playing all tracks in random
Press the SHF button to play all tracks on the disc in random order. Press it again to cancel this function.
4.5.7 Searching file or directory (MP3)
Press the MP3 button repeatedly to select one of the following search modes:
Searching by track number
Searching by directory or file name
Searching in the root directory
Searching in the current directory
Copying MP3 files to a USB device or SD/MMC card
1) Searching by track number
In this search mode, “SRH-01” will appear on the LCD display (the track number will blink)
a). Press the VOL+/VOL- button to select the track number.
b). Press the MOD(ENTER) button to start playback.
2) Searching by directory or file name
In this search mode, the symbol “*” will blink on the LCD display.
a). Press the VOL+/VOL- to select a character. These characters are “A-Z”, “0-9”,” _”, “-“, “+”, “ ”, “*”.
b). Press the SEL button to confirm the input of each character.
c). Press the MOD(ENTER) to search for the title. If this directory or file name does not exist, “NO FOUND” is shown on the LCD.
d). In this case, if the selected title is a directory, you can press the VOL+/- to browse all files in the directory.
e). Press MOD(ENTER) to start playback.
* If the selected title is in a sub-directory, repeat the above steps.
GB-13
3) Searching from root directory
In this search mode, the list of directories and tracks appears on the LCD display.
a). Press the VOL+/VOL- buttons to browse through all the directories or files in the root directory.
b). Press MOD(ENTER) to select. Play the song if the selected title is a file. If the selected title is a directory, repeat the above steps.
4) Searching from current directory
In this search mode, the list of sub-directories and tracks in the current directory appears on the LCD display.
a). Press the VOL+/- buttons to browse through the directories or files in the current directory.
b). Press the MOD (ENTER) button to select a directory or file. Play the song if the selected title is a file. If the selected title is a directory, repeat the above steps.
5) Copying MP3 files to a USB device or SD/MMC card
When an MP3 disc is playing, insert a USB device or / and an SD/MMC into the unit.
a). Press the MP3 button five times to access “Copy the MP3 file to USB device or SD/MMC card” mode. The message “COPY USB”
appears on the LCD display, and “USB” blinks.
b). Press the VOL+/VOL- button to select “COPY USB” or “COPY SD”.
- Select “COPY USB” to copy the MP3 files on the MP3 disc to the inserted USB device.
- Select “COPY SD” to copy the MP3 files on the MP3 disc to the inserted SD/MMC card.
c) Press the ENTER button to confirm your selection. The message “COPY ONE” will be visible on the LCD display, and “ONE” blinks.
d). Press the VOL+/VOL- button to select “COPY ONE” or “COPY ALL”.
- Select “COPY ONE” to copy the current MP3 file to the USB device or SD/MMC card.
- Select “COPY ALL” to copy all the MP3 files on the current disc to the USB device or SD/MMC card.
e). Press the MOD (ENTER) button to confirm the selected copy mode. The message “COPY Y / N” will appear on the LCD display.
f ). Press the VOL+/VOL- button to select “Y” or “N”. If you select “Y” and confirm by pressing the ENTER button, the unit will complete
the copy task automatically after several seconds. If you select “N” and confirm by pressing the ENTER button, the unit will stop
copying.
In the same way, when you play the MP3 files on the USB device, you can copy the MP3 files to the inserted SD/MMC card; and when
you play the MP3 files on the SD/MMC card, you can copy the MP3 files to the inserted USB device. The files are saved in the folder
named “COPY“. This folder is created automatically.
GB-14
4.5.8 Supported MP3 decoding modes
The MP3 decoder in this unit supports the following formats:
Standard
Bit Rate (kbps)
Supports mode
MPEG1
AUDIO
Layers 3
(44.1KHz)
32,48,64,96,128,
192,256,320
Stereo
4.6 USB device and SD/MMC card Operations
- Playing MP3 files on the USB device or SD/MMC card:
When you insert a USB device into the port or an SD/MMC card into the card slot, the unit will search for the MP3 files and start to play
them automatically.
If a disc is inserted into the disc slot while the unit is reading a USB device or SD/MMC card, the unit will play the disc automatically.
Press the MOD (ENTER) button to select USB or SD/MMC mode.
Note:
- It is preferable to use the USB adaptor cable, as this will prevent bad contacts whilst the vehicle is moving.
- Operations for MP3 files on a USB device or SD/MMC card are the same as the MP3 file operations described in the section “CD/
MP3 Disc Operations”
- When using a USB device or SD/MMC card, do not touch or remove it.
- This unit can only support standard USB memory devices.
- It is a preferable to remove the batteries from your MP3 player before connecting it to the USB port. Otherwise, there is a risk that the
batteries may explode.
- Copying MP3 files on the current disc to the USB device or SD/MMC card:
For more details, please refer to “Copying MP3 files to a USB device or SD/MMC card”
4.7 AUX IN Operation
This receiver has a front panel auxiliary input jack, so it can be connected to an iPod or another MP3 player or audio player. If you have
plugged such a player into the AUX IN jack, press the MOD button to switch the input source to AUX.
GB-15
5. DISC NOTES
5.1 Notes on discs
a. Do not use non-standard shape discs (e.g. square, star or heart-shaped discs) as they may damage the unit. Be sure to use circular
CD discs only for this unit.
b. Do not stick paper or tape, etc, onto either side of your discs, as it may cause a malfunction.
Dusty, scratched and warped discs may cause problems in playback.
5.2 Notes on CD-Rs/CD-RWs
a. Be sure to only use discs with following marks:
b. The unit cannot play a CD-R or CD-RW that has not been finalized. (Please refer to the manual of your CD-R/CD-RW recorder or
CD-R/CD-RW software for more information on the finalization process).
c. Depending on the recording status, conditions of the disc and the equipment used for the recording, some CD-Rs/CD-RWs may not
be compatible with this unit.
For more reliable playback:
- Use CD-RWs with speed from 1x up to 4x, written with speed from 1x to 2X.
- Use CD-Rs with speed from 1x up to 8x, written with speed from 1x to 2X..
- Do not use a CD-RW which has been written for more than 5 times.
5.3. Handling and Cleaning
1) Handling
- Dirty, dusty, scratched and warped discs may inhibit playback.
- Do not place stickers on discs or scratch them.
- Do not warp discs.
- A disc should always be kept in its case when not in use to prevent damage.
GB-16
- Do not expose discs to direct sunlight or place them in dirty, dusty or damp areas. Do not store near the heater vent of your car, or
leave on the seats or dashboard.
2) Disc cleaning
Use a dry soft cloth to wipe the surface. If the disc is quite dirty, use a soft cloth, lightly dampened with isopropyl alcohol. Never use
solvents such as benzene, thinner or conventional record cleaners as they may damage the surface of the disc.
5.4 Precautions when using new discs
A new disc may have rough edges. It will sometimes be necessary to remove these rough surfaces with a ballpoint pen or pencil as
shown in the illustration.
GB-17
6. TECHNICAL SPECIFICATIONS
GENERAL
Pow er Supply Requirements
DC 12 Volts, Negative Ground
Unit Dimensions
178(W) x 160(D) x 50(H) mm
Tone Controls
- Bass (at 100 Hz)
±14 dB
- Treble (at 10 KHz)
±14 dB
Maximum Output Power: 7W X 4 CH;
Normal Output Power: 3.2 W (r.m.s.) x 4 CH
Fuse: 10 Ampere (max.)
Sensitivity: <38dB
USB/SD/MMC (card)
USB port type: 2.0
USB port maximum handling capacity: 8GB
Card types : SD/MMC
SD/MMC card slot maximum handling capacity: 8GB
CD PLAYER
Signal to Noise Ratio: > 55 dB
Channel Separation: > 40 dB
Frequency Response: 40Hz - 18 kHz
Audio output (RCA): >1.5Vrms ±0.4V 10kΩ
Compatible discs and formats: CD-DA, CD-R/RW, MP3
RADIO
FM TUNER
Frequency Coverage: 87.5-108.0 MHz
Intermediate Frequency: 10.7 MHz
Sensitivity (S/N=30dB): 4μV
S/N ratio: >40dB
Stereo Separation: >20dB
AM TUNER
Frequency Coverage: 522-1620 kHz
Intermediate Frequency: 450 KHz
S/N ratio: >40dB
If at any time in the future you should need to dispose of this
product, please note that waste electrical products should not be
disposed of with household waste. Please recycle where
facilities exist. Check with Your Local Authority or retailer for
recycling advice. (Waste Electrical and Electronic Equipment
Directive)
GB-18
7. TROUBLESHOOTING
SYMPTOM
The unit will not
switch on
Disc cannot be
loaded or ejected.
No sound.
Sound skips.
The front panel
buttons do not
operate properly.
The radio does not
work.
CAUSE
SOLUTION
The +12V car ignition is not on.
Turn the ignition key to the “Accessory.” position in order to power
the radio.
The fuse of the vehicle powering the unit has blown.
Replace the vehicle fuse with a new one with the same capacity.
The ISO harness is not properly connected.
Remove the unit from the dashboard and check the electrical
connections.
The power cable fuse has blown.
Replace the fuse with a new one with the same capacity.
There is already a disc in the player.
Remove the disc in the player, and then insert a new one.
The disc has been Inserted upside down.
Insert the compact disc with the label facing upward.
Compact disc is extremely dirty or defective.
Clean the disc or try to play a new one.
Condensation is present in the player.
Leave the player off for an hour or so, and then try again.
The volume level is turned all the way down or the
mute function has been switched on.
Adjust the volume to a desired level or switch off the mute mode.
The wiring is not properly connected.
Check the connections.
The disc is extremely dirty or a defective disc.
Clean the compact disc and then try to play a new one.
The unit is installed at an angle of greater than 30°.
Fix the installation so that the unit is less than 30° from horizontal.
The built-in micro-processor is not operating properly
due to electrical noise.
Press the RESET button.
Front panel is not properly fixed into its place.
The antenna cable is not connected.
Check the antenna connector is properly connected.
The signals are too weak.
Select a station manually.
GB-19