1
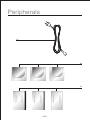
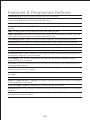
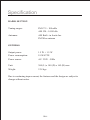
i-SX10
INSTRUCTION MANUAL
Warnings and Precautions
TO PREVENT FIRE OR SHOCK HAZARDS, DO NOT EXPOSE THIS UNIT TO
RAIN OR MOISTURE.
This symbol, located on back or bottom of the unit, is intended to alert the user to the
presence of uninsulated “dangerous voltage” within the product’s casing that may be
of sufficient magnitude to constitute a risk of electric shock to persons.
This symbol, located on back or bottom of the unit, is intended to alert the user to the
presence of important operating and maintenance (servicing) instructions in the literature accompanying the appliance.
Any use of the controls or an adjustment to the procedures other than those specified herein may
result in hazardous radiation.
To reduce the risk of electric shock, do not remove cover (or back). There are no user-serviceable parts inside. Please refer any servicing to qualified service personnel.
WARNING: Changes or modifications to this unit not expressly approved by the party responsible for compliance could void the user’s ability to operate the equipment.
NOTE: This equipment generates, uses, and can radiate radio frequency energy and, if not
installed and used in accordance with the instructions, may cause harmful interference to radio
communications. however, there is no guarantee that interference will not occur in a particular
installation. If this equipment does cause harmful interference to radio or television reception,
which can be determined by turning the equipment off and on, the user is encouraged to try to
correct the interference by one or more of the following measures:
• Reorient or relocate the receiving antenna.
• Increase the separation between the equipment and receiver.
• Connect the equipment into an outlet on a circuit different from that to which the receiver is
connected.
• Consult the dealer or an experienced radio/TV technician for help.
GB-1
Features
1
2
3
4
5
6
13
14
7
8
9
15
16
10
17
11
12
18
GB-2
Peripherals
19
20
21
GB-3
Features & Peripherals Defined
1 PLAY/PAUSE Press the PLAY/PAUSE button to play or pause an iPod.
2 NEXT/SEARCH Press the NEXT/SEARCH button to skip to the next track on an iPod. Press and hold
the NEXT/SEARCH button to search forward through a song.
3 HR The HR button is used to adjust the hour when setting the clock.
4 CLOCK SET Use the CLOCK SET button in conjunction with the MIN and HR buttons, when setting
the clock.
5 MIN The MIN button is used to adjust the minute when setting the clock.
6 PREV/SEARCH Press the PREV/SEARCH button to skip to the previous track on an iPod. Press and
hold the PREV/SEARCH button to search backwards through a song
7 iPod Docking Station Connect your iPod, iPod mini, iPod nano, or second generation iPod nano.
8 FM Antenna The FM Antenna is extendable and adjustable. An AM Antenna is built into the Radio.
9 AM / FM Switch to select between AM or FM Bands.
10 Line-In Use the Line-In jack to connect a first generation iPod shuffle or other digital audio device.
11 Line-Out Use the Line-Out jack to connect the appliance to an audio amplifier.
12 Video Out Plug the yellow connector of an AV Cord in the Video Output to send a video signal from a
Video iPod to a source (TV) with a Video Input.
13 LCD Display View the Time, PM Indicator, AM Indicator, iPod Indicator, and Radio Frequency
through this Liquid Crystal Display.
14 TUNING Turn the TUNING dial clockwise to increase the radio frequency and counter-clockwise to
decrease the radio frequency.
15 POWER OFF iPOD/AUX RADIO Use the Off/iPod Aux/Radio toggle switch to adjust the i-SWIO
mode between Off, iPod, Aux, or Radio.
16 VOLUME Turn the VOLUME dial clockwise to increase the volume and counter-clockwise to decrease
the volume.
17 AC Connector Plug in the detachable AC Cord here.
18 Battery Compartment (8 - C Batteries) The Battery Compartment allows the i-SWIO to be operated by
DC Power (Batteries Not Included).
19 AC Cord (230V / 50 Hz) The detachable AC Cord provides power to the radio.
20 iPod Inserts 1-3 Use these inserts to connect an iPod mini, 2nd generation iPod nano, or 1st generation
iPod nano.
21 iPod Inserts 4-6 Use these inserts to connect a 30GB iPod video, 60 + 80GB iPod video, 3rd and 4th
generation iPod, or iPod: U2 Edition.
GB-4
Operations
Setting the Clock
a. Press and hold the CLOCK SET button during power off or iPod/Aux mode.
b. While holding the CLOCK SET button, press the HR button to adjust the
hour and the MIN button to adjust the minute.
c. The PM indicator on the LCD Display will tell you if the time is set to PM,
and the AM indicator on the LCD Display will tell you if the time is set to AM.
Viewing Video or Photos from your iPod on an External Device
a. Connect a video cable to the video output on the appliance and the TV’s
video input.
b. Insert your iPod Video into the iPod Docking Station with the appropriate
adapter.
c. After your iPod Video is seated properly in the docking station, you will now
be able to control your iPod from the i-SWIO’s control panel. Use the PLAY/
PAUSE, NEXT/SEARCH, and PREV/SEARCH buttons to start play, pause
play and to move from one video or photograph to the next.
Connecting Other Audio Devices
a. Use a Line-In cord to connect a first generation iPod shuffle or other digital
audio device to the Line-In port.
b. Switch the POWER OFF iPOD/AUX RADIO Toggle Switch to iPOD/
AUX.
c. The first generation iPod shuffle or other digital audio device will now play
through the speakers of the i-SWIO.
If at any time in the future you should need to dispose of this product please
note that Waste electrical products should not be disposed of with household
waste. Please recycle where facilities exist. Check with your Local Authority
or retailer for recycling advice. (Waste Electrical and Electronic Equipment
Directive)
GB-5
Specification
RADIO SECTION
Tuning ranges:
FM 87.5 - 108 mHz
AM 520 - 1630 kHz
Antennas:
AM Built - in ferrite bar
FM Wire antenna
GENERAL
Output power:
1.5 W + 1.5 W
Power consumption:
18 WATTS
Power source:
AC: 230V - 50Hz
Unit:
300 (L) x 140 (D) x 165 (H) mm
Weight:
2.38 kgs
Due to continuing improvement, the features and the design are subject to
change without notice.
GB-6