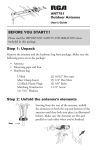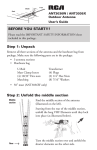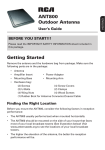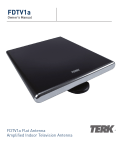
1
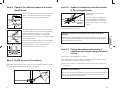
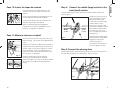
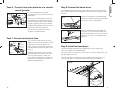
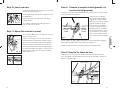
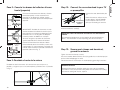
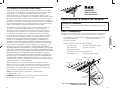
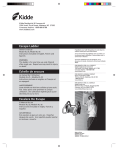
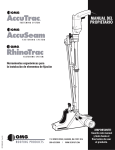
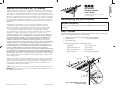
Audiovox Electronics Corporation (la “Compañia”) le garantiza a usted, el comprador
original de este producto que si, bajo condiciones y uso normales, se encontrara que
este producto o alguna pieza presenta defectos materiales o de mano de obra dentro
de los primeros 12 messes a partir de la fecha de compra original, tales defectos serán
reparados o reemplazados (a opción de la Compañia) sin cargo alguno por las piezas y
labores de reparación. Para obtener los servicios de reparación o reemplazo dentro de
los términos de esta Garantia, el producto junto con cualquier accesorio incluido en el
empaque original se entregarán con prueba de garantia. No devuelva este producto al
Distribuidor.
Esta Garantía no es transferible y no cubre un producto adquirido, mantenido
o utilizado fuera de los Estados Unidos o Canadá. Esta garantía no incluye la
eliminación de estática o ruido generados externamente. Esta garantía no incluye
los costos incurridos en la instalación remoción o reinstalación de este producto,
o, si es opinión de la Compañia, que este producto ha sufrido daños debido a
causas de fuerza mayor, alteraciones, instalación inadecuada, abuso, uso indebido,
negligencia o accidente. Esta garantia no incluye daños ocasionados por un
adapador de CA que no haya sido suministrado con el producto. EL ALCANCE DE
LA RESPONSABILIDAD DE LA COMPAÑIA BAJO ESTA GARANTÍA ESTÁ LIMITADO
A LA REPARACIÓN O EL REEMPLAZO PROVISTO ARRIBA Y, EN NINGÚN CASO,
DEBERÁ LA RESPONSABILIDAD DE LA COMPAÑIA EXCEDER EL PRECIO DE
COMPRA PAGADO POR EL COMPRADOR DE ESTE PRODUCTO. Esta Garantía
reemplaza cualesquiera otras responsabilidades o garantías expresas. CUALESQUIERA
GARANTÍAS IMPLÍCITAS, INCLUYENDO CUALQUIER GARANTÍA IMPLÍCITA DE
COMERCIABILIDAD O ADAPTABILIDAD PARA UN PROPÓSITO EN PARTICULAR
ESTARÁN LIMITADAS A LA DURACIÓN DE ESTA GARANTÍA. CUALQUIER ACCIÓN
PARA EL INCUMPLIMIENTO DE CUALQUIER GARANTÍA EN EL PRESENTE,
INCLUYENDO CUALQUIER GARANTÍA IMPLÍCITA, DEBERÁ PRESENTARSE DENTRO
DE UN PERÍODO DE 24 MESES A PARTIR DE LA FECHA DE COMPRA ORIGINAL. EN
NINGÚN CASO LA COMPAÑÍA SERÁ RESPONSABLE POR DAÑOS EMERGENTES O
INCIDENTALES. Ninguna persona ni representante está autorizado a asumir, a nombre
de la Compañía, ninguna responsabilidad salvo la expresada aquí en conexión con la
venta de este producto.
Algunos estados/provincias no permiten limitaciones sobre la duración de una garantía
implícita o la exclusión o la limitación de daños incidentales o emergentes, de modo
que es posible que las limitaciones o exclusiones anteriores no se apliquen en su caso.
Esta Garantía le confiere derechos legales específicos; según el estado/provincia,
puede disfrutar además de otros derechos.
ANT3038XR
Outdoor Antenna
User’s Guide
Para obtener instrucciones en español,
consulte la página 9.
Assembling the ANT3038XR
BEFORE YOU START!!!
Please read the IMPORTANT SAFETY INFORMATION sheet included in this
package.
Step 1: Unpack
Remove all three sections of the antenna and the hardware bag from package.
Make sure the following parts are in the package:
• (3) Antenna sections (rear, large/middle, and front booms)
• (1) Boom brace
• (2) Reflector booms
• (1) Hardware bag
The hardware bag contains the following pieces:
(2) U-Bolts
(2) Mast clamp inserts
(10) #10 Flange nuts
(8) #10 Washers
(4) 1/4” Flange nuts
(5) End caps
(4) #10 Screws
(1) Matching transformer
Boom Brace
Large Boom
Rear Boom
Front Boom
U.S.A.: Audiovox Electronics Corporation, 150 Marcus Blvd., Hauppauge, NY 11788
CANADÁ: Audiovox Return Center, c/o Genco, 6685 Kennedy Road, Unit #3 Door 16,
Mississauga Ontario L5T 3A5
Mast
(Not Included)
Fig.1: ANT3038XR fully assembled
(mast not inclued)
© 2010 Audiovox Accessories Corporation
ANT3038 US IB 01
Reflector
Booms
English
Garantía Limitada de 12 Meses
Find the two reflector booms and the front (or small)
boom. The two smaller elements on the reflector
booms face away from the small main boom.
Paso 12: Acople el conector de conexión coaxial
al TV o preamplificador
Acople el conector de conexión
coaxial al TV.
Fig. 14
Oriente hacia
las torres de
difusión
Fig. 1
IMPORTANT: Unfold the elements on each end of
the reflector boom so that the front of their locking
tabs face towards each other. The remaining
locking tabs can be unfolded in either direction.
Make sure that all of the elements are perpendicular
to the reflector boom.
Fig. 2
FRONT
Fig. 2A
Locking Tab
Connect the two reflector booms to the front boom
using two of the provided #10 nuts and screws.
The reflector booms should be parallel to the
smaller boom at this point. (See Fig. 1.)
Main Boom
Gire la antena hasta que obtenga
una imagen óptima. Posiblemente
necesitará a alguien que se fije en la
imagen del TV mientras usted gira la
antena.
AVISO: Oriente el extremo pequeño
de la antena hacia la emisora(s).
Importante: Oriente la Antena hacia las Torres de Difusión
Locales
Visite www.antennaweb.org para conocer las ubicaciones de las torres de
difusión locales. Esta información es sumamente importante para la lograr la
orientación correcta de la antena.
Paso 13: Fije las abrazaderas del mástil y el
conductor de conexión, ponga la antena
a tierra
Apriete bien las dos abrazaderas del mástil.
Step 3: Unfold the rest of the antenna
Unfold all the other elements on the antenna until they lock into place ensuring
that they are flat and parallel to each other. (See Fig. 3.)
Fig. 3
Fije el conductor de conexión coaxial al mástil (utilizando amarras de cable o
cinta aislante) para evitar que el viento lo derribe.
Ponga a tierra la antena y el mástil observando las instrucciones de puesta a
tierras adjuntas.
Remoción de la Antena
Siga las instrucciones de instalación exactamente a la inversa para remover
antena. Por su propia seguridad, siga las instrucciones para instalar la
antena comenzando con el último paso.
2
15
Español
Step 2: Connect the reflector booms to the front
(small) boom
Inserte dos tapas de extremo plásticas en los
extremos de la antena según se muestra en la
figura 11.
Inserte una tercera tapa de extremo plástica en el
extremo expuesto del sujetador del brazo.
Fig. 11
Inserte las dos últimas tapas de extremo en los
extremos de los brazos del reflector.
Utilice un martillo de goma para golpearlas
suavemente de manera de acomodarlas en los
extremos y asegurarlas en posición.
Step 4: Connect the middle (large) section to the
front (small) section
Find the middle (large) section. Locate the end of the middle section that
matches figure 4.
Remove the nut and screw in
the center. Slide the narrow
boom of the front (small)
section into the middle (large)
section. Make sure the
phasing lines are on the top
side of the small boom and the
black plastic element holders
Front
Middle
are also on this same side.
section
section
This is the top of the antenna.
(See figure 5.)
Paso 11: Monte la antena en el mástil
Tap lightly with a rubber mallet
on the end of the small boom
aligning the holes for the
screw. (See figure 4.)
Fig. 4
Tuercas #10
Sujetador del brazo
Inserto de las
abrazaderas
Brazo
principal
Inserto de
las abrazaderas
Fig. 12
Encuentre los dos pernos en U, cuatro tuercas de
brida de ¼ pulg. y los insertos de la abrazadera del
mástil.
Coloque los insertos de la abrazadera del mástil en
la parte interior de las abrazaderas del mástil en las
antenas según se muestra en la figura 12. Luego
inserte los pernos en U en las abrazaderas del
mástil y los insertos de las abrazaderas del mástil.
Fije las tuercas sin apretarlas.
Re-install the screw and nut;
be sure to tighten securely.
Step 5: Connect the phasing lines
Place the phasing lines from the front section over the studs. Secure them to
the studs with #10 flange nuts and washers. Tighten securely.
Deslice la antena sobre el mástil y apriete
levemente las dos abrazaderas del mástil.
(Consulte las figuras 12 y 13). La superficie superior
de la antena es el lado con las piezas plásticas
negras.
Phasing Lines
Fig. 13
Fig. 5
14
3
English
Paso 10: Inserte las tapas de extremo
Screw
Rear
section
Middle
section
Nut
Fig. 6
On the open end of the middle (large)
section, remove the rear nut and screw.
Find the rear section. Slide the narrow
boom of the rear antenna into the middle
(large) section. Tap lightly with a rubber
mallet on the end of the small boom,
aligning the holes for the screw. (See figure
6.)
Re-install the screw and nut; be sure to
tighten securely.
Paso 8: Conecte el sujetador del brazo
Coloque el sujetador del brazo en la parte superior de la antena. Asegúrese
que las abrazaderas del mástil (las secciones color latón) del sujetador del
brazo y la antena estén orientadas en la misma dirección.
Ubique el orificio para el tornillo en el brazo
del reflector y fije el sujetador con una de
las tuercas y tornillos #10 suministrados.
(Consulte la figura 8.)
Fig. 8
Fig. 9
Tuerca
Step 7: Connect the phasing lines
Phasing
line
Nut
Washer
Stud
Fig. 7
On the middle (large) section, near where
the middle and rear sections come
together, find the posts on the top and
bottom of the last element holder studs.
(See figure 7.)
Place the phasing lines from the rear
section over the studs, one on the top side
and one on the bottom. Then fasten them
to the posts with washers and #10 flange
nuts. Tighten securely.
Gire el sujetador del brazo hacia abajo y
hacia atrás. Forme una “V” con las bandas
de metal. Utilice una de las tuercas y tornillos
#10 suministrados para fijar la “V” a cada
lado del brazo. (Consulte la figura 9.)
Español
Step 6: Connect the rear section to the middle
(large) section
Tornillo
Paso 9: Instale el transformador
Encuentre la conexión del conductor en la parte inferior de la sección frontal
de la antena, justo detrás de los brazos del reflector.
Coloque dos arandelas en cada prisionero con rosca. Coloque una tuerca #10
sobre cada prisionero con rosca, pero no la apriete todavía.
Coloque los extremos del transformador entre las dos arandelas y apriete bien
las tuercas. (Consulte la figura 10.) Fije el conductor de conexión coaxial al
transformador.
Fig. 10
Transformador
Conexiones
del
conductor
4
13
Tornillo
Sección
posterior
Sección
central
Tuerca
Fig. 6
En el extremo abierto de la sección
central (grande), retire el tornillo y la tuerca
posteriores.
Encuentre la sección posterior. Deslice el
brazo delgado de la antena posterior en la
sección central (grande). Con un martillo
de goma, golpee suavemente el extremo
del brazo pequeño para alinear los orificios
para tornillo. (Consulte la figura 6.)
Vuelva a instalar el tornillo y la tuerca;
asegúrese de apretarlos bien.
Paso 7: Conecte las líneas de fase
Línea
de fase
Tuerca
Arandela
Prisionero
con rosca
Fig. 7
En la sección central (grande), cerca de
donde se intersectan las secciones central
y posterior, encuentre los postes en la
partes superior e inferior de los pernos del
sujetador del último elemento. (Consulte la
figura 7.)
Coloque las líneas de fase de la sección
posterior sobre los prisioneros con rosca,
uno en la parte superior y el otro en la
parte inferior. Asegúrelas a los prisioneros
con rosca con las arandelas y tuercas de
brida #10. Apriételas bien.
Step 8: Connect the boom brace
English
Paso 6: Conecte la sección posterior a la sección
central (grande)
Lay the boom brace on top of the antenna. Make sure the mast clamps (the
brass-colored sections) on the boom brace and antenna are facing the same
direction.
Locate the screw hole in the reflector boom
and attach the brace with one of the provided
#10 screws and nuts. (See figure 8.)
Fig. 8
Fig. 9
Nut
Swing the boom brace down towards the
rear. Form a “V” with the metal straps. Use
one of the provided #10 screws and nuts to
attach the “V” to each side of boom. (See
figure 9.)
Screw
Step 9: Install the transformer
Find the downlead connection on the bottom of the front section of the
antenna, just beyond the reflector booms.
Place two washers on each of the studs. Place a #10 nut on top of each stud,
but don’t tighten them yet.
Place the transformer ends between the two washers and tighten the nuts
securely. (See figure 10.) Attach the coax downlead to the transformer.
Fig. 10
Transformer
12
Downlead
connections
5
Insert two of the plastic end caps in the ends of the
antenna as shown in figure 11.
Insert a third plastic end cap in the exposed end of
the boom brace.
Insert the last two end caps on the ends of the
reflector booms.
Fig. 11
Use a rubber mallet to gently tap them into the
ends so that they are secure.
Step 11: Mount the antenna to a mast
#10 Nuts
Boom brace
Clamp insert
Main
boom
Clamp
insert
Fig. 12
Find the two U-bolts, four 1/4” flange nuts, and the
two mast clamp inserts.
Place the mast clamp inserts on the inside of the
mast clamps on the antennas as shown in figure
12. Then insert the U-bolts into the mast clamps
and mast clamp inserts. Attach the nuts loosely.
Slide the antenna over the mast and lightly tighten
the two mast clamps. (See figures 12 and 13.) The
top side of the antenna is the side with the black
plastic pieces on it.
Paso 4: Conecte la sección central (grande) a la
sección frontal (pequeña)
Encuentre la sección central (grande). Ubique el extremo de la sección central
que corresponda con la figura 4.
Retire la tuerca y el tornillo
en el centro. Deslice el brazo
delgado de la sección frontal
(pequeña) en la sección central
(grande). Asegúrese que las
líneas de fase se encuentren
en la parte superior del brazo
pequeño y que los sujetadores
Sección
Sección
de elementos plásticos negros
frontal
central
se encuentren en este mismo
lado. Esta es la parte superior
de la antena. (Consulte la figura
5.)
Fig. 4
Español
Step 10: Insert end caps
Con un martillo de goma, golpee suavemente el extremo del brazo pequeño
para alinear los orificios para tornillo. (Consulte la figura 4.)
Vuelva a instalar el tornillo y la tuerca; asegúrese de apretarlos bien.
Paso 5: Conecte las líneas de fase
Coloque las líneas de fase de la sección frontal sobre los prisioneros con
rosca. Asegúrelas a los prisioneros con rosca con las arandelas y tuercas de
brida #10. Apriételas bien.
Fig. 13
Líneas de fase
Fig. 5
6
11
Encuentre los dos brazos del reflector y el brazo
frontal (o pequeño). Los dos elementos más
pequeños en los brazos del reflector quedan
orientados en dirección opuesta al brazo principal
pequeño.
Fig. 1
IMPORTANTE: Desdoble los elementos en cada
extremo del brazo del reflector de manera que la
parte frontal de las lengüetas de bloqueo queden
orientadas entre sí. Las lengüetas de bloqueo
restantes pueden desdoblarse en cualquier
dirección. Asegúrese que todos los elementos
queden perpendiculares al brazo del reflector.
Fig. 2
PARTE
FRONTAL
Fig. 2A
Lengüeta de
bloqueo
Conecte los dos brazos del reflector al brazo
frontal utilizando dos de los tornillos y tuercas #10
suministrados. En estos momentos, los brazos del
reflector deben encontrarse paralelos al brazo más
pequeño. (Consulte la Fig. 1.)
Brazo principal
Step 12:
Connect the coax downlead to your TV
or preamplifier
English
Paso 2: Conecte los brazos del reflector al brazo
frontal (pequeño)
Connect the coax downlead to your
TV.
Fig. 14
Point toward
broadcast
towers
Rotate the antenna until you receive
the best picture. You will probably
need a helper to view the TV set
while you are rotating the antenna.
NOTE: Point the small end of the
antenna towards the station(s).
Important: Point The Antenna Toward Your Local Broadcast
Towers
Visit www.antennaweb.org to see the locations of your local broadcast
towers. This information is crucial in pointing your antenna correctly.
Step 13:
Secure mast clamps and downlead,
ground the antenna
Tighten the two mast clamps securely.
Secure the coaxial downlead to the mast (using cable ties or electrical tape) to
prevent it from whipping by the wind.
Paso 3: Desdoble el resto de la antena
Desdoble los demás elementos de la antena hasta que encajen en su
posición, y asegúrese que se encuentren planos y paralelos entre sí. (Consulte
la Fig. 3.)
Fig. 3
10
Ground the antenna and mast per the accompanying grounding instructions.
Antenna Removal
Removal of the antenna should be exactly the reverse of the installation
instructions. Please, for your own safety, follow the instructions for installing
the antenna starting with the last step first.
7
12 Month Limited Warranty
This Warranty is not transferable and does not cover product purchased,
serviced or used outside the United States or Canada. The warranty
does not extend to the elimination of externally generated static or noise.
This Warranty does not apply to costs incurred for installation, removal or
reinstallation of the product, or, if in the Company’s opinion, the product
has been damaged through acts of nature, alteration, improper installation,
mishandling, misuse, neglect, or accident. This warranty does not cover
damage caused by an AC adapter not provided with the product. THE
EXTENT OF THE COMPANY’S LIABILITY UNDER THIS WARRANTY IS
LIMITED TO THE REPAIR OR REPLACEMENT PROVIDED ABOVE AND, IN
NO EVENT, SHALL THE COMPANY’S LIABILITY EXCEED THE PURCHASE
PRICE PAID BY PURCHASER FOR THE PRODUCT. This Warranty is in lieu
of all other express warranties or liabilities. ANY IMPLIED WARRANTIES,
INCLUDING ANY IMPLIED WARRANTY OF MERCHANTABILITY OR FITNESS
FOR A PARTICULAR PURPOSE, SHALL BE LIMITED TO DURATION OF THIS
WARRANTY. ANY ACTION FOR BREACH OF ANY WARRANTY HEREUNDER,
INCLUDING ANY IMPLIED WARRANTY, MUST BE BROUGHT WITHIN A
PERIOD OF 24 MONTHS FROM THE DATE OF ORIGINAL PURCHASE. IN
NO CASE SHALL THE COMPANY BE LIABLE FOR ANY CONSEQUENTIAL
OR INCIDENTAL DAMAGES WHATSOEVER. No person or representative is
authorized to assume for the Company any liability other than expressed herein
in connection with the sale of this product.
Some states/provinces do not allow limitations on how long an implied
warranty lasts or the exclusion or limitation of incidental or consequential
damage so the above limitations or exclusions may not apply to you. This
Warranty gives you specific legal rights and you may also have other rights
which vary from state/province to state/province.
ANT3038XR
Antena Exterior
Guía del Usuario
Cómo montar la antena ANT3038XR
¡¡¡ANTES DE COMENZAR!!!
Lea la hoja de INFORMACIÓN IMPORTANTE DE SEGURIDAD incluida en
este empaque.
Paso 1: Desempaque
Extraiga las tres secciones de la antena y la bolsa de herrajes del empaque.
Asegúrese que todas las piezas se encuentren incluidas en el empaque:
• (3) Secciones de la antena (brazos posterior, grande/central y frontal)
• (1) Sujetador del brazo
• (2) Brazos del reflector
• (1) Bolsa de herrajes
Español
Audiovox Electronics Corporation (the “Company”) warrants to the original
retail purchaser of this product that should this product or any part thereof,
under normal use and conditions, be proven defective in material or
workmanship within 12 months from the date of original purchase, such
defect(s) will be repaired or replaced (at the Company’s option) without charge
for parts and repair labor. To obtain repair or replacement within the terms of
this Warranty, the product along with any accessories included in the original
packaging is to be delivered with proof of warranty coverage (e.g. dated bill of
sale), specification of defect(s), transportation prepaid, to the Company at the
address shown below. Do not return this product to the Retailer.
La bolsa de herrajes incluye las siguientes partes:
(2) Pernos en U
(2) Insertos de la
abrazadera del mástil
(10) Tuercas de brida #10
(8) Arandelas #10
(4) Tuercas de brida de ¼ pulg.
(5) Tapas de extremo
(4) Tornillos #10
(1) Transformador análogo
Sujetador del brazo
Brazo grande
Brazo posterior
Brazo frontal
U.S.A.: Audiovox Electronics Corporation, 150 Marcus Blvd.,
Hauppauge, NY 11788
CANADA: Audiovox Return Center, c/o Genco, 6685 Kennedy Road,
Unit #3 Door 16, Mississauga Ontario L5T 3A5
Mástil
(no incluido)
Brazos
del reflector
Fig.1: Antena ANT3038XR completamente
montada (mástil no incluido)
8
9