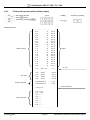
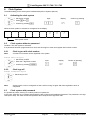
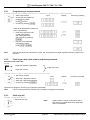
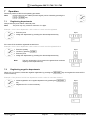
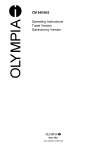
1
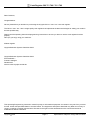
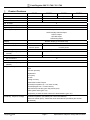
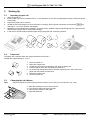
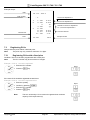
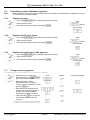
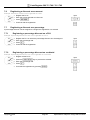
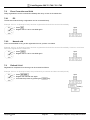
OLY MPIA
CM 75 / 760 / 761 / 762
Operating Instructions
Programming Instructions
Since 1903
www.olympia-vertrieb.de
Cash Register CM 75 / 760 / 761 / 762
Declaration of Conformity
CM 75 / 760 / 761 / 762
GB
The manufacturer hereby declares
that the equipment complies with the stipulations defined in the following guidelines and standards:
DE
The manufacturer hereby declares
that the equipment complies with the stipulations defined in the following guidelines and standards:
FR
Le fabricant déclare par la présente que l'appareil est conforme aux règlements et normes en vigueur:
ES
Por medio de la presente,
el fabricante declara que este aparato está conforme a lo dispuesto en las directivas y normas vigentes:
NL
De fabrikant verklaart hierbij dat het apparaat voldoet aan de bepalingen in de richtlijnen en normen:
2006/95/EC
2010/108/EC
EN 60950-1:2006 +A1:2009
EN 55022:2006 +A1:2007
EN 50024:1998 +A1:2001 +A2:2009
EN 61000-3-2:2000
EN 61000-3-3:2008
Olympia Business Systems
Doc: 947500001
7th December 2010
Olympia
2010
Heinz Prygoda
Page 2
Managing Director
Specifications subject to change without notice!
Cash Register CM 75 / 760 / 761 / 762
Dear Customer,
Congratulations!
We are pleased that you decided on purchasing the Olympia CM 75 / 760 / 761 / 762 cash register.
The CM 75 / 760 / 761 / 762 is a high-quality cash register that implements the latest technologies to satisfy your needs in
the best possible way.
Please read the operating instructions/programming instructions to ensure you learn to use the cash register functions
properly.
We hope you enjoy using your machine!
Kindest regards
Olympia Business Systems Vertriebs GmbH
Olympia Business Systems Vertriebs GmbH
Zum Kraftwerk 1
D-45527 Hattingen
Deutschland
Internet: www.olympia-vertrieb.de
This Operating/Programming Instruction manual is purely for informational purposes. Its content is not part of any contract
for sale. All the data specified relates to nominal values. The equipment and options described may differ from country to
country according to national requirements. We reserve the right to make amendments to the content and technical
modifications without notification.
Olympia
2010
Page 3
Specifications subject to change without notice!
Cash Register CM 75 / 760 / 761 / 762
Intended Use
This cash register is exclusively intended for processing cash register business indoors. Any other use is considered
unintended use.
General Information / Safety Notes
●
●
●
●
●
●
●
●
Ensure that the mains power supply corresponds to that specified on the rating plate located on the rear side of the
cash register.
This cash register is a highly sophisticated piece of equipment. Never attempt to repair it yourself. If repairs should
become necessary, please bring the cash register to an authorised service centre or the sales outlet.
Never insert metallic objects, such as a screwdriver, paper clips etc., in the cash register. This could damage the cash
register and also exposes you to the risk of an electric shock.
Always switch the cash register off when it no longer needs to be used.
Clean any dust from the cash register by wiping it gently with a dry cloth. Never use water or solvents, such as paint
thinner, spirit etc., to clean the cash register.
To disconnect the power supply fully, disconnect the plug from the power socket.
Never expose the cash register to extreme temperatures.
Keep all the transport locks in a safe place for future use. The transport locks must be reinstalled for any future
transportation of the cash register.
Transport Locks
Before the cash register can be put into operation, remove any transport locks installed and store them for future use.
Important transport note: In the case of transport damage, the unit must be returned together with the packaging,
Operating/Programming Instruction manual and accessories.
Connecting to the Power Supply
Before connecting the cash register to the mains power supply, please check that the voltage and frequency
specifications stipulated on the rating plate coincide with the local power supply.
Safety note:
Note:
The power socket must be close to the cash register and easily accessible. This means that the
cash register can be disconnected from the power supply quickly in an emergency.
All the data is retained following disconnection from the power supply. The batteries ensure the data is
retained for approx. 2 months after the cash register has been disconnected from the power supply.
Printer Mechanism
Attention: Observe the following information to ensure long, trouble-free operation:
● Never
● print without any paper installed!
● pull the paper while the printer is operating!
● use poor quality paper!
● insert paper rolls which have already been used!
● tamper with the printer using hard objects or move the drive by hand!
● Pay attention to the markings indicating the end of the paper roll.
Change the paper roll immediately.
● Have the cash register / printer mechanism serviced regularly by an authorised service centre.
Olympia
2010
Page 4
Specifications subject to change without notice!
Cash Register CM 75 / 760 / 761 / 762
Table of Contents
Declaration of Conformity ....................................................................................................................................................... 2
Intended Use........................................................................................................................................................................... 4
General Information / Safety Notes ........................................................................................................................................ 4
Transport Locks ...................................................................................................................................................................... 4
Connecting to the Power Supply ............................................................................................................................................ 4
Printer Mechanism .................................................................................................................................................................. 4
Table of Contents.................................................................................................................................................................... 5
1
Product Features ..................................................................................................................................................... 7
2
2.1
2.2
2.3
Starting Up............................................................................................................................................................... 8
Inserting a paper roll........................................................................................................................................... 8
Paper reel ........................................................................................................................................................... 8
Changing the ink ribbons.................................................................................................................................... 8
3.1
3.2
Key Switch ............................................................................................................................................................... 9
Key switch positions ........................................................................................................................................... 9
Keys.................................................................................................................................................................... 9
3
4
Keyboard ............................................................................................................................................................... 10
Changing the key labels ................................................................................................................................... 10
CM 75 keyboard ............................................................................................................................................... 10
4.2.1
Original English labelling............................................................................................................................. 10
4.2.2
German key labelling .................................................................................................................................. 10
4.3
CM 760 / 761 / 762 keyboard ........................................................................................................................... 11
4.3.1
Original English labelling............................................................................................................................. 11
4.3.2
German key labelling .................................................................................................................................. 11
4.4
Explanation of the key functions....................................................................................................................... 12
4.1
4.2
5
Programming ......................................................................................................................................................... 14
Programming the date...................................................................................................................................... 14
Programming the time ...................................................................................................................................... 14
Programming the VAT rate............................................................................................................................... 14
Programming a percentage discount ............................................................................................................... 15
Programming departments (DP) ...................................................................................................................... 15
5.5.1
Programming department status and fixed price ........................................................................................ 15
5.5.2
Printing the department programme ........................................................................................................... 16
5.6
Programming the PLU (price look up).............................................................................................................. 17
5.6.1
Programming the price and department assignment .................................................................................. 17
5.6.2
Programming the PLU status and department assignment ........................................................................ 17
5.6.3
Printing the PLUs programmed................................................................................................................... 18
5.7
Programming foreign currencies ...................................................................................................................... 18
5.8
System options ................................................................................................................................................. 19
5.8.1
Programming system settings..................................................................................................................... 19
5.8.2
Printing the system options (dump report) .................................................................................................. 21
5.1
5.2
5.3
5.4
5.5
6
Clerk System ......................................................................................................................................................... 22
6.1
Activating the clerk system............................................................................................................................... 22
6.2
Clerk system without a password..................................................................................................................... 22
6.2.1
Clerk log-on with clerk number.................................................................................................................... 22
6.2.2
Clerk logs off ............................................................................................................................................... 22
6.3
Clerk system with password............................................................................................................................. 22
6.3.1
Programming a clerk password................................................................................................................... 23
6.3.2
Clerk log-on with clerk number and clerk password ................................................................................... 23
6.3.3
Clerk logs off ............................................................................................................................................... 23
Olympia
2010
Page 5
Specifications subject to change without notice!
Cash Register CM 75 / 760 / 761 / 762
7
Operation ............................................................................................................................................................... 24
7.1
Registering departments .................................................................................................................................. 24
7.2
Registering negative departments ................................................................................................................... 24
7.3
Registering PLUs ............................................................................................................................................. 25
7.3.1
Registering PLUs with a fixed price ............................................................................................................ 25
7.3.2
Registering a PLU with free pricing............................................................................................................. 26
7.3.3
Registering negative PLUs.......................................................................................................................... 26
7.4
Concluding receipts / Methods of payment ...................................................................................................... 27
7.4.1
Payment by cash......................................................................................................................................... 27
7.4.2
Payment by EC card / check....................................................................................................................... 27
7.4.3
Payment by credit card / credit approval..................................................................................................... 27
7.5
Foreign currency payment................................................................................................................................ 27
7.6
Registering a discount as an amount............................................................................................................... 28
7.7
Registering a discount as a percentage........................................................................................................... 28
7.7.1
Registering a percentage discount on a PLU ............................................................................................. 28
7.7.2
Registering a percentage discount on a subtotal........................................................................................ 28
7.8
Error Correction and Void................................................................................................................................. 29
7.8.1
EC ............................................................................................................................................................... 29
7.8.2
Normal void ................................................................................................................................................. 29
7.9
Refund / Void.................................................................................................................................................... 29
7.10
Received on account operations...................................................................................................................... 30
7.11
Paid out operations .......................................................................................................................................... 30
7.12
Printing function................................................................................................................................................ 31
7.13
Opening the cash drawer without a sale .......................................................................................................... 31
7.14
Printing a receipt on/off .................................................................................................................................... 32
7.15
Printing a copy of the receipt............................................................................................................................ 32
8
8.1
8.2
8.3
Training Mode........................................................................................................................................................ 32
Activating Training mode.................................................................................................................................. 32
Practising in Training mode.............................................................................................................................. 32
Deactivating Training mode.............................................................................................................................. 32
9.1
9.2
9.3
Cash Register Reports .......................................................................................................................................... 33
Basic information.............................................................................................................................................. 33
Overview of cash register reports..................................................................................................................... 33
Explanation of the Z1 day's financial report ..................................................................................................... 34
10.1
10.2
10.3
10.4
Eliminating Problems............................................................................................................................................. 35
Error messages in the display .......................................................................................................................... 35
Display indicators ............................................................................................................................................. 35
Printer malfunction ........................................................................................................................................... 35
Resetting the cash register to its default settings............................................................................................. 35
9
10
11
Options .................................................................................................................................................................. 36
11.1
Bank note verifier (Euro) .................................................................................................................................. 36
11.2
Rechargeable battery ....................................................................................................................................... 37
11.2.1 Technical data ............................................................................................................................................. 37
11.2.2 Installation of the rechargeable battery....................................................................................................... 37
Olympia
2010
Page 6
Specifications subject to change without notice!
Cash Register CM 75 / 760 / 761 / 762
1
Product Features
Feature
CM 75
CM 760
CM 761
CM 762
Yes
No
Yes (small)
Yes (large)
Cash drawer
No. of departments
8
16
No. of PLUs
99
200
No. of clerks
8
No. of VAT rates (tax rates)
4
Type of payment
Cash, check, credit card
Cash register reports
X1/Z1 day's financial report
X2/Z2 monthly financial report
X/Z PLU report
X/Z clerk report
X/Z training report
Display
Numeric display (9-character LED)
Customer display
Printer
No
Yes
EPSON M-31
numeric printer
EPSON M-42
numeric printer
Printer type
Single station roll printer
Printing speed (lines per
second)
Ink ribbon
1.0
1.4
IR-30
IR-40 = Size # 744
No. of columns
13
Paper width
57.5 ± 0.5 mm
Breakdown frequency
(MCBF)
300,000 lines
Programmability
Date
Time
VAT rate (tax rate)
Department
PLU (item)
-% rate
Foreign currency
Grand total & clear Z report
Decimal point position (0. / 0.0 / 0.00 / 0.000)
Time display(24-hour / 12-hour format)
Date format (month-day-year / day-month-year)
Clerk system active (yes / no)
Compulsory to enter the clerk number for all transactions (yes / no)
Options (not contained in scope
of delivery, subject to charge)
Olympia
2010
Battery: to operate the cash register without a power cable for approx. 5 hours
continuous operation (OLYMPIA part number 947990002).
Bank note verifier (Euro): Tests bank notes are authentic (OLYMPIA part number
947990003).
Page 7
Specifications subject to change without notice!
Cash Register CM 75 / 760 / 761 / 762
2
Starting Up
2.1
1.
2.
3.
4.
5.
6.
Inserting a paper roll
Open the printer lid.
Insert a paper roll of 57 mm width and max. 70 mm diameter. Do not use recycled paper because it wears the printer
more quickly.
Prepare the paper roll for insertion.
Thread the end of the paper roll, which has been cut straight, into the printer mechanism and press the Feed key
until approx. 10 cm of it has been transported.
Depending on the intended use (calculation or journal mode), thread the paper strip through the slot in the printer lid
and tear off the paper strip on the lid's tear-off edge.
In the case of journal mode, thread the paper strip in the paper reel. Close the printer lid.
2.2
Paper reel
The paper reel is required when the receipt should be wound onto it.
Change the system setting no. 18 to 1.
1.
2.
3.
4.
5.
Open the printer lid.
Remove the paper reel.
Thread the end of the journal paper in the slit in the paper reel.
Insert the paper reel in the reel guides provided for it.
To remove the journal paper after it has been rolled up on the reel, remove the
paper reel and pull the journal roll off.
6. Reinsert the paper reel.
7. Close the printer lid.
2.3
Note:
Changing the ink ribbons
Only use original ink ribbons (Group IR-30 for CM 75, IR-40, Size # 744 for CM 760 / 761 / 762).
1.
2.
3.
4.
Olympia
2010
Open the small flap in front of the printer lid.
Lift out the ink ribbon using the grip (left).
Insert a new ink ribbon in the guide.
Close the printer lid.
Page 8
Specifications subject to change without notice!
Cash Register CM 75 / 760 / 761 / 762
3
Key Switch
3.1
Key switch positions
The key can be turned to five different positions:
OFF
REG
X
Z
PRG
The cash register
is off
Registration mode
Print report without
memory deletion
Print report with
memory deletion
Programming mode
3.2
Keys
Six different keys are available for use with the cash register:
Key
identification
No. of keys
S
Switch position
OFF
REG
X
2
X
X
X
Z
2
X
X
X
X
P
2
X
X
X
X
Olympia
2010
Page 9
Z
PRG
X
Specifications subject to change without notice!
Cash Register CM 75 / 760 / 761 / 762
4
Keyboard
In its standard form, the cash register leaves the factory with English labels on the keyboard.
It is possible to apply labels in different languages on the keys. Keyboard sheets in various languages are enclosed with
the cash register for this purpose.
4.1
Changing the key labels
Proceed as follows:
1. Remove the transparent cap from the key.
If it is easier for you, carefully remove the entire key beforehand.
2. Replace the existing key label with a new label.
3. Replace the transparent cap back on the key.
If you removed the entire key, replace the key carefully back on the keyboard.
4.2
CM 75 keyboard
4.2.1
Original English labelling
4.2.2
German key labelling
Olympia
2010
Page 10
Specifications subject to change without notice!
Cash Register CM 75 / 760 / 761 / 762
4.3
CM 760 / 761 / 762 keyboard
4.3.1
Original English labelling
4.3.2
German key labelling
Olympia
2010
Page 11
Specifications subject to change without notice!
Cash Register CM 75 / 760 / 761 / 762
4.4
Explanation of the key functions
Key
!
!
!
!
!
!
!
!
!
!
Explanation
Press and hold the FEED key to continue feeding the receipt or journal paper until the key is
released.
The RA key is used to record payments made into the cash register.
The total amount received on account is recorded in the financial report.
The PO is used to record amounts removed from the cash drawer.
The total amount registered appears separately in the financial report.
The EC key is used to cancel an incorrect registration immediately after it has been entered.
The error correct total is recorded in the financial report.
The RETOUR/- key is used to subtract an amount from the total amount of a sale. The
financial report records the (-) key total. The RETOUR/- key is used for refund transactions.
The refund total is recorded in the financial report.
VOID key is used to complete the cancellation of an item within a registration which has
! The
not yet been concluded. The void total is recorded in the financial report.
The CLR or CLEAR is used to delete all the entries made using the numeric keyboard or
*! the
X/TIMEt key before the entries have been finalised by pressing a department or function
2 key. The CLR or CLEAR is also used to clear error states.
!
Numeric keys:
!
The numeric keys are used to enter numbers.
The . is used to enter the decimal point.
!
!
! PLU (Price Look-Up) key.
!
!
!
Olympia
2010
The CLERK key is used to register a clerk.
The % - key is used to subtract a percentage from a PLU or the total amount of a sale. The
total amount registered by the % - key is recorded in the financial report.
The X/TIME key is used repeat (multiply) entries for departments or refunds.
Page 12
Specifications subject to change without notice!
Cash Register CM 75 / 760 / 761 / 762
Key
Explanation
%)!
$(!
#'!
"&!
The Department keys serve to register departments.
Note: The CM 75 has 8 departments. The CM 760 / 761 / 762 have 16 departments.
$(,02
#'+/2
"&*.2
!%)-2
!
2
!
!
!
!
!
!
!
!
Olympia
2010
The Receipt ON/OFF key is used to switch printout of the receipt off or on.
This key is used to print a copy of the receipt.
The CHECK key is used for transactions made with a cheque.
The FC key is used for converting amounts into a foreign currency.
The #/NS (NS = No Sale) is used for operations in which entries should not be added. It
can be use to print a maximally 7 digit number on the receipt. The entry does not affect
other sales totals.
The #/NS key is used to open the cash drawer.
The CARD key is used for transactions made with a credit card.
Press the SUB-TOTAL key to display the total amount of the sale.
The CASH key is used for transactions made with cash.
Page 13
Specifications subject to change without notice!
Cash Register CM 75 / 760 / 761 / 762
5
Programming
5.1
Programming the date
Example: 15 June 2010
●
Set the key to PRG
Enter the date as 6 digits
(DDMMYY)
●
Confirm by pressing #/NS
●
5.2
Input
Display
!
1506,10
Confirm by pressing
!
Programming the time
Example: 9:30 a.m.
●
Set the key to PRG
Enter the time as 4 digits (hhmm)
●
Confirm by pressing X/TIME
●
5.3
Input
Display
9,30
Confirm by pressing
!
Programming the VAT rate
A maximum of four different VAT (Value Added Tax) rates can be programmed.
Note:
On leaving the factory, the following value added tax rates are pre-programmed: TX 1 = 19% and TX 2 = 7%.
If these rates correspond with those you need, no adjustments to the programme are necessary at this point.
Example 1: VAT rate 1 is 19%
●
●
●
Set the key to PRG
Enter the storage location
(1, 2, 3 or 4)
Confirm by pressing
SUB-TOTAL
●
Enter the VAT rate
(to 3 decimal places but without a
decimal point)
●
Confirm by pressing CASH
Input
Display
Confirm by pressing
!
0,01
!
!
!
19,000
!
Example 2: VAT rate 2 is 7%
Refer to instructions in Example 1.
Input
Display
0,02
!
! 7,000
Olympia
2010
Page 14
Confirm by pressing
!
!
Specifications subject to change without notice!
Cash Register CM 75 / 760 / 761 / 762
5.4
Programming a percentage discount
You can enter a discount value from 0.00 to 99.99%.
Example: 10% discount
●
Set the key to PRG
Enter the discount value as
4 -digits (10% = 1000).
●
Confirm by pressing % -
●
5.5
Input
Display
!10,00
Confirm by pressing
!
Programming departments (DP)
In the case of the CM 75, eight departments can be programmed and for the CM 760 / 761 / 762 sixteen departments.
CM 75:
On leaving the factory, Departments 1 to 4 are already assigned VAT rate 1 at 19% and Departments 5 to 8
are assigned VAT rate 2 at 7%.
CM 760 / 761 / 762: On leaving the factory, Departments 1 to 8 are already assigned VAT rate 1 at 19% and Departments
9 to 16 are assigned VAT rate 2 at 7%.
All the departments are set up as an itemised department with free pricing.
If these settings correspond with those you need, no adjustments to the programme are necessary at this point.
5.5.1
Programming department status and fixed price
Department status (3-digit)
1st digit
Itemised department
0
Single item department
1
2nd + 3rd digit
No VAT
00
VAT rate 1
01
VAT rate 2
02
VAT rate 3
03
VAT rate 4
04
Price entry
Free pricing
000
Fixed price
Enter the price with the number of decimal places
Example 1: DP1 should be set-up as an itemised department at VAT rate 1 (19%) and without a fixed price.
●
●
●
●
Olympia
2010
Set the key to PRG
Enter status S1 and S2 as 3 digits
and confirm by pressing
CHECK
Enter fixed price or free pricing
Assign the programmed settings
to the department by pressing the
corresponding DP key, in this
case: DP1
Input
Display
Confirm by pressing
!
0,01
!
!
0,00
"!
Page 15
Specifications subject to change without notice!
Cash Register CM 75 / 760 / 761 / 762
Example 2: DP2 should be set-up as an itemised department at VAT rate 2 (7%) and with a fixed price of 5.00 € (system
option 1 in default setting: 2 decimal places).
●
●
●
●
5.5.2
Set the key to PRG
Enter status S1 and S2 as 3 digits
and confirm by pressing
CHECK
Enter fixed price or free pricing
Assign the programmed settings
to the department by pressing the
corresponding DP key, in this
case: DP1
Input
Display
Confirm by pressing
!
0,02
!
!
5,00
"!
Printing the department programme
●
Set the key to PRG
●
Press 8 6 times
●
Confirm by pressing CASH
Input
Display
!
8888,88
Confirm by pressing
!
Example printout:
1 = DP number
1
2
3
4
5
6
7
8
Olympia
2010
10・00
001
20・00
002
30・00
003
40・00
004
50・00
000
60・00
001
70・00
002
90・00
000
Page 16
TX1
CK
TX2
CK
TX3
CK
TX4
CK
10.00 = fixed price, TX1 = VAT rate 1
001 = department status
CK
CK
CK
CK
Specifications subject to change without notice!
Cash Register CM 75 / 760 / 761 / 762
5.6
Programming the PLU (price look up)
99 PLUs can be programmed for the CM 75, and 200 PLUs for the CM 760 / 761 / 762.
PLUs are programmed in two steps:
● Enter the price and department assignment for all PLUs.
● Enter the PLU status and department assignment for all PLUs.
(Not necessary if the PLU is operated with a fixed price.)
5.6.1
Programming the price and department assignment
Example: PLU 12 must be priced at 2.50 € and is assigned to Department 1.
●
Set the key to PRG
●
Press X/TIME
●
Enter the required
PLU number
●
Confirm by pressing PLU
●
Enter the fixed price of the PLU
and assignment it to the
department required by
pressing the relevant
department key DP1 .
Input
●
Proceed in the same way for
the other PLUs.
Conclude input by pressing
X/TIME
Confirm by pressing
!
!
P001 0,00
P12 0,12
!
!
!
2,50
"!
P13 0,00
!
The next PLU automatically
appears in the display.
●
Display
!
!
5.6.2
Programming the PLU status and department assignment
Note:
This step is only necessary for PLUs which should also be able to operate with free pricing.
PLU status (1 digit)
Fixed price only
0
Also with free pricing
1
Example: In the case of PLU 12 (Department 1), free pricing is permitted.
●
Set the key to PRG
●
Press PO
●
Enter the PLU number to be
programmed
●
Confirm by pressing PLU
●
Enter the PLU status
Confirm by pressing the
relevant department key
DP1 .
●
The next PLU automatically
appears in the display.
●
●
Olympia
2010
Proceed in the same way for
the other PLUs.
Conclude input by pressing
PO
Input
Display
Confirm by pressing
!
!
P001 0,00
P12 0,12
!
!
!
0,01
"!
!
P13 0,00
!
!
Page 17
!
Specifications subject to change without notice!
Cash Register CM 75 / 760 / 761 / 762
5.6.3
Printing the PLUs programmed
●
Set the key to PRG
●
Press PLU
Input
!
Example printout:
01 = PLU number
1 = Department number of the
department assigned
5.7
01
1
02
2
01
3
0
1・00
1
2・00
0
3・00
TX1
0 = PLU status
1.00 = price, TX1 = VAT rate 1
TX2
Programming foreign currencies
A maximum of 4 foreign currencies can be programmed.
The following information must be entered for the programming process:
● Foreign currency identification (1, 2, 3 or 4)
● Number of decimal places for the exchange rate (EXP): 0 to 8 decimal places are possible
● Decimal places for the foreign currency (DP): 0 to 3 decimal places are possible
● Exchange rate (RATE): 6-digit entry from 000001 to 999999
Example: Foreign currency no. 1: Euro to US Dollars (1 USD = 0.76494 EURO) as foreign currency no. 1
●
Set the key to PRG
Enter the foreign currency
identification, here: 1
●
Confirm by pressing FC
●
Enter
● EXP, here: 5
● DP, here: 2
● RATE, here: 076494
Confirm by pressing
CASH
●
●
Olympia
2010
Input
!
Display
0,01
!
520764,94
!
Page 18
Confirm input by pressing
!
!
Specifications subject to change without notice!
Cash Register CM 75 / 760 / 761 / 762
5.8
System options
The basic program settings of the cash register are stored in the system options.
5.8.1
Programming system settings
Example: Change the time display to the 12-hour format.
●
Set the key to PRG
Enter the system option number and
status number
(2 or 3 digits)
●
Confirm by pressing RA
●
Input
Display
!
41
Confirm by pressing
!
The default settings appear in bold print.
Note:
System option
1
Status
0
Decimal point position: 0 (no point)
1
Decimal point position: 0.0
2
Decimal point position: 0.00
3
Decimal point position: 0.000
2
3
4
5
6
7
8
9
10
11
12
Setting
(reserved)
1
Net price (exclusive of tax)
2
Gross price (including tax)
0
Time: 24-hour format
1
Time: 12-hour format
0
Print total taxable amount: No print
1
Print total taxable amount: Print
0
Print net total for each tax rate: No print
1
Print net total for each tax rate: Print
0
Date format: Month-Day-Year
1
Date format: Day-Month-Year
0
Clerk system not active
1
Clerk system active
0
Clerk log on not active after each transaction
1
Clerk log on active after each transaction
0
Print extra line "Net Total": No print
1
Print extra line "Net Total": Print
0
Zero skip printing for Z-report
1
No zero skip printing for Z-report
(reserved)
- Continued on next page -
Olympia
2010
Page 19
Specifications subject to change without notice!
Cash Register CM 75 / 760 / 761 / 762
System option
Status
Setting
No special European rounding
0
1
13
2
3
14
15
16
17
18
19
20
Olympia
2010
Rounding occurs after pressing the SUB-TOTAL and CASH keys.
If no special European rounding has been selected, rounding is performed
according to commercial 5/4 rounding: If the first decimal place to be rounded is
a 0, 1, 2, 3 or 4, the number is rounded down. If the first decimal place to be
rounded is a 5, 6, 7, 8 or 9, the number is rounded up.
European rounding: Switzerland
0.01 – 0.02 = 0.00
0.03 – 0.07 = 0.05
0.08 – 0.09 = 0.10
European rounding: Sweden
0.00 – 0.24 = 0.00
0.25 – 0.74 = 0.50
0.75 – 0.99 = 1.00
European rounding: Denmark
0.00 – 0.12 = 0.00
0.13 – 0.37 = 0.25
0.38 – 0.62 = 0.50
0.63 – 0.87 = 0.75
0.88 – 0.99 = 1.00
0
Printing of an additional bill permitted
1
Printing of an additional bill not permitted
0
Z1 and Z2 counters are not deleted after Z-financial report printout
1
Z1 and Z2 counters are deleted after Z-financial report printout
0
Grand Total is not deleted after Z1 financial report printout
1
Grand Total is deleted after Z1 financial report printout
0
Grand Total is not printed on the financial report
1
Grand Total is printed on the financial report
0
Receipt mode
1
Journal mode (the winding reel is driven)
0
Basic currency is the local currency (amount ÷ conversion factor)
1
Basic currency is foreign currency (amount × conversion factor)
0
Refunds are printed on the financial report
1
Refunds are not printed on the financial report
Page 20
Specifications subject to change without notice!
Cash Register CM 75 / 760 / 761 / 762
5.8.2
Printing the system options (dump report)
●
Set the key to PRG
●
Press 9 6 times
●
Confirm by pressing CASH
Input
Display
!
!
Confirm by pressing
9999,99
!
Example printout:
System options
01
03
04
05
06
07
08
09
10
11
12
13
14
15
16
17
18
19
20
2
2
0
1
0
1
0
0
1
0
1
0
0
0
1
0
0
0
0
RA
RA
RA
RA
RA
RA
RA
RA
RA
RA
RA
RA
RA
RA
RA
RA
RA
RA
RA
Status
%- rate
VAT rates
Foreign currencies
10・00 -%
-%
10・000
20・000
30・000
40・000
TX1
TX2
TX3
TX4
02000001
02000001
1@
2@
1234 Z
Clerk passwords
Olympia
2010
#1
#2
#3
#4
#5
#6
#7
#8
Z-report password
111
222
-------------
Page 21
Specifications subject to change without notice!
Cash Register CM 75 / 760 / 761 / 762
6
Clerk System
The default setting for the clerk system is deactivated (refer to System Option 8).
6.1
Activating the clerk system
●
Set the key to PRG
●
Press 8 and 1 .
●
Confirm by pressing RA .
Input
Display
!
0,81
Confirm by pressing
!
When the clerk system is activated, a dot appears in the display:
0.
.
0
0
Clerk system active
6.2
Clerk system without a password
Condition: The clerk system is activated.
If no password has been programmed for a clerk, that clerk logs on at the cash register with his clerk number.
6.2.1
Clerk log-on with clerk number
Note:
A maximum of 8 clerks can be registered in the system.
Example: Clerk no. 6 logs on.
●
Set the key to REG
Enter the 1-digit clerk number
●
Confirm by pressing CLERK
●
6.2.2
Input
!
Display
0,06
Confirm by pressing
!
Clerk logs off
Example: A salesperson logs off.
●
Note:
6.3
Set the key to OFF
System option 9 can be configured so that a clerk must log on again after each registration which is
completed.
Clerk system with password
It is possible to protect clerk log on codes by means of a password.
In this case, clerks log on by entering their respective clerk number and an additional password. The password is a 3-digit
code (000 to 999). The clerk number and password thus comprise the 4-digit clerk code.
Olympia
2010
Page 22
Specifications subject to change without notice!
Cash Register CM 75 / 760 / 761 / 762
6.3.1
Programming a clerk password
Example: Programming the password for clerk no. 1 (password: 456) and clerk no. 2 (password: 987).
Set the key to PRG
Access the clerk password
programming mode:
press 4 6 times
●
●
Confirm by pressing CASH
●
Enter all the passwords in sequence
(max. 8 passwords):
●
Enter the 4-digit clerk code
(1-digit clerk number
and 3-digit password)
and conclude by pressing
CLERK .
●
Exit from clerk password
programming mode:
press CLR / CLEAR .
Input
Display
!
!
4444,44
! 14,56
! 29,87
Confirm by pressing
!
!
!
*!
!
/
Note:
If 000 is entered as the password for a clerk, the clerk system once again operates without a password for
this clerk.
6.3.2
Clerk log-on with clerk number and clerk password
Structure of the clerk code
1234
3-digit clerk password (000-999)
4-digit clerk code
1-digit clerk number
Example: Clerk no 1 logs on with password "456" (clerk code: 1456).
●
Set the key to REG
Enter the 1-digit clerk number
Enter the 3-digit clerk password
●
Confirm by pressing CLERK
●
●
Input
Display
Confirm by pressing
!
1
!14,56
!
!
Clerks remain logged on until they log off properly (see below).
Note:
If an incorrect password is entered, error message "E" appears in the display.
6.3.3
Clerk logs off
Example: A salesperson logs off.
●
Olympia
Set the key to OFF
2010
Note:
Page 23
System option 9 can be configured so that a
clerk must log on again after each registration
which is completed.
Specifications subject to change without notice!
Cash Register CM 75 / 760 / 761 / 762
7
Operation
Set the key switch to REG for all operating processes.
Note:
7.1
Incorrect input or error states (acoustic signal) can be cleared by pressing the
CLR / CLEAR key.
Registering departments
Always enter the price without a decimal point!
Note:
The price may only contain a maximum of 7 digits.
Example 1: A PLU from department 1 with a value of 1.00 € must be registered.
●
●
Enter the price
Assign the department by pressing the relevant department key
Input
!
"!
If the same PLU should be registered several times:
Example 2: A PLU from department 3 with a value of 3.00 € must be registered twice.
●
Enter the quantity
●
Confirm by pressing X/TIME
●
Enter the price
Assign the department by pressing the relevant department key
●
Note:
7.2
Input
The sum of Quantity x Price must not be greater than maximum
capacity of the report memory!
!
!
!
$!
Registering negative departments
When a PLU is returned, initiate the negative registration by pressing the RETOUR/- key and register the returned PLU
in the normal way.
Example 3: Two pieces of a PLU from department 3 with a value of 3.00 € are returned.
●
●
Olympia
2010
Initiate registration of a negative department by pressing the RETOUR/key.
Register the PLU in the normal way.
Page 24
Input
!
!
!
!
$!
Specifications subject to change without notice!
Cash Register CM 75 / 760 / 761 / 762
Example receipt:
Date
19・01・2011
Clerk number
・1・
1
2
3
Total amount
Time
7.3
1.00 € from department 1
1・00
2・00
2
3・00
6・00
0・09
0・67
11・00
TX1
TX2
X
@
TX1
TX2
CA
13-00
001
2.00 € from department 2
Several PLUs from a department:
2 x 3.,00 € from department 3
Total VAT amount
Receipt number
Registering PLUs
Always enter the price without a decimal point!
Note:
The price may only contain a maximum of 7 digits.
7.3.1
Registering PLUs with a fixed price
Condition: The PLU has been programmed with a fixed price.
Note:
The PLU number may be a maximum of 3 digits.
Example 1: PLU no. 12 must be registered.
●
Enter the PLU number
●
Press the PLU key
Input
!
!
If the same PLU should be registered several times:
Example 2: PLU no. 12 must be registered twice.
●
Enter the quantity
●
Confirm by pressing X/TIME
●
Enter the PLU number
●
Press the PLU key
Note:
Olympia
2010
Input
The sum of Quantity x Price must not be greater than maximum
capacity of the report memory!
Page 25
!
!
!
!
Specifications subject to change without notice!
Cash Register CM 75 / 760 / 761 / 762
7.3.2
Registering a PLU with free pricing
Condition: The PLU to be registered is programmed for free pricing.
Example 3: PLU no. 10 with a price of 2.49 € must be registered.
●
Enter the PLU number
●
Press the PLU key
●
Enter the price
●
Press the PLU key
Note:
7.3.3
Input
The sum of Quantity x Price must not be greater than maximum
capacity of the report memory!
!
!
!
!
Registering negative PLUs
When a PLU is returned, initiate the negative registration by pressing the RETOUR/- key and register the returned PLU
in the normal way.
Example 4: PLU no. 10 with a price of 2.49 € is returned.
Initiate registration of a negative department by pressing the RETOUR/key.
Register the PLU in the normal way.
●
●
Input
!
!
!
!
!
Example receipt:
Date
19・01・2011
Clerk number
・1・
01
02
03
Total VAT amount
PLU no. 1 (taxable at VAT rate 1)
1・00
2・00
3・00
2
2・00
04
4・00
0・09
10・00
TX1
X
@
TX1
CA
Time
2010
Several PLUs from a department:
2 x PLU no. 4
Total amount
Receipt number
13-05
Olympia
PLU no. 2 (not taxable)
002
Page 26
Specifications subject to change without notice!
Cash Register CM 75 / 760 / 761 / 762
7.4
Concluding receipts / Methods of payment
Note:
Different methods of payment (tender media) cannot be used within one transaction! A registration can only
be concluded by one tender medium.
7.4.1
Payment by cash
●
Press the SUB-TOTAL key to display and print the subtotal
●
Enter the amount paid
●
Conclude the receipt and print by pressing CASH
Input
(option)!
Amount paid
!
7.4.2
Payment by EC card / check
●
Press the SUB-TOTAL key to display and print the subtotal
●
Enter the amount paid
●
Conclude the receipt and print by pressing CHECK
Input
(option)!
Amount paid
!
7.4.3
Payment by credit card / credit approval
●
Press the SUB-TOTAL key to display and print the subtotal
●
Enter the amount paid
●
Conclude the receipt and print by pressing CARD
Input
(option)!
Amount paid
!
7.5
Foreign currency payment
A customer pays a bill amounting to 15.- Euro with 20 US Dollars.
●
●
●
When all the PLUs have been
registered, press the SUB-TOTAL
key to produce the subtotal.
Enter the foreign currency
identification (here: US-Dollar =
foreign currency identification 1) and
press the FC key.
Enter the amount received in the
foreign currency and conclude the
receipt. The change payable is
displayed in the foreign currency.
Then press the FC key to convert
the change payable to the local
currency.
Example: The customer receives either
30 Euro Cents or 39 US Cents change.
●
Olympia
2010
Input
Display
!
!
!
!
!
!
Page 27
Confirm by pressing
19,61
!
!
!
20,00
!
0,39
!
0,30
!
15,00
1
Specifications subject to change without notice!
Cash Register CM 75 / 760 / 761 / 762
7.6
Registering a discount as an amount
Example: A discount of 5,00 € is to be granted on a sale.
●
Register the PLUs.
Enter the amount granted as a discount.
●
Press RETOUR/- .
●
Continue with the registration.
●
7.7
Input
!
!
Registering a discount as a percentage
A percentage discount can be assigned to a single item registration or a subtotal.
7.7.1
Registering a percentage discount on a PLU
Example: A percentage discount of 5% is to be granted on a PLU.
●
Register the PLU on which the percentage discount is to be assigned.
Enter the percentage rate.
●
Press % - .
●
Continue with the registration.
●
7.7.2
Input
!
!
Registering a percentage discount on a subtotal
Example: A percentage discount of 7% is to be granted on a total sale.
Olympia
●
Register all the PLUs.
●
Press the SUB-TOTAL key to produce the subtotal.
●
Enter the percentage rate.
●
Press % - .
●
Conclude the registration by pressing CASH .
2010
Input
Page 28
!
!
!
Specifications subject to change without notice!
Cash Register CM 75 / 760 / 761 / 762
7.8
Error Correction and Void
Faulty registrations can be corrected immediately after entry or later in the transaction.
7.8.1
EC
The last item entered during a registration can be corrected directly.
Example: PLU no. 20 (fixed price item) has been registered and should be corrected immediately.
7.8.2
●
Press EC
●
Register the PLU to be cancelled again.
Input
!
!
Normal void
PLUs can be deleted as long as the registration has not yet been concluded.
Example: PLU no. 20 (fixed price item) has been registered and should be corrected immediately. However, more items
have been registered in the meantime.
7.9
●
Press VOID
●
Register the PLU to be cancelled again.
Input
!
!
Refund / Void
Registrations completed some time ago can be reverted as follows:
Example: PLU no. 50 (fixed price item) was purchased by a customer and later returned (refund).
Olympia
●
Press RETOUR/-
●
Register the returned item again.
●
Conclude the process by pressing the CASH key.
2010
Input
Page 29
!
!
(option)!
!
Specifications subject to change without notice!
Cash Register CM 75 / 760 / 761 / 762
7.10
Received on account operations
Example: 10.00 € are paid in.
●
Enter the amount paid into the cash
register (max. 7 digits).
●
Confirm by pressing RA
Input
Display
Confirm by pressing
!10,00
!
Example receipt:
19・01・2011
・1・
10・00
RA
13-20
7.11
005
Paid out operations
Example: 5.00 € are paid out.
●
Enter the amount removed from the cash
register (max. 7 digits).
●
Confirm by pressing PO
Input
Display
!
5,00
Confirm by pressing
!
Example receipt:
19・01・2011
・1・
5・00
13-25
Olympia
2010
PO
006
Page 30
Specifications subject to change without notice!
Cash Register CM 75 / 760 / 761 / 762
7.12
Printing function
A number containing up to 7 digits can be printed on the receipt, e.g. a customer number.
Example: The sequence of digits 1234567 should be printed on the receipt.
Note:
●
Enter the number
(max. 7 digits)
●
Confirm by pressing #/NS
●
Continue with the registration in
the normal way.
Input
Display
!
12345,67
!
Confirm by pressing
!
The entry does not influence the report memory.
Example receipt:
19・01・2011
・1・
1234567 #
1
1・00
0・09 1
1・00
13-30
7.13
Printed number
TX1
TX
CA
007
Opening the cash drawer without a sale
Example: The cash drawer needs to be opened.
●
Press #/NS
Input
!
Note:
The number of times the drawer is opened is recorded in the report memory and printed in the financial
report.
Example receipt:
19・01・2011
・1・
NS
13-35
Olympia
2010
008
Page 31
Specifications subject to change without notice!
Cash Register CM 75 / 760 / 761 / 762
7.14
Printing a receipt on/off
●
Press Receipt ON/OFF
Input
!
If the print receipt function is switched off, a dot lights up in the display at the 2nd position.
Note:
7.15
Printing a copy of the receipt
If the receipt printing function has been switched off via the Receipt ON/OFF key, a copy of the last receipt can be
printed later.
●
Press Receipt ISSUE
Input
!
8
Training Mode
You can set the cash register to Training mode to practice using it without the registration processes and transactions
being transferred to the report memory.
8.1
Note:
8.2
Activating Training mode
●
Set the key to PRG
●
Press 6 6 times
●
Confirm by pressing CASH
Olympia
!
!
6666,66
Confirm by pressing
!
Practising in Training mode
●
8.3
Display
If Training mode is activated, a dot lights up in the display at the 6th position.
●
Note:
Input
Set the key to REG
Practise operations using the cash register (refer to Chap. 10)
No reports can be printed in Training mode.
Deactivating Training mode
●
Set the key to PRG
●
Press 5 6 times
●
Confirm by pressing CASH
2010
Input
Display
!
!
Page 32
5555,55
Confirm by pressing
!
Specifications subject to change without notice!
Cash Register CM 75 / 760 / 761 / 762
9
Cash Register Reports
The cash register stores all the department or item-related sales transactions. Sums received on account, paid out,
payments made in cash, by EC cards, on credit or in foreign currencies are stored and totalled. Similarly, opening the
drawer for no sale requirements, refunds, discounts and corrections/voids are also stored. This data can be printed out in
various ways in cash register reports.
9.1
Basic information
Cash register reports can be printed as X or Z-reports.
● X-reports are intermediate reports which can be printed out several times because the respective memory is not
deleted after printing such reports. The key switch must be set to position X to print X-reports.
● Z-reports must be kept for the revenue authorities. When a Z-report is printed, the respective memory is deleted,
which means that the grand total is reset to zero. Therefore, Z-reports can only be printed once. The key switch must
be set to position Z to print Z-reports.
9.2
Overview of cash register reports
Type of report
X1
Z1
Day's financial report
X
Z
PLU report, day
X
Z
Clerk report
X2
Z2
Monthly financial report
X
Z
Training report
Olympia
2010
Print by pressing
!
!
!
!
!
Page 33
Specifications subject to change without notice!
Cash Register CM 75 / 760 / 761 / 762
9.3
Explanation of the Z1 day's financial report
19・01・2011
Date
002
1Z
003-1
350・00 1TX
001-2
100・00 2TX
450.00 ST
41.37 1TX
258.63 -TX
6.54 2TX
93.46 -TX
47.91
#TX
-50.00
-%
400.00
ST
352.09
#ST
-50.00 -004
300.00 CA001
100.00 CH
001
20.00
RA
001
-20.00 PO
..51.13 1@
002 ##
300.00 #CA
400.00
Z1 counter (3-digit)
Number of registrations in department 1
Sales of department 1 (VAT rate 1)
Number of registrations in department 2
Sales of department 2 (VAT rate 2)
Sales of all departments
Total VAT 1
Net total of all taxable items at VAT rate 1, without VAT 1
Total VAT 2
Net total of all taxable items at VAT rate 2, without VAT 2
Total VAT
Total percentage discount
Total sales (receipts minus deductions)
Net total (receipts minus tax)
Discounts and refunds
Number of cash payments
Total of cash payments
Number of card payments
Total of card payments
Number of received on account transactions
Total received on account
Number of paid out transactions
Total paid out
Sum of foreign currency, here: foreign currency 1
Number of drawer openings (No Sale)
Cash in drawer
Grand total (sum of all sales / Grand total of all payments made by
card and in cash)
Time and receipt number
13-40
Olympia
2010
009
Page 34
Specifications subject to change without notice!
Cash Register CM 75 / 760 / 761 / 762
10 Eliminating Problems
10.1
Error messages in the display
Error messages appear in the display in the case of incorrect operation.
Error message
E
Corrective measure
Wrong key pressed.
SEC_CodE
10.2
Cause
A password has been
programmed for clerk log-on.
Press CLR / CLEAR to clear error message. Then press
the correct key.
Enter the 1-digit clerk number and 3-digit clerk password.
Conclude by pressing CLERK .
Display indicators
The activation or deactivation of certain functions is indicated in the display by the respective dot.
・
・
・
Training mode is activated (refer to Chap. 8)
Receipt printing is deactivated (refer to Chap. 7.14)
Clerk system is activated (refer to Chap. 6)
10.3
Printer malfunction
In the event of a printer malfunction, switch off the cash register immediately and disconnect the power plug from the
power socket.
Possible cause
Corrective measure
The paper roll is not inserted correctly.
Insert the paper roll again.
There is a foreign body in the printer
mechanism.
Remove any foreign bodies.
Attention: Remove the foreign body very carefully. Do not use a
knife, screwdriver or anything similar. Never use force.
This could damage the printer mechanism.
Switch the cash register on again and complete a registration. If the printer error continues to occur, contact the service
centre.
10.4
Resetting the cash register to its default settings
Attention: This operation resets the cash register to its default status and deletes all the programmed settings,
cash register reports and report memories!
Note:
Olympia
●
Set the key to PRG
●
Press CLR / CLEAR
●
Enter the following sequence
of digits: 9 5 1 7
●
Confirm by pressing RA
Input
*/
!
Display
Confirm by pressing
9517
!
This process may take a few minutes.
2010
Page 35
Specifications subject to change without notice!
Cash Register CM 75 / 760 / 761 / 762
11 Options
The following options are available for the cash register:
11.1
Bank note verifier (Euro)
Art. No. 947990003
The bank note verifier can be used to check whether all Euro bank notes are authentic.
Cash register without bank note verifier
Cash register with bank note verifier
Simple plug-and-play installation. Note: The installation manual is enclosed with the bank note verifier.
The bank note verifier is installed on the cash register above the display. This means than no space is necessary
beside the cash register.
The bank note verifier is covered by a lid section which matches the cash register.
● No additional power supply is required.
● Special feature: After being verified, the bank note is laid in a tray at the rear. The clerk can issue the change and then
put the bank note in the cash drawer. This ensures that the verification process is completed drawing very little
attention and is not annoying for the customer.
●
●
Olympia
2010
Page 36
Specifications subject to change without notice!
Cash Register CM 75 / 760 / 761 / 762
11.2
Rechargeable battery
Art. No. 947990002
When the battery is fully charged, it can operate the cash register for a maximum of 5 hours without the need of a power
cable.
Note:
The runtime of the cash register by the battery depends on the quantity and length of the receipts printed.
5 hours can be achieved when approx. 50 receipts with just 15 text lines are printed.
Note:
The bank note verifier cannot be used in battery mode.
The printing speed is lower in battery mode than when operating from the mains power. The exact runtime
capacity of the battery is also somewhat dependent on the ambient temperature.
When the battery capacity is too low, L (Low) appears in the cash register display. When the cash register is connected to
the mains power, the battery in the cash register is automatically recharged.
Note:
11.2.1
Technical data
2100 mAh, 7.4 Volt
11.2.2
●
●
●
●
●
Installation of the rechargeable battery
Disconnect the cash register from the mains power supply.
Open the cash drawer and remove the cash tray.
Raise the cash drawer a little and pull it out.
The cash drawer is fixed to the cash register by a screw in the front section. Remove this screw.
Raise the cash register a little and open the small flap under the keyboard. Insert the battery in this compartment and
connect the cable.
Olympia
2010
Page 37
Specifications subject to change without notice!
This Operating/Programming Instruction manual is purely for informational purposes. Its content is not part of any
contract for sale. All the data specified relates to nominal values. The equipment and options described may differ
from country to country according to national requirements. We reserve the right to make amendments to the content
and technical modifications without notification.
Version 02 / 02.2011