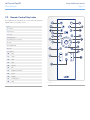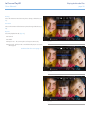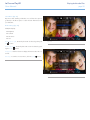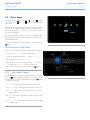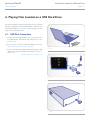
1
LaCinema PlayHD User Manual Table of Contents page 1 Table of Contents 1. Introduction................................................................................................................. 6 1.1. 1.2. 1.3. 1.4. 1.5. 1.6. Computer Minimum System Requirements . ..................................................................................... 7 Supported Formats......................................................................................................................... 8 Box Content.................................................................................................................................. 9 Languages.................................................................................................................................... 9 Supported Subtitles...................................................................................................................... 10 Views of the LaCinema PlayHD..................................................................................................... 10 1.6.1. Front View...................................................................................................................... 10 1.6.2. Rear View....................................................................................................................... 10 1.7. Cables and Connectors................................................................................................................ 11 1.7.1. A/V (Audio/Video) Cables................................................................................................ 11 1.7.2. USB Cable...................................................................................................................... 11 2. Using the Remote Control.......................................................................................... 12 2.1. Battery Installation........................................................................................................................ 12 2.2. Remote Control Key Index............................................................................................................ 13 2.2.1. Important Button Details................................................................................................... 14 3. Setting Up: Transferring Files..................................................................................... 15 3.1. STEP 1: Connect the Power Supply................................................................................................ 16 3.2. STEP 2: Connect the USB cable.................................................................................................... 17 3.2.1. Media File Organization on the LaCinema PlayHD............................................................. 17 3.3. STEP 3: Unmounting Your Drive.................................................................................................... 18 4. Setting Up: TV Connection......................................................................................... 19 4.1. STEP 1: Connect HDMI or Composite Video/Stereo Audio Cables................................................... 19 4.1.1. HDMI (High Definition) Connection................................................................................... 20 4.1.2. Composite Video & Stereo Audio Cable............................................................................ 20 4.1.3. Coaxial Audio Connection............................................................................................... 21 4.2. STEP 3: Connect the Power Supply................................................................................................ 22 4.2.1. USB and TV Simultaneous Connection Warning................................................................. 22 4.3. STEP 4: Complete the Installation Wizard....................................................................................... 23 5. Playing Multimedia Files............................................................................................ 24 5.1. Movie Space............................................................................................................................... 24 5.1.1. Movie Space Options...................................................................................................... 25 5.2. Photos Space............................................................................................................................... 27 5.2.1. Music During Your Slide Shows......................................................................................... 27 5.2.2. Photo Space Options....................................................................................................... 27 5.3. Music Space................................................................................................................................ 30 5.3.1. Music Space Options....................................................................................................... 30 6. Playing Files Located on a USB Hard Drive................................................................. 31 6.1. USB Disk Connection................................................................................................................... 31 6.2. Compatibility............................................................................................................................... 32 6.3. Safe USB Disk Removal................................................................................................................ 32 7. Settings Menu............................................................................................................ 33 7.1. Settings: General......................................................................................................................... 33 7.1.1. Menu Language ............................................................................................................ 33 7.1.2. Subtitle Format................................................................................................................ 34 7.1.3. Screen Saver................................................................................................................... 34 LaCinema PlayHD User Manual Table of Contents page 2 7.1.4. Media Library.................................................................................................................. 34 7.2. Settings: Audio/Video................................................................................................................... 35 7.2.1. Resolution....................................................................................................................... 35 7.2.2. Aspect Ratio.................................................................................................................... 35 7.2.3. HDMI Audio .................................................................................................................. 36 7.2.4. S/PDIF Audio.................................................................................................................. 36 7.2.5. 1080P 24Hz................................................................................................................... 36 7.3. Settings: System........................................................................................................................... 37 7.3.1. Version........................................................................................................................... 37 7.3.2. Firmware Update............................................................................................................. 37 7.3.3. HDD Format (Formatting the internal hard disk)................................................................. 38 7.3.4. Factory Default................................................................................................................ 38 8. Reformatting the LaCinema PlayHD Hard Disk........................................................... 39 8.1. Reformatting: Windows................................................................................................................ 40 8.1.1. Formatting for Windows XP............................................................................................... 40 8.1.2. Formatting for Windows Vista/7........................................................................................ 43 8.2. Reformatting: Mac Users.............................................................................................................. 47 8.3. Reformatting: The LaCinema PlayHD TV Menu............................................................................... 49 9. Technical Information................................................................................................ 51 9.1. HD File Format Compatibility........................................................................................................ 51 9.2. Optimizing Data Transfers............................................................................................................ 51 10.Troubleshooting ....................................................................................................... 52 10.1.Troubleshooting the Television/Stereo Connection.......................................................................... 53 10.2.USB Connection (Mac Users)........................................................................................................ 54 10.3.USB Connection (Windows Users)................................................................................................. 55 11.Contacting Customer Support.................................................................................... 56 11.1.LaCie Technical Support Contacts................................................................................................. 57 12.Warranty Information................................................................................................ 58 LaCinema PlayHD User Manual Copyrights Copyright © 2010 LaCie. All rights reserved. No part of this publication may be reproduced, stored in a retrieval system, or transmitted in any form or by any means, electronic, mechanical, photocopying, recording or otherwise, without the prior written consent of LaCie. Trademarks Apple, Mac, and Macintosh are registered trademarks of Apple Inc. Microsoft, Windows XP, Windows Vista, and Windows 7 are registered trademarks of Microsoft Corporation. Other trademarks mentioned in this manual are the property of their respective owners. Manufactured under license from Dolby Laboratories. “Dolby” and the double-D symbol are trademarks of Dolby Laboratories. Manufactured under license under U.S. Patent #: 5,451,942 & other U.S. and worldwide patents issued & pending. DTS and the Symbol are registered trademarks and DTS Digital Out and the DTS logos are trademarks of DTS, Inc. Product includes software. © DTS, Inc. All Rights Reserved. Foreword page 3 in this document, or from the use of the information contained herein. LaCie reserves the right to make changes or revisions in the product design or the product manual without reservation and without obligation to notify any person of such revisions and changes. Canada Compliance Statement This Class B digital apparatus meets all requirements of the Canadian InterferenceCausing Equipment Regulations. Manufacturer’s Declaration for CE Certification We, LaCie, solemnly declare that this product conforms to the following European standards: Class B EN60950, EN55022, EN55024, EN61000-3-2: 2000, EN61000-3-3: 2001 With reference to the following conditions: 73/23/EEC Low Voltage Directive; 89/336/EEC EMC Directive CAUTION: Modifications not authorized by the manufacturer may void the user’s authority to operate this device. CAUTION: The LaCinema PlayHD’s warranty may be void as a result of the failure to respect the precautions listed above. NOTE: The main cable must be in conformity with CEI 60227 or CEI 60245 and the type of plug must match the standards in the country of use. Changes The material in this document is for information only and subject to change without notice. While reasonable efforts have been made in the preparation of this document to assure its accuracy, LaCie assumes no liability resulting from errors or omissions 101006 v1.0 LaCinema PlayHD User Manual This symbol on the product or on its packaging indicates that this product must not be disposed of with your other household waste. Instead, it is your responsibility to dispose of your waste equipment by handing it over to a designed collection point for the recycling of waste electrical and electronic equipment. The separate collection and recycling of your waste equipment at the time of disposal will help to conserve natural resources and ensure that it is recycled in a manner that protects human health and the environment. For more information about where you can drop off your waste equipment for recycling, please contact your local city office, your household waste disposal service, or the shop where you purchased the product. CAUTION: The LaCinema PlayHD’s warranty may be void as a result of the failure to respect the precautions listed above. Health and Safety Precautions ✦✦ Only qualified persons are authorized to carry out maintenance on this device. ✦✦ Read this User Manual carefully and follow the correct procedure when setting up the device. ✦✦ Do not open a disk drive or attempt to disassemble or modify it. Never insert any metallic object into the drive to avoid any risk of electrical shock, fire, short-circuiting or dangerous emissions. The disk drives shipped with your LaCinema PlayHD contain no user-serviceable parts. If it appears to be malfunctioning, have it inspected by a qualified LaCie Technical Support representative. ✦✦ Never expose your device to rain, or use it near water, or in damp or wet conditions. Never place objects containing liquids on the LaCinema PlayHD, as they may spill into its Foreword page 4 openings. Doing so increases the risk of electrical shock, short-circuiting, fire or personal injury. ✦✦ Make sure that the computer and LaCinema PlayHD are electrically grounded. If the devices are not grounded, there is an increased risk of electrical shock. Power requirements 100-240 V~, 1.5 A, 60-50 Hz, (Supply voltage fluctuations not exceeding ± 10% of the nominal, transient over-voltages according to over-voltage category II). General Use Precautions ✦✦ Do not expose the LaCinema PlayHD to temperatures outside the range of 5° C to 30° C (41° F to 86° F); or to operational humidity beyond 5-80%, non-condensing, or non-operating humidity beyond 10-90%, noncondensing. Doing so may damage the LaCinema PlayHD or disfigure its casing. Avoid placing your LaCinema PlayHD near a source of heat or exposing it to sunlight (even through a window). Inversely, placing your LaCinema PlayHD in an environment that is too cold or humid may damage the unit. ✦✦ Always unplug the LaCinema PlayHD from the electrical outlet if there is a risk of lightning or if it will be unused for an extended period of time. Otherwise, there is an increased risk of electrical shock, short-circuiting or fire. ✦✦ Use only the power supply shipped with the device. ✦✦ Do not place objects on top of the LaCinema PlayHD or use excessive force on it. ✦✦ Never use excessive force on your LaCinema PlayHD. If you detect a problem, see the Troubleshooting section in this manual. CAUTION: A shielded-type power cord is required in order to meet FCC emission limits and also to prevent interference to the nearby radio and television reception. It is essential that only the supplied power cord be used. LaCinema PlayHD User Manual Foreword page 5 Operating Environment Temperatures ✦✦ Do not expose the LaCinema PlayHD to temperatures outside the range of 5° C to 30° C (41° F to 86° F). As high end audio/video appliance, the LaCinema PlayHD has been designed with an efficient ventilation system. Allow 5 cm of clearance for airflow on all sides of the LaCinema PlayHD to prevent overheating. See Fig. 01. ✦✦ Do not stack the LaCinema PlayHD on another audio/video appliance such as a TV, VCR or DVD player. Other audio/ video appliances require sufficient airflow and carry the same precautions of use. See Fig. 02 and Fig. 03. 5 cm 5 cm Fig. 01 IMPORTANT INFO: Any loss, corruption or destruction of data while using a LaCie drive is the sole responsibility of the user, and under no circumstances will LaCie be held liable for the recovery or restoration of this data. To help prevent the loss of your data, LaCie highly recommends that you keep TWO copies of your data; one copy on your external hard disk, for instance, and a second copy either on your internal hard disk, another external hard disk or some other form of removable storage media. LaCie offers a complete line of CD and DVD drives. If you would like more information on backup, please refer to our website. IMPORTANT INFO: 1GB = 1,000,000,000 bytes. 1TB = 1,000,000,000,000 bytes. Once formatted, the actual available storage capacity varies depending on operating environment (typically 5-10% less). Fig. 02 Fig. 03 5 cm LaCinema PlayHD User Manual 1.Introduction Congratulations on the purchase of your new LaCinema PlayHD! Simply connect the LaCinema PlayHD to your TV and use the included remote for easy navigation. The intuitive PlayHD menus are called Spaces and they give you easy access to watch high definition movies, view photos or listen to music. The LaCinema PlayHD allows you to choose from MPG, AVI, MP4, MKV, WMV, MOV, RMVB, ISO, VOB, IFO, ASF, TS, TP, TRP, MTS, M2TS, and DAT video formats for easy playback. Quick Links Click a topic: ✦✦ Setting Up: Transferring Files ✦✦ Setting Up: TV Connection ✦✦ Playing Multimedia Files Introduction page 6 LaCinema PlayHD User Manual 1.1. Computer Minimum System Requirements ✦✦ Latest version of: • Windows XP®, Windows Vista®, or Windows 7® or • Mac® OS X 10.5 or 10.6 ✦✦ USB interface port ✦✦ Internet connection (for downloading LaCinema PlayHD firmware updates) Introduction page 7 LaCinema PlayHD User Manual Introduction page 8 1.2. Supported Formats Photo File Types Video Codecs ✦✦ MPEG-1 ✦✦ Xvid ✦✦ MPEG-2 / HD ✦✦ H.264 HD ✦✦ MPEG4 ✦✦ WMV9 HD ✦✦ DivX / HD ✦✦ VC-1 ✦✦ Real Video ✦✦ AVC HD ✦✦ PNG ✦✦ BMP ✦✦ GIF ✦✦ JPEG (except Progressive JPEG) Video Outputs ✦✦ Composite (CVBS) Video File Types (Containers) ✦✦ MOV ✦✦ FLV ✦✦ MP4 ✦✦ MPEG ✦✦ M2TS ✦✦ MKV ✦✦ VOB ✦✦ DVR-MS ✦✦ WMV ✦✦ ASF ✦✦ ISO* ✦✦ MPG ✦✦ TS ✦✦ Video_TS* ✦✦ DAT ✦✦ RMVB ✦✦ M4V ✦✦ M2V ✦✦ M1V ✦✦ AVC External Hard Drive File Systems ✦✦ FAT32 ✦✦ Ext2 ✦✦ NTFS ✦✦ Ext3 ✦✦ SSA ✦✦ SRT ✦✦ SMI Audio File Types (Containers) ✦✦ MP3 ✦✦ AAC** ✦✦ AC3 ✦✦ WMA ✦✦ OGG ✦✦ MP4 ✦✦ WAV/LPCM ✦✦ FLAC ✦✦ MKA ✦✦ ALAC ✦✦ ASF ✦✦ APE ✦✦ MP1 ✦✦ MP2 ✦✦ MPA Playlists ✦✦ M3U ✦✦ Coaxial ✦✦ Stereo Dolby Digital® & DTS® ✦✦ Two channels only*** ✦✦ Multichannel decoding via optical S/PDIF and HDMI to home amplifier * DVD Video function is supported via VOB / IFO (Video_TS folder). If the drive is formatted in FAT32, DVD ISO file size cannot exceed 4GB due to file system format limitation. ** Supports iTunes encoded (m4a). Subtitles ✦✦ SUB (Vobsub, Subviewer) ✦✦ HDMI 1.3 Audio Outputs ✦✦ AVI ✦✦ HFS+ (nonJournaled) ✦✦ TIFF *** For audio with more than two channels, connect the product to a digital home receiver. The audio is passed through the HDMI and coaxial connections (see 4.1.1. HDMI (High Definition) Connection, 4.1.3. Coaxial Audio Connection, 7.2.3. HDMI Audio and 7.2.4. S/PDIF Audio). TECHNICAL NOTE: A container, such as AVI or MOV, is a file format that defines how the data stream is stored. They contain data that has been compressed using a codec. For a file to play properly on your LaCinema PlayHD, both its codec and container type must be supported. TECHNICAL NOTE: To identify the codec and container for a media file, download LaCie Media Info at http://www.lacie.com/us/ support/drivers/driver.htm?id=10202. LaCinema PlayHD User Manual Introduction page 9 1.3. Box Content Your LaCinema PlayHD package contains the items listed below: 1. LaCinema PlayHD 2. Remote control 3. 2 x AAA batteries 4. HDMI cable 5. USB cable 6. External power supply 7. Quick Install Guide 8. LaCie Utilities CD-ROM (with the User Manual and Media Info software) IMPORTANT INFO: Please save your packaging. In the event that the drive should need to be repaired or serviced, it must be returned in its original packaging. 1.4. Languages Supported Languages ✦✦ English ✦✦ Polish ✦✦ French ✦✦ Swedish ✦✦ Italian ✦✦ Simplified Chinese ✦✦ German ✦✦ Traditional Chinese ✦✦ Spanish ✦✦ Japanese ✦✦ Greek ✦✦ Korean ✦✦ Russian ES Setup EN Setup LaCinema PlayHD Remote Control 1 Step 1: Transfer multimedia files from your Power Please check the LaCie website for a complete list of supported languages. Step 3: Connect the power. Step 4: Turn on the TV. Step 5: Follow the Installation Wizard. Home Play/Pause Previous Up Left/Rewind Quick Install Guide 1 3 2 Next Stop OK 1 1. Infrared receiver 2. Blue status light 3. USB expansion port Favorite OK Right/Fast Forward 4 2 Info a. HDMI b. Analog audio/video Settings Search/Go To Volume Step 6: Play multimedia files on the TV. Rear View 7 8 Page Use the remote control to access and play multimedia files. The LaCinema PlayHD offers two sources for your multimedia files: Eject a. The LaCinema PlayHD internal hard drive. b. An external USB 2.0 disk drive connected to the front USB port. 4 5 6 9 4. Power connector 5. USB 2.0 Device port 6. HDMI 7. Video out (yellow) 8. Coaxial S/PDIF 9. Audio out (white and red stereo plugs) TV Note: See the User Manual located on the Utilities CD-ROM for further details. HOME THEATER RECEIVER ES Setup XX ES Setup XX ES Setup XX ES Setup XX ES Setup XX Step 1: Transfer multimedia files from your Step 1: Transfer multimedia files from your Step 1: Transfer multimedia files from your Step 1: Transfer multimedia files from your Step 1: Transfer multimedia files from your computer to the LaCinema PlayHD hard disk. a. Plug the power supply into an AC outlet and connect the power cable to the LaCinema PlayHD. b. Connect the LaCinema PlayHD to your PC or Mac® via the included USB 2.0 cable. c. Copy multimedia files to the LaCinema PlayHD. Step 2: Connect the LaCinema PlayHD to your TV. a. Via HDMI b. Via analog audio/video computer to the LaCinema PlayHD hard disk. a. Plug the power supply into an AC outlet and connect the power cable to the LaCinema PlayHD. b. Connect the LaCinema PlayHD to your PC or Mac® via the included USB 2.0 cable. c. Copy multimedia files to the LaCinema PlayHD. Step 2: Connect the LaCinema PlayHD to your TV. a. Via HDMI b. Via analog audio/video computer to the LaCinema PlayHD hard disk. a. Plug the power supply into an AC outlet and connect the power cable to the LaCinema PlayHD. b. Connect the LaCinema PlayHD to your PC or Mac® via the included USB 2.0 cable. c. Copy multimedia files to the LaCinema PlayHD. computer to the LaCinema PlayHD hard disk. a. Plug the power supply into an AC outlet and connect the power cable to the LaCinema PlayHD. b. Connect the LaCinema PlayHD to your PC or Mac® via the included USB 2.0 cable. c. Copy multimedia files to the LaCinema PlayHD. Step 2: Connect the LaCinema PlayHD to your TV. Step 2: Connect the LaCinema PlayHD to your TV. a. Via HDMI b. Via analog audio/video a. Via HDMI b. Via analog audio/video computer to the LaCinema PlayHD hard disk. a. Plug the power supply into an AC outlet and connect the power cable to the LaCinema PlayHD. b. Connect the LaCinema PlayHD to your PC or Mac® via the included USB 2.0 cable. c. Copy multimedia files to the LaCinema PlayHD. Step 2: Connect the LaCinema PlayHD to your TV. a. Via HDMI b. Via analog audio/video Note: Make certain the LaCinema PlayHD has adequate airflow to prevent overheating. See the related section in the User Manual for details. Note: Make certain the LaCinema PlayHD has adequate airflow to prevent overheating. See the related section in the User Manual for details. Note: Make certain the LaCinema PlayHD has adequate airflow to prevent overheating. See the related section in the User Manual for details. Note: Make certain the LaCinema PlayHD has adequate airflow to prevent overheating. See the related section in the User Manual for details. Note: Make certain the LaCinema PlayHD has adequate airflow to prevent overheating. See the related section in the User Manual for details. Step 3: Connect the power. Step 4: Turn on the TV. Step 3: Connect the power. Step 4: Turn on the TV. Step 3: Connect the power. Step 3: Connect the power. Step 4: Turn on the TV. Step 3: Connect the power. Step 4: Turn on the TV. Step 5: Follow the Installation Wizard. Step 6: Play multimedia files on the TV. Use the remote control to access and play multimedia files. The LaCinema PlayHD offers two sources for your multimedia files: a. The LaCinema PlayHD internal hard drive. b. An external USB 2.0 disk drive connected to the front USB port. Note: See the User Manual located on the Utilities CD-ROM for further details. Step 5: Follow the Installation Wizard. Step 6: Play multimedia files on the TV. Use the remote control to access and play multimedia files. The LaCinema PlayHD offers two sources for your multimedia files: a. The LaCinema PlayHD internal hard drive. b. An external USB 2.0 disk drive connected to the front USB port. Note: See the User Manual located on the Utilities CD-ROM for further details. Step 4: Turn on the TV. Step 5: Follow the Installation Wizard. Step 6: Play multimedia files on the TV. Use the remote control to access and play multimedia files. The LaCinema PlayHD offers two sources for your multimedia files: a. The LaCinema PlayHD internal hard drive. b. An external USB 2.0 disk drive connected to the front USB port. Note: See the User Manual located on the Utilities CD-ROM for further details. Box Content Mute Back a. Via HDMI b. Via analog audio/video Note: Make certain the LaCinema PlayHD has adequate airflow to prevent overheating. See the related section in the User Manual for details. LaCinema PlayHD Front View computer to the LaCinema PlayHD hard disk. a. Plug the power supply into an AC outlet and connect the power cable to the LaCinema PlayHD. b. Connect the LaCinema PlayHD to your PC or Mac® via the included USB 2.0 cable. c. Copy multimedia files to the LaCinema PlayHD. Step 2: Connect the LaCinema PlayHD to your TV. Step 5: Follow the Installation Wizard. Step 6: Play multimedia files on the TV. Use the remote control to access and play multimedia files. The LaCinema PlayHD offers two sources for your multimedia files: a. The LaCinema PlayHD internal hard drive. b. An external USB 2.0 disk drive connected to the front USB port. Note: See the User Manual located on the Utilities CD-ROM for further details. Step 5: Follow the Installation Wizard. Step 6: Play multimedia files on the TV. Use the remote control to access and play multimedia files. The LaCinema PlayHD offers two sources for your multimedia files: a. The LaCinema PlayHD internal hard drive. b. An external USB 2.0 disk drive connected to the front USB port. Note: See the User Manual located on the Utilities CD-ROM for further details. 2 3 5 6 1. LaCinema PlayHD 2. Remote control 3. 2 x AAA batteries (for the remote control) 7 4. HDMI cable 5. USB 2.0 cable 6. External power supply 7. LaCinema PlayHD Utilities CD-ROM (includes the User Manual and Media Info software) Note: Please read all the safety instructions and precautions. They may be found in the User Manual located on the CD-ROM. Protect your investment – register for free technical support at www.lacie.com/register Contact Us LaCie Asia 25/F Winsan Tower 98 Thomson Road Wanchai, Hong-Kong, China [email protected] LaCie Australia 458 Gardeners Road Alexandria, NSW 2015 [email protected] LaCie Benelux Vorstlaan / 165 Bld du Souverain B-1160 Brussels, Belgium [email protected] LaCie Canada 235 Dufferin St. Toronto, Ontario M6K 1Z5 [email protected] LaCie France 17, rue Ampère 91349 Massy Cedex [email protected] Elecom – Japan http://www.lacie.jp/support/ LaCie Nordic (Sweden, Denmark, Norway, Finland) Sveavägen 90, 5tr 113 59 Stockholm, Sweden [email protected] LaCie Spain C/ Núñez Morgado, 3, 5a pl. 28036 Madrid [email protected] LaCie Switzerland Davidsbodenstrasse 15A 4004 Basel [email protected] LaCie United Kingdom and Ireland LaCie Ltd, Power Road Studios 114 Power Road Chiswick, London, UK W4 5PY UK: [email protected] Ireland: [email protected] LaCie Germany Am Kesselhaus 5 D-79576 Weil Am Rhein [email protected] LaCie USA 22985 NW Evergreen Pkwy Hillsboro, OR 97124 [email protected] LaCie Italy Milano Business Park Edificio B1 Via dei Missaglia 97 20142 Milano [email protected] LaCie Worldwide Export 17, rue Ampère 91349 Massy Cedex, France [email protected] [email protected] Visit www.lacie.com for more information on LaCie products. Copyright © 2010, LaCie 715137 100917 100% Recyclable LaCinema P L A Y D E S I G N B Y N E I L P O U LTO N HD LaCie Media Info 1.0.0 For Windows XP, Vista, 7 Mac OS 10.5 or higher User Manual Manuel d’utilisation Guida per l'utente Benutzerhandbuch Manual de Usuario ©2 010 LaCi 194 e, all rig hts reser ved. 715 7 92 100 LaCinema PlayHD User Manual Introduction page 10 1.5. Supported Subtitles The LaCinema PlayHD supports the following subtitle formats, listed by font code: ✦✦ Western Europe (ISO) ✦✦ Central Europe (ISO, Windows-1250 ) ✦✦ Greek (ISO, Windows-1253) ✦✦ Cyrillic (Windows-1251) ✦✦ Cyrillic (KOI8-R) ✦✦ Traditional Chinese (Big5) ✦✦ Simplified Chinese (GB18030) ✦✦ Japanese (Shift-JIS) ✦✦ Korean (EUC-KR) Fig. 04 ✦✦ Arabic (Windows-1256) 1.6. Views of the LaCinema PlayHD 1.6.1. Front View 1. Infrared receiver – Receives the infrared signal from the remote control. Make sure the receiver is not obstructed. 2. Disk status LED – A flickering light indicates disk activity. 3. USB expansion port (host) – Connect a USB flash disk, key, hard disk, or card reader to access its multimedia files directly from your TV. You may also connect a camera with photos or video. Fig. 05 1.6.2. Rear View 1. Power connector – Connect the power supply 2. USB 2.0 (device) – Connect to the USB 2.0 port of your computer to transfer media files 3. HDMI – Connect to a compatible TV or video projector 4. Audio (white and red) – Connect to the audio input of a TV or receiver/pre-amplifier 5. Video out (yellow) – Connect to a compatible TV 6. Coaxial audio out – Connect to a compatible digital receiver/ pre-amplifier LaCinema PlayHD User Manual Introduction page 11 1.7. Cables and Connectors 1.7.1. A/V (Audio/Video) Cables Audio/video cables supported by the LaCinema PlayHD: 1. HDMI (High-Definition Multimedia Interface - included with the box contents) – The optimal audio/video connection from the LaCinema PlayHD to compatible televisions. 2. Composite video/Stereo audio (not included) – Standard analog video and audio connections. The yellow RCA plug is for video while the white (left channel) and red (right channel) are for audio. If your TV only has a SCART connection, you can purchase a SCART-Composite adapter from your local retailer. Fig. 06 3. Coaxial Audio (S/PDIF) (not pictured/not included) – Connect your LaCinema PlayHD to a digital receiver/pre-amplifier for surround sound formats. 1.7.2. USB Cable USB is a serial input/output technology for connecting peripheral devices to a computer or to each other. Hi-Speed USB 2.0 is the provides the necessary bandwidth and data transfer rates to support high speed devices such as hard drives, CD/DVD drives, and digital cameras. NOTE: Your LaCinema PlayHD is shipped with a Hi-Speed USB 2.0 cable to connect the device to a PC or Mac. It plugs into the rear USB 2.0 device port of the PlayHD. You may connect a USB peripheral to the LaCinema PlayHD’s front USB 2.0 port. USB peripherals include digital cameras, USB drives, USB flash drives and keys, etc. Please use the USB cable that shipped with the peripheral. TECHNICAL NOTE: The included device cable will also work when connected to a USB port, but drive performance will be limited to USB 1.1 transfer rates. To achieve Hi-Speed USB 2.0 data transfer rates, you must be connected to a Hi-Speed USB 2.0 host interface. Connection Maximum Resolution High Definition HDMI (Digital) 1080p Standard Definition Composite (Analog) 576i Fig. 07 - USB cable ends LaCinema PlayHD User Manual Using the Remote Control page 12 2.Using the Remote Control 2.1. Battery Installation Please install the included AAA batteries before using the remote control. To install the batteries: 1. Remove the battery compartment cover. 2. Load the batteries onto the battery compartment. Position the batteries so that the “+” symbols on the batteries face the same direction as the “+” symbols on the battery compartment. 3. Slide the battery compartment cover back into the remote. IMPORTANT INFO: If you will not use the remote control for an extended period of time, LaCie recommends removing the batteries. Replace the batteries when you use the remote control. IMPORTANT INFO: The remote control must be pointed at the infrared receiver on the LaCinema PlayHD. The receiver must be no further than 23 feet (7 meters) from the remote control. Fig. 08 Remote control receiver Fig. 08 LaCinema PlayHD User Manual Using the Remote Control page 13 2.2. Remote Control Key Index The included remote control allows you to set up and use the LaCinema PlayHD while it is connected to your TV. Button 1. Power 2. Previous 3. Stop 4. Play/Pause 5. Back (previous screen) OK 6. Up 7. Left/Rewind 8. Info 9. Volume 10. Eject 11. Home 12. Next 13. Mute 14. Favorite 15. OK 16. Right/Fast Forward 17. Down 18. Settings 19. Search/Go To 20. Page Fig. 09 LaCinema PlayHD User Manual Using the Remote Control page 14 2.2.1. Important Button Details 1. Return: Go back to the previous menu. 2. OK: Confirm a selection. 3. Settings button: Display the available settings or actions in the different media spaces. During playback, this button will bring up a contextual menu to adjust the settings. OK Fig. 10 LaCinema PlayHD User Manual Setting Up: Transferring Files page 15 3.Setting Up: Transferring Files This chapter explains how to transfer files to the LaCinema PlayHD from your computer via USB. Learn how to play files stored on a USB disk drive or flash drive in section 6. Playing Files Located on a USB Hard Drive. The USB connection consists of the following steps: 3.1. STEP 1: Connect the Power Supply 3.2. STEP 2: Connect the USB cable 3.3. STEP 3: Unmounting Your Drive When you have finished transferring files, safely disconnect the USB cable and proceed to chapter 4. Setting Up: TV Connection. Fig. 11 LaCinema PlayHD User Manual Setting Up: Transferring Files page 16 3.1. STEP 1: Connect the Power Supply 1. Plug one end of the power adapter cord into the back of the LaCinema PlayHD and the other end into an active power outlet (Fig. 12). 2. Move to the next step, 3.2. STEP 2: Connect the USB cable. CAUTION: Only use the AC adapter supplied with your specific LaCie device. Since each product is unique, do not substitute a power supply from another LaCie device or another manufacturer for the LaCinema PlayHD. Please note that the AC adapter provided with your LaCie device includes connectors for electrical outlets in multiple regions. Thanks to its 100-240 Volt power supply, you may use your device in a foreign country. However, LaCie accepts no responsibility for any damage to the drive resulting from the use of an inappropriate adapter. Further, your warranty will be void if you: ✦✦ Use any other power cable, power supply, or power adapter other than one that has been authorized by LaCie. ✦✦ Do not remove your AC adapter when transporting your LaCie device. Doing so may damage your LaCinema PlayHD. Fig. 12 LaCinema PlayHD User Manual Setting Up: Transferring Files page 17 3.2. STEP 2: Connect the USB cable 1. Make sure the power cable is connected as described in section 3.1. STEP 1: Connect the Power Supply. 2. Connect one end of the USB cable to your computer (Fig. 13) and the other end to the USB port on the rear of the LaCinema PlayHD (Fig. 14). Windows Users a. The drive will mount in My Computer/Computer (Fig. 15). b. Copy multimedia files to the mounted volume. Fig. 13 Mac Users a. The drive is preformatted and optimized for NTFS. For information on how to use the drive with your Mac, go to section 8.2. Reformatting: Mac Users. Once the PlayHD is compatible with your Mac, proceed to step b below. b. The drive will mount on your Desktop. c. Copy multimedia files to the mounted volume. 3. Unmount the drive and unplug the USB cable before connecting the drive to your television (see 3.3. STEP 3: Unmounting Your Drive). 3.2.1. Media File Organization on the LaCinema PlayHD Fig. 14 You can copy files directly onto the root level of the LaCinema PlayHD hard disk. For easy organization, the LaCinema PlayHD operating system places the file types in their own Spaces (i.e. Movie Space, Music Space, and Photo Space; see 5. Playing Multimedia Files). Of course, you may also create folders on the PlayHD hard disk for browsing content according to your own preference. When operating the PlayHD, you have the option to view files by Folder from within each media space. IMPORTANT INFO: To avoid data corruption, make sure to unmount your drive before disconnecting the USB cable. See 3.3. STEP 3: Unmounting Your Drive for details. IMPORTANT INFO: The drive cannot be connected to your computer via USB and to the television simultaneously. Fig. 15 LaCinema PlayHD User Manual Setting Up: Transferring Files page 18 3.3. STEP 3: Unmounting Your Drive The LaCinema PlayHD behaves like an external USB device when it is connected to your computer via USB. LaCie highly recommends that you unmount the PlayHD disk drive volume before unplugging the USB cable. Windows XP From the system tray (located in the lower right-hand side of your screen), click the Eject icon (a small green arrow over a hardware image) (Fig. 16 - Windows XP). Fig. 16 - Windows XP A message will appear, listing the devices the Eject icon controls (it should say, “Safely remove...”). Click on the LaCinema PlayHD in this prompt. You will receive a message that it is safe to remove hardware. It is now safe to disconnect the device. Fig. 17 - Windows Vista/7 Windows Vista/7 From the system tray located in the lower right-hand side of your screen, right-click on the plug icon (note the white check mark inside a green circle). Fig. 17 - Windows Vista/7 Select the small message Safely Remove Hardware. From the window prompt, choose the LaCinema PlayHD and select Stop. A second window may open to confirm your selection. Select the LaCinema PlayHD and click OK. A message will appear noting that it is safe to remove the device. Mac Drag the LaCinema PlayHD drive icon to the trash (Fig. 18 Mac). The icon in the illustration is a generic USB device icon. Your drive may be represented by an icon that looks like the drive itself. When the icon disappears from the desktop, the drive can be disconnected. Fig. 18 - Mac LaCinema PlayHD User Manual Setting Up: Connecting to TV page 19 4.Setting Up: TV Connection This chapter explains how to connect your LaCinema PlayHD to your television in order to browse and play files. Once the connection is established, go to section 5. Playing Multimedia Files for information on playing files. Setup consists of these steps: LaCinema PlayHD 4.1. STEP 1: Connect HDMI or Composite Video/Stereo Audio Cables 4.2. STEP 3: Connect the Power Supply 4.3. STEP 4: Complete the Installation Wizard 4.1. STEP 1: Connect HDMI or Composite Video/Stereo Audio Cables Television Fig. 19 IMPORTANT INFO: The LaCinema PlayHD cannot be connected to a TV and a computer at the same time. Disconnect the USB cable before proceeding (see 3.3. STEP 3: Unmounting Your Drive). The LaCinema PlayHD may be connected to your television via: ✦✦ HDMI (section 4.1.1. HDMI (High Definition) Connection) ✦✦ Composite (section 4.1.2. Composite Video & Stereo Audio Cable) You may also connect the LaCinema PlayHD coaxial output to a receiver/pre-amplifier to take advantage of surround sound formats. (see 4.1.3. Coaxial Audio Connection for details). TECHNICAL NOTE: Please note that the HDMI cable also carries digital surround sound formats along with the picture signal. See the user manual for your digital receiver/pre-amplifier to determine the optimal connection. This User Manual will assume a connection directly to your television. continued on the next page >> Connection Maximum Resolution High Definition HDMI (Digital) 1080p Standard Definition Composite (Analog) 576i Picture quality for HDMI and composite video. LaCinema PlayHD User Manual Setting Up: Connecting to TV page 20 4.1.1. HDMI (High Definition) Connection 1. Connect one end of the HDMI cable to your television’s HDMI port (Fig. 20). 2. Connect the other end of the HDMI cable to the corresponding port on the LaCinema PlayHD (Fig. 20). 3. Go to the next step, 4.2. STEP 3: Connect the Power Supply. 4.1.2. Composite Video & Stereo Audio Cable 1. Connect the three RCA-type ends of composite video and stereo audio cables (not included) to the proper ports on your television (Fig. 21). Fig. 20 - HDMI connection 2. Connect the other ends of the composite video and stereo cables (not included) to the corresponding ports on the LaCinema PlayHD (Fig. 21). 3. Move to the next step, 4.2. STEP 3: Connect the Power Supply. IMPORTANT INFO: Before connecting the cables, make sure your TV is turned off. TECHNICAL NOTE: The connectors on the rear of your TV may not appear exactly the same as the illustrations in this User Manual. Please read the labels next to the connectors to ensure correct connections. Fig. 21 - Composite connection LaCinema PlayHD User Manual Setting Up: Connecting to TV page 21 4.1.3. Coaxial Audio Connection You may use the coaxial audio connection (cable not included) to pass surround sound formats to a digital receiver/pre-amplifier. Please note that you will require an RCA type connector for the coaxial connection (not included). Coaxial Digital Audio Cable IMPORTANT INFO: Before connecting the cable, power off your digital receiver/pre-amplifier. 1. Connect one end of a coaxial audio cable to your digital receiver/pre-amplifier (Fig. 22 - Coaxial connection). Fig. 22 - Coaxial connection 2. Connect the other end of the cable to the back of the LaCinema PlayHD (Fig. 22 - Coaxial connection). 3. Move on to the next step, 4.2. STEP 3: Connect the Power Supply. 4.1.3.1. Enabling Surround Sound Pass-through Coaxial Connection After completing the LaCinema PlayHD on-screen setup, you can enable coaxial Pass through for surround signals: Fig. 23 1. Using the PlayHD remote control, go to Home Menu > Setup > Audio/Video > S/PDIF Audio (Fig. 23 and Fig. 24). 2. Select Pass through (Fig. 25). Fig. 24 Fig. 25 Digital Audio Amplifier LaCinema PlayHD User Manual Setting Up: Connecting to TV page 22 4.2. STEP 3: Connect the Power Supply IMPORTANT INFO: If your power supply cable is already connected, turn on your TV and skip to 4.3. STEP 4: Complete the Installation Wizard. 1. Plug one end of the power adapter cord into the back of LaCinema PlayHD and the other end into a power outlet (Fig. 26). 2. Turn on your television. TECHNICAL NOTE: If you do not see the PlayHD loading screen, you may have to adjust the video input on your TV. Consult the user manual for your television to determine how to select the video input signal. The video signal must match the video cable used to connect the LaCinema PlayHD to the television: HDMI or composite (Fig. 27). Fig. 26 3. Move on to the next step, 4.3. STEP 4: Complete the Installation Wizard. 4.2.1. USB and TV Simultaneous Connection Warning Your LaCinema PlayHD should be attached to a computer to receive media files (3.2. STEP 2: Connect the USB cable). Once the files have been copied to the PlayHD disk drive, please disconnect it safely from your computer in order to watch and listen to your content on a television (3.3. STEP 3: Unmounting Your Drive and 4.1. STEP 1: Connect HDMI or Composite Video/Stereo Audio Cables). Fig. 27 Please do not connect the LaCinema PlayHD to a computer and a television at the same time. The device will warn you to disconnect one of the cables if it senses computer and audio/video signals at the same time (Fig. 28). Fig. 28 LaCinema PlayHD User Manual Setting Up: Connecting to TV page 23 4.3. STEP 4: Complete the Installation Wizard The first time you turn on the LaCinema PlayHD, an installation wizard appears to help you configure the basic settings. The wizard will only appear the first time you turn on the LaCinema PlayHD or after a reset to factory default (7.3.4. Factory Default). 1. Make certain that: ✦✦ The LaCinema PlayHD is connected to the TV ✦✦ The power supply has been connected ✦✦ The TV is turned on Fig. 29 2. A startup screen will appear during product initialization. 3. Select your language using the Up and Down buttons (Fig. 29). Confirm the selection by pushing the button. 4. You will see a diagram of your PlayHD remote control. It is similar to 2.2. Remote Control Key Index. Click Next (Fig. 30). 5. Setup is finished. For further details, go to 5. Playing Multimedia Files. (Fig. 31). Fig. 30 Fig. 31 LaCinema PlayHD User Manual Playing Multimedia Files page 24 5.Playing Multimedia Files This chapter explains how to use the LaCinema PlayHD interface and play files from its hard disk. For information on playing files from external sources, refer to section 6. Playing Files Located on a USB Hard Drive. To access your files, use the remote control to browse through the different media spaces – Movie, Photo, or Music. The following section outlines how to play files for each media space. Related Section ✦✦ 6. Playing Files Located on a USB Hard Drive File Type Section Movies 5.1.1. Movie Space Options Photos 5.2. Photos Space Music 5.3. Music Space 5.1. Movie Space Navigate to the Movies Space using the Left and Right buttons. Then use the Up and Down buttons to select the Movie Space (Fig. 32). The Movie Space will display all supported video files that are accessible to the LaCinema PlayHD (1.2. Supported Formats). Music and Photo files will not be displayed. Files are organized according to their location. For example, whether they are stored on the LaCinema PlayHD internal storage or an external USB hard drive. To load a movie, select the file you wish to play and press the button. A loading animation will appear while the it is being analyzed to ensure optimum playback experience. NOTE: If you stop a film and then return to it later, the LaCinema PlayHD will ask if you want to play from where you left off. You may also start from the beginning. Fig. 32 LaCinema PlayHD User Manual Playing Multimedia Files page 25 5.1.1. Movie Space Options While a movie is playing, you can adjust several playback pa rameters. Press the Setup button to display or exit the on-screen menu. Use the Left and Right buttons to navigate to a setting and click to enter the setting menu. To confirm a setting, click the button. Movie Space Menu (Fig. 33): 1. Audio 2. Subtitles 3. Play Mode Fig. 33 4. Video Settings 5. Go To 6. Zoom In/Zoom Out Audio Languages (Fig. 34) Modify the audio language if alternates are available. Subtitle (Fig. 35) ✦✦ Activate or modify the encoding language ✦✦ Change the position, color, and size of subtitles ✦✦ Synchronize subtitles that are not properly timed to the audio continued on the next page >> Fig. 34 Fig. 35 LaCinema PlayHD User Manual Playing Multimedia Files page 26 Play Mode Choose how to play back a movie: ✦✦ Normal playback ✦✦ Repeat one will play back the same file until it is stopped. ✦✦ Repeat all will play all the movie files in the same folder. The movie files are played back according to their order in the folder. Video Settings (Fig. 36) Modify the display: ✦✦ Brightness ✦✦ Contrast Fig. 36 ✦✦ Saturation ✦✦ Hue Go To (Fig. 37) Select the playback position by: ✦✦ Hour: Minutes: Seconds ✦✦ Chapter Zoom In/Zoom Out ✦✦ Select this option than the Up age. button to zoom into the im- ✦✦ Select this option than the Down from the image. button to zoom away Display info: Click the i button to display information about the current file. Information includes time remaining, time elapsed, etc. Exit Setup: To exit the on-screen menu, click the Setup button. Fig. 37 LaCinema PlayHD User Manual Playing Multimedia Files page 27 5.2. Photos Space Navigate to the Photo Space using the Left and Right buttons (Fig. 38). Then use the Up and Down buttons to browse within the Photo Space. The Photo Space will display all supported photo files that are accessible to the LaCinema PlayHD (1.2. Supported Formats). Music and video files will not be displayed. Files are organized according to their location. For example, whether they are stored on the LaCinema PlayHD internal storage or an external USB hard drive. To load a picture, select the image you wish to display and press the button. Fig. 38 5.2.1. Music During Your Slide Shows There are two ways to play music while watching a photo slideshow (Fig. 39): 1. Choose the Select Music option in the Photo Space 2. Manually navigate between the Music and Photo Spaces. ✦✦ Start the music track in the Music Space. ✦✦ While the music track is playing, press the Home button to navigate to the Photo Space to start your slideshow. ✦✦ Select the track you wish to play and press the button. 5.2.2. Photo Space Options You can adjust several playback parameters while a photo is being displayed. Press the Setup button to display or exit the on-screen menu. Use the Left and Right buttons to navigate to a setting and to adjust. Once you’ve selected the option you want, click the button. Fig. 39 Photo Space Menu (Fig. 40): 1. Timing 2. Transition 3. Repeat 4. Select Music 5. Photo Settings continued on the next page >> Fig. 40 LaCinema PlayHD User Manual Playing Multimedia Files page 28 Timing Select the transition time between photos during a slideshow (Fig. 41). Transition Choose the transition effect between photos during a slideshow (Fig. 42). Repeat Select the playback mode (Fig. 43): ✦✦ Normal ✦✦ Shuffle ✦✦ Repeat one - the current photo will repeat continuously Fig. 41 ✦✦ Repeat all - all files in the current folder will play in succession until stopped continued on the next page >> Fig. 42 Fig. 43 LaCinema PlayHD User Manual Playing Multimedia Files page 29 Select Music (Fig. 44) Play music while watching a slideshow. You will have the option to go directly to the Music Space to select the track that fits best with your slideshow. Photo Settings (Fig. 45) Modify the display: ✦✦ Brightness ✦✦ Contrast ✦✦ Saturation ✦✦ Hue Rotate a photo right: Rotate the photo 90° clockwise by pushing the Up button. Fig. 44 Rotate a photo left: Rotate the photo 90° counter-clockwise by pushing the Down button. Display info: Click the i button to display information about the current file. Exit Setup: To exit the on-screen menu, click the Setup button. Fig. 45 LaCinema PlayHD User Manual Playing Multimedia Files page 30 5.3. Music Space Navigate to the Music Space using the Left and Right buttons (Fig. 46). Use the Up and Down buttons to browse within the Music Space. The Music Space will display all of the supported music files that are accessible to the LaCinema PlayHD. Only files recognized as audio files will be displayed (1.2. Supported Formats). Photo and video files will not be displayed. Files are organized according to their location. For example, whether they are stored on the LaCinema PlayHD internal storage or an external USB hard drive. To load a track, select the music file you wish to hear and press the button. Fig. 46 Music During Your Slide Shows There are two ways to play music while watching a photo slideshow: 1. Choose the Select Music option in the Photo Space 2. Manually navigate between the Music and Photo Spaces. ✦✦ Start the music track in the Music Space. ✦✦ While the music track is playing, press the Home button to navigate to the Photo Space to start your slideshow. ✦✦ Select the track you wish to play and press the button. 5.3.1. Music Space Options During playback, you can adjust several parameters (Fig. 47). Press the Setup button to display or exit the on-screen menu. You can navigate the music settings to adjust playback. Click the button to confirm your selection. 1. Normal: The currently playing file will repeat continuously. 2. Repeat one: The currently track will repeat until it is stopped. 3. Repeat all: All files in the current folder will play in succession until it is stopped. 4. Shuffle: Files in the current folder or playlist will play in random order. 5. Shuffle repeat all: Files in the current folder or playlist will play in random order. Fig. 47 LaCinema PlayHD User Manual Playing Files Located on USB Hard Drive page 31 6.Playing Files Located on a USB Hard Drive The LaCinema PlayHD can play multimedia files stored on external USB drives. Simply plug an external USB hard disk or flash drive into the front USB 2.0 port (Fig. 49 and Fig. 50) and navigate to the files using the LaCinema PlayHD menu. 6.1. USB Disk Connection 1. Connect the external USB hard drive to your computer to transfer multimedia files. Unmount the drive safely from your computer (Fig. 48). 2. If it is not set up, connect your LaCinema PlayHD to your television (4. Setting Up: TV Connection - Fig. 49 ). 3. Power on the external hard disk (if applicable) and plug its USB cable into the LaCinema PlayHD’s front USB device slot (Fig. 49 and Fig. 50). Fig. 48 continued on the next page >> Fig. 49 Fig. 50 LaCinema PlayHD User Manual Playing Files Located on USB Hard Drive page 32 4. Use the remote control to navigate to one of the Media Spaces (Movies, Photos, or Music). Files located on the external USB hard drive can be accessed under USB1 (Fig. 51). 6.2. Compatibility In addition to hard disks, you can connect card readers, digital cameras, or digital camcorders with USB Mass storage support. Hard drives with the following file system formats are supported: ✦✦ NTFS (optimal) ✦✦ FAT32 Fig. 51 ✦✦ HFS+/Mac OS Extended (non-journaled) ✦✦ Linux file systems IMPORTANT INFO: External USB hard drives formatted in HFS+ (journaled) are not compatible with the LaCinema PlayHD. 6.3. Safe USB Disk Removal Click the (Eject) button on the remote control. Confirm that the USB disk can be safely removed from the LaCinema PlayHD before disconnecting it (Fig. 52). IMPORTANT INFO: If the disk is not properly disconnected, the data could be damaged. Make sure that you always safely eject disks before disconnecting them. Fig. 52 LaCinema PlayHD User Manual Settings Menu page 33 7.Settings Menu The Setup Space will help you configure and customize your LaCinema PlayHD. Access the Setup Space by navigating to the gear icon on the PlayHD menu (Fig. 53). Scroll through the Setup menu using the Up and Down buttons (Fig. 53). You can select General, Audio/Video, or System. To display the options for a setup category, press the changes are automatically saved. To select another option, press the Return previous menu. To exit the setup menu, press the Setup button. All button to return to a button. Fig. 53 7.1. Settings: General Fig. 54 ✦✦ Change the menu language, subtitle format, or screen saver settings ✦✦ Update the Media Library information 7.1.1. Menu Language Select Menu Language to change the language of the LaCinema PlayHD menu language (Fig. 55). Fig. 54 Fig. 55 LaCinema PlayHD User Manual Settings Menu page 34 7.1.2. Subtitle Format You may change the default subtitle format (Fig. 56). See 1.5. Supported Subtitles for more information on supported subtitle formats. 7.1.3. Screen Saver The LaCinema PlayHD has a screen saver for inactive periods. Select the time of inactivity that will trigger the screen saver (Fig. 57). Fig. 56 7.1.4. Media Library Your LaCinema PlayHD will find all media files copied to its internal hard drive or stored on an external USB storage devices attached to the front USB 2.0 port. However, there may be times when the media is not classified by genre or artist. The LaCinema PlayHD can scan its internal hard disk and external USB disk drives for media files (Fig. 58). For example, you recently attached the LaCinema PlayHD to your computer to copy additional music files. When you reconnect the device to the television, you see the files in the Music Space but they are not listed under the artist’s name. To have the LaCinema PlayHD search through its files, select Scan Now. The files should be classified once the scan is finished. The default setting is Auto scan off. Fig. 57 Fig. 58 LaCinema PlayHD User Manual Settings Menu page 35 7.2. Settings: Audio/Video Fig. 59 ✦✦ Adjust settings for video resolution and aspect ratio ✦✦ Change the HDMI and coaxial audio output settings ✦✦ View movies at their native rate 7.2.1. Resolution Choose a display resolution to match your television (Fig. 60 - the default is HDMI Auto). 7.2.2. Aspect Ratio Fig. 59 Adjust the aspect ratio of the LaCinema PlayHD to match your television (Fig. 61): ✦✦ 16:9 ✦✦ Pan Scan 4:3 ✦✦ Letterbox 4:3 Fig. 60 Fig. 61 LaCinema PlayHD User Manual Settings Menu page 36 7.2.3. HDMI Audio Select the audio signal output via HDMI (Fig. 62): ✦✦ Decode - Best suited when connecting the HDMI cable to your television. Surround formats will be mixed down for stereo output. ✦✦ Pass through - Best suited when connecting the HDMI cable to a digital receiver/pre-amplifier for surround sound audio. Surround sound formats feature multichannel audio output to more than two speakers. Examples may be 5.1 surround sound (five speakers and one sub-woofer) or 7.1 surround sound (seven speakers and one sub-woofer). IMPORTANT INFO: You may want to connect the coaxial cable (S/PDIF) to a digital receiver/pre-amplifier when using the HDMI for the TV. In such a case, LaCie highly recommends selecting the Decode option for HDMI Audio. Fig. 62 7.2.4. S/PDIF Audio Select the audio signal output via the coaxial cable (Fig. 63): ✦✦ Decode - Surround formats will be mixed down for stereo output. ✦✦ Pass through - Best suited when connecting the coaxial cable to a digital receiver/pre-amplifier for surround sound audio. Surround sound formats feature multichannel audio output to more than two speakers. Examples may be 5.1 surround sound (five speakers and one sub-woofer) or 7.1 surround sound (seven speakers and one sub-woofer). 7.2.5. 1080P 24Hz This setting allows you to view movies specifically shot and recorded as film. The 24 Hz indicates that the field rate is 24 fields per second. Since the field rate is not standard, the default for this setting is Off. LaCie recommends using this option only when you know that one or more media files are compatible with 1080P 24 Hz. When you have compatible files, you can reproduce the original frame rate by turning the 1080P 24 Hz option On. Fig. 63 LaCinema PlayHD User Manual Settings Menu page 37 7.3. Settings: System Fig. 64 ✦✦ Review and update the LaCinema PlayHD firmware ✦✦ Reformat the internal hard disk ✦✦ Reset the LaCinema PlayHD to factory settings 7.3.1. Version View the firmware version of your LaCinema PlayHD (Fig. 65). 7.3.2. Firmware Update Fig. 64 LaCie highly recommends that you search for firmware updates to your LaCinema PlayHD: 1. Find the version of the current firmware (see 7.3.1. Version). 2. Visit www.lacie.com 3. Go to the PlayHD product page. Since there are a range of LaCinema products, please make certain that you are on the PlayHD site. 4. Select the Support tab. 5. Compare the version of firmware available on the website with the version on your LaCinema PlayHD. If the version on the LaCinema PlayHD website is more recent, please download it to your computer. 6. Unzip the file before copying the firmware update to the root of a USB flash drive or USB key. The PlayHD will not find the update if it is placed within a folder on the USB flash drive or key. Fig. 65 7. Safely eject the USB flash drive or USB key safely from your computer and insert it into the front USB 2.0 port of the LaCinema PlayHD. 8. Using the LaCinema PlayHD remote, navigate to Settings > System > Firmware Update. TECHNICAL NOTE: If the LaCinema PlayHD does not find the firmware update on the USB flash drive or key, you will see the message in Fig. 66. Eject the USB flash drive or key and try again. If the problem persists, please plug the USB flash drive or key into your computer to confirm that the firmware update is present. As well, return to the PlayHD product site at www.lacie.com to make certain that the update is correct. continued on the next page>> Fig. 66 LaCinema PlayHD User Manual Settings Menu page 38 9. The LaCinema PlayHD should find the firmware update on your USB flash drive or key (Fig. 67). Click OK to proceed with the update. 10.A window prompt will ask you to keep the LaCinema PlayHD powered on during the update. You may damage the PlayHD if you turn the power off or unplug the USB flash drive or key during the firmware update. 11.A final window prompt will let you know that the update was successful and that the LaCinema PlayHD will restart. 7.3.3. HDD Format (Formatting the internal hard disk) Fig. 67 You can reformat the LaCinema PlayHD in NTFS. See 8.3. Reformatting: The LaCinema PlayHD TV Menu for further details. CAUTION: Formatting will erase all media files from the LaCinema PlayHD. Back up all media that you want to protect or continue to use before you format the disk drive. Please note that your PlayHD settings will be preserved (i.e. language). 7.3.4. Factory Default For troubleshooting purposes, you may revert the LaCinema PlayHD to its initial settings (Fig. 68). Only your settings will be erased as the media remains intact. At the window prompt, select Yes to reset the PlayHD to its factory settings. The device will automatically restart. Complete the installation wizard to access your media files (4.3. STEP 4: Complete the Installation Wizard). Fig. 68 LaCinema PlayHD User Manual Reformatting the LaCinema PlayHD page 39 8.Reformatting the LaCinema PlayHD Hard Disk Your LaCinema PlayHD is preformatted and optimized for NTFS. It is ready to receive media content from a Windows computer straight out of the box. You may reformat the LaCinema PlayHD on a computer (8.1. Reformatting: Windows and 8.2. Reformatting: Mac Users) or on the device itself. IMPORTANT INFO FOR MAC USERS: While the PlayHD will work with the Mac OS HFS+ (non-journaled) format, it offers improved performance when formatted in Windows NTFS. If your Macintosh computer includes third-party applications or drivers that permit writing to NTFS, LaCie highly recommends maintaining NTFS as the drive format for the PlayHD. NTFS Windows Mac IMPORTANT INFO: Please note that the Mac disk format HFS+ (journaled) is not supported on the LaCinema PlayHD. LaCie cannot guarantee performance if you format the LaCinema PlayHD’s internal hard drive in HFS+ (journaled). HFS+ (non-journaled) MS-DOS (FAT32) ✦✦ Optimized performance when ✦✦ HFS+ is not recommended for Win- ✦✦ using the LaCinema PlayHD. dows. ✦✦ ✦✦ Supports file sizes greater than 4GB ✦✦ ✦✦ More suited for high definition media content. Compatible with Windows and Mac A maximum single file size restriction of 4GB. Not suited for larger high definition media content. ✦✦ The Mac OS can read and copy ✦✦ In most instances, HFS+ (non-jour- ✦✦ Compatible with Windows and Mac files from NTFS disks. naled) offers very good performance ✦✦ A maximum single file size restriction of for Macintosh systems. ✦✦ The Mac OS requires third-party 4GB. software or drivers to write to ✦✦ Supports file sizes greater than 4GB. ✦✦ Not suited for larger high definition media NTFS disks. ✦✦ More suited for high definition media content. content. ✦✦ If your Macintosh computer includes third-party applications or drivers that permit writing to NTFS, LaCie highly recommends maintaining NTFS as the drive format for the PlayHD. Once you have chosen a file format, see sections 8.1. Reformatting: Windows, 8.2. Reformatting: Mac Users, or 8.3. Reformatting: The LaCinema PlayHD TV Menu for instructions on formatting your LaCinema PlayHD. LaCinema PlayHD User Manual Reformatting the LaCinema PlayHD page 40 8.1. Reformatting: Windows 8.1.1. Formatting for Windows XP The steps listed below will help you format and partition your LaCinema PlayHD disk drive using Windows XP. Please see 8.1.2. Formatting for Windows Vista/7 or 8.2. Reformatting: Mac Users for instructions on formatting with alternative operating systems. For more information on the optimal file format, go to 8. Reformatting the LaCinema PlayHD Hard Disk. CAUTION: Following these steps will erase all media files from the LaCinema PlayHD. Back up all data that you want to protect or continue to use before you format the disk drive. Please note that your PlayHD settings will be preserved (i.e. language). Fig. 69 1. Connect the drive to the computer via the interface port. 2. Right-click My Computer and select Manage. 3. From the “Computer Management” window, select Disk Management (located below the Storage group). See Fig. 69. 4. If the “Initialize and Convert Disk Wizard” window appears, click Cancel. 5. Windows will list the Hard Disks that are installed on the system. Locate the LaCie hard disk (Fig. 69). Right-click the icon and select Initialize. 6. In the box to the right that says Unallocated, right-click and select New Partition… 7. On the first page of the “New Partition Wizard,” click Next (Fig. 70). 8. Select the Primary or Extended option (Fig. 71) and click Next. Fig. 70 continued on next page>> Fig. 71 LaCinema PlayHD User Manual Reformatting the LaCinema PlayHD page 41 9. Specify the partition size. By default, the partition occupies the entire volume (Fig. 72). Click Next. 10.Assign a drive letter or mount path (Fig. 73). Click Next . 11.Select the file format for the disk (FAT32 will only appear as an option if the partition is 32GB or less). Once FAT32 or NTFS has been selected (Fig. 74), you have the option to Perform a quick format, which allows for a much faster format. While Disk Management does not check the drive for errors as extensively with a quick format, the option does save time. Click Next. continued on next page>> Fig. 72 Fig. 73 Fig. 74 LaCinema PlayHD User Manual Reformatting the LaCinema PlayHD page 42 12.A window appears listing your choices. If all seems well, click Finish to begin the format process (Fig. 75). To make a change, select Back. 13.Windows Disk Management will format and partition the disk according to your settings (Fig. 76), and your drive will appear in My Computer, ready to use. IMPORTANT INFO: MS-DOS (FAT32) is compatible with Windows and Mac operating systems. However, it is not the optimal format for high definition multimedia content due to file size restriction. Fig. 75 Fig. 76 LaCinema PlayHD User Manual Reformatting the LaCinema PlayHD page 43 8.1.2. Formatting for Windows Vista/7 Master Boot Record or GUID Partition Table? Master Boot Record (MBR) partitioning has been the hard drive standard for many years. It supports a maximum of four primary partitions with a size limit of 2TB per partition. Due to partition limitations in the face of ever-expanding hard disk drive sizes, Global Unique Identifier Partition Tables (GPT) has been established. It allows for more partitions with greater capacities. Further, GPT has many additional advantages that may offer enhancements in performance. However, GPT is not compatible with Windows XP 32-bit. While Windows XP 64-bit supports GPT, it is best to use MBR if you intend to share your LaCie device with computers running Windows XP 32-bit. Fig. 77 Switching from MBR to GPT or, conversely, from GPT to MBR, is not difficult. Please copy all important data to a separate disk before making the change since adjusting the partition table format is destructive: Right-click on Computer and choose Manage. From the Manage window select Disk Management and find your LaCie disk drive. Right-click on the disk number to choose GPT (Fig. 78) or MBR (Fig. 79). The steps listed below will help you format and partition your disk drive using Windows Vista or Windows 7. Please see 8.1.1. Formatting for Windows XP or 8.2. Reformatting: Mac Users for instructions on formatting using alternative operating systems. For more information on the optimal file format, go to 8. Reformatting the LaCinema PlayHD Hard Disk. CAUTION: Following these steps will erase all media files from the LaCinema PlayHD. Back up all media that you want to protect or continue to use before you format the disk drive. Please note that your PlayHD settings will be preserved (i.e. language). Fig. 78 1. Right-click on Computer and choose Manage. From the Manage window select Disk Management. 2. From the list of drives in the middle of the Disk Management window, right-click on your LaCie hard drive. Select New Simple Volume... (Fig. 77) continued on next page>> Fig. 79 LaCinema PlayHD User Manual Reformatting the LaCinema PlayHD page 44 3. The New Simple Volume Wizard will appear. To continue choose Next. (Fig. 80) 4. This wizard allows you to create volumes, also known as partitions. You can choose to create a single partition or many. Type the size of the partition you want to create in megabytes (MB). For example, a 100GB (gigabyte) partition is 100000MB. (Fig. 81) Once you have chosen a partition size, select Next. continued on next page>> Fig. 80 Fig. 81 LaCinema PlayHD User Manual Reformatting the LaCinema PlayHD page 45 5. Assign a drive letter or accept the default. (Fig. 82) Select Next. 6. Choose the file system format for the partition. If the partition size is 32GB or less, the choices will include NTFS and FAT32. Once the format is selected, you may check Perform a quick format, which allows for a much faster format. While Disk Management does not check the drive for errors as extensively with a quick format, the option does save time (Fig. 83). Select Next. continued on next page>> Fig. 82 Fig. 83 LaCinema PlayHD User Manual Reformatting the LaCinema PlayHD page 46 TECHNICAL NOTE: Windows Vista SP1/SP2 and Windows 7 offer the exFAT file system, which is not limited to partitions less than 32GB (Fig. 83). Used primarily with USB flash drives, the exFAT file system overcomes many of the limitations of FAT32. In addition to Windows Vista SP1 and Windows 7, the exFAT file system can work on Windows XP SP2 with a special driver. Mac OS support is questionable, which limits sharing your LaCie drive between Windows and Apple operating systems. LaCie does not support using the LaCinema PlayHD with the exFAT file system. 7. The last window is a summary of the format options you have just selected. If all looks to be correct, click Finish for the format to begin (Fig. 85). 8. See 3. Setting Up: Transferring Files to begin copying media files to your LaCinema PlayHD. Fig. 84 Fig. 85 LaCinema PlayHD User Manual Reformatting the LaCinema PlayHD page 47 8.2. Reformatting: Mac Users IMPORTANT INFO FOR MAC USERS: While the PlayHD will work with the Mac OS HFS+ (non-journaled) disk format, it offers improved performance when formatted in NTFS. If your Macintosh computer includes third-party applications or drivers that permit writing to NTFS, LaCie highly recommends maintaining NTFS as the drive format for the PlayHD. The steps listed below will help you format and partition your disk drive using Mac OS X. Please see 8.1.1. Formatting for Windows XP or 8.1.2. Formatting for Windows Vista/7 for instructions on formatting using alternative operating systems. For more information on the optimal file format, go to 8. Reformatting the LaCinema PlayHD Hard Disk. CAUTION: Following these steps will erase all media files from the LaCinema PlayHD. Back up all media that you want to protect or continue to use before you format the disk drive. Please note that your PlayHD settings will be preserved (i.e. language). Fig. 86 1. Connect the drive to the computer via the interface port. 2. Select Utilities from the Go menu in the Finder menu bar. 3. In the Utilities folder, double-click Disk Utility. 4. The Disk Utility window will open (Fig. 86). Select your LaCie hard disk from the list of available hard disks on the left side of the window. 5. Select the Partition tab (Fig. 87). continued on next page>> Fig. 87 LaCinema PlayHD User Manual Reformatting the LaCinema PlayHD page 48 6. From the Volume Scheme: menu, choose the number of partitions for the disk drive using the pull-down menu (Fig. 88 (6a) - Mac OS X gives you the option of dividing the drive into a maximum 16 partitions). You can adjust the size of each partition using the slide bar between the partitions in the Volume Scheme: area (Fig. 88 (6b)) or write the size manually in the Size box. (Fig. 88 (6c)). 7. Click on a volume (partition) in Volume Scheme so that a name can be entered in the Volume Information section (Fig. 88 (7a)). From the volume Format pull-down list (Fig. 88 (7b)), select one of the following Mac formats: Mac OS Extended (Journaled), Mac OS Extended, Mac OS Extended (Case-sensitive, Journaled), Mac OS Extended (Casesensitive) or Free Space. To format a partition FAT32, you must select Options... (Fig. 88 (7c)) below the list of partitions and choose the radio button for Master Boot Record (Fig. 89). MS-DOS (FAT) will appear on the pull-down list of Formats (Fig. 88 (7b)). 7a 6a 7b 6c 6b 7c Fig. 88 8. Once you have finalized the volume options, click Apply (Fig. 88 (8a)). Click Partition (Fig. 90) when the alert message appears. 9. Disk Utility will format and partition the disk according to your settings. Once finished, the partition(s) will appear on your desktop, indicating the disk drive is ready for use. 10.See 3. Setting Up: Transferring Files to begin copying media files to your LaCinema PlayHD. Fig. 89 Fig. 90 8a LaCinema PlayHD User Manual Reformatting the LaCinema PlayHD page 49 8.3. Reformatting: The LaCinema PlayHD TV Menu The LaCinema PlayHD internal hard disk may be formatted using the menu. Choosing this method will reformat the disk in NTFS. CAUTION: Following these steps will erase all media files from the LaCinema PlayHD. Back up all data that you want to protect or continue to use before you format the disk drive. Please note that your PlayHD settings will be preserved (i.e. language). 1. Go to Home > Settings > Setup > HDD > Format. A series of prompts will guide you through the disk format. Make certain to read each window carefully before responding. Fig. 91 2. The Format window asks if you wish to format your LaCinema PlayHD (Fig. 91). Click CANCEL to leave the format operation or Yes to continue. 3. The Warning window notifies you that the format will erase all data on the LaCinema PlayHD (Fig. 92). Click CANCEL to leave the format operation or OK to continue. 4. The Confirmation window notes one last time that you are about to delete all your media files (Fig. 93). Your settings will be kept (i.e. language). Click CANCEL to leave the format operation or Format to continue. Fig. 92 continued on next page>> Fig. 93 LaCinema PlayHD User Manual Reformatting the LaCinema PlayHD page 50 5. Please do not unplug the power to your LaCinema PlayHD during the format (Fig. 94). 6. You will receive a window prompt announcing that the format is finished (Fig. 95). Click Restart to reinitialize the LaCinema PlayHD. 7. See 3. Setting Up: Transferring Files to begin copying media files to your LaCinema PlayHD. Fig. 94 Fig. 95 LaCinema PlayHD User Manual 9.Technical Information 9.1. HD File Format Compatibility The LaCinema PlayHD is fully compatible with the high definition formats below: ✦✦ AVC HD ✦✦ H.264 (MPEG-4 P10) ✦✦ MPEG-2 HD ✦✦ MPEG-4.2 ✦✦ WMV9 ✦✦ VC-1 ✦✦ Xvid 9.2. Optimizing Data Transfers Data transfers for the LaCinema PlayHD are the flow of data from computer RAM to storage, or between storage devices. With external drives, such as the LaCinema PlayHD, the data is transferred from the computer to the drive via the USB interface. USB For Hi-Speed USB 2.0 performance, your computer must be equipped with a Hi-Speed USB 2.0 host bus adapter card. The USB 2.0 port can be integrated into your computer’s motherboard or sold separately as a peripheral device. Operating systems compatible with the PlayHD include drivers that support USB 2.0 disk drives. For information about Hi-Speed USB 2.0 peripheral cards, visit our website: www.lacie.com. Technical Information page 51 LaCinema PlayHD User Manual 10. Troubleshooting If your LaCinema PlayHD does not work properly, please refer to the Troubleshooting table to find a solution. You may also visit the PlayHD product page on the LaCie website for recent information concerning the device: www.lacie.com. If you need further assistance, please contact your LaCie reseller or LaCie Customer Support (see section 11. Contacting Customer Support for details). Manual Updates LaCie strives to offer comprehensive, up-to-date User Manuals. It is our goal to provide you with a friendly, easy-to-use format that will help you quickly install and utilize your new device. If your User Manual does not reflect the configuration of the product you purchased, please check our website for a current version. www.lacie.com Troubleshooting page 52 LaCinema PlayHD User Manual Troubleshooting page 53 10.1.Troubleshooting the Television/Stereo Connection Problem Question Answer The TV does not recognize the connected disk. Have you properly set the video out parameters in the Settings menu? Click the Info button on the PlayHD remote control to change from HDMI (default) to Composite Video Out mode. When switching, make certain to connect the proper cables to view the image (4.1.1. HDMI (High Definition) Connection and 4.1.2. Composite Video & Stereo Audio Cable). Checking the firmware version. How do you know which firmware version your LaCinema PlayHD is using? See 7.3.1. Version for details on how to check the LaCinema PlayHD firmware. How do you download and install new firmware? For a detailed explanation, please see 7.3.2. Firmware Update. There is no picture being displayed. Are all of the cables connected correctly? Ensure that all of the cables are connected correctly. See section 4. Setting Up: TV Connection. The picture is black and white or there is no image on the television. Is the LaCinema PlayHD properly connected? Make certain that the video setting on your television matches the cable connection from the laCinema PlayHD. Are the video settings correct? Make certain that all the cable are are in place and not loosely connected to the ports on the television or the LaCinema PlayHD. If the video is present but discolored, press the Info button on the remote control until the correct image is displayed. Go to the Settings menu and select Video. From there, you can select the correct settings. For more information, please see section 7.2. Settings: Audio/Video. Optimizing video connections. What video connection will offer the best picture quality? Under most circumstances, the optimal video connection is HDMI (cable included). There is no sound when connecting the LaCinema PlayHD to a digital stereo. Have the Audio Settings been adjusted? No matter if you are using the HDMI or analog outputs from the PlayHD, the picture and sound should play on your television if the cables have been properly connected. Please check your television video and audio playback settings to make certain that they match the cable connections. If you have connected the coaxial cable or HDMI cable to your digital receiver/pre-amplifer, please see the device user manual to determine how to hear audio. As well, you must adjust the settings on the LaCinema PlayHD. See for 7.2.3. HDMI Audio HDMI and 7.2.4. S/PDIF Audio for coaxial. Slideshows are sluggish. Does it take several seconds to load a picture? Depending on file size, photos may take several seconds to load properly. Reducing photo resolution may allow files to load faster during a slideshow. LaCinema PlayHD User Manual Troubleshooting page 54 10.2.USB Connection (Mac Users) Problem Question Answer The drive is not recognized by the computer. Does an icon for the drive appear on the desktop? Unless you have set the Finder preference not to show External disks on the desktop, an icon for the LaCie drive will be visible. If the drive does not appear, follow the rest of the Troubleshooting tips to isolate the problem. Does your computer’s configuration meet the minimum system requirements for use with this drive? See 1.1. Computer Minimum System Requirements for more information. Is the drive’s power supply connected? Make sure that the power supply is properly connected (see 3.1. STEP 1: Connect the Power Supply) and that the outlet is working. Are both ends of the USB cable securely attached? ✦✦ Only use a USB cable provided by LaCie. ✦✦ Check both ends of the USB cable to make sure they are fully seated in their respective ports. ✦✦ Try disconnecting the cables, waiting 10 seconds, and then reconnecting them. ✦✦ If the drive is still not recognized, restart your computer and try again. Error messages under Mac OS 10.x. Is there a conflict with other device drivers or extensions? Contact LaCie Technical Support for help. Does your computer’s operating system support the hard disk file system? See section 8. Reformatting the LaCinema PlayHD Hard Disk for more information. Is there an “Error –50” message while copying to a FAT 32 (MSDOS) volume? When copying files or folders from Mac OS 10.x to a FAT 32 volume, file names with certain characters cannot be copied. These characters include, but are not limited to: ?<>/\: Check your files and folders to ensure that these characters are not being used. The drive is not running noticeably faster when connected via Hi-Speed USB 2.0. Are you operating in Mac OS 9.x? The LaCinema PlayHD is not compatible with Mac OS 9.x. Is the drive connected to a standard USB port on your computer? Performance will be affected if your drive is connected to a standard USB port. A Hi-Speed USB 2.0 device can only operate at Hi-Speed USB 2.0 performance levels when it is connected directly to a Hi-Speed USB 2.0 port. Otherwise, the Hi-Speed USB 2.0 device will operate at the slower USB transfer rates. For more information, please see sections 9.2. Optimizing Data Transfers and 1.7. Cables and Connectors. Is the drive connected to a HiSpeed USB 2.0 port on your computer? Check to see that the Hi-Speed USB 2.0 drivers for both your host bus adapter and device have been installed correctly. If in doubt, un-install the drivers and re-install them. Also, make sure that you are connected directly to a Hi-Speed USB 2.0 port on your computer. Performance for the LaCinema PlayHD is not guaranteed when connected to a hub. LaCinema PlayHD User Manual Troubleshooting page 55 10.3.USB Connection (Windows Users) Problem Question Answer The drive is not recognized by the computer. Has the drive been formatted? Make sure that the drive has been formatted properly. Please see 8. Reformatting the LaCinema PlayHD Hard Disk. Does your operating system support the disk file system format? Check your computer’s documentation and see 8. Reformatting the LaCinema PlayHD Hard Disk. Is there an icon for the drive in My Computer/Computer? Go to My Computer/Computer and look for an icon and drive letter assigned to the LaCie drive. If the drive does not appear, follow the rest of the Troubleshooting tips to isolate the problem. Does your computer meet the minimum system requirements for use with this drive? See section 1.1. Computer Minimum System Requirements for more information. Is the drive’s power supply connected? Make sure that the power supply is properly connected (see section 3.1. STEP 1: Connect the Power Supply) and that the outlet is working. Are both ends of the USB cables firmly attached? Check both ends of the USB cable to make sure they are fully seated in their respective ports. Try disconnecting the cables, waiting 10 seconds, and then reconnecting them. If the drive is still not recognized, restart your computer and try again. Is there a conflict with other device drivers or extensions? Check the website support page for updated information on potential conflicts (www.lacie.com). Contact LaCie Technical Support for help. Is the drive connected to a standard USB port on your computer? Performance will be affected if your drive is connected to a standard USB port. A Hi-Speed USB 2.0 device can only operate at Hi-Speed USB 2.0 performance levels when it is connected directly to a Hi-Speed USB 2.0 port. Otherwise, the Hi-Speed USB 2.0 device will operate at the slower USB transfer rates. For more information, please see sections 9.2. Optimizing Data Transfers and 1.7. Cables and Connectors. Is the drive connected to a Hi-Speed USB 2.0 port on your computer? Check to see that the Hi-Speed USB 2.0 drivers for both your host bus adapter and device have been installed correctly. If in doubt, un-install the drivers and re-install them. Also, make sure that you are connected directly to a Hi-Speed USB 2.0 port on your computer. Performance for the LaCinema PlayHD is not guaranteed when connected to a hub. The drive is not running noticeably faster when connected via Hi-Speed USB 2.0. LaCinema PlayHD User Manual Contacting Customer Support page 56 11. Contacting Customer Support Before You Contact Technical Support 1. Read the User Manual and review section 10. Troubleshooting. 2. Try to isolate the problem. If possible, make the drive the only external device on your computer or TV. 3. Make sure that all of the cables are correctly and firmly attached. If you have asked yourself all of the pertinent questions from troubleshooting and the problem persists, contact us at www.lacie. com. Please make certain that you are in front of your computer and that you have the following information on hand: Information Location LaCie hard drive serial number Located on a sticker at the back of drive or on the original packaging LaCinema PlayHD firmware version See 7.3.1. Version Macintosh/PC model Mac users: Click on the Apple icon in the menu bar and select About This Mac. Operating system version Processor speed Computer memory The brands and models of other internal and external peripherals installed on your computer Windows users: Right click My Computer and select Properties > General. Mac users: Click on the Apple icon in the finder bar and select About This Mac. Select More Info... The Apple System Profiler will launch and will list your internal and external peripherals. Windows users: Right click My Computer and select Properties > Hardware. LaCinema PlayHD User Manual Contacting Customer Support page 57 11.1.LaCie Technical Support Contacts LaCie Asia http://www.lacie.com/cn/contact/ LaCie Australia http://www.lacie.com/au/contact/ LaCie Belgium http://www.lacie.com/be/contact/ (Dutch) http://www.lacie.com/befr/contact/ (French) LaCie Brazil http://www.lacie.com/us/contact/ LaCie Canada http://www.lacie.com/ca/contact/ (English) http://www.lacie.com/cafr/contact/ (French) LaCie Denmark http://www.lacie.com/dk/contact/ LaCie Finland http://www.lacie.com/fi/contact/ LaCie France http://www.lacie.com/fr/contact/ LaCie Germany http://www.lacie.com/de/contact/ LaCie Ireland http://www.lacie.com/ie/contact/ LaCie Italy http://www.lacie.com/it/contact/ Japan – Elecom CO., LTD. http://www.lacie.jp LaCie Korea http://www.lacie.com/kr/contact/ LaCie Latin America http://www.lacie.com/la/contact/ LaCie Netherlands http://www.lacie.com/nl/contact/ LaCie Norway http://www.lacie.com/no/contact/ LaCie Portugal http://www.lacie.com/pt/contact/ LaCie Singapore http://www.lacie.com/asia/contact/ LaCie Southeast Asia http://www.lacie.com/sea/contact/ LaCie Spain http://www.lacie.com/es/contact/ LaCie Sweden http://www.lacie.com/se/contact/ LaCie Switzerland http://www.lacie.com/ch/contact/ (German) http://www.lacie.com/chfr/contact/ (French) http://www.lacie.com/chit/contact/ (Italian) LaCie UK http://www.lacie.com/uk/contact/ LaCie USA http://www.lacie.com/us/contact/ (English) http://www.lacie.com/uses/contact/ (Spanish) LaCie Grand Export http://www.lacie.com/intl/contact/ LaCinema PlayHD User Manual Warranty Information page 58 12. Warranty Information LaCie warrants your drive against any defect in material and workmanship, under normal use, for the period designated on your warranty certificate. In the event this product is found to be defective within the warranty period, LaCie will, at its option, repair or replace the defective drive. This warranty is void if: ✦✦ The drive was operated/stored in abnormal use or maintenance conditions; ✦✦ The drive is repaired, modified or altered, unless such repair, modification or alteration is expressly authorized in writing by LaCie; ✦✦ The drive was subjected to abuse, neglect, lightning strike, electrical fault, improper packaging or accident; ✦✦ The drive was installed improperly; ✦✦ The serial number of the drive is defaced or missing; ✦✦ The broken part is a replacement part such as a pickup tray, etc. ✦✦ The tamper seal on the drive casing is broken. LaCie and its suppliers accept no liability for any loss of data during the use of this device, or for any of the problems caused as a result. LaCie will not, under any circumstances, be liable for direct, special or consequential damages such as, but not limited to, damage or loss of property or equipment, loss of profits or revenues, cost of replacement goods, or expense or inconvenience caused by service interruptions. Any loss, corruption or destruction of data while using a LaCie drive is the sole responsibility of the user, and under no circumstances will LaCie be held liable for the recovery or restoration of this data. Under no circumstances will any person be entitled to any sum greater than the purchase price paid for the drive. To obtain warranty service, call LaCie Technical Support. You will be asked to provide your LaCie product’s serial number, and you may be asked to furnish proof of purchase to confirm that the drive is still under warranty. All drives returned to LaCie must be securely packaged in their original box and shipped with postage prepaid. IMPORTANT INFO: Register online for free technical support: www.lacie.com/register