1
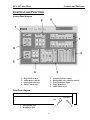
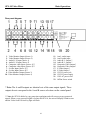
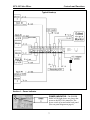
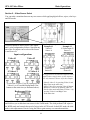
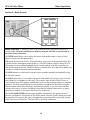
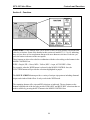
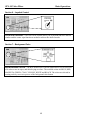
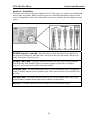
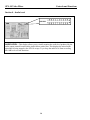
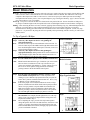
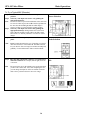
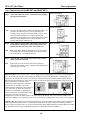
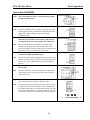
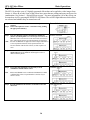
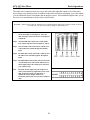
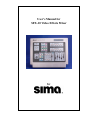
User’s Manual for
SFX-10 Video Effects Mixer
by
Sima Products Corporation
140 Pennsylvania Ave.
Bldg. #5
Oakmont, PA 15139
800-345-7462
www.simacorp.com
PN 21753
©2007 by Sima Products Corp.
All rights reserved. No part of this publication may be reproduced or transmitted in any form or by any means without prior written
permission from Sima Products Corp.
SFX-10 Video Mixer
Table of Contents
Table of Contents
Introduction ............................................................................. 4
Information ........................................................................................................................4
Warnings and Safety information ......................................................................................4
Controls and Functions ............................................................ 5
Control Panel diagram.......................................................................................................5
Front Panel diagram..........................................................................................................5
Rear panel diagram...........................................................................................................6
Typical Hook-up ................................................................................................................7
Section 1 – Power Indicator ..............................................................................................7
Section 2 – Video Source Select .......................................................................................8
Section 3 - Digital Effects (Source A & B) .........................................................................9
Section 4 – Mode Control................................................................................................10
Section 5 – Functions......................................................................................................11
Section 6 – Joystick Control ............................................................................................12
Section 7 – Background Color.........................................................................................12
Section 8 - Audio Mixer ..................................................................................................13
Section 9 – Audio Level...................................................................................................14
Basic Operation ..................................................................... 15
To Try a Typical A / B Wipe.............................................................................................15
To Try a Typical MIX (Dissolve) ......................................................................................16
Typical PIP (Picture - In - Picture) ...................................................................................17
To Try a Typical Center Wipe..........................................................................................17
Try a Typical Key edit (LUMA KEY and BLUE KEY) .......................................................18
Typical Auto FADE/WIPE ................................................................................................19
Digital Effects ..................................................................................................................20
Audio Mixer .....................................................................................................................21
Specifications ........................................................................ 22
World Wide compatibility .................................................................................................23
Troubleshooting ..................................................................... 24
90 Day Limited Warranty ........................................................ 24
3
SFX-10 Video Mixer
Introduction
INTRODUCTION
Congratulations on your purchase of the Sima SFX-10 Video Effects Mixer. The SFX-10 is a state-of-the-art, Digital
Signal Processing video mixer designed to give amateur and home videographers professional-level effects. This unit is
capable of editing two or more tapes into a single finished piece. Note: the SFX-10 abides by copy protection
regulations and will not accept copy-protected signals. When a copy-protected signal is fed into the SFX-10, the
unit will display a blank screen and the Video Source Select Key light will flash. It is equipped with 4 video inputs, 5
digital effects, dual time base correction and can effectively wipe, dissolve, fade and make transitions between video and
audio segments. Please read this manual to become familiar with the SFX-10 and its various controls and then
experiment on your own to make the tapes you want.
Information
This equipment generates and uses radio frequency energy and if not installed and used properly, that is, in strict
accordance with the manufacturer’s instructions, may cause interference to radio and television reception. It has been
type tested and found to comply with the limits for a Class B computing device in accordance with the specifications in
Subpart J of Part 15 of FCC Rules, which are designed to provide reasonable protection against such interference in a
residential installation. However, there is no guarantee that interference will not occur in a particular installation. If this
equipment does cause interference to radio or television reception, which can be determined by turning the equipment off
and on, the user is encouraged to try to correct the interference by one or more of the following measures:
1. Re-orient the receiver.
2. Relocate this equipment with respect to the receiver.
3. Move this equipment away from the receiver.
4. Plug this equipment into a different outlet so that the equipment and receiver are on different branch circuits.
If necessary, the user should consult the dealer or an experienced radio/television technician for additional suggestions.
The user may find the following booklet prepared by the Federal Communications Commission helpful. “How to
Identify and Resolve Radio-TV Interference Problems”. This booklet is available from the U.S. Government Printing
Office, Washington D.C. 20402, Stock No. 004-000-00345-4.
Warnings and Safety information
Safety Check list
Only a qualified service person should remove the cover or attempt to service this device. To reduce the risk of fire or electric shock,
do not expose this apparatus to rain or moisture. Never make or change connections when the power is still switched on To prevent
the risk of electric shock, do not remove the cover (or back). No user- serviceable parts inside. Please refer to important operating and
maintenance (servicing) instructions in the literature accompanying this appliance
9
9
9
9
9
9
9
9
9
9
Read these instructions and keep them for future reference.
Heed all warnings and follow all instructions.
Do not use this apparatus near water.
Clean only with a damp cloth.
Do not install near any heat surfaces such as radiator, heat registers, stoves or other apparatus (including amplifiers) that
produce heat.
Do not defeat the safety purpose of the polarized or grounding-type plug. A polarized plug has two blades with one wider
than the other. A grounding type plug has two blades and a third grounding prong. The wide blade or the third prong is
provided for your safety. When the provided plug does not fit into your outlet, consult an electrician for replacement of the
obsolete outlet.
Protect the power cord from being walked on or pinched particularly at plug’s convenience receptacles, and the point where
they exit from the apparatus.
Use only with a cart, stand tripod bracket or table specified by the manufacturer, or sold with the apparatus. When a cart is
used, use caution when moving the cart/apparatus combination to avoid injury from tip-over.
Unplug this apparatus during lightening storms or when unused for long periods of time.
Refer all servicing to qualified service personnel. Service is required when the apparatus has been damaged in any way, such
as the power-supply cord or plug is damaged, if liquid has been spilled or an object has fallen into the apparatus or the
apparatus has been exposed to rain or moisture, has been dropped, and does not operate normally.
4
SFX-10 Video Mixer
Controls and Functions
CONTROLS AND FUNCTIONS
Control Panel diagram
1.
2.
3.
4.
Digital Effects keys
Audio mixer controls
Source Selection keys
Mode Control keys
5.
6.
7.
8.
9.
Joystick position control
Background color selection control
Power Indicator Light
Wipe Mode Keys
Audio Mixer level
Front Panel diagram
MIC
1. Microphone jack
2. Headphone jack
1
5
PHONES
2
SFX-10 Video Mixer
Basic Operations
Rear panel diagram
1.
2.
3.
4.
5.
6.
7.
8.
9.
10.
Video Monitor Output (Source 1)
Video Monitor Output (Source 2)
Audio R / L Input (Source 1)
Audio R / L Input (Source 2)
Composite video Input (Source 1)**
Composite video Input (Source 2)**
S-video Input (Source 3)**
S-video Input (Source 4)**
Video Monitor Output (Source 3)
Video Monitor Output (Source 4)
11.
12.
13.
14.
15.
16.
17.
18.
19.
20.
21.
22.
Aux L audio input
Aux R audio input
Audio R / L Output *
Audio R / L Output *
Composite Video Output *
Composite Video Output *
S-Video Output *
S-Video Output *
12V DC power jack
12V DC power supply
120V AC power cord
Off/On Power switch
* Note: The A and B outputs are identical sets of the same output signals. These
outputs do not correspond to the A and B source selections on the control panel.
** Note: the SFX-10 abides by copy protection regulations and will not accept copy-protected
signals. When a copy-protected signal is fed into the SFX-10, the unit will display a blank screen
and the Video Source Select Key light will flash.
6
SFX-10 Video Mixer
Controls and Functions
Typical Hook-up
Section 1 – Power Indicator
POWER INDICATOR – The POWER
INDICATOR light shows at a glance that
power to the SFX-10 is turned on. The
power switch is located on the back panel.
(See rear panel diagram on page 6.)
7
SFX-10 Video Mixer
Basic Operations
Section 2 – Video Source Select
You can make a transition between any two sources while applying digital effects, wipes, color keys
and PIP modes.
Two Sample set-ups
Example #1
Video #1
Source A
Use these buttons to select from 4 video inputs
and 1 color background as follows: Note that any
one of the five inputs can be selected for Source
A and Source B.
Example #2
S-Video Input #3
Source A
Input configurations
Video #1
S-Video # 3
Video #2
Video #2
Source B
S-Video # 4
Background Color
Source B
To toggle between S-video and composite video
inputs within a single source try this sequence.
Use only buttons in Source A for this example.
1. Select S-video #3 by pressing Video #1 and
Bkgd Color at the same time.
2. Select Video #2 by pressing Video #2 button..
3. Return to S-video #3 by pressing Video #1.
4. Exit S-video mode and return to Video # 1 by
pressing Video #1 and Bkgd Color
at the same time
To select the S-video #3 (or #4) input press the
Video #1 (or #2) and the Background Color
buttons at the same time (as illustrated above).
Background Color
Video Slide Control - The A/B slide controls several transition functions. Moving it between A
and B allows you to fade between sources in the FADE mode. The slide performs A/B wipes in
the WIPE mode and controls the speed of wipes in the AUTO mode. In the KEY mode, the slide
makes color adjustments. Practice using the slide to gain mastery over smooth transitions.
8
SFX-10 Video Mixer
Controls and Functions
Section 3 - Digital Effects (Source A & B)
EFFECTS ON (A and B) – This off/on button allows you to activate digital effects for
either source A or B or both. Press once to turn on, press a second time to turn off. The red
LED indicates that the effects are activated for the given source. Note: This button must be
ON for any of the effects below to work.
STILL - The STILL effect freezes the picture on the screen, but allows the audio track to
continue. Press once to select STILL, press a second time to turn off. The red LED is on when
the STILL effect is selected.
STROBE - The STROBE button creates video stop-action effects. Three STROBE speeds
are available. Press once to turn on STROBE at high speed, press a second time to set to a
medium speed and press a third time to set to a low speed. Press a fourth time to turn off. The
red LED is on when the STROBE effect is selected.
MOSAIC - The MOSAIC button breaks up the video image up into a pattern of squares
rendering the selected image area un-recognizable. (Commonly used in news and police
shows to disguise identities.) There are three sizes of MOSAIC squares available. Each time
you press the button, the effect shifts to the next size. Press a fourth time to turn off. The red
LED is on when the MOSAIC effect is selected.
PAINT - The PAINT effect (sometimes called POSTERIZATION) merges shades of colors
and creates an abstract type of picture. Three levels of intensity are available. Press the button
three times to select the three different PAINT effects. Press a fourth time to turn the PAINT
effect off. The red LED is on when the PAINT effect is selected
NEGATIVE - The NEGATIVE effect creates a negative image of the video selected. Press
once to select NEGATIVE and press a second time to turn off. The red LED is on when the
NEGATIVE effect is selected.
Note: These effects can be combined. STILL or STROBE can be used with MOSAIC,
PAINT and NEGATIVE. Select several effects at once and apply when desired by pressing
the EFFECTS ON button.
9
SFX-10 Video Mixer
Basic Operations
Section 4 – Mode Control
MODE CONTROL – These keys allow you to select the type of transition between two
sources. Note: All of the transitions are made by using the A/B slide control located in
the Video Source Select box.
The WIPE button allows you to replace one source with another using a variety of wipe
patterns as selected in the function box.
PIP stands for Picture-in-Picture. This mode allows you to place an image from Source B in
a smaller window that appears within Source A. (The PIP window is always Source B.) The
PIP window can be positioned using the joystick control and the A/B slide control let you
fade the PIP image in and out. The PIP window is available three sizes and can be shown with
or without a border as selected in the function box.
The MIX button lets you dissolve from one source to another smoothly and gradually using
the A/B slide control.
The KEY button allows you to replace one source with another by keying on a pre-selected
color (Blue key) or brightness (Luma key). For example, when keyed on black, Source A
would replace source B beginning with all black areas of color and progressing to a complete
transition. The slide control adjusts for color intensity or brightness to optimize keying the
function buttons (Blue and Luma keys). Each has two settings, so you can replace the blue
with the other source or replace everything except the blue with the other source. A Source
and B Source buttons let you select which source is used to key.
The AUTO FADE/WIPE performs wipes and fades automatically at a speed you select.
Press the ON button to activate the AUTO WIPE control. Press the START button to execute
the transition. The speed of the wipe is determined by the setting of the control slide located
in the Video Source Select box. The Start LED is on during a transition.
10
SFX-10 Video Mixer
Controls and Functions
Section 5 – Functions
FUNCTIONS – These buttons allow you to select a variety of wipe patterns, PIP modes and
color key selections. Some of the buttons in this section are marked 1/2, 1/3 or 1/4 indicating
they are two, three or four step buttons that provide more than one selection. Each time you
press the button it advances to the next option.
These buttons are also color coded in coordination with the color-coding on the buttons in the
MODE CONTROL box.
WIPE = Purple, PIP = Green, MIX = Yellow, KEY = Aqua, AUTO WIPE = Blue
For example, when the WIPE button is selected in the MODE CONTROL box, the
FUNCTION buttons will provide the selections highlighted in purple.
The MULTI SCREEN button provides a variety of unique wipe patterns including diamond
shapes and window-blind effects. It only works in the WIPE mode.
The remaining buttons offer wipe and PIP selections as indicated. The two buttons on the
bottom left hand side of the box also provide LUMA KEY and BLUE KEY selections that are
made available by pressing the KEY button in the MODE CONTROL box.
11
SFX-10 Video Mixer
Basic Operations
Section 6 – Joystick Control
JOYSTICK CONTROL – The JOYSTICK control allows you to position and move the PIP
window and the center wipe function as needed to achieve the desired results.
Section 7 – Background Color
BACKGROUND COLOR – The BACKGROUND COLOR control allows you to select one
of 8 colors to use in wipes, and edits keying on colors. The available colors are BLUE, RED,
MAGENTA, GREEN, CYAN, YELLOW, WHITE and BLACK. The colors are selected in
rotating order by successive presses of the background color button.
12
SFX-10 Video Mixer
Controls and Functions
Section 8 - Audio Mixer
The audio mixer allows to mix the soundtrack from 2 video sources, an audio source (background
music) and a microphone. Note: the audio sources are controlled independently from the video
sources. Changing the video source, doing fades or wipes for example, does not change the audio
source.
SOURCE (Input #1 - Input #2)– This slide dissolves from the audio track on Input #1 to
the audio track on Input #2 when the slide is moved from the top to the bottom. When left at
center, both tracks are mixed evenly.
SOURCE MAX / MIN – This slide controls the audio level of the source selected with the
SOURCE slide. If the SOURCE slide is set at the top (Input #1) then the level input of
Source #1 can be increased or reduced using this control.
AUX MAX / MIN – This slide controls the audio level from an auxiliary source. Background
music or another audio track can be added to your edited video and its level is controlled with
this slide.
MIC MAX / MIN – This slide controls the audio level of the microphone input. This is used
when narration or another miked audio track is added to an edited video.
MASTER – This slide controls the overall output level of all mixed audio tracks.
13
SFX-10 Video Mixer
Controls and Functions
Section 9 – Audio Level
AUDIO LEVEL – This display allows you to visually monitor the audio level produced by the
audio output controls located on the Audio Mixer control box. This displays the mixed audio
signal that is being output by the SFX-10 to tape. Try to keep the audio level from exceeding
the 0 dB level to avoid distortion.
14
SFX-10 Video Mixer
Basic Operations
BASIC OPERATION
Hook up – First connect the 120V AC power cord to the 18V power supply. Plug the power supply into the SFX-10 and
into a 120V AC outlet. Connect the SFX-10 to video and audio sources as desired. This video mixer can accept 2
composite video input sources and 2 S-video sources. It can also accept up to 4 audio input sources including a
microphone and an auxiliary source. (See rear panel diagram - page 6 and typical hook-up - page 7.) Be sure to hook
up a video monitor to view your editing.
Power up – The power switch for the SFX-10 is found on the rear panel of the unit. Turn on the SFX-10. With power
on, the power indicator light on the front panel and several red LED lights located on control buttons will light up.
Editing – After mastering the basics of source selection, applying effects and using wipe, key, PIP and background color
functions, you will be able to create professional looking tapes for your enjoyment. The next several pages
demonstrate basic editing procedures. Make sure all connections are correct and all equipment (VCRs, TVs, tape
players etc...) is powered on. By using the SFX-10 repeatedly and experimenting with the controls, you will become
familiar with it.
To Try a Typical A / B Wipe
Step 1 Push the slide on Video Source Select to the top “A” position.
Step 2 Select any video input to be Source A by pushing the
appropriate button(s).
Note: To select S-Video #3 press both end buttons at the same time. To
select S-Video #4 press the middle and far right button at the same
time. Red LED lights indicate which input is selected. (Video #1 is
selected in the example at right.)
Step 3 Select any video input to be Source B by pushing the
appropriate button(s). (Background color is selected as Source B
in the example at right.) Move the slide control between the “A”
and “B” positions to view the two source images.
Step 4 Press the WIPE button (purple) in the MODE CONTROL box.
TIP:
Source Selection
Mode Selection
MODE controls determine the type of transition you want to make
between Source A and Source B. The wipe selection lets you
replace one SOURCE with another by “wiping” images across in
the screen in various patterns. Wipe patterns are selected by
pressing buttons in the FUNCTIONS control panel.
Step 5 Press the upper left hand button marked “A Source” in the
FUNCTIONS control panel. This is a four-step button (1/4)
which gives you a different wipe pattern each time you press the
button. The 4 patterns available with this button are: R to L, Top
to Bottom, L to R, or Bottom to Top.
TIP: Icons in the purple color-coded area indicate the choice of wipe
patterns. Each button in the FUNCTION control panel provides a
choice of 4 wipe patterns except the Multi-Screen button. The
Multi-Screen button works in combination with the other wipe
patterns providing 3 multi-screen patterns and an “Off” position.
The red LED lights indicate which wipe pattern is selected.
Step 6 Move the slide control from “Source A” to “Source B” to make
the transition. The example (bottom right) shows a L to R wipe
pattern. Your wipe pattern will depend on the setting of the fourstep button selected in Step 5.
TIP: After completing the wipe, press the four-step button again to
change the pattern. Now move the slide from the “Source B” to the
“Source A” position. Experiment with all the different four-step
buttons and the Multi-screen button, changing wipe patterns until
you are comfortable with them.
Wipe Type Selection
Wipe
A
15
B
SFX-10 Video Mixer
Basic Operations
To Try a Typical MIX (Dissolve)
Step 1 Push the Video Source Select slide to the top “A”
position.
Step 2 Select any video input to be Source A by pushing the
appropriate button(s).
Note: To select S-Video #3 press both end buttons at the same time.
To select S-Video #4 press the middle and far right button at
the same time. Red LED lights indicate which input is
selected. (Video #1 is selected in the example at right.)
Step 3 Select any video input to be Source B by pushing the
appropriate button(s). (Background color is selected as
Source B in the example at right.) Move the slide control
between the “A” and “B” positions to view the two source
images.
Step 4 Press the MIX button (yellow) in the MODE CONTROL
panel.
TIP:
Mode Selection
MODE controls determine the type of transition you want to
make between Source A and Source B. The MIX selection
lets you dissolve from one image into another smoothly and
gradually. Use the MIX mode to fade to and from black.
Step 5 Move the slide control from “Source A” to “Source B” to
make the transition. The example (bottom right) shows an
A to B mix.
TIP:
Source Selection
Mix
The speed of the mix is determined by the speed with which
you move the control slide. Also, after completing the mix,
you can change the input for Source A and then return the
slide to the A position to dissolve into a new image.
A
16
B
SFX-10 Video Mixer
Basic Operations
Typical PIP (Picture - In - Picture)
Step 1 Push slide on Video Source Select to the top “A” position.
Step 2 Select video inputs for Source A and Source B by pushing the
appropriate button(s). Note: Source A will always be the main
picture and Source B will always be the inserted picture.
TIP: Remember – If the MODE button is set for WIPE or FADE, you can
view the two source images by moving the slide control between the
“A” and “B” positions.
Source Selection
Step 3 Press the PIP button (green) in the MODE CONTROL panel.
Mode Selection
TIP:
MODE controls determine the type of transition you want to make
between Source A and Source B. The PIP selection lets you place a
window containing one image into another. The PIP window is
positioned by using the joystick control.
Step 4 Select a PIP window pattern from the FUNCTIONS control
panel.
TIP:
PIP window options are color-coded in green. PIP windows can have
a colored border or no border. There are three sizes of PIP windows
to select.
Step 5 Move the slide control from “Source A” to “Source B” to make
the transition.
TIP:
PIP Selection
PIP
The PIP window image can appear smoothly and gradually by
controlling the Video Source Select slide or by using the AUTO
FADE/WIPE mode.
A
To Try a Typical Center Wipe
Step 1 Push the slide on Video Source Select to the
top “A” position.
Step 2 Select inputs for Video Source A and Source B
by pressing the appropriate buttons.
Step 3 Press the WIPE button in the MODE
CONTROL panel.
Step 4 Press the CENTER WIPE button in the
FUNCTIONS control panel as shown at right.
This is also a four-step button. Each time you
press it, a different center wipe shape is selected.
Use
The available options are:
the joy stick to position the center wipe window.
Step 5 Move the slide control from “Source A” to
“Source B” to enlarge or reduce the size of the
center wipe window.
TIP: Use the AUTO FADE/WIPE mode to re-size the
Center Wipe gradually and smoothly.
17
B
SFX-10 Video Mixer
Basic Operations
Try a Typical Key edit (LUMA KEY and BLUE KEY)
Step 1 Push slide on Video Source Select to the top “A” position.
Step 2 Select video inputs for Source A and Source B by pushing
the appropriate button(s).
Source Selection
Step 3 Press the KEY button in the MODE CONTROL panel.
Mode Selection
TIP:
There are two KEY modes: LUMA KEY and BLUE KEY. As
you make the transition, the key color is replaced by the
secondary image. A typical use for BLUE KEY edits is when
news broadcasts superimpose a weather map behind the
weatherman, who stands in front of a blue background. LUMA
KEY keys on the brightness levels. BLUE KEY keys on a
specific shade of blue (Pantone 293).
Step 4 Select either the LUMA KEY or BLUE KEY button in the
FUNCTIONS control panel as desired. (KEY choices are
indicated by the icons in the yellow color-coded area.)
TIP:
Both LUMA KEY and BLUE KEY buttons are 2-step buttons.
Try each setting to determine the kind of key edit you want to
key off the blue or everything but the blue.
Step 5 Move the slide control in the Video Source Select control
panel to make the transition.
TIP:
Key Selection
Key
As the slide is moved, colors are replaced from lightest to
darkest by the secondary image. Experiment with the KEY edit
to get the effect you want.
Blue Screen tips: You can create a blue screen by applying a blue background to a flat wall. It is recommended to
use a roll of heavy photographic background paper (Pantone 293) that can be purchased at a photographic or art
supply store. Be careful not to fold or crease the paper. Folds and creases cause shadows that change the shade of
blue and may affect the blue key effect. Place a subject in front of the blue screen and input this image as source A.
Keep in mind that all of the blue will be
replaced by another image when you do the
blue key edit. As the slide is moved, the
Pantone 293 blue and shades of blue similar to
it are replaced by the image from source B.
This is how a weatherman is superimposed
onto a weather map. ( See illustration at right.)
If portions of the blue screen are not
eliminated, it is because the shade of blue is out of the range of adjustment. This can be caused by shadows and
reflections. Lighting is very important in your set-up. Try to make the lighting on the blue screen as even as possible.
Luma key tips: The LUMA key can be used in the same way but with a black background. It will first eliminate the
black background and then proceed to eliminate lighter shades from the subject image. Experimenting with these
color key edits can produce some very creative and interesting effects Tip: Repeatedly pressing the BLUE or LUMA
key, alternates between keying off the BLUE/LUMA or everything but the BLUE/LUMA key.
18
SFX-10 Video Mixer
Basic Operations
Typical Auto FADE/WIPE
Step 1 Push slide on Video Source Select to the top “A” position.
Step 2 Select video inputs for Source A and Source B by pushing
the appropriate button(s).
Source Selection
Step 3 Select WIPE from the MODE CONTROL panel.
Mode Selection
TIP:
We will use WIPE for purposes of this example. However, the
AUTO mode will work in combination with whichever button
(WIPE, KEY, MIX, or PIP) is selected in the MODE
CONTROL panel.
Step 4 Select one of the wipe patterns by pressing the appropriate
button in the FUNCTIONS control panel. (Wipe patterns
are indicated by the icons in the purple color-coded area.)
TIP:
After selecting the desired wipe pattern, perform the wipe
manually by moving the slide control in the Video Source
Select control panel. If the wipe pattern is the one desired, reset
the slide to the top “A” position before proceeding.
Step 5 Press the ON button (blue) in the AUTO FADE/WIPE
section of the MODE CONTROL panel.
TIP:
Set Speed
The speed of the auto wipe is determined by the setting of the
control slide. The top “A” position is fastest. The bottom “B”
position is slowest.
Step 7 Press the START button to execute the automatic wipe. The
wipe is illustrated below the Step 7 diagram at right
TIP:
Auto Wipe/Fade Selection
Once pressed, the ON button changes the function of the Video
Source Select slide control. The slide now controls the speed of
the auto wipe. (This is indicated in the blue color-coded type
above it.)
Step 6 Position the slide control where desired to set the speed of
the auto wipe.
TIP:
Wipe Selection
Auto Wipe/Fade
You can change the speed of the transition while the auto wipe is
in progress by moving the slide control. The red LED light on
the START button will stay lit for the duration of the auto wipe.
Pressing the START button a second time during the auto wipe
will pause the transition. Press a third time to resume progress.
A
19
B
SFX-10 Video Mixer
Basic Operations
Digital Effects
The SFX-10 provides a set of 5 digitally generated effects that can be applied to video images from
Source A, Source B or both. Some of the effects have more than one setting and some can be used in
combination. (See Section 1 – Digital Effects on page 7 for more information.) All of the effects can
be turned on or off by pressing the EFFECTS ON button. The red LED light indicates which effects
are selected and whether they are turned on or off.
Step 1 Push the slide on Video Source Select to the top “A”
position.
Step 2 Select video inputs for Source A and Source B by pushing
the appropriate button(s).
Source Selection
Step 3 Press the MOSAIC button in the DIGITAL EFFECTS
(Source A) control panel. The red LED light will indicate the
MOSAIC effect is selected. You can control effects for Source
B by following the same steps using the buttons for Source B
TIP: We will use MOSAIC for purposes of this example. MOSAIC is
a four-step button with three mosaic patterns and off. To
become familiar with all of the effects, use this sequence on
each.
Effects Selection
Step 4 Press the EFFECTS ON (Source A) button to view the
mosaic effect. Press the MOSAIC button again to select a
different mosaic pattern.
Activate Effects
Step 5 Press other effects buttons to see how they work in
combination with the Mosaic effect.
Combine Effects
TIP:
STILL and STROBE can be combined with MOSAIC, PAINT
or NEGATIVE effects. Experimentation is the best way to
achieve success.
Step 6 Press the EFFECTS ON button a second time to turn the
effects off.
20
Turn Effects Off
SFX-10 Video Mixer
Basic Operations
Audio Mixer
The audio mixer controls permit you to mix and control the input and output levels of the audio
tracks during your editing session. In addition to the audio tracks that accompany your video inputs,
you can add audio from a microphone and an auxiliary source. These additional inputs allow you to
do voice-overs and add music tracks easily and efficiently.
Overview: Audio tracks for Input #1 and Input #2 are routed through the audio mixer controls. If Input #1 and #2
are being used, you can use the auxiliary input as a third audio track.
Step 1 The far left-hand slide control mixes the audio
tracks from Input #1 and Input #2. Move the
slide from top to bottom to dissolve from Input #1
to Input #2.
Step 2 The Max/Min slide controls the overall volume
level output of the mix between Inputs #1 and #2.
Step 3
The AUX slide control controls the volume level
of the audio track routed through the auxiliary
input.
Step 4 The MIC slide control controls the volume level of
the audio track routed through the microphone
input.
Step 5 The MASTER OUTPUT slide control controls the
overall volume level of the mixed audio tracks of
all the inputs. This is the volume level control for
your output to tape.
TIP:
The audio level is displayed by the Audio Level
meter, located in the top right hand corner of the
SFX-10 (shown at right). Use this meter to
monitor the master output volume level.
Occasional peaks in the red zone (above 0 dB) are
okay
21
SFX-10 Video Mixer
___
Specifications
SPECIFICATIONS
Source Inputs
External Sound Input
Recording Output
Monitor Output
Headphone Output
Time base correction
Video Effects – dual channel
Background colors
Key Effects
Picture in Picture
Wipe patterns
Auto wipe/fade
S/N (typical)
Power Source
Power Adapter output
Power Consumption
Dimensions
Weight
Four Video Inputs
Composite Video Input : x 2 (Source 1,2)
1.0Vp-p 75Ω composite signal, Pin Jacks
S-Video (Y/C Input) Input : x 2 (Source 3, 4):
Y signal: 1.0 vp-p 75Ω
C signal: 0.3Vp-p 75V, Mini Din 4-pin connector
Audio Input: x 2
-6dbv/20k Ω, Pin Jacks (L/R)
MIC input: x 1 (MIC); -35dbv/600 Ω, ¼”
AUX input: x 1 (AUX); -6dbv/20k Ω, Pin Jacks (L/R)
Video Output: x 2
1.0Vp-p 75Ω composite signal, Pin Jacks
Y/C Output: x 2
Y signal: 1.0 vp-p 75Ω
C signal: 0.3Vp-p 75V, Mini Din 4-pin connector
Audio Output: L/R x 2
-6dBs/1 kΩ Pin Jacks (L/R)
x 4 (monitor outputs, one for each input)
Video Output: 1.0Vp-p 75Ω composite signal, Pin Jacks
x 1 (Headphone); 8 Ω, 1/8” phone jack
Dual time base correctors
Still, Strobe, Mosaic, Paint, Negative, Wipe, Mix, Fade, Picture-inPicture, Chroma key, Luminance key
White, Yellow, Cyan, Green, Magenta, Red, Blue, Black
Chroma – blue key, adjustable key level, normal or reverse key
Luma – adjustable from black to white, normal or reverse key
Three size, w/ or w/o border, any position on the screen
96 patterns
Adjustable auto fade / wipe speed
Video: 48 dB (composite), 50dB (Y/C) Audio: 60 dB
120V (240 AC), 50/60 Hz
12VDC 1.25 A
Approximately 10W
15.6 (W) x 11.3 (D) x 2 (H) inches
4 lbs. 13 oz
22
SFX-10 Video Mixer
Trouble Shooting
World Wide compatibility
By pressing special key combinations, you can change the video system of the SFX-10 to make it
compatible with different video formats used worldwide. This feature is not available on earlier
versions of this product. If your manual includes this page, then the worldwide compatibility feature
is fully functioning. The unit defaults to the NTSC (USA) setting.
Press the following key combination simultaneously for over 10 seconds to get your desired system
Color + ON(B-bus) ---------- NTSC (USA)
Color + Still(B-bus) ---------
PAL
Color + Strobe(B-bus) ----
PAL N
Color + Mosaic(B-bus) -----
Secam
Color + Paint(B-bus) -------- PAL M
Color + Nega(B-bus) -------
NTSC 4.43
Note: When powered off, the unit retains the last worldwide setting selected.
23
SFX-10 Video Mixer
Basic Operations
TROUBLESHOOTING
Remember: before assuming there is technical problem, check all connections to be sure inputs and
outputs are correctly hooked up.
Problem
Possible Cause
Remedy
LED’s do not light up when the
power is turned on.
AC adapter is not connected to the
Mixer or is not plugged into a
working outlet.
• AC adapter is not connected to
the Mixer or is not plugged into
a working outlet.
• Recording VCR is not switched
to LINE or AUX
• VCR output not switched to
VCR or TV not switched to
channel 3 or 4.
• Input Source A not in PLAY
mode
Audio mixer slide(s) are set at
minimum levels.
Effects are selected but not turned
on.
Unit set to wrong video standard
Attach adapter cable to the
mixer. Try a different AC outlet
No picture or audio on output
TV monitor.
No audio on the output
DIGITAL EFFECTS do not work
– have no effect on the output.
Video output is rolling
Attach adapter cable to the
mixer. Try a different AC outlet.
Switch recording VCR to LINE or
AUX input to accept signals
through the A/V inputs. Refer to
your VCR.
Move slide to appropriate setting
Press EFFECTS On button to
apply effects.
Set to NTSC (USA) as described
on page 23.
90 DAY LIMITED WARRANTY
Sima Products Corporation warrants that if the accompanying product proves to be defective to the original
purchaser in material or workmanship within 90 days from the original retail purchase, Sima Products
Corporation will, at the its option, either repair or replace same without charge (but no cash refund will be
made). To enforce this warranty, you must deliver, mail or ship the product, together with the original bill of
sale, this limited Warranty statement as proof of warranty coverage to:
Sima Products Corporation
Attn: Customer Service
140 Pennsylvania Ave., Bldg. #5,
Oakmont, PA 15139
Before sending the unit in for service, it is recommended that you call
Sima Products Corporation at 800-345-7462.
Limitation of Liability and Remedies
Sima Products Corporation shall have no liability for any damages due to lost profits, loss of use or
anticipated benefits, or other incidental, consequential, special or punitive damages arising from the use of, or
the inability to use, this product, whether arising out of contract, negligence, tort or under any warranty, even if
Sima Products Corporation has been advised of the possibility of such damages. Sima Products
Corporation's liability for damages in no event shall exceed the amount paid for this product. Sima Products
Corporation neither assumes nor authorizes anyone to assume for it any other liabilities.\
24