1
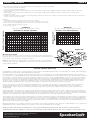
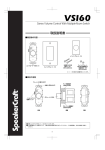
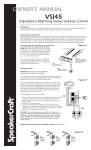
OWNER’S MANUAL
VSI60 Stereo Volume Control
With Multiple-Room Switch
Congratulations on your purchase of SpeakerCraft’s VSI60 Stereo Volume Control.
The VSI60 allows you to easily add any number of speakers to your amplifier without worry of damaging it.
The adjustment is simple, and can be made using a conveniently placed front-mounted switch.
Volume Control
The SpeakerCraft VSI60 is a wall mounted stereo volume control. It connects
between the speaker level output of an amplifier, receiver or speaker selector and
a pair of speakers.
Control Placement
When deciding where the volume control will be mounted in the wall, consider the
various ways it will be used. The primary listening area and the ease of running the
wire to your chosen location are the important things to keep in mind. The most
common locations to mount volume controls are by the door as you walk into the
room, next to existing wall fixtures, or in the area that you will be listening to music.
If you do not understand any part of these instructions, please contact your
SpeakerCraft dealer. Improper wiring could cause damage to your audio system.
Do not put the control into the same box as a 110V AC circuit. (i.e. light
switch, electrical outlet, etc.). Speaker wires can act as an "antenna" for electrical noise. Locating speaker wires too close to a light switch or dimmer may cause a
buzzing or popping sound to be heard through the speakers. If you must locate the
VSI60 near electrical devices, use a separate electrical box.
Once a location has been chosen, you may install the control after you have first
installed a standard single gang plaster ring, or a single gang electrical box (light
switch type).
Figure #1
Wiring the VSI60
(See Figure #1)
CAUTION: Please make sure your amplifier or receiver is off before proceeding.
The VSI60 features SpeakerCraft's LiftLock Wire Connecting system. This system is
quicker and more secure than other methods and eliminates the need for turning
small screws.
SpeakerCraft
®
™
For best results, strip the wire no more than 1/4” from the end. Push the wire completely into the opening on the connector, then lift the lever using your finger or
screwdriver. This will secure the wire (see Figure #2).
If you need to remove the wire, simply push the lever down. This can be done with
your finger. but it may be easier to use a screwdriver or similar tool. With the lever
in the down position, you can pull the wire out.
1. Connect the amplifier's or receiver's left speaker output to the left amplifier
terminals of the volume controls. Please observe proper polarity of the connections (+ amplifier to + input on the control).
2. Repeat step 1 for the right.
3. Connect the wires from the left speaker to the left speaker output terminals of the
volume control. Check proper polarity of wires for correct speaker phase (+ speaker to + output).
4. Repeat step 3 for right speaker connection.
Figure #2
CAUTION:
If the input and output connections are reversed, the minimum setting on the volume control would present a short across
the amplifier or receiver output terminals. This may seriously damage your amplifier or receiver. Please double check steps 1
through 4. This volume control cannot be connected in series with another volume control.
Adjusting the Switch for Multiple Speakers
The VSI60 is designed so that you may run multiple pairs of speakers without damaging your amplifier or receiver. The
adjustment is made by using a switch that can be easily changed even after the control is mounted into the wall.
Please follow the recommendations in this section carefully. Failure to properly set the switch may result in
damage to your amplifier or receiver.
The label next to the switch on the VSI60 gives a minimum recommended setting for placing the switch according to how
many speakers you will be attaching to the VSI60. However, to achieve optimum performance you should follow the steps
below.
OWNER’S MANUAL
PAGE 2
1. Determine the minimum recommended load that your amplifier or receiver can handle.
• If it is 4 ohms, you will use Chart A
• If it is 8 ohms, you will use Chart B
2. How many 8 ohm speakers will be attached to one channel (left or right) of the amplifier? Find the number under 8 ohms on the chart
you are using.
3. How many 4 ohm speakers will be attached to one channel (left or right) of the amplifier? Find the number next to 4 ohms on the
chart you are using.
4. Follow the column under the number of 8 ohm speakers and the row next to the number of 4 ohm speakers until they intersect. You will see
a letter. Set the switch to this letter.
Example:
1. The amplifier states it can safely power 4 ohms. Use chart A.
2. There is one 8 ohm speaker. Find 1 under the 8 ohm columns on the chart.
3. There are three 4 ohm speakers. Find 3 next to the 4 ohm rows on the chart.
4. The column and the row intersect at "B".
5. Set the switch to "B".
CHART A
CHART B
(Use when amplifier can safely power 8 ohms)
Number of 8 ohm Speakers
Number of 8 ohm Speakers
0 1 2 3 4 5 6 7 8 9 10 11 12 13 14 15 16 17 18
0
A A A A B B
C
C
C
C
C
C C C C D D
C C D D D D
D D D D D D
D D D D D D
1 A A A B B B
2 A B B B B C
3 B B B C C C
4 B C C C C C
5 C C C C C C
6 C
7 C
8 C
9 D
B
C
C
C
C
D
D
D
D
D
B
C
C
C
C
D
D
D
D
D
C
C
C
C
D
D
D
D
D
D
C
C
C
C
D
D
D
D
D
D
C
C
C
C
D
D
D
D
D
D
C
C
C
D
D
D
D
D
D
D
C
C
D
D
D
D
D
D
D
D
C
C
D
D
D
D
D
D
D
D
C
D
D
D
D
D
D
D
D
D
C
D
D
D
D
D
D
D
D
D
D
D
D
D
D
D
D
D
D
D
D
D
D
D
D
D
D
D
D
D
Number of 4 ohm
Speakers
Number of 4 ohm Speakers
(Use when amplifier can safely power 4 ohms)
0 1 2 3 4 5 6 7 8 9
A A A A B B
C
C
C
C
5 C C C C C C C
0
1 A A A B B B
2 A B B B B C
3 B B B C C C
4 B C C C C C
B
C
C
C
C
D
B
C
C
C
C
D
C
C
C
C
D
D
Figure #3
Mounting the VSI60
Once the control has been wired, it is ready to be mounted into the wall. Referring to
Figure #3, place the components of the control into the wall In the order illustrated. Use
the enclosed screws to hold the components in place.
NOTE: The rotary switch is shipped with the control turned as far counterclockwise as
it will turn (off). If you have changed this, return it to the full counterclockwise position
before starting installation.
Limited Lifetime Warranty
SpeakerCraft Inc. warrants to the original retail purchaser only that this SpeakerCraft product will be free from defects in materials and workmanship,
provided it was purchased from a SpeakerCraft Authorized Dealer.
Defective products must be shipped, together with proof of purchase, prepaid insured to the SpeakerCraft Authorized Dealer from whom they
were purchased, or to the SpeakerCraft factory at the address listed on this installation instruction manual. Freight collect shipments will be refused.
It is preferable to ship this product in the original shipping container to lessen the chance of transit damage. In any case, the risk or loss or damage in transit is to be borne by the purchaser. If upon examination at the Factory or SpeakerCraft Authorized Dealer it is determined that the unit
was defective in materials or workmanship at any time during this warranty period, SpeakerCraft or the SpeakerCraft Authorized Dealer will, at
its option, repair or replace this product at no additional charge, except as set forth below. If this model is no longer available and can not be
repaired effectively, SpeakerCraft, at its sole option, may replace the unit with a current model of equal or greater value.
In some cases where a new model is substituted, a modification to the mounting surface may be required. If mounting surface modification is
required, SpeakerCraft assumes no responsibility or liability for such modification. All replaced parts and product become the property of
SpeakerCraft Inc. Products replaced or repaired under this warranty will be returned to the original retail purchaser, within a reasonable time,
freight prepaid.
This warranty does not include service or parts to repair damage caused by accident, disaster, misuse, abuse, negligence, inadequate packing or
shipping procedures, commercial use, voltage inputs in excess of the rated maximum of the unit, or service, repair or modification of the product
which has not been authorized or approved by SpeakerCraft. This warranty also excludes normal cosmetic deterioration caused by environmental
conditions. This warranty will be void if the Serial number on the product has been removed, tampered with or defaced.
This warranty is in lieu of all other expressed warranties. If the product is defective in materials or workmanship as warranted above, the purchaser's
sole remedy shall be repair or replacement as provided above. In no event will SpeakerCraft be liable for any incidental or consequential damages
arising out of the use or inability to use the product, even if SpeakerCraft Inc. or a SpeakerCraft Inc. Authorized Dealer has been advised of the possibility of such damages, or for any claim by any other party. Some states do not allow the exclusion or limitation of consequential damages, so the
above limitation and exclusion may not apply.
All implied warranties on the product are limited to the duration of this expressed warranty. Some states do not allow limitation on the length of an
implied Warranty. If the original retail purchaser resides in such a state, this limitation does not apply.
Should you have any questions regarding this, or any other SpeakerCraft product, please call our toll free service hotline at
1-800-448-0976. We are available to assist you every weekday, except holidays, between the hours of 7:00 a.m. and 5:00 p.m. PST.
940 Columbia Avenue, Riverside CA 92507-4492
(800) 448-0976 Fax (951) 787-8747
www.speakercraft.com
SpeakerCraft
®
LIT90136-1 (rev1)