1
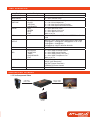
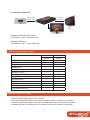
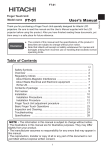
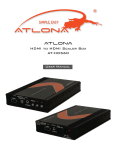
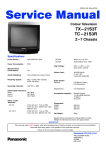
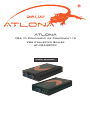
AtlonA
VGA to Component or Component to
VGA Converter Scaler
AT-VGA300CV
User Manual
TABLE OF CONTENTS
1. Introduction
.................................................. 1
2. Package Includes
.................................................. 1
3. Features
.................................................. 1
4. Specification
.................................................. 1
5. Panel Descriptions .................................................. 2
5.1 Front Panel
.................................................. 2
5.2 Rear Panel
.................................................. 2
6. OSD Operation
.................................................. 3
7. Connection Diagram
.................................................. 3
7.1. PC to Component Video
.................................................. 3
7.2. Component video to PC
.................................................. 4
8. Support Resolution
.................................................. 4
9. Resetting the Unit
.................................................. 4
10. Safety Information
.................................................. 5
11. Warranty
.................................................. 6
12. Atlona Product Registration
.................................................. 7
INTRODUCTION
The Atlona AT-VGA300CV is a very advanced scaler box, designed to convert any PC/Laptop input to
component video or Component video input to VGA output. The Atlona scaler is capable of accepting a
wide-range of PC or HDTV resolutions up to WUXGA/1080P. This scaler/converter has a comprehensive
on-screen menu which allows user to select from a variety of resolutions, picture adjustments ets.
PACKAGE INCLUDES:
• 1x AT-VGA300CV
• 1x 5v Universal Power Supply
• 1x 3ft VGA to Component Breakout Cable
• 1x User Manual
FEATURES:
• Scales any PC or HDTV resolutions to PC or HDTV resolution up to WUXGA or 1080p
• Provides output picture adjustment on contrast, brightness, hue, saturation, sharpness, rgb (color
tone) level and aspect ratio size.
• Has a loop-out for connecting to a local monitor.
• Supports high resolution output:
PC: VGA, SVGA, XGA, SXGA, UXGA, WXGA, WSXGA, WUXGA
SD/HD: 480i, 576i, 480p, 576p, 720p, 1080i and 1080p.
• Converts PC (VGA) signal from PC or Laptop to Component Video
• Converts Component Video signals from DVD’s, Video Games ets. to VGA inputs on Computer
monitors, Projectors, Plasma Screens
SPECIFICATIONS:
Input ports
Output ports
Loop-out port
1 x HD15 (Could be used for PC or Component Video)
1 x HD15 (Could be used for PC or Component Video)
Power Supply
Dimensions (mm)
Weight(g)
Chassis Material
Silk Skin Color
Operating Temperature
5V/2.6A DC (US/EU standards, CE/FCC/UL certified)
157(d) x 102(w) x 25(h)
332
Aluminum
Black
Operating from 0°C ~ 48°C
1 x HD15 (Could be used for PC or Component Video)
1
PANEL DESCRIPTION
1. Front Panel
1. PC/HD BYPASS: BYPASS THE PC/HD INPUT SIGNAL.
2. INPUT: CONNECT THE PC INPUT D-SUB (15-PIN) PORT TO THE D-SUB OUTPUT PORT OF YOUR
SOURCE EQUIPMENT SUCH LIKE PC.
2. Rear Panel
1. POWER: PLUG THE 5VDC POWER SUPPLY INTO THE UNIT AND CONNECT THE ADAPTOR TO AC WALL
OUTLET.
2. PC/HD OUTPUT: CONNECT THE PC OUTPUT D-SUB (15-PIN) PORT TO THE D-SUB INPUT PORT OF
YOUR DISPLAY.
3. MENU BUTTON: PRESS THE MENU BUTTON TO BRING UP OSD OPERATION MENU.
(SEE SECTION “4. OSD OPERATION” FOR REFERENCE.)
4. +/- BUTTON:
a. THE MINUS (–) BUTTON WILL AUTO ADJUST THE PICTURE.
b. ON THE FIRST TIER OF OSD MENU, USE + AND – BUTTONS TO MOVE UP/DOWN THE HIGHLIGHT
ITEM FOR SELECTION.
c. ONCE THE DESIRED OPTION IS SELECTED, USE + AND – BUTTONS TO TOGGLE BETWEEN SETTING
VALUES.
2
OSD OPERATION
1 st Tier Option
2 nd Tier Option
Adjustment
CONTRAST
-
0 ~ 100 of Contrast Level
BRIGHTNESS
- PHASE
- CLOCK
- VERTICAL
- HORIZONTAL
- RED
- GREEN
- BLUE
- EXIT
0 ~ 100 of Contrast Level
-
FULL / OVERSCAN / UNDERSCAN /LETTERBOX / PANSCAN
-
NATIVE / VGA / SVGA / XGA /SXGA /UXGA / 480i / 480p
/720p@60Hz / 1080i@60Hz /1080p@60Hz / 576i / 576p
/720p@50Hz / 1080i@50Hz /
1080p@50Hz / WXGA / WSXGA /WUXGA
-
EAR PHONE / OPTICAL
- HPOSITION
- VPOSITION
- TIMER
- BACKGROUND
- EXIT
0 ~ 100 of OSD Horizontal Position
0 ~ 100 of OSD Vertical Position
0 ~ 100 of OSD Existing Time (sec.)
0 ~ 100 of OSD Transparent Level
Back to 1st Tier
INFORMATION
-
SOURCE (Input Interface)
INPUT (Input Resolution)
OUTPUT (Output Resolution)
VERSION (Firmware Version
EXIT
-
Close OSD Menu
FINETUNE
COLOR
SIZE
OUTPUT
AUDIO
OSD
0 ~ 100 of WKH6FDOHU
V3L[HO$OLJQPHQW
0 ~ 10 of &ORFN$GMXVWPHQW
0 ~ 100 of the Signal's Vertical Position
0 ~ 100 of the Signal's Horizontal Position
0 ~ 100 of Red Color Level
0 ~ 100 of Green Color Level
0 ~ 100 of Blue Color Level
Back to 1st Tier
CONNECTION DIAGRAM
1. PC to Component Video
VGA cable,
male to male
VGA yo YPbPr
Adapter cable
PC
HDTV
computer
monitor
3
2. Component video to PC
VGA cable,
male to male
VGA yo YPbPr
Adapter cable
DVD
computer
monitor
HDTV
Selecting Component Video Output
• Press “Menu” and “-“ at the same time
Selecting VGA output:
• Press “Menu” and “+“ at the same time
SUPPORT RESOLUTION
PC INPUT
PC OUTPUT
PC/HD
PC/HD
v
v
480I/576I (NTSC/PAL)
480P/576P
v
v
720P@(50/60)
v
v
1080I@(25/30)
v
v
1080P@(50/60)
v
v
VGA@(60/72/75/85)
v
v
SVGA@(56/60/72/75/85)
v
v
XGA@(60/70/75/85)
v
v
SXGA@(60/75/85)
v
v
UXGA@60
v
v
WXGA@60(1280x800)
v
v
WSXGA@60(1680x1050)
v
v
WUXGA@60(1920x1200)
v
v
RESETTING the UNIT
1. Press and hold “Menu” button for 5 seconds
2. Disconnect power plug from the unit while holding the “Menu” and wait for 5 seconds
3. Connect the power plug back in and continue holding the “Menu” for another 5 seconds
4. Release the “Menu” and allow up to 10 seconds for the unit to connect to the display
4
SAFETY INFORMATION
Avoid excessive humidity, sudden
temperature changes or temperature
extremes.
Safeguards
To reduce the risk of electric shock, do not
expose this product to rain or moisture.
Keep this product away from wet locations
such as bathtubs, sinks, laundries, wet
basements and swimming pools.
If the wall plug does not fit into your local
power socket, hire an electrician to replace
your obsolete socket.
Use only accessories recommended by
ATLONA to avoid fire, shock or other
hazards.
Do not modify the wall plug.
Doing so will void the warranty and safety
features.
Unplug the product before cleaning. Use
a damp cloth for cleaning. Do not use
cleaning fluid or aerosols, which could
enter the unit and cause damage, fire or
electrical shock. Some substances may
also mar the finish of the product.
This equipment should be installed near
the socket outlet and the device should
be easily accessible in case it requires
disconnection.
Precautions
Never open or remove unit panels or make
any adjustments not described in this
manual. Attempting to do so could expose
you to dangerous electrical shock or other
hazards. It may also cause damage to your
AT-VGA300CV. Opening the product will
void the warranty.
FCC Regulations state that any
unauthorized changes or modifications to
this equipment not expressly approved by
the manufacturer could void the
user’s authority to operate this
equipment.
Do not attempt to service the unit. Instead
disconnect it and contact your Authorized
ATLONA reseller or contact ATLONA
directly.
Operate this product using only the
included external power supply. Use of
other power supplies could impair
performance, damage the product or cause
fires.
In the event of an electrostatic discharge,
this device may automatically turn off. If this
occurs, unplug the device, and plug it back
in.
Protect and route power cords so they will
not be stepped on or pinched by anything
placed on or against them. Be especially
careful of plug-ins, or cord exit points from
this product.
5
WARRANTY
1.LIMITED WARRANTY
Atlona Technologies warrants that (a) its products (the “Product”) will perform substantially in accordance with the
accompanying written materials for a period of 3 YEARS from the date of receipt and (b) that the Product will be
free from defects in materials and workmanship under normal use and service for a period of 3 years. In the event
applicable law imposes any implied warranties, the implied warranty period is limited to 3 years from the date of
receipt. Some jurisdictions do not allow such limitations on duration of an implied warranty, so the above limitation
may not apply to Customer.
2.CUSTOMER REMEDIES
Atlona Technologies and its suppliers’ entire liability and Customer’s exclusive remedy shall be, at Atlona Technologies’ option, either return of the price paid for the Product, or repair or replacement of the Product that does not meet
this Limited Warranty and which is returned to Atlona Technologies with a copy of Customer’s receipt. This Limited
Warranty is void if failure of the Product has resulted from accident, abuse, or misapplication. Any replacement Product will be warranted for the remainder of the original warranty period or 3 year, whichever is longer.
3.NO OTHER WARRANTIES
TO THE MAXIMUM EXTENT PERMITTED BY APPLICABLE LAW, ATLONA TECHNOLOGIES AND ITS SUPPLIERS DISCLAIM ALL OTHER WARRANTIES, EITHER EXPRESS OR IMPLIED, INCLUDING, BUT NOT LIMITED
TO IMPLIED WARRANTIES OF MERCHANTABILITY AND FITNESS FOR A PARTICULAR PURPOSE, WITH
REGARD TO THE PRODUCT AND ANY RELATED WRITTEN MATERIALS. THIS LIMITED WARRANTY GIVES
CUSTOMER SPECIFIC LEGAL RIGHTS. CUSTOMER MAY HAVE OTHER RIGHTS DEPENDING ON THE JURISDICTION.
4.NO LIABILITY FOR DAMAGES
TO THE MAXIMUM EXTENT PERMITTED BY APPLICABLE LAW, IN NO EVENT SHALL ATLONA TECHNOLOGIES OR ITS SUPPLIERS BE LIABLE FOR ANY DAMAGES WHATSOEVER (INCLUDING WITHOUT LIMITATION, SPECIAL, INCIDENTAL, CONSEQUENTIAL, OR INDIRECT DAMAGES FOR PERSONAL INJURY, LOSS
OF BUSINESS PROFITS, BUSINESS INTERRUPTION, LOSS OF BUSINESS INFORMATION, OR ANY OTHER
PECUNIARY LOSS) ARISING OUT OF THE USE OF OR INABILITY TO USE THIS PRODUCT, EVEN IF ATLONA
TECHNOLOGIES HAS BEEN ADVISED OF THE POSSIBILITY OF SUCH DAMAGES. IN ANY CASE, ATLONA
TECHNOLOGIES’ AND ITS SUPPLIERS’ ENTIRE LIABILITY UNDER ANY PROVISION OF THIS AGREEMENT
SHALL BE LIMITED TO THE AMOUNT ACTUALLY PAID BY YOU FOR THE PRODUCT. BECAUSE SOME JURISDICTIONS DO NOT ALLOW THE EXCLUSION OR LIMITATION OF LIABILITY FOR CONSEQUENTIAL OR
INCIDENTAL DAMAGES, THE ABOVE LIMITATION MAY NOT APPLY TO YOU.
ATLONA
Toll Free: 1-877-536-3976
International: 408-954-8782
FAX: 408-954-8792
Website: www.atlona.com
E-MAIL: [email protected]
6
ATLONA PRODUCT REGISTRATION
Thank you for purchasing this Atlona product — we hope you’ll enjoy it.
We also hope that you’ll take a few moments to register your new purchase. Registration creates an ownership
record if your product is lost or stolen and helps ensure you’ll receive notification of performance issues and firmware updates.
At Atlona, we respect and protect your privacy and assure you that your registration information is completely
secure. Of course, Atlona product registration is totally voluntary and failure to register will not diminish your limited
warranty rights.
To register go to www.atlona.com/registration
7