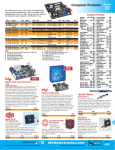
1
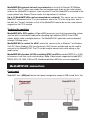
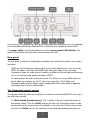
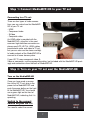
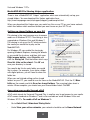
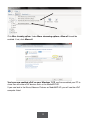
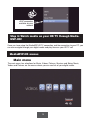
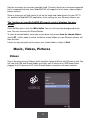
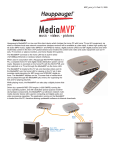
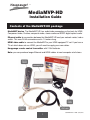
Hauppauge!
®
MediaMVP-HD
Installation Guide
Contents of the MediaMVP-HD package
MediaMVP device. The MediaMVP-HD has audio/video connectors on the back for HDMI,
Component video, S-video, composite video, stereo audio and SPIDF digital optical audio.
Ethernet cable for connection between the MediaMVP-HD and your network router, hub or
switch. This uses RJ-45 connectors and is 1.5 meters long.
HDMI video cable to connect the MediaMVP to your HDMI equipped TV set. If you have a
TV set which does not use HDMI, you will need to supply your own cables.
Hauppauge remote control transmitter with 2 AAA batteries
Note: you can purchase longer Ethernet and HDMI cables at most computer retail stores.
QI-MVPHD-V1.1-ENG 4/30/2010
1
Overview of MediaMVP-HD
MediaMVP-HD brings digital media to your HD TV
MediaMVP-HD is installed at your TV set and plays digital media (digital music, digital
videos and digital pictures) from your PC or a USB thumb drive onto the TV set.
When the digital content is on the PC, MediaMVP-HD connects to your PC over your home
Ethernet (wired) network. You can also put digital media on a USB thumb drive, plug the
USB thumb drive into the MediaMVP-HD and then play the content onto your HD TV set.
MediaMVP-HD plays digital audio (MP3), high definition digital video (MPEG-2 as recorded
by the WinTV-PVR or WinTV-HVR series of Hauppauge TV tuners, plus H.264 as recorded
by the Hauppauge HD PVR and DivX) and digital pictures (JPEG, PNG, BMP and GIF).
Play WinTV and HD PVR recordings on your HD TV set
MediaMVP-HD can play all recordings which can be made with a Hauppauge WinTV-PVR,
WinTV-HVR or HD PVR. The video formats which can be played by the MediaMVP-HD are
MPEG-2 and H.264, both standard definition and high definition (up to 1080p). You can
also play standard and high definition Divx and standard definition Windows Media files.
USB thumb drives can be a source for media, too
In addition to connecting to a PC to play digital media, MediaMVP-HD also has a USB port
where you can plug in a USB thumb drive and play digital media. If you have a external
USB hard drive, you might need to use a powered USB hub since the USB port on the
MediaMVP-HD is designed for thumb drives.
Access PC media with shared folders or uPnP
There are two ways the MediaMVP-HD can access media on a PC: you can set up Shared
Folders on your PC, or you can use Universal Plug and Play (called ‘uPnP’) to access
media folders on your PC.
2
MediaMVP-HD connects to local area networks via its built-in Ethernet 10/100Mbps
connection. The PC where your media files are located needs to be on the same network
node as the MediaMVP. In general, if you have the PC and the MediaMVPs connected to the
same network hub, Access Point or router, this requirement is satisfied.
Up to 12 MediaMVP-HDs can be connected on a network. This means you can have a
MediaMVP connected to the TV in your bedroom, one to the TV in the living room, one in
the den, etc. The only limitation is that all the MediaMVPs need to be on the same network
segment as the PC is located.
Technically speaking
MediaMVP-HD’s CPU engine (a Sigma 8655 processor) runs the Linux operating system,
and has built-in multimedia hardware for decoding high definition MPEG-2 and H.264
videos, digital audio and digital pictures. The MediaMVP-HD application can be reloaded
through it’s Setup menu.
MediaMVP-HD is a client for uPnP, where the server can be a Windows 7 or Windows
Vista PC. Some Windows XPs have third party uPnP servers installed and can be used to
connect to the MediaMVP-HD. The PC can be used for normal tasks while acting as the
media server. .
MediaMVP-HD decodes full HD resolution NTSC and PAL encoded MPEG-2 or H.264
bit streams in real time, up to and including 1080p. Video formats supported include MPG,
MPEG, MP4, AVI, MKV, VOB and TS. Standard definition WMV files are also supported.
MediaMVP-HD connectors
Front panel
MediaMVP has a USB port on the front panel, designed to accept a USB thumb drive. You
3
can also plug in a powered USB disk drive. Unpowered USB disk drives are not supported
since the power provided by MediaMVP-HD is limited to that needed by thumb drives.
The power switch is on the front panel as well as a green power LED indicator. The
green LED will blink once with every remote control key click.
Rear panel
The rear panel is where the audio/video connectors and network connections are made. A
few notes:
-
HDMI out and Component video out give you the best video quality. If you are using
HDMI, the audio is carried in the HDMI cable along with video. If you are using
Component video, for audio you will need to use either the left and right audio connectors or the Optical Audio output connector (SPDIF).
-
All video outputs are active at the same time. This allows you to use HDMI and composite video, for example, on two TV sets at the same time. The S-Video and
Composite video outputs always output standard definition video, without regard for
the original format of your video media.
The Hauppauge remote control
The remote control will allow you to perform all functions on the MediaMVP-HD. Here are a
few of the key controls:
-
‘i’ / Menu button (Instant menus): The ‘i’ button is the most important button on
the remote control. Click the i button and you will see a list of functions which can be
performed from the current menu. For example, if you are in the Pictures menu, when
you click the i button you will see selections to start and stop background music, to
4
start picture slide shows, to use a selected picture for the MediaMVP menu background and to scan for shared folders.
-
Back/exit button: when you click this
button, you will return to the previous
menu.
-
Guide button: this is where you can
see the video adjustments briteness,
contrast and saturation. Use the right
and left arrow buttons to make these
adjustments. Click the Back/exit button to
exit the video adjustments.
-
FastSkip buttons (0 to 9): when you
are playing a video, the video will move
to 10%, 20%, etc. of the video. Hitting
the 0 button brings you to the beginning
of your video program.
-
Skip forward / skip back: these buttons will move you through your video
program 30 seconds at a time
-
Videos, Music and Pictures buttons:
moves you to these main menus.
-
Volume up / down: this controls the
volume from the MediaMVP-HD.
-
Go button: this button brings you to the
main menu.
-
Power button: puts MediaMVP-HD in low power, and turns off the video output.
5
Installation overview
1.
Connect MediaMVP-HD to your TV set
Use the HDMI cable (provided) or the audio video connectors on the back of
MediaMVP-HD to connect to your HD TV set or TV monitor. MediaMVP-HD supports
video resolutions from 480i (standard definition) to 1080p (high definition).
2.
Turn on your TV and MediaMVP-HD
The green light will appear on your MediaMVP-HD and you should see the main menu
screen on your TV set.
3.
Configure the video format of MediaMVP-HD for your TV set (if necessary)
When using HDMI, MediaMVP-HD automatically configures itself for the video format of
your TV set. Some TV sets cannot be configured automatically and you must therefore
set the video format on the MediaMVP-HD manually.
4.
Attach MediaMVP-HD to your network
Plug a network cable into the MediaMVP-HD and then plug this cable into your router.
5.
Setup your PC for file sharing or for uPnP
There are two ways to get access to media on your PC: you can either use uPnP or
you can set up shared folders. If you already have shared folders enabled on your
PC, then you can simply scan for these folders (hit the ‘i’ button on your MediaMVPHD remote control, and go to ‘Scan for shared folders’). uPnP needs to be enabled
on your PC. See step 5 for information.
6.
Watch your media on your TV!
Use the Hauppauge remote control to navigate through your digital media from a USB
thumb drive or over your home network from your PC. The ‘i’ button on the
Hauppauge remote is the key to searching and sorting media.
6
Step 1: Connect MediaMVP-HD to your TV set
Connecting to a TV set:
There are four types of video connections you can make from the MediaMVPHD to your TV set:
- HDMI
- Component video
- S-Video
- Composite video
An HDMI cable is provided with the
MediaMVP-HD, since this is the most
common high definition connection on
plasma and LCD HD TVs. HDMI cables
provide both audio and video to TV set,
but you can also use the stereo and digital audio outputs of the MediaMVP-HD to
connect to a home stereo system.
If your HD TV uses component video, SVideo or composite, use the appropriate cables (not included with the MediaMVP-HD package) and connections from the back of MediaMVP-HD.
Step 2: Turn on your TV set and the MediaMVP-HD
Turn on the MediaMVP-HD
Once you have made a connection to the HD TV set, plug in the
power to the MediaMVP-HD and
push the power button on the front
of the MediaMVP-HD. You should
see a green light on the front of
MediaMVP-HD, indicating that it is
operating.
Switch to the correct
source on your HD TV:
You need to select the correct
7
Video Input on your HD TV set. Each TV set does this differently, but many TV sets have a
button marked “Video source” on the remote control. You will need to find the correct
source which corresponds to the connection you made from the MediaMVP-HD.
Once you select the correct source, you should see the MediaMVP-HD main screen.
If you do not see the main screen and you are using HDMI, you might need to change the
video format setting on your HD TV set or the MediaMVP-HD. Please see Step 3:
Configure the HDMI video format of MediaMVP-HD to match your HD TV set (if
necessary) for tips on matching your HD TV video format to the MediaMVP-HD.
Step 3: Configure the HDMI video format of
MediaMVP-HD to match your HD TV set (if necessary)
If you are using HDMI to connect to your HD TV, MediaMVP-HD typically adjusts the HDMI
setting automatically. For some HD TV sets, the automatic settings do not work properly.
There are a few things you can do in this case:
- you can use the MediaMVP-HD Setup menu to manually set MediaMVP-HD to HDMI
video settings. To do this, we suggest you connect both the Composite video and HDMI
video to your HD TV at the same time. If you do this, you can see the MediaMVP-HD screen
using composite video. You can then quickly switch back and forth between Composite and
HDMI to see if you have chosen the correct settings.
- you can use the Component video connections, which are also high definition but do not
attempt to use automatic settings and therefore will connect more easily
Use the MediaMVP-HD Setup menu to manually set MediaMVP-HD to HDMI
video settings
Start by using Composite video. You should see the MediaMVP-HD main menu on your
HD TV set. Then use your Hauppauge remote control and go to Setup/VideoOutput and
choose NTSC HDMI.
ote: Click the OK button on the remote control to enter each menu.
N
You will see a list of HDMI video formats, from 480i to 1080p (the highest video format).
Choose 480i and click the OK button on MediaMVP-HD.
Now switch your HD TV set to the HDMI input which is connected to MediaMVP-HD.
If you see video (the MediaMVP-HD HDMI Setup menu), you know that this format is supported by your TV set.
Once you have found a format, try the next higher video format. Do this until you cannot
8
see a picture on your TV set using HDMI.
Once the video fails to display, you have gone beyond the video format capacity of your HD
TV and the MediaMVP-HD. Use the Composite display to go back one video format.
Once you have found the best HDMI format, click the Back/Exit button on the Hauppauge
remote to return to the Main menu.
ip: if switch your HD TV between sources (for example the MediaMVP-Hd and a
cable TV box) and you cannot see your MediaMVP-HD video, click the green
Power button on the MediaMVP-HD remote twice. This resets the HDMI video out.
T
Built-in HDMI video test
MediaMVP-HD also has a built-in function to test all of the HDMI formats, which range from
480i to 1080p. To try this built-in test function, switch your HD TV set to the HDMI input
which is connected to MediaMVP-HD, and then click the blue button on your remote control
four times. Then click OK. Keep an eye on your TV set. You might not see anything for a
minute or so. When MediaMVP-HD finds a mode which works with your TV set, you will see
the format listed in the upper right hand corner of your TV picture. Make a note of these formats and then use the manual HDMI format setup to chose one of these formats.
Step 4: Attach MediaMVP-HD to your network
Plug an Ethernet network cable into the back of MediaMVP-HD and connect the other end
to a router or Ethernet hub.
If you want to see if your MediaMVP-HD has connected to your home network, go to
Setup/System/Information/Network. You should see a setting in the line which says IP. For
example, you might see a number like 164.1.1.16 This is the network address which was
assigned by your Ethernet router.
Step 5: Setup your PC for file sharing or uPnP
Scanning for shared folders on your PC
If you already have shared folders setup on your PC, you can simply scan for them on the
MediaMVP-HD. To scan for shared folders, from the Main menu on the MediaMVP-HD, click
the ‘i’ / Menu button and click Scan for shared folders. The scanning takes about a
minute. When complete, you should see your Shared folder listed. Click OK.
The scanning process looks for PCs with network address’s from .1 to .254 These are
common addresses for most home networks. The scan works with Windows XP, Windows
9
Vista and Windows 7 PCs.
MediaMVP-HD File Sharing Helper application
There is also a MediaMVP-HD “Helper” application which can automatically set up your
shared folders. You can download this Helper application from:
http://www.hauppauge.com/site/support/support_mediamvp-hd.html
When you download this Helper app, you would run this on any PC on your home network
which has folders which contains content you want to see on your HD TV set.
Setting up shared folders on your PC
File sharing is the most common way to access
media on a Windows XP PC. File sharing is also
supported on Windows Vista and Windows 7.
File sharing is set up on the PC which contains
the media you would like to play on the
MediaMVP-HD.
For Windows XP, you enable file sharing by
opening Windows Explorer, chosing the directory you would like to share, and then click your
Right mouse button, select Properties and
click the Sharing tab. Click the button which says
Share this folder on the network. Click OK and
now your directory is shared.
You need to do this for each folder you would
like to share. For example, if you have a folder
with digital pictures, you will need to share this
folder too.
When you are finished setting up the shared
folders on your PC, you need to scan for them on the MediaMVP-HD. Click the ‘i’ / Menu
button on the remote and click Scan for shared folders. The scanning takes about a
minute. When complete, you should see your Shared folder listed. Click OK.
Accessing your media through uPnP
uPnP, which stands for Universal Plug and Play, is another way to get access to your media.
uPnP comes standard on Windows 7 and is also available on some Windows Vista and
Windows XP PCs. To enable uPnP on Windows 7:
-
Go to Control Panel / Network and Sharing Center
-
Under View your active networks, your network should be set to 'Home Network'.
10
If not, click on Home Network to configure your home network settings.
-
If you are setting up your Home Network for the first time, follow the steps to complete the configuration. Enable the media you would like to share, typically Music,
Videos, Pictures.
-
Next, launch Windows Media Player by clicking Start / All Programs / Windows Media
Player. Under the Stream tab, click Automatically allow devices to play my media.
11
Click More streaming options. Under More streaming options, Allow all should be
enabled. If not, click Allow all.
You have now enabled uPnP on your Windows 7 PC, and have enabled your PC to
share files with other uPnP devices such as the MediaMVP-HD.
If you now look in the Music,Videos or Pictures on MediaMVP-HD, you will see the uPnP
computer listed.
12
uPnP computers
available on your
network
Step 6: Watch media on your HD TV through MediaMVP-HD!
Once you have setup the MediaMVP-HD TV connection and the connection to your PC, you
can now navigate through your digital media and play them on your HD TV set!
MediaMVP-HD menus
Main menu
The main menu has selections for Music, Videos, Pictures, Services and Setup. Music,
Videos and Pictures are the menus where you can see lists of your digital media.
13
Services are where any services would be listed. Currently, there are no services supported
but it is expected that over time, MediaMVP-HD will support a list of music, video or digital
picture services.
Setup is where you will find menus to set up the audio and video formats for your HD TV
set, update the MediaMVP-HD application, make settings for your Ethernet network, etc.
The i button on your MediaMVP-HD remote control displays the user
menus
From the Main menu, click the i/Menu button. You can start and stop background music
here. You can also scan for Shared Folders.
To scan for shared folders, move your cursor down to the item Scan for shared folders
and hit OK. It takes about a minute to find the shared folders on your Ethernet network, will
then be listed.
If there are no passwords set to access your shared folders, simply hit Next
Music, Videos, Pictures
Videos
Here is the main menu of Videos, which would be typical of Music and Pictures as well. You
will note that USB and Shared folders are listed, even if there are no USB thumb drives
plugged in or if there are no PCs with Shared folders scanned on the home network.
14
If you have a uPnP computer on your network, you will see these listed just underneath the
Shared Folder. In this case, the name of the uPnP computer is MEDIA: Win7-64
i/Menu button
When you are in the Videos menu: the i button shows a menu where you can Sort by
name, Sort by date, Play all and Scan for shared folders. If you click Sort by name or
Sort by date a second time, it sorts in the reverse order (Z to A or last date first).
When you are playing a video: hit the i button to see the progress of your video.
15
Fast Skip
When you are playing a video, Fast Skip allows you to quickly move to scgments of your
video by using the 0 to 9 keys on the MediaMVP-HD remote control. Click the 1 key to go
to 10% of your video, hit 2 to go to 20% of your video, etc.
Stop and Resume
To make it easier to stop your video playback and then resume it at the point it was
stopped, MediaMVP-HD has a Resume/Restart function. You can stop the video playing
and the next time you start the playing that video, a message will pop up on your screen
asking for Resume or Restart. Resume starts the video where you stopped it. Restart
starts the playback at the beginning of the program.
Pictures
Use a digital picture for your MediaMVP-HD menu background
You can set the background of your menus. To do this, choose the picture you want to use
as the background and click the ‘i’ menu and select Use image as background. This picture
will then be used on all of the menu backgrounds except for the Main menu.
Running a slide show with background music
-
Navigate to the Music menu and then find your folder with your music
-
Click the i menu then select Background music (this directory)
-
Navigate to the Pictures menu and then find the folder with your pictures
-
Click the i menu and then select Slide show
To stop the slideshow, click the Stop button.
To stop background music, navigate to the Music menu. Click the i menu and then select
Stop background music
16
Setup menu
System menu
You can get information on your system in this menu, including software and hardware revisions, and can load a new version of MediaMVP-HD application
Load a new version of MediaMVP-HD application
From time to time, Hauppauge will add feature enhancements and bug fixes to the
MediaMVP-HD application. To install an updated application, first, download the new application from the Hauppauge website:
www.hauppauge.com/site/support/mediamvp-hd.html
Next, unzip the new MediaMVP-HD application to a USB thumb drive. There are two files:
mvphd.md5 and mvphd. The firmware update program requires that these two files be in
the root directory on the USB thumb drive.
Plug the USB thumb drive into the USB port on the front of MediaMVP-HD. Wait a few seconds for the drive to be recognized.
Then from the System menu, click Advanced setup / Upgrade. Then click OK. You will see a
progress bar as the new MediaMVP-HD application installs.
17
ote: If you receive an error message, make sure the two files are in the root
directory. If you continue to receive error messages, try another USB thumb
drive. Sometimes the file systems on USB thumb drives become corrupt and cannot
be read by MediaMVP-HD.
N
18
Troubleshooting
If video does not appear on your HD TV set after changing from one HDMI
source to the MediaMVP-HD
If you have chosen the correct HDMI mode for your HD TV set but the video does not
appear after you change the source on your HD TV set, click the green power button on the
MediaMVP-HD remote control (puts MediaMVP-HD into a power down mode), then click the
green button once more. This resets the HDMI output on the MediaMVP-HD.
If you are having problems with the HDMI video mode
Click the Blue button on the remote control 4 times. Then click the OK button. This will run
an HDMI test which sets all HDMI video modes. When you see a good image on your HD
TV set, you will know which mode to set MediaMVP-HD for a good picture on your TV set.
If your TV image needs contrast, briteness or color adjustment
You can click the Guide button on the MediaMVP-HD remote control to put the display settings on your TV screen. You can adjust the Briteness, Contrast and Saturation. Click
the right arrow to increase these setttings and the left arrow to decrease these settings.
When you are finished, click the Back/Exit button to return the MediaMVP-HD menu.
You can adjust these settings from any menu or while you are playing a video.
19
Contacting Technical Support
e-mail: [email protected]
telephone: 631-434-3197
FCC Statement
Radio Interference Statement:
ID: H9OMEDIAMVP
User Caution: Changes or modifications not expressly approved by Hauppauge Computer Works could void the
user's authority to operate the equipment.
The MediaMVP has been tested and found to comply with the limits for a Class B digital device, pursuant to part 15
of the FCC Rules. These limits are designed to provide reasonable protection against harmful interference in a residential installation. This equipment generates, uses, and can radiate radio frequency energy and cause harmful interference to radio communications. However, there is no guarantee that interference will not occur in a particular installation. If this equipment does cause harmful interference to radio or television reception, which can be determined by
turning the equipment off and on, the user is encouraged to try to correct the interference by one or more of the following measures: Reorient or relocate the receiving antenna. Increase the separation between the equipment and
receiver. Connect the equipment into an outlet on a circuit different from that to which the receiver is connected.
Consult the dealer or an experienced radio/TV technician for help.
CE Statement:
This equipment has been tested and complies with EN 55013, EN 55022, EN 55024 and EN 55020 standards.
20